Nginx配置成系统服务
把Nginx应用服务设置成为系统服务,方便对Nginx服务的启动和停止等相关操作,具体实现步骤:
- 在
/usr/lib/systemd/system目录下添加nginx.service,内容如下: ```shell [Unit]Unit表明该服务的描述,类型描述
Description=nginx web service Documentation=http://nginx.org/en/docs/要求在network服务启动后再启动
After=network.target
[Service]
运行模式 simple|forking|oneshot|dbus|notify
Type=forking
存放PID文件的位置
PIDFile=/usr/local/nginx/logs/nginx.pid
ExecStart被执行之前被执行
ExecStartPre=/usr/local/nginx/sbin/nginx -t -c /usr/local/nginx/conf/nginx.conf
服务运行的具体执行命令
ExecStart=/usr/local/nginx/sbin/nginx
服务重启的执行命令
ExecReload=/usr/local/nginx/sbin/nginx -s reload
服务停止的执行命令
ExecStop=/usr/local/nginx/sbin/nginx -s stop PrivateTmp=true
[Install] WantedBy=default.target
2. 添加完成后如果权限有问题需要进行权限设置`chmod 755 /usr/lib/systemd/system/nginx.service`3. 使用系统命令来操作Nginx服务.启动: systemctl start nginx<br />停止: systemctl stop nginx<br />重启: systemctl restart nginx<br />重新加载配置文件: systemctl reload nginx<br />查看nginx状态: systemctl status nginx<br />开机启动: systemctl enable nginx<a name="ZhHe4"></a># 静态资源配置指令<a name="uMeTk"></a>## 设置请求资源的目录1. **root**:设置请求的根目录| 语法 | root path; || --- | --- || 默认值 | root html; || 位置 | http、server、location |path为Nginx服务器接收到请求以后查找资源的根目录路径。2. **alias**:用来更改location的URI| 语法 | alias path; || --- | --- || 默认值 | — || 位置 | location |path为修改后的根路径。<br />案例:<br />在`/usr/local/nginx/html`目录下创建一个 images目录,并在目录下放入一张图片`1.jpg`图片<br />`../html/`<br />`├── 50x.html`<br />`├── html`<br />`│ ├── 50x.html`<br />`│ └── index.html`<br />`├── images`<br />`│ └── `**`1.jpg`**<br />`└── index.html````nginxserver {listen 8070;server_name 127.0.0.1;location /images {root /home/nginx/html;}}# 访问图片的路径为:http://172.41.100.15:8070/images/1.jpgserver {listen 8071;server_name localhost;location /images {#把root改为aliasalias /home/nginx/html;}# 正确配置location /imagess {alias /home/nginx/html/images;}}# 访问http://172.41.100.15:8071/images/1.jpg 报404# 正确访问图片的路径为:http://172.41.100.15:8071/imagess/1.jpg
- root与alias的区别
root的处理结果是: root路径+location路径/usr/local/nginx/html/images/1.jpg
alias的处理结果是: 使用alias路径替换location路径/usr/local/nginx/html/1.jpg
如果location路径是以/结尾,则alias也必须是以/结尾,root没有要求
alias是一个目录别名的定义,root则是最上层目录的含义。
例如:
location /imagess/ {alias /home/nginx/html/images;}# 访问就会出问题,查看错误日志还是路径不对,所以需要把alias后面加上 /2021/08/16 16:14:14 [error] 27736#0: *57 open() "/home/nginx/html/images1.jpg" failed (2: No such file or directory),client: 172.41.100.13, server: localhost, request: "GET /images1/1.jpg HTTP/1.1", host: "172.41.100.15:8071"
index指令
index:设置网站的默认首页
| 语法 | index file …; |
|---|---|
| 默认值 | index index.html; |
| 位置 | http、server、location |
index后面可以跟多个设置,如果访问的时候没有指定具体访问的资源,则会依次进行查找,找到第一个为止。
案例:
location / {root /home/nginx/html;index index.html index.htm;}
访问该location的时候,可以通过 http://ip:port/,地址后面如果不添加任何内容,则默认依次访问index.html和index.htm,找到第一个来进行返回
error_page指令
error_page:设置网站的错误页面
| 语法 | error_page code … [=[response]] uri; |
|---|---|
| 默认值 | — |
| 位置 | http、server、location…… |
当出现对应的响应code后,如何来处理。
案例:
# 指定具体跳转的地址server {error_page 404 http://www.baidu.com;}# 指定重定向地址server{error_page 404 /50x.html;error_page 500 502 503 504 /50x.html;location =/50x.html{root html;}}# location的@ 完成错误信息展示server{error_page 404 @jump_to_error;location @jump_to_error {default_type text/plain;return 404 'Not Found Page...';}}# =[response]的作用是用来将相应代码更改为另外一个server{error_page 404 =200 /50x.html;location =/50x.html{root html;}}#当返回404找不到对应的资源的时候,在浏览器上可以看到,最终返回的状态码是200#编写error_page后面的内容,404后面需要加空格,200前面不能加空格
静态资源优化配置
Nginx对静态资源从三个属性配置进行优化:sendfileon、tcp_nopushon、tcp_nodeplayon
- sendfile:用来开启高效的文件传输模式。 | 语法 | sendfile on |off; | | —- | —- | | 默认值 | sendfile off; | | 位置 | http、server、location… |
请求静态资源的过程:
- 客户端通过网络接口向服务端发送请求.
- 操作系统将这些客户端的请求传递给服务器端应用程序.
- 服务器端应用程序会处理这些请求.
- 请求处理完成以后,操作系统还需要将处理得到的结果通过网络适配器传递回去。

例如:
server {listen 80;server_name localhost;location / {root html;index index.html;}}# 在html目录下有一个welcome.html页面,访问地址http://172.41.100.15/welcome.html
未使用sendfile流程: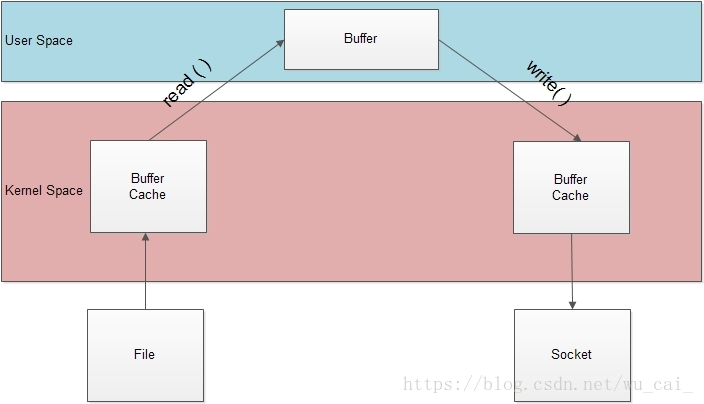
使用sendfile流程:

tcp_nopush:该指令必须在sendfile打开的状态下才会生效,主要是用来提升网络包的传输’效率’,相当于开启缓冲区 | 语法 | tcp_nopush on|off; | | —- | —- | | 默认值 | tcp_nopush off; | | 位置 | http、server、location |
tcp_nodelay:该指令必须在keep-alive连接开启的情况下才生效,来提高网络包传输的’实时性’,即有数据立刻发送 | 语法 | tcp_nodelay on|off; | | —- | —- | | 默认值 | tcp_nodelay on; | | 位置 | http、server、location |
sendfile可以开启高效的文件传输模式,tcp_nopush开启可以确保在发送到客户端之前数据缓冲区已经充分“填满”, 这大大减少了网络开销,并加快了文件发送的速度。 然后,当它到达最后一个可能因为没有“填满”而暂停的数据包时,Nginx会忽略tcp_nopush参数, 然后,tcp_nodelay强制套接字发送数据。由此可知,tcp_nopush可以与tcp_nodelay一起设置,它比单独配置tcp_nodelay具有更强的性能。
**

若有收获,就点个赞吧
0 人点赞
