1. 授权码模式
1.1 授权码模式图解
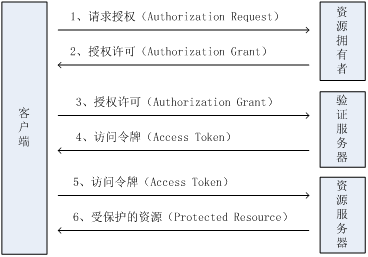
客户端:可以理解为浏览器,用户通过浏览器向服务器发送访问受限资源的请求
资源拥有者: 能授权访问受限资源的一个实体(比如某网站要访问微信用户的信息,那么这个微信用户就是资源拥有者)
验证服务器: 负责验证授权码、发放令牌
资源服务器: 存在资源的服务器,我们需要访问的受限资源存在在这里
1.2 搭建demo工程
1.2.1 引入maven依赖
<?xml version="1.0" encoding="UTF-8"?><project xmlns="http://maven.apache.org/POM/4.0.0" xmlns:xsi="http://www.w3.org/2001/XMLSchema-instance"xsi:schemaLocation="http://maven.apache.org/POM/4.0.0 https://maven.apache.org/xsd/maven-4.0.0.xsd"><modelVersion>4.0.0</modelVersion><parent><groupId>org.springframework.boot</groupId><artifactId>spring-boot-starter-parent</artifactId><version>2.3.12.RELEASE</version><relativePath/> <!-- lookup parent from repository --></parent><groupId>com.simple</groupId><artifactId>demo-springsecurity-oauth2</artifactId><version>0.0.1-SNAPSHOT</version><name>demo-springsecurity-oauth2</name><description>demo-springsecurity-oauth2</description><properties><java.version>1.8</java.version><!--定义SpringCloud的版本。注意:SpringCloud的版本对应SpringBoot的版本是有要求的--><spring-cloud.version>Hoxton.SR12</spring-cloud.version></properties><dependencies><!--web组件--><dependency><groupId>org.springframework.boot</groupId><artifactId>spring-boot-starter-web</artifactId></dependency><!--oauth2组件--><dependency><groupId>org.springframework.cloud</groupId><artifactId>spring-cloud-starter-oauth2</artifactId></dependency><!--security组件--><dependency><groupId>org.springframework.cloud</groupId><artifactId>spring-cloud-security</artifactId></dependency><!--测试--><dependency><groupId>org.springframework.boot</groupId><artifactId>spring-boot-starter-test</artifactId><scope>test</scope></dependency></dependencies><dependencyManagement><dependencies><!--引入SpringCloud的相关依赖因为在SpringCloud中,父工程一般都会在dependencyManagement中定义了相关依赖以及对应的版本号,方便子工程引用这个依赖并且不用定义版本--><dependency><groupId>org.springframework.cloud</groupId><artifactId>spring-cloud-dependencies</artifactId><version>${spring-cloud.version}</version><!--表示引入类型为pom文件--><type>pom</type><!--表示范围是导入pom文件中的dependencies--><scope>import</scope></dependency></dependencies></dependencyManagement><build><plugins><plugin><groupId>org.springframework.boot</groupId><artifactId>spring-boot-maven-plugin</artifactId></plugin></plugins></build></project>
需要注意的是,这里引入的是SpringCloud的security和oauth2组件,因为SpringCloud的比SpringBoot的版本更新、更方便集成使用
1.2.2 自定义登陆逻辑和配置
这部分的内容就直接贴代码,不做过多介绍,具体内容可以查看之前关于SpringSecurity的入门案例
service
@Service
public class UserServiceImpl implements UserDetailsService {

    @Autowired
    private PasswordEncoder passwordEncoder;

    @Override
    public UserDetails loadUserByUsername(String s) throws UsernameNotFoundException {
        String password = passwordEncoder.encode("123456");
        return new User(s,password, AuthorityUtils.createAuthorityList("admin"));
    }
}
SecurityConfig
@Configuration
@EnableWebSecurity
public class SecurityConfig extends WebSecurityConfigurerAdapter {

    @Override
    protected void configure(HttpSecurity http) throws Exception {
        http.authorizeRequests()
                .antMatchers("/oauth/**", "/login/**", "/logout/**").permitAll()
                .anyRequest().authenticated()
                .and()
                .formLogin().permitAll()
                .and()
                .csrf().disable();
    }

    @Bean
    public PasswordEncoder getPasswordEncoder() {
        return new BCryptPasswordEncoder();
    }
}
1.2.3 配置资源服务器和授权服务器
资源服务器
/**
 * 资源服务器配置
 */
@Configuration
@EnableResourceServer
public class ResourceServerConfig extends ResourceServerConfigurerAdapter {

    @Override
    public void configure(HttpSecurity http) throws Exception {
        /**
         * 表示一开始,全部请求都要拦截,需要认证,资源服务器会向授权服务器要访问者的令牌,有令牌才可以访问
         */
        http.authorizeRequests()
                .anyRequest().authenticated()
                .and()
                .requestMatchers()
                .antMatchers("/user/**");
    }
}
授权服务器
/**
 * 授权服务器的配置
 */
@Configuration
@EnableAuthorizationServer
public class AuthorizationServerConfig extends AuthorizationServerConfigurerAdapter {

    @Autowired
    private PasswordEncoder passwordEncoder;

    @Override
    public void configure(ClientDetailsServiceConfigurer clients) throws Exception {

        /*
        这里的客户端指的是我们的应用,也是就到授权服务器这里获取授权码的应用,这里为了方便直接另其在
        内存中生成了。
         */
        clients.inMemory()
                // 客户端id
                .withClient("client")
                // 密钥
                .secret(passwordEncoder.encode("112233"))
                // 重定向地址(通过这个地址我们可以拿到授权码(地址栏))
                .redirectUris("https://www.baidu.com")
                // 授权范围
                .scopes("all")
                /*
                授权类型
                authorization_code:授权码模式
                 */
                .authorizedGrantTypes("authorization_code");
    }
}
在企业开发中,一般资源服务器和授权服务器是分开部署的,这里为了测试方便,将其放在同一个服务器中
在授权服务器中的配置需要特别注意,之后的请求授权和请求令牌的过程中,需要用到这些参数
1.2.4 添加一个资源
此授权码模式是验证客户端访问受保护资源的权限的,那么我们就需要添加一个受保护的资源
@RestController
@RequestMapping("/user")
public class UserController {

    @RequestMapping("/getCurrentUser")
    public Object getCurrentUser(Authentication authentication) {
        return authentication.getPrincipal();
    }
}
1.3 测试
1.3.1获取授权码
获取授权码的url写法比较固定,只需要把其中的参数换成我们自定义的授权服务器的参数即可.
url:
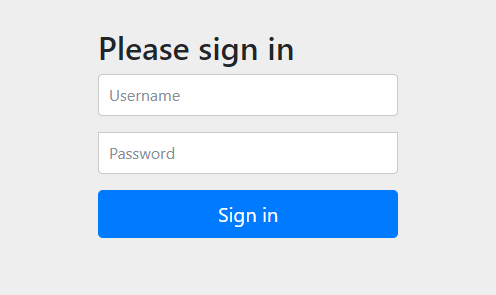
http://localhost:8080/oauth/authorize?response_type=code&client_id=client&redirect_uri=https://www.baidu.com&scope=all
然后就会出现SpringSecurity内置的登陆界面。这里的用户名和密码,就是我们之前在自定义登陆逻辑中设置的。
输入账号和密码登陆成功后,就会跳转到一个授权页面:
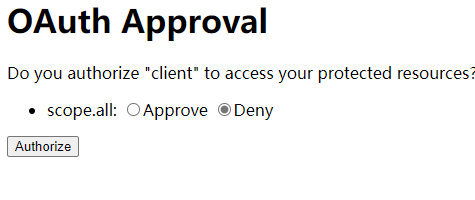
选择Approve,表示允许。点击下面的Authorize按钮授权。
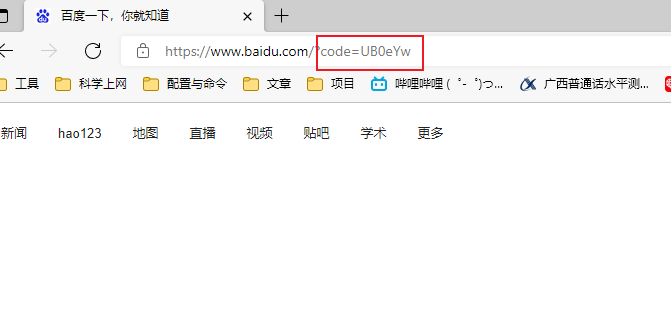
由此,我们就会跳转到我们配置的重定向页面(百度),在浏览器的地址栏上面,可以看到授权码
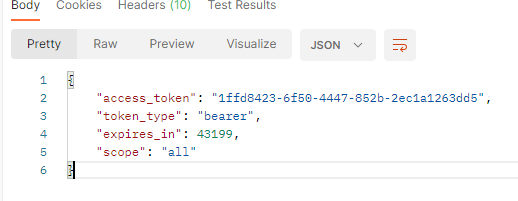
1.3.2 获取令牌
获取令牌的url,注意是POST请求
http://localhost:8080/oauth/token
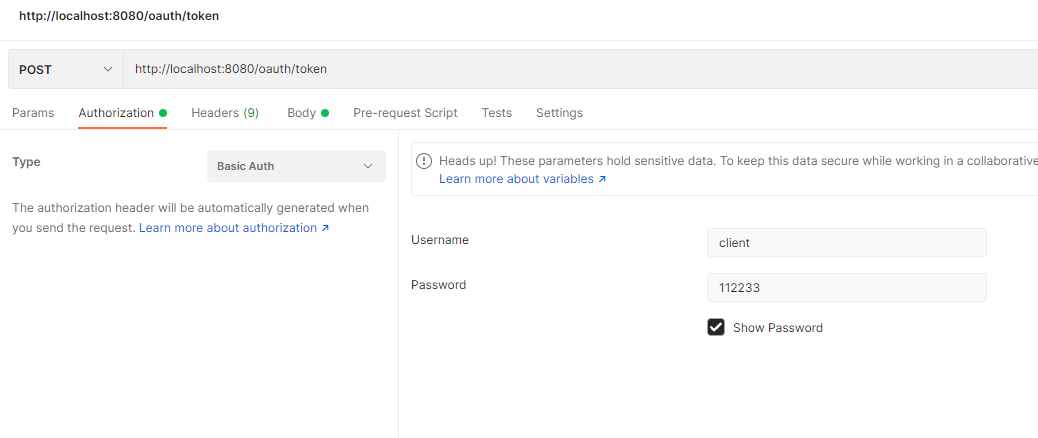
打开Postman测试,输入参数如下:
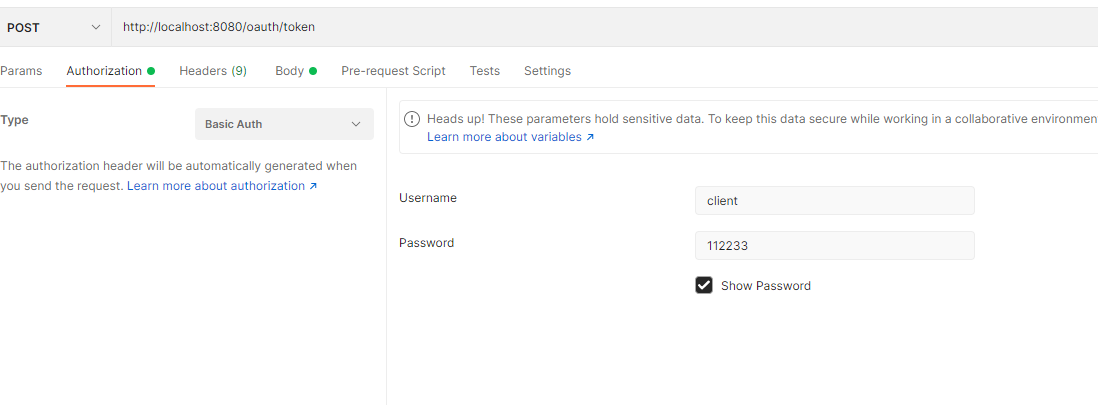
授权信息的用户名和密码填写我们配置的授权服务器的client_id和secret
body数据选择表达项,填写我们自定义的配置信息,并且填上授权码code。完成之后即可发送请求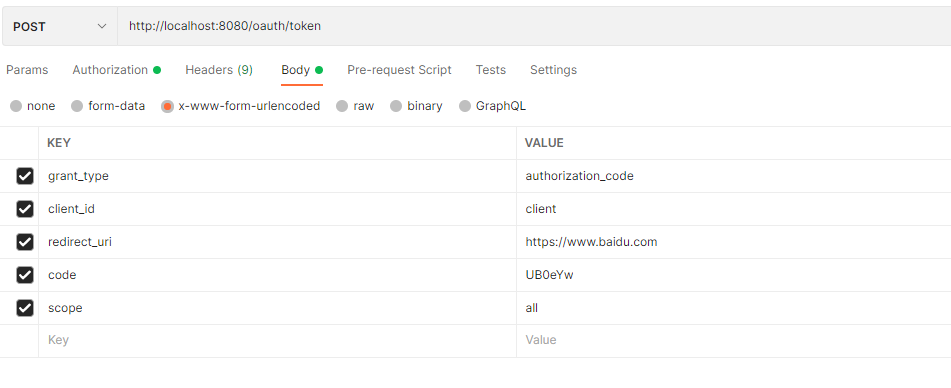
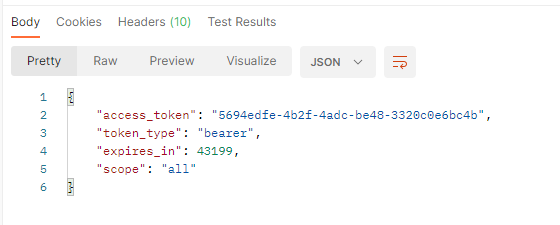
在结果栏中,我们可以看到获取的令牌(access_token)
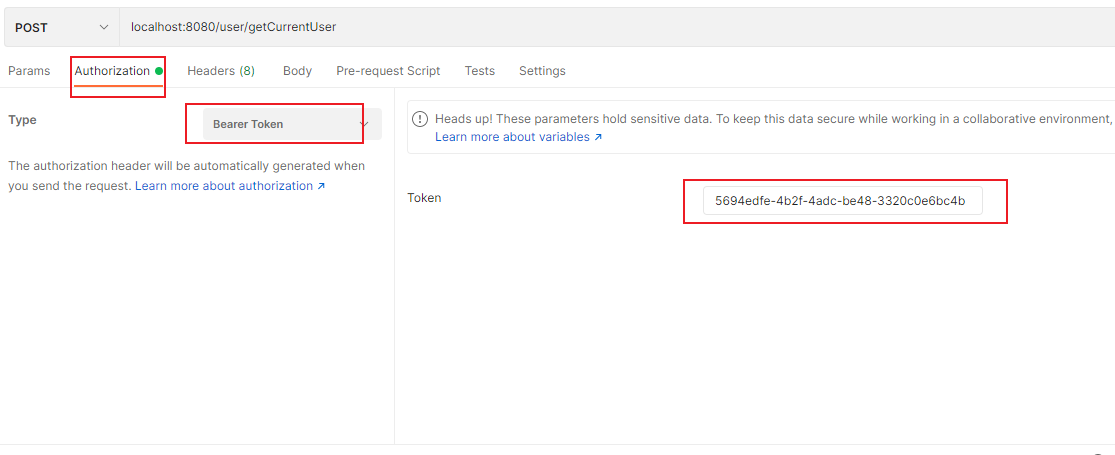
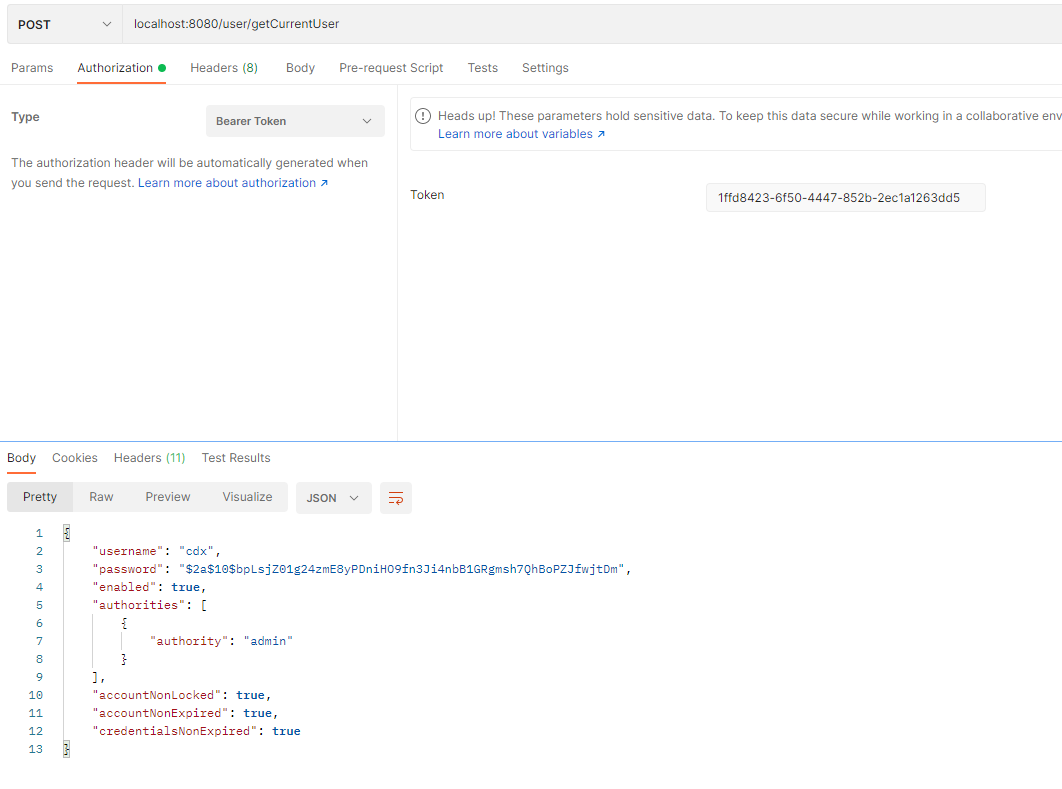
1.3.3 通过令牌访问受保护资源
访问我们资源的url,且填写令牌的值
返回结果:
至此,我们已经成功获取到了受保护资源的数据。
如果不带令牌直接访问该资源,会提示如下:

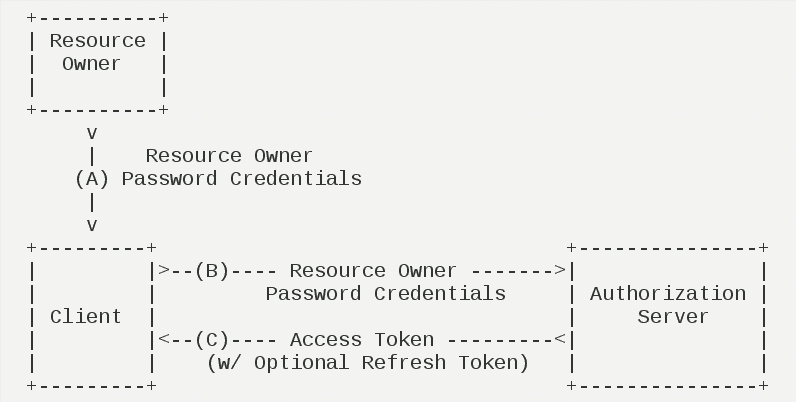
1.2 密码模式
密码模式图解:
密码模式比较简单,只需要在上面的代码内容中,添加一些代码即可。
1.2.1 AuthorizationServerConfig.java
在其中加入
/**
     * 添加这个配置之后即可使用密码模式
     * @param endpoints
     * @throws Exception
     */
@Override
public void configure(AuthorizationServerEndpointsConfigurer endpoints) throws Exception {
    endpoints.authenticationManager(authenticationManager)
        .userDetailsService(userService);
}
其中authenticationManager已经在SecurityConfig.java中注入bean
@Override
@Bean
protected AuthenticationManager authenticationManager() throws Exception {
    return super.authenticationManager();
}
userService就是我们自定义的登陆逻辑
@Autowired
private UserServiceImpl userService;
在授权类型中,添加一个密码模式
/*
授权类型
authorization_code:授权码模式
password: 密码模式
*/
.authorizedGrantTypes("authorization_code","password");
1.2.2 测试
获取令牌的url
http://localhost:8080/oauth/token
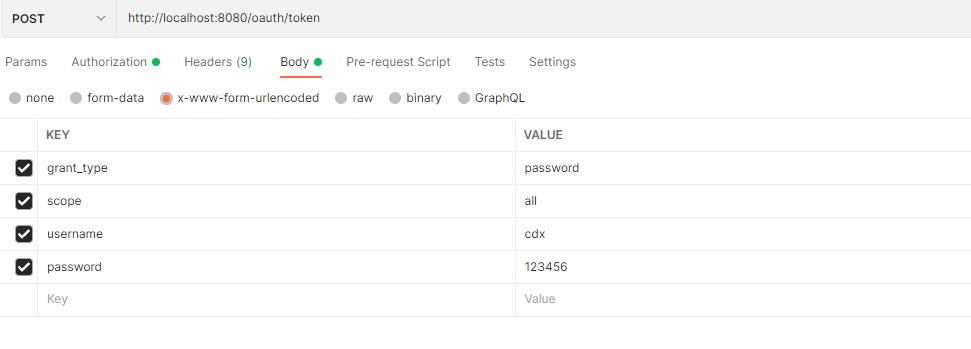
传入参数
需要注意的是,这里的参数不再像授权码模式那样复杂,而是直接传入用户名和密码,即可得到token
返回结果如下:
使用token访问资源:

若有收获,就点个赞吧
0 人点赞
