Vue
从之前的使用jQuery的过程中,我们可以发现一些问题。
- jQuery的优缺点:
- 优点:在前后端分离的开发框架中,jQuery即可以做请求交互(ajax),又可以做页面数据渲染
- 缺点:在数据渲染上,jQuery需要通过HTML标签的拼接、DOM节点操作才能完成数据的显示。其开发效率低,且容易出错,渲染效率低
在介绍vue之前,我们先来看下有关于前端框架的一些知识。
一、 前端框架
- 前端框架三要素:HTML、CSS、JavaScript
- HTML 决定了网页的结构
- CSS 决定了显示效果
- JavaScript 决定了网页功能(交互,数据显示)
前端框架分为UI框架和JS框架
- UI框架
- Bootstrap
- ElementUI
- Layui
…
- JS框架
- JQuery
- React
- Angular
- NodeJs
- vue
二、 MVVM
三个发展阶段
- 后端mvc(单体项目,流程控制在后端进行,前端只进行页面显示)
- 前端mvc(前后端分离,流程控制在前端进行,后端只提供数据)
- mvvm(后端响应的数据转换成前端所需要的vm,前端页面可以直接从vm中拿数据)
MVVM的概念:
前端从后端请求数据,并将返回的数据转换成vm,html页面从vm取值。
- M model 数据模型(也就是后端返回的数据)
- V view 视图层(也就html显示的页面)
- VM ViewModel 视图模型 ,是数据模型和视图之间的桥梁,视图层可以直接从vm中取数据。
三、 vue快速入门
<!DOCTYPE html><html lang="en"><head><meta charset="UTF-8"><title>vue快速入门</title><script type="application/javascript" src="js/vue.js"></script></head><body><div id="container">从vm获取到的数据是:{{str}}</div><script>var vm = new Vue({el: "#container",data: {str: "从前有座山"}})</script></body></html>
四、 vue的基本语法
关于vue的基本语法,内容比较多,且官方文档上都有,所以这里就不再赘述,请自行查看官方文档。
五、vue的生命周期
官方文档中有描述,这里不做过多描述。
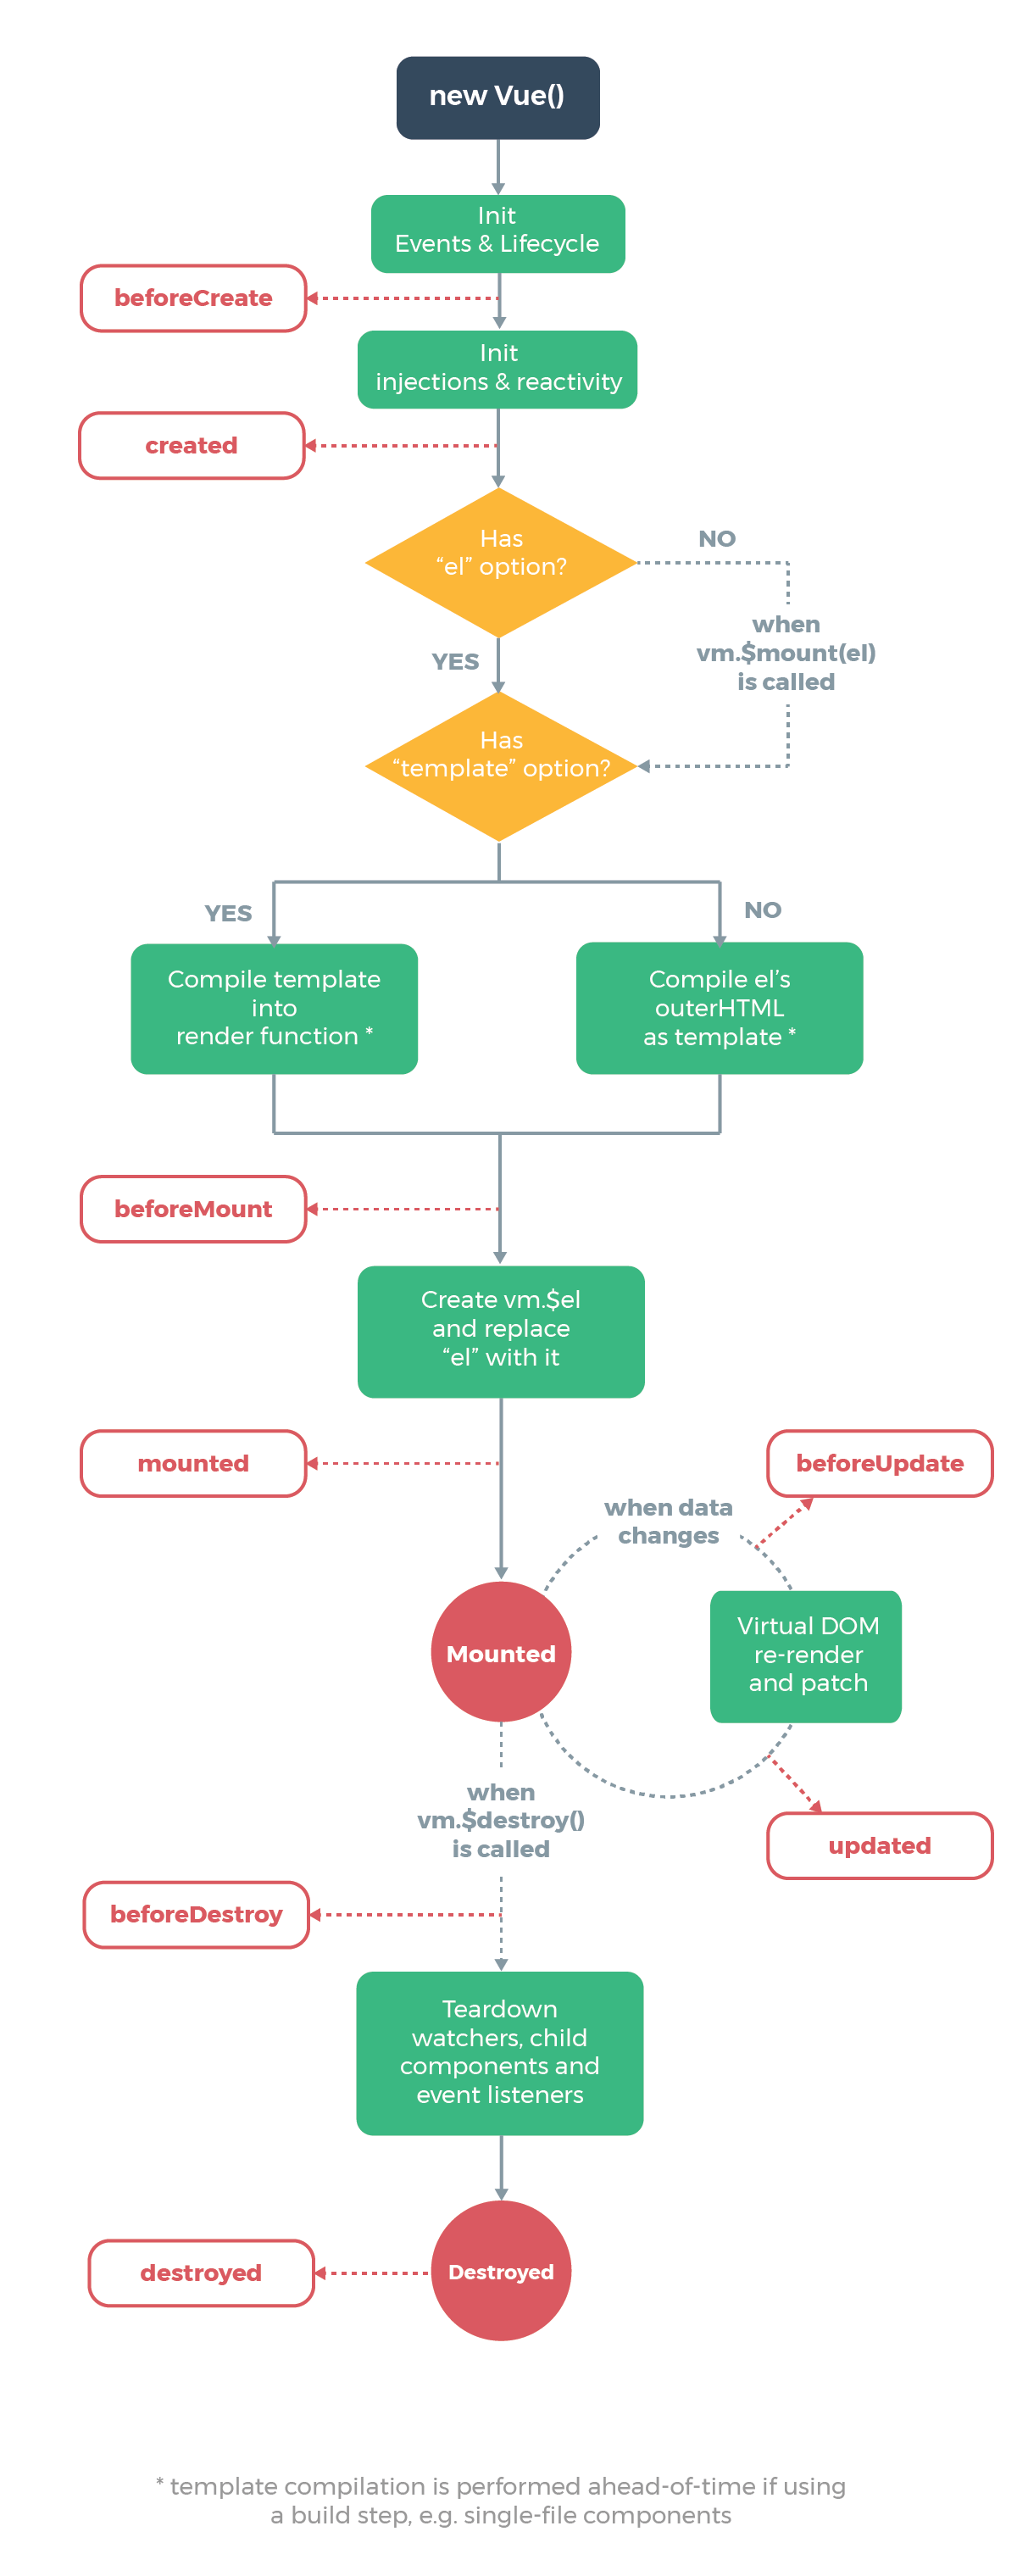
六、钩子函数
钩子函数要结合上面的生命周期示意图来看。
<script>
        var app = new Vue(
            {
                el:"#app",
                data:{
                    str:"从前有座山"
                },
                beforeCreate:function ()
                {
                    // 1. data初始化之前执行,不能操作data
                },
                created:function (){
                    // 2. data初始化之后执行,模板加载之前,可以修改/获取data中的值
                    // console.log(this.str);
                    // this.str="山里有座庙";
                },
                beforeMount:function (){
                    // 3. 模板加载之后,数据初始渲染(挂载之前),可以修改/获取data中的值
                    // this.str = "庙里有口井";
                },
                mounted:function (){
                    // 4. 数据初始渲染(挂载)之后,可以对data中的变量进行修改,但是不会影响v-once的渲染
                    // this.str="井里有只蛙";
                },
                beforeUpdate:function (){
                    // 5. 数据渲染之后,当data中的数据发生变化触发重新渲染,渲染之前执行此函数
                    // data数据被修改之后,重新渲染到页面前
                    console.log("------------"+this.str);
                    // this.str="从前有座山2";
                },
                updated:function (){
                    // 6. data数据被修改之后,重新渲染到页面之后
                    // this.str="从前有座山3"
                },
                beforeDestroy:function (){
                    // 7. 实例销毁之前
                },
                destroy:function (){
                    // 8. 实例销毁之后
                }

            }
        )
    </script>
需要注意的是,**created**和**beforeMount**在使用效果上,几乎是一样的。如果在**updated**中修改数据,那么又会触发**beforeUpdate**,接着又会执行到**updated**函数,会形成一个死循环。所以不要在**updated**中去修改数据
七、计算属性和侦听器
7.1 计算属性
计算属性指的是,在vue实例初始化构造器中,添加一个属性computed,可以绑定data中的属性值。
<div id="container">
        <input type="text" v-model:value="str1"> <br/>
        <input type="text" v-model:value="str2"> <br/>
        {{str3}}
</div>

<script type="application/javascript">
    var vm = new Vue({
        el:"#container",
        data:{
            str1:"广西",
            str2:"桂林"
        },
        computed:{
            str3:function (){
                return this.str1+this.str2;
            }
        }
    })
</script>
7.2 侦听器
这个内容比较简单,这里就不作记录了。
八、Class和Style绑定
8.1 Class绑定
<!DOCTYPE html>
<html lang="en">
<head>
    <meta charset="UTF-8">
    <title>vue中的class绑定和style绑定</title>
    <script type="application/javascript" src="js/vue.js"></script>
    <style>
        .mystyle1 {
            width: 200px;
            height: 100px;
            background: orange;
        }

        .mystyle2 {
            border-radius: 10px;
        }

        .mystyle3 {
            width: 200px;
            height: 100px;
            background: black;
        }
    </style>
</head>
<body>
    <div id="container">
        <!--如果b1为true就加载mystyle1,如果b2为true就加载mystyle2-->
        <div :class="{'mystyle1':b1,'mystyle2':b2}"></div>

        <!--为class加载多个样式-->
        <div :class="[chooseStyle1,chooseStyle2]"></div>

        <!--这是一个三元表达式,如果b3为true就加载mystyle3,否则加载mystyle1-->
        <div :class="[b3 ? 'mystyle3' : 'mystyle1']"></div>
        <!--如果三元表达式中使用的样式名,则需要加单引号。如果不加,表示从data里面取值-->
        <div :class="[b3 ? chooseStyle3 : chooseStyle1]"></div>
    </div>


    <script type="application/javascript">
        var vm = new Vue({
            el: "#container",
            data: {
                b1: true,
                b2: true,
                b3:false,
                chooseStyle1:"mystyle1",
                chooseStyle2:"mystyle2",
                chooseStyle3:"mystyle3"
            }
        })
    </script>
</body>
</html>
8.2 Style绑定
<!DOCTYPE html>
<html lang="en">
    <head>
        <meta charset="UTF-8">
        <title>vue中的class绑定和style绑定</title>
        <script type="application/javascript" src="js/vue.js"></script>

    </head>
    <body>
        <div id="container">
            <!--当使用v-bind绑定内联样式时:
                1. 使用{}定义style样式,才能获取data中的值,{}要遵循JSON格式
                2. {}中不在使用style样式属性名"font-size",而是使用对应的js属性名
                border-style-width ---- borderStyleWidth-->
            <div v-bind:style="{color:colorname,fontSize:fontsize+'px'}">村里有座庙</div>

            <!-- 我们可以直接为style属性绑定一个data中定义好的内联样式的字符串 -->
            <div v-bind:style="mystyle1">村里有座庙</div>

            <!-- 我们可以直接为style属性绑定一个data中定义好的内联样式的对象 -->
            <div v-bind:style="mystyle2">村里有座庙</div>

            <!-- 可以在同一个style上通过数组引用多个内联样式的对象 -->
            <div v-bind:style="[mystyle2,mystyle3]">村里有座庙</div>
        </div>


        <script type="application/javascript">
            var vm = new Vue({
                el: "#container",
                data: {
                    str: "color:red",
                    colorname: "green",
                    fontsize: 30,
                    mystyle1:"color:orange;font-size:45px",
                    mystyle2:{
                        color:"blue",
                        fontSize:"60px"
                    },
                    mystyle3:{
                        textShadow:"orange 3px 3px 5px"
                    }
                }
            })
        </script>
    </body>
</html>
九、条件渲染
v-if,v-else-if,v-else,v-show
内容比较简单,不做过多展示
十、列表渲染
v-for
十一、事件处理
关键词: v-on,@click,event
<!DOCTYPE html>
<html lang="en">
    <head>
        <meta charset="UTF-8">
        <title>列表渲染</title>
        <script type="application/javascript" src="js/vue.js"></script>
        <link rel="stylesheet" href="css/bootstrap.css" />
    </head>
    <body>
        <div id="container">
            <ul>
                <li v-for="c in categories">
                    <a :href="'query?cid='+c.cid">{{c.cname}}</a>
                </li>
            </ul>

            <table class="table table-bordered">
                <tr>
                    <th>学号</th>
                    <th>照片</th>
                    <th>姓名</th>
                    <th>性别</th>
                    <th>年龄</th>
                    <th>操作</th>
                </tr>
                <tr v-for="s in stus">
                    <td>{{s.stuNum}}</td>
                    <td>
                        <img height="30px" :src="s.stuImg" />
                    </td>
                    <td>{{s.stuName}}</td>
                    <td>
                        <label v-if="s.stuGender=='M'">男</label>
                        <label v-else="s.stuGender=='F'">女</label>
                    </td>
                    <td>{{s.stuAge}}</td>
                    <td>
                        <button type="button" class="btn btn-danger btn-xs" v-on:click="doDelete(s.stuNum,$event)" :data-snum="s.stuNum">删除</button>
                        <button type="button" class="btn btn-success btn-xs" @click="doUpdate" :data-snum="s.stuNum"
                            :data-sName="s.stuName" :data-sImg="s.stuImg">修改</button>
                    </td>
                </tr>
            </table>
        </div>


        <script type="application/javascript">
            var vm = new Vue({
                el: "#container",
                data: {
                    stus: [{
                            stuNum: "10010",
                            stuImg: "img/01.jpg",
                            stuName: "张三",
                            stuGender: "M",
                            stuAge: 20
                        },
                        {
                            stuNum: "10011",
                            stuImg: "img/02.jpg",
                            stuName: "李四",
                            stuGender: "M",
                            stuAge: 20
                        },
                        {
                            stuNum: "10012",
                            stuImg: "img/03.jpg",
                            stuName: "王五",
                            stuGender: "M",
                            stuAge: 20
                        },
                        {
                            stuNum: "10013",
                            stuImg: "img/04.jpg",
                            stuName: "赵六",
                            stuGender: "F",
                            stuAge: 20
                        }

                    ]
                },
                methods: {
                    doDelete: function(snum,event) {
                        console.log("-----delete:" + snum);
                        console.log(event.srcElement.dataset);
                    },
                    doUpdate: function(event) {
                        // 如果v-on绑定的js函数没有参数,调用的时候可以省略'()',同时可以给js函数一个event参数(事件对象)
                        // 1.event 表示触发当前函数的事件
                        // 2.event.srcElement 表示发生事件的元素-----修改按钮
                        // 3.event.srcElement.dataset 表示按钮上绑定的数据集('data-'开头的属性)
                        console.log(event.srcElement.dataset);
                    }
                }
            })
        </script>
    </body>
</html>
十二、音乐播放案例
<!DOCTYPE html>
<html>
<head>
<meta charset="utf-8">
<title>音乐搜索</title>
<script type="application/javascript" src="js/vue.js"></script>
<script type="application/javascript" src="js/jquery-3.6.0.js"></script>
<script type="application/javascript" src="js/bootstrap.min.js"></script>
<link rel="stylesheet" href="./css/bootstrap.css" />
</head>
<body>
<div id="container">
<div style="text-align: center;font-size: 60px; margin-top: 30px;margin-bottom: 20px;">
<span>音乐搜索</span>
</div>
<!-- 搜索框 -->
<div class="input-group input-group-lg" style="margin-left: 30px;margin-right: 30px">
<input type="text" class="form-control" v-on:keyup.enter="doSearch" v-model="searchStr"
placeholder="请输入要搜索的歌曲名/歌手" aria-describedby="sizing-addon1">
<span class="input-group-btn">
<button class="btn btn-default" type="button" @click="doSearch">搜索</button>
</span>
</div>
<div style="margin-top: 30px;font-size: 25px; text-align: center;">
<span v-bind:style="{display:display1}">搜索结果</span>
</div>
<!--搜索结果表格-->
<div v-bind:style="{marginTop:'30px',display:display1,marginLeft:'30px',marginRight:'30px'}">
<table class="table table-hover table-bordered table-condensed">
<tr>
<th>序号</th>
<th>id</th>
<th>歌曲</th>
<th>歌手</th>
<th>专辑</th>
<th>时长</th>
<th>操作</th>
</tr>
<tr v-for="song,index in songsRes">
<td>{{index+1}}</td>
<td>{{song.id}}</td>
<td>
{{song.name}}
<button v-if="song.mvid!=0" type="button" class="btn btn-primary btn-xs">MV</button>
</td>
<td>
<span v-for="artist,index in song.artists">
{{artist.name}} 
</span>
</td>
<td>{{song.album.name}}</td>
<td
v-text="(parseInt(song.duration/1000/60)<10?'0'+parseInt(song.duration/1000/60):parseInt(song.duration/1000/60))+':'
+(Math.round(song.duration/1000%60)<10?'0'+Math.round(song.duration/1000%60):Math.round(song.duration/1000%60))">
</td>
<td width="30px">
<button type="button" class="btn btn-default" @click="doPlay(song.id,song.name)">
<span class="glyphicon glyphicon-play" style="color: teal"></span>
播放
</button>
</td>
</tr>
</table>
</div>
<!--分页功能-->
<nav aria-label="Page navigation" v-bind:style="{textAlign:'center',display:display1}">
<ul class="pagination">
<!-- 前一页按钮 -->
<li>
<template v-if="offset==0">
<a class="disabled" aria-label="Previous">
<span aria-hidden="true">«</span>
</a>
</template>
<template v-else>
<a v-on:click="doSearch(offset-1)" aria-label="Previous">
<span aria-hidden="true">«</span>
</a>
</template>
</li>
<!-- 中间页码按钮显示 -->
<template v-for="song,index in songsRes">
<li v-if="index==offset" class="active">
<a @click="doSearch(index)">{{index+1}}</a>
</li>
<li v-else>
<a @click="doSearch(index)">{{index+1}}</a>
</li>
</template>
<!-- 后一页按钮 -->
<li>
<template v-if="offset==songsCount-1">
<a class="disabled" aria-label="Next">
<span aria-hidden="true">»</span>
</a>
</template>
<template v-else>
<a v-on:click="doSearch(offset+1)" aria-label="Next">
<span aria-hidden="true">»</span>
</a>
</template>
</li>
</ul>
</nav>
</div>
<!-- 播放插件 -->
<div style="float: bottom; text-align: center;width: 100%;margin-left: auto;margin-right: auto">
<label id="playTips"></label><br>
<audio id="player" autoplay="true" controls style="width: 80%;display:none" src="">
</audio>
</div>
<script type="application/javascript">
var player = document.getElementById("player");
var playTips = document.getElementById("playTips");
var vm = new Vue({
el: "#container",
data: {
searchStr: "王力宏",
songsRes: [],
display1: "none",
offset: 0,
limit: 10,
songsCount: 0
},
// computed: {
// playUrl: function () {
// //music.163.com/outchain/player?type=2&id=1881521546&auto=1&height=66
// //http://music.163.com/song/media/outer/url?id=
// return "//music.163.com/outchain/player?type=2&id="+this.currentSongId+"&auto=1&height=66";
// }
// },
methods: {
doSearch: function(offset) {
// 如果offset不是数字的话,就把它设置为0
// 因为在页面首次加载查询结果的时候,offset还没有被设置,这个时候的offset就相当于函数的event参数,也就是点击事件的一些参数
// 当我们点击分页的时候,offset就会被设置为分页起始页数
if (isNaN(offset)) {
offset = 0;
}
$.get("http://localhost:9999/music/search?s=" + vm.searchStr + "&limit=" + vm.limit +
"&offset=" + offset,
function(res) {
if (res.code === 200) {
vm.songsRes = res.result.songs;
vm.songsCount = res.result.songCount;
}
}, "json");
vm.display1 = "";
vm.offset = offset;
},
doPlay: function(songId, songName) {
player.style.display = "";
playTips.innerText = "♫ " + songName + " ♫";
playTips.style.color = "teal";
player.src = "http://music.163.com/song/media/outer/url?id=" + songId;
}
}
})
</script>
</body>
</html>
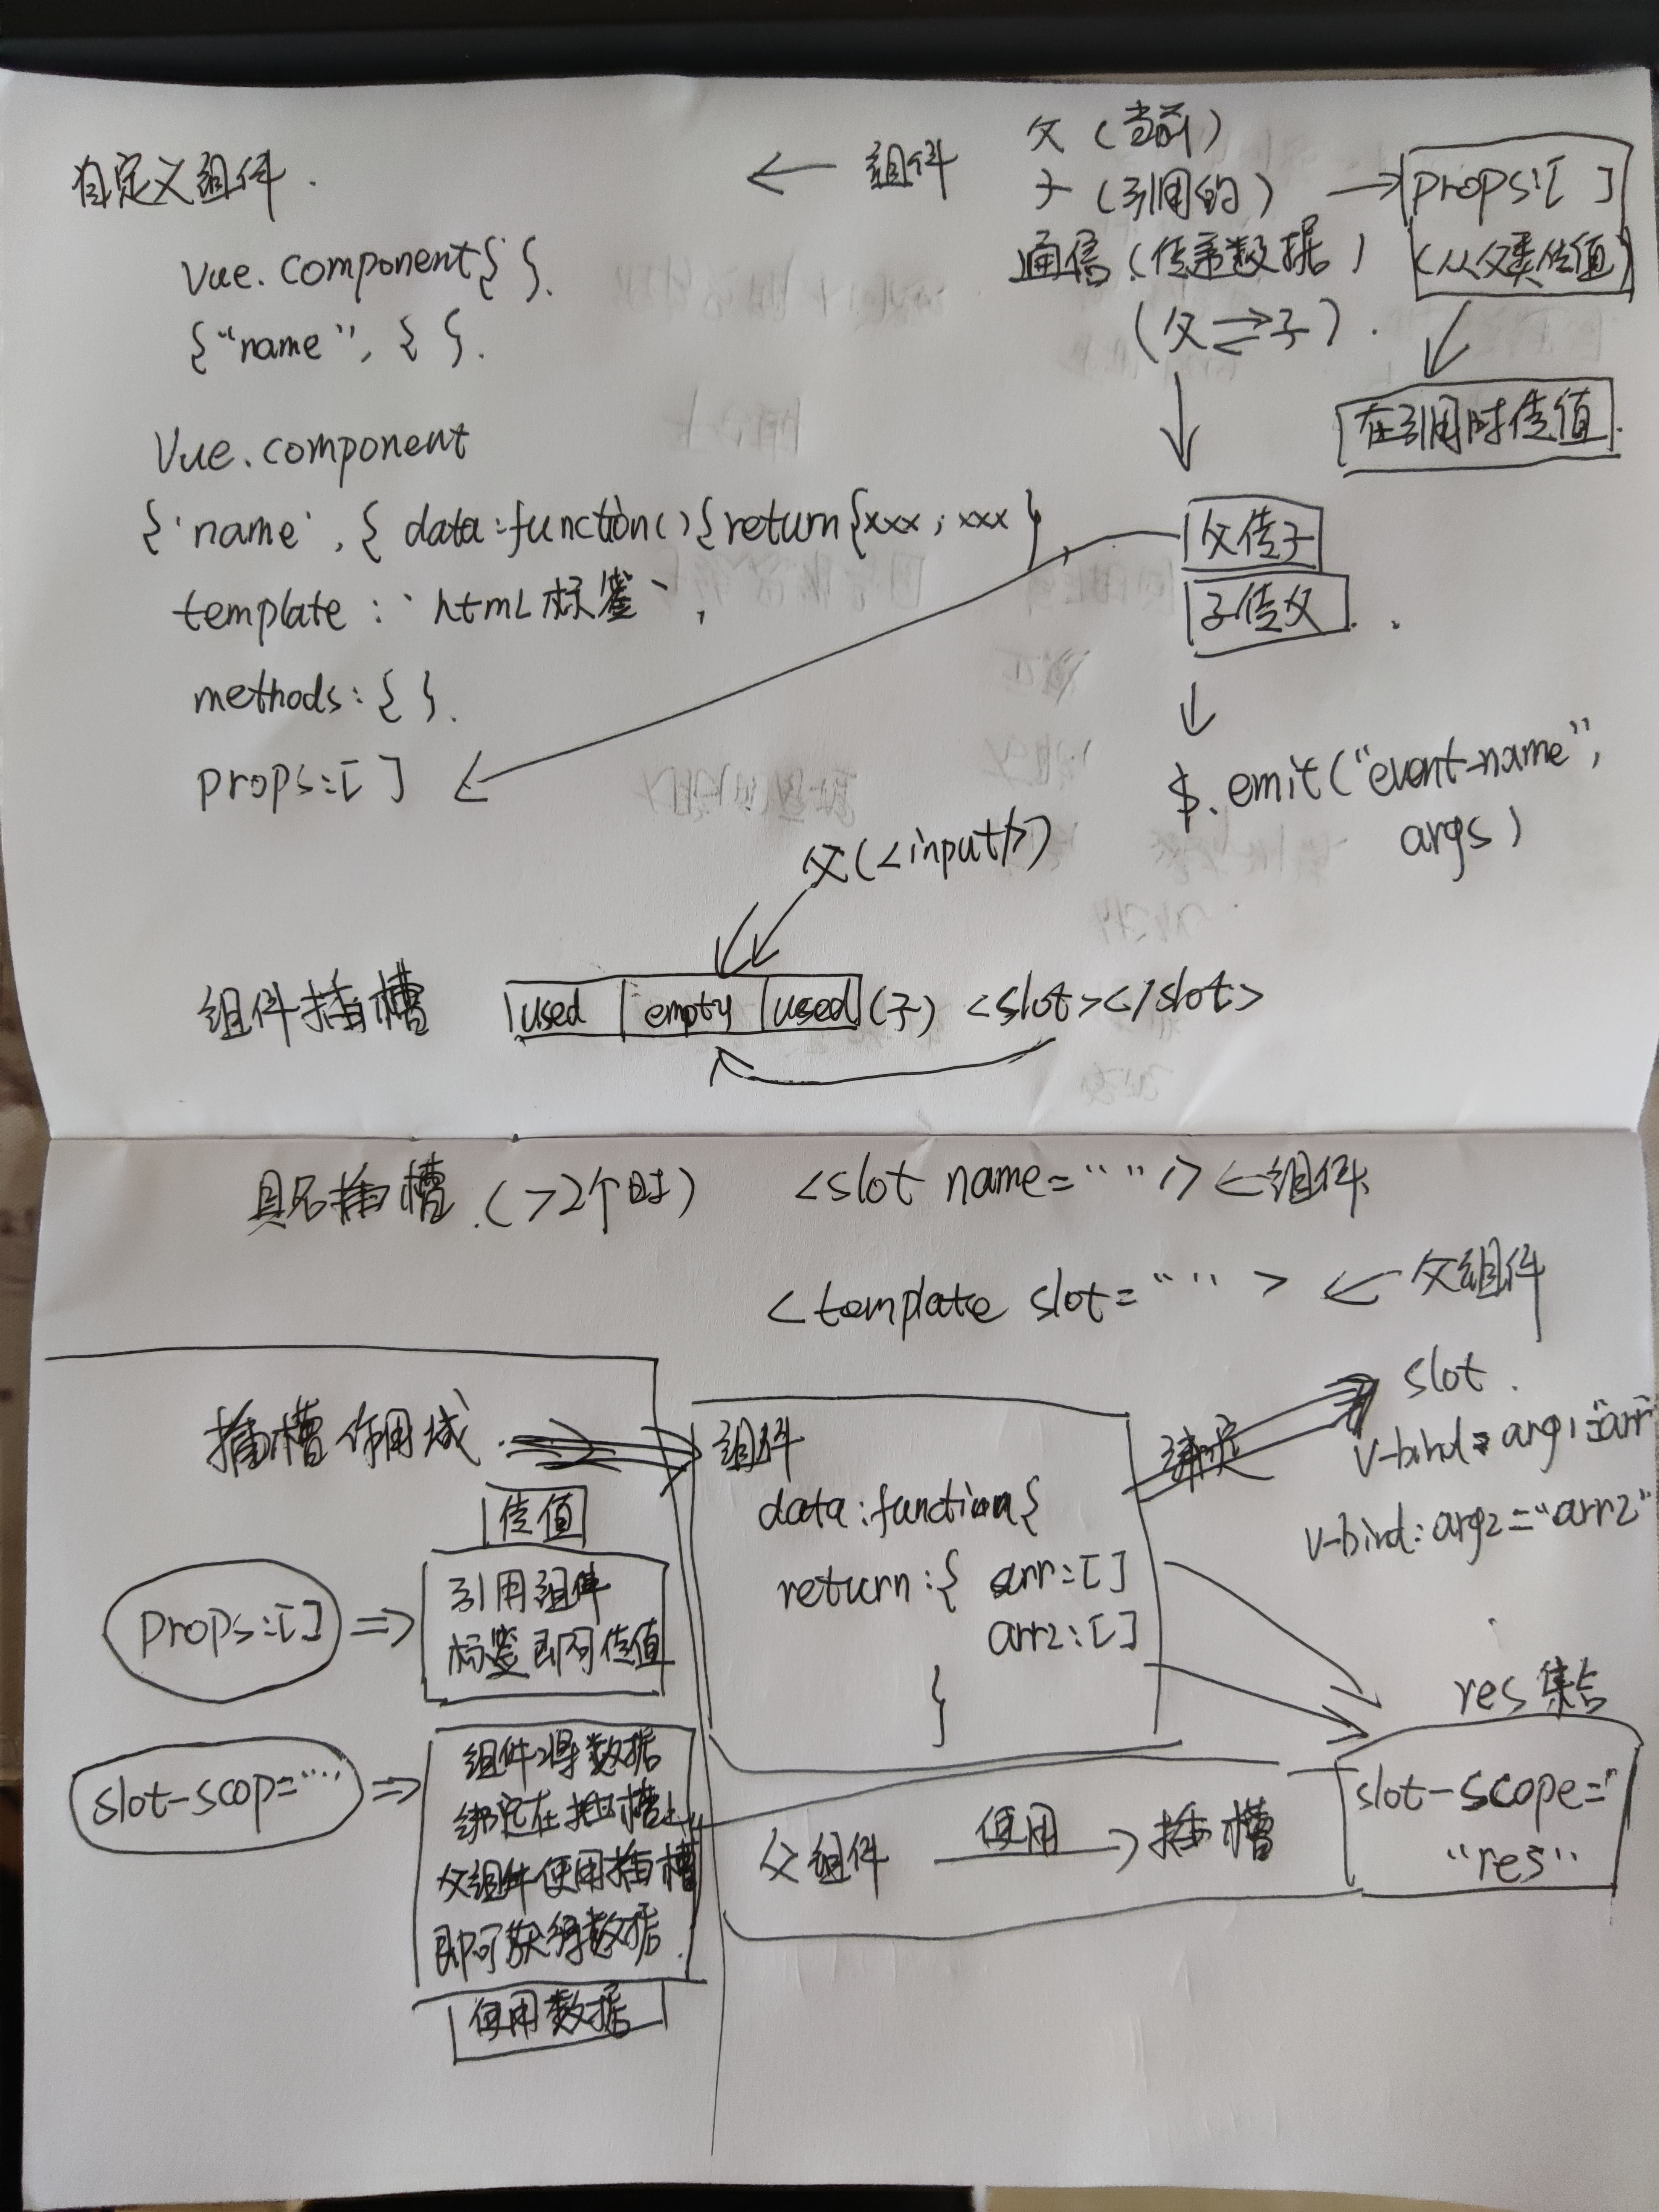
十三、组件
.mytitle{
    width: 100%;
    height: 100px;
    color: teal;
    font-size: 80px;
    text-align: center;
    background-color: darkgrey;
}
.myfooter{
    width: 100%;
    height: 30px;
    color: red;
    font-size: 30px;
    text-align: center;
    background-color: lightgrey;
}

.mycontent{
    width: 100%;
    height: 600px;
    color: blue;
}
Vue.component("my-component", {
    data: function() {
        // 组件中的data是通过function返回数据的
        return {
            str: "子组件中的数据",
            arr: [
                "数据1",
                "数据2",
                "数据3"
            ],
            arr2: [
                "data1",
                "data1",
                "data1"
            ]
        };
    },
    // template就是写html标签的地方
    template: `
    <div>
        <div class="mytitle">
            <span>{{title}}</span>
            <button type="button" @click="childMethod">点我</button>
            <!--定义了一个插槽-->
            <slot name="s1"></slot>
        </div>

        <div class="mycontent" >
        这是主体内容
        <!--将组件的数据绑定在了插槽上面-->
        <slot name="s3" v-bind:data1="arr" v-bind:data2="arr2"></slot>
        </div>

        <div class="myfooter">
        这是页脚
        <!--定义了一个插槽-->
        <slot name="s2"></slot>
        </div>
    </div>
            `,
    props: ["title"],
    methods: {
        childMethod: function() {
            // 触发在父组件中自定义的事件
            this.$emit("my-event", this.str);
        }
    }
});
<!DOCTYPE html>
<html>
    <head>
        <meta charset="utf-8">
        <title>组件的使用</title>
        <script type="application/javascript" src="js/jquery-3.6.0.js"></script>
        <script type="application/javascript" src="js/vue.js"></script>
        <link rel="stylesheet" href="css/title.css" />
        <script type="application/javascript" src="component1.js"></script>
    </head>
    <body>
        <div id="container">
            <my-component :title="str" @my-event="parentMethod">
                <!-- 使用template将插槽内容作为一个整体,并且指定要插入的插槽名 -->
                <template slot="s1">
                    <input /><button type="button">搜索</button>
                </template>
                <!-- 获取到插槽上绑定的数据 -->
                <template slot="s3" slot-scope="data">
                    <table border="1px" width="70%" cellspacing="0">
                        <tr>
                            <td v-for="value in data.data1">
                                {{value}}
                            </td>
                        </tr>
                        <tr>
                            <td v-for="value in data.data2">
                                {{value}}
                            </td>
                        </tr>
                    </table>
                </template>
                <template slot="s2">
                    <label>Copyright</label>
                </template>

            </my-component>
            子组件中的数据是:{{str2}}
        </div>

        <script type="application/javascript">
            var app = new Vue({
                el: "#container",
                data: {
                    str: "这是一个标题",
                    str2: ""
                },
                methods: {
                    // 这个方法将会被子组件的事件调用
                    parentMethod: function(p) {
                        this.str2 = p;
                    }
                }
            })
        </script>
    </body>
</html>
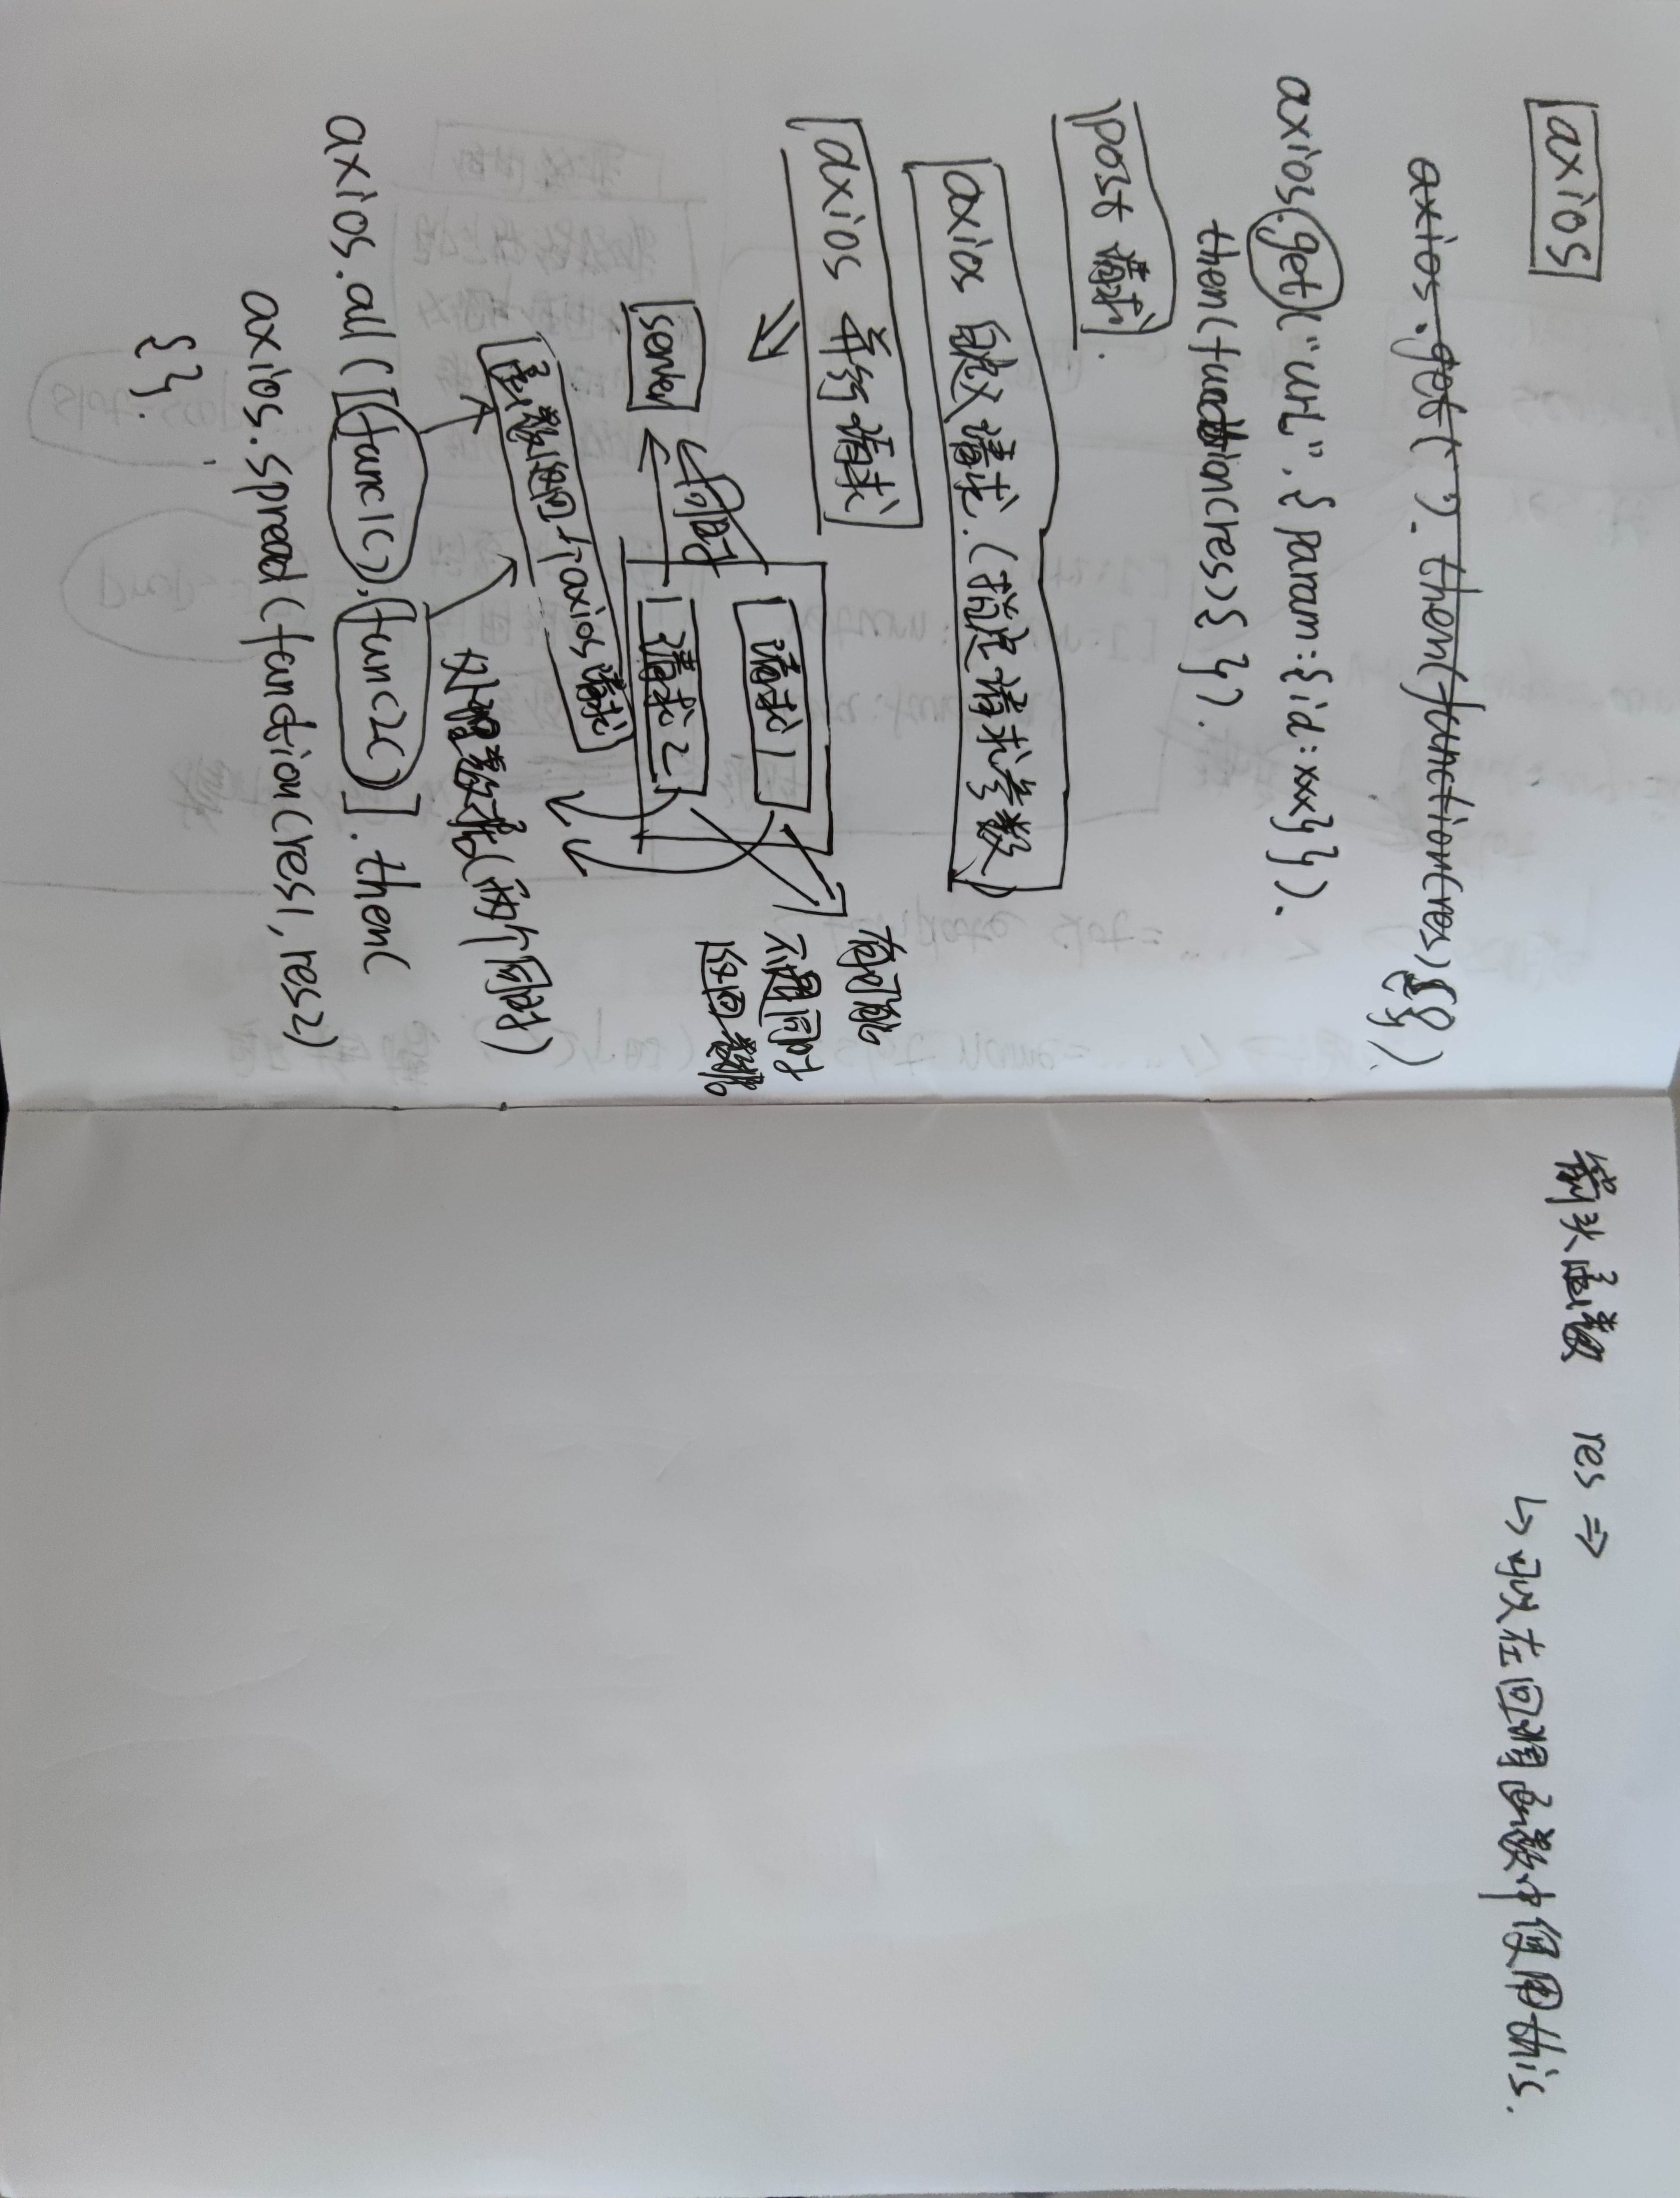
十四、axios
<!DOCTYPE html>
<html>
    <head>
        <meta charset="utf-8">
        <title>axios的使用</title>
        <script type="application/javascript" src="js/vue.js"></script>
        <script type="application/javascript" src="js/axios.min.js"></script>


    </head>
    <body>
        <div id="app">
            {{song.name}}<br/>
            <button type="button" @click="test1">发送请求</button>
        </div>

        <script type="application/javascript">
            var app = new Vue({
                el: "#app",
                data: {
                    song: {}
                },
                methods: {
                    test1: function() {
                        // 使用get方法
                        // axios.get("http://localhost:9999/music/search", {
                        //     params: {
                        //         s: "成都",
                        //         limit:10
                        //     }
                        // }).then(function(res) {
                        //     console.log(res);
                        // })

                        // 使用post方法
                        // axios.post("http://localhost:9999/music/search", {
                        //     s: "张韶涵"
                        // }).then(function(res) {
                        //     console.log(res)
                        // })

                        // 使用自定义axios请求
                        // axios({
                        //     method:"get",
                        //     url:"http://localhost:9999/music/search",
                        //     params:{s:"王力宏"}
                        //     }).then(function(res){
                        //         console.log(res);
                        //     }).catch(function(error){
                        //         console.log(error)
                        //     })

                        // // 使用并行请求
                        // axios.all([func1(), func2()]).then(axios.spread(function(res1, res2) {
                        //     console.log(res1);
                        //     console.log(res2);
                        // }))

                        // 使用箭头函数
                        axios.get("http://localhost:9999/music/detail", {
                            params: {
                                id: "210049"
                            }
                        }).then(res => {
                            this.song = res.data.songs[0];
                        })

                    }
                }
            });

            // 请求函数1
            function func1() {
                return axios.get("http://localhost:9999/music/search", {
                    params: {
                        s: "王力宏"
                    }
                });
            }
            // 请求函数2
            function func2() {
                return axios.get("http://localhost:9999/music/detail", {
                    params: {
                        id: "210049"
                    }
                });
            }
        </script>
    </body>
</html>
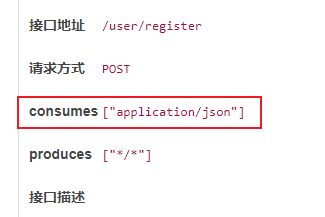
这里我们使用axios时,有个地方需要注意:如果后端api需要使用post请求,且consumes(swagger-ui上显示的参数类型)是application/json的话,前端在使用axios发送请求时,要设置content-type为application/json,设置方法可以参考官方文档,这里给出一个示例:
axios({
    method:"post",
    url: "/user/register",
    baseURL:baseUrl,
    params: {
    username: vm.username,
    password: vm.userPwd
    },
    headers: {
    "content-type": "application/json"
    }
}
).then(res => {
console.log(res.data);
});
需要注意的是,当后端需要前端在发送请求时传入的参数是一个**对象**时,我们可以直接在axios的请求中这样定义:
- get请求:在params中直接传入一个对象,并且直接在其中定义键值对,就像上面的代码一样。
- post请求:需要在data中传入一个对象,并且需要将对象转为json,如下
axios({
 method: "post",
 url: baseUrl + "user/login",
 data: JSON.stringify(this.loginData),
 headers: {
 "content-type": "application/json"
}
}).then(res => {
 // 处理回调数据
 console.log(res.data);
})
两者都需要设置”content-type”为”application/json”,同时,后端接口在接收对象的时候,需要使用@RequestBody注解
十五、Vue Router
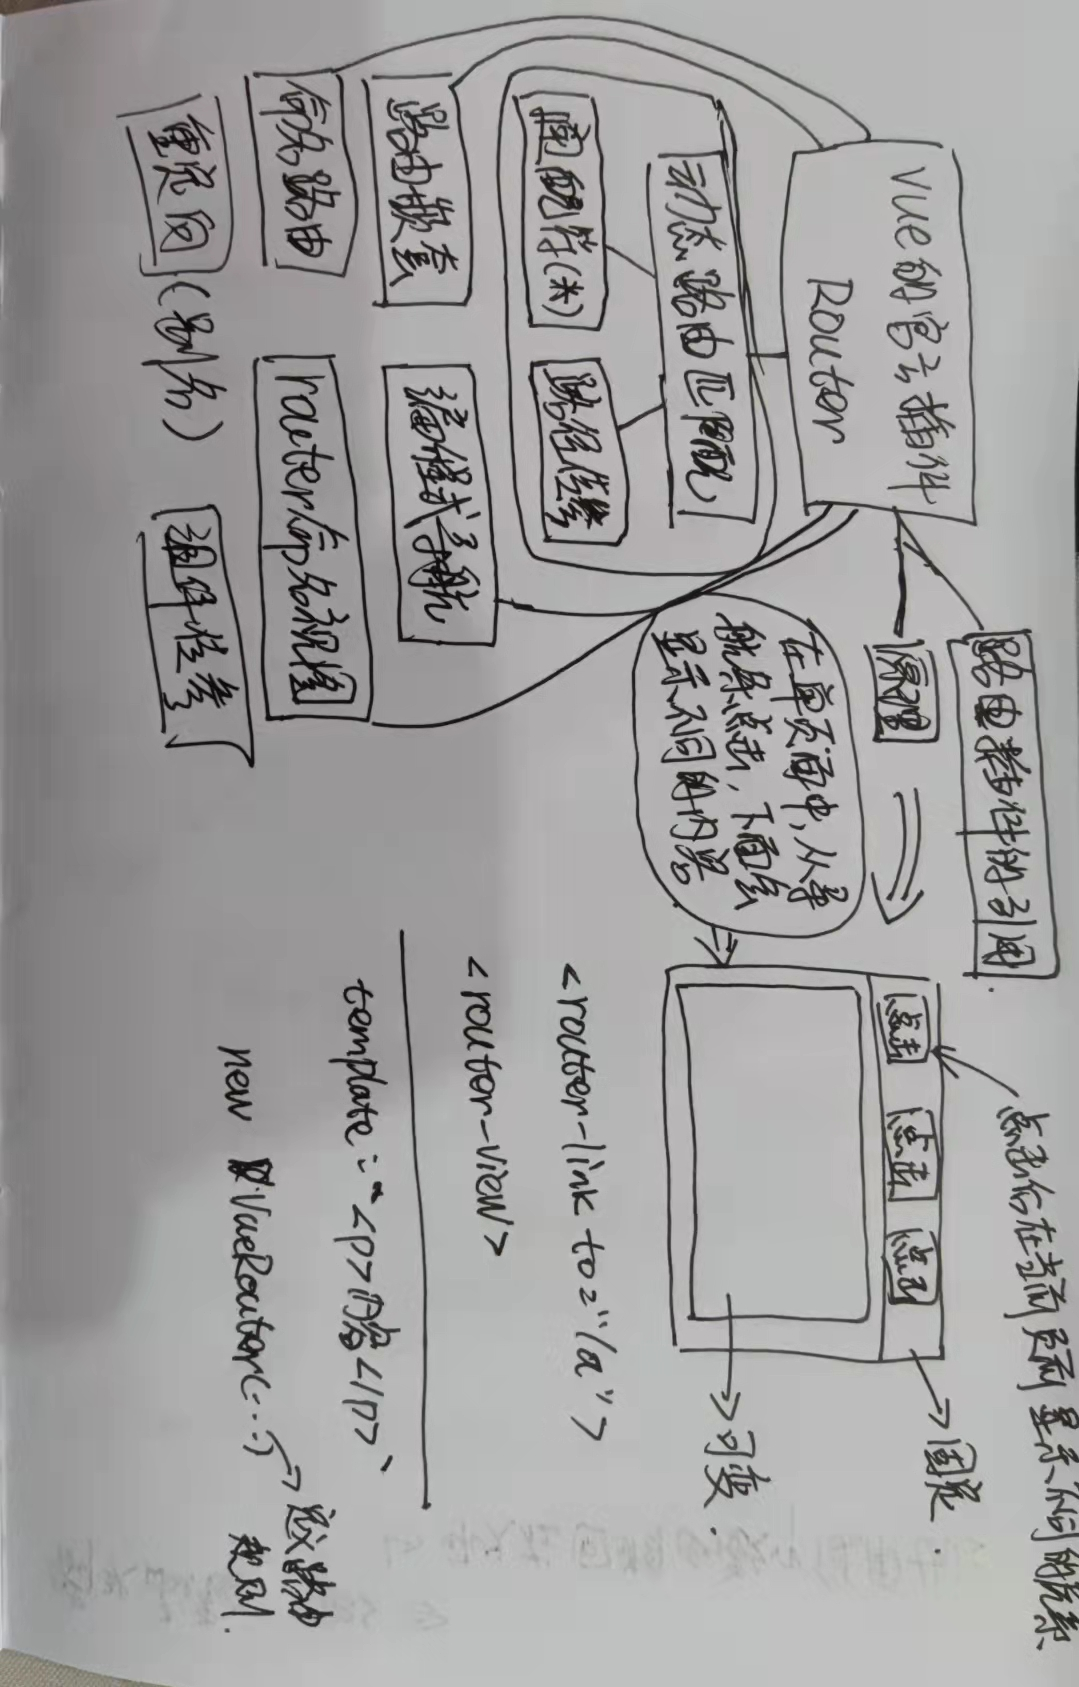
路由的使用、动态路由
<body>
    <div id="app">
        <div style="height: 50px;margin-bottom: 30px;text-align: center;background-color: cadetblue;">
            <label style="margin-right: 30px;">
                <router-link to="/a/101">首页</router-link>
            </label>
            <label style="margin-right: 30px;">
                <router-link to="/b">Java</router-link>
            </label>
            <label style="margin-right: 30px;">
                <router-link to="/c">HTML</router-link>
            </label>
            <label style="margin-right: 30px;">
                <router-link to="/d">Python</router-link>
            </label>
            <label style="margin-right: 30px;">
                <router-link to="/e">Test</router-link>
            </label>
        </div>
        <div style="width: 100%;height: 600px;background-color: lightpink;">
            <!--路由规则定义的跳转链接的模板内容会在下面显示-->
            <router-view></router-view>
        </div>
    </div>
    <script type="application/javascript">
        // 定义跳转链接的模板
        const t1 = {
            // 获取传递过来的参数
            template: `<p>首页的内容:{{$route.params.id}}</p>`
        };
        const t2 = {
            template: `<p>Java的内容</p>`
        };
        const t3 = {
            template: `<p>HTML的内容</p>`
        };
        const t4 = {
            template: `<p>Python的内容</p>`
        };
        const t5 = {
            template: `<p>您点击的内容不存在!404</p>`
        };

        // 定义路由规则
        const myrouter = new VueRouter({
            routes: [{
                //表示路径有参数传递,参数名设置为'id'
                path: "/a/:id",
                component: t1
            },
                     {
                         path: "/b",
                         component: t2
                     },
                     {
                         path: "/c",
                         component: t3
                     },
                     {
                         path: "/d",
                         component: t4
                     },
                     {
                         // 表示匹配任意路径,都会执行t5模板的内容
                         // 如果写的是/user-*,表示‘user-‘后面的所有内容都可以匹配
                         // 需要注意的是,如果跳转路径可以匹配到多个路由规则,则写在前面的会被匹配
                         path: "/*",
                         component: t5
                     }
                    ]
        })
        // 引用路由
        var app = new Vue({
            el: "#app",
            router: myrouter
        })
    </script>
</body>
路由嵌套
<body>
    <div id="app">
        <div style="height: 50px;margin-bottom: 30px;text-align: center;background-color: cadetblue;">
            <label style="margin-right: 30px;">
                <router-link to="/a">路由父亲</router-link>
                <router-link to="/a/c1">路由孩子1</router-link>
                <router-link to="/a/c2">路由孩子2</router-link>
            </label>
        </div>
        <div style="width: 100%;height: 300px;background-color: lightpink;border: #000000 1px solid;">
            <!--路由规则定义的跳转链接的模板内容会在下面显示-->
            <router-view style="width: 50%;height:200px;border: #000000 1px solid;">
            </router-view>
        </div>
    </div>
    <script type="application/javascript">
        // 定义跳转链接的模板.这个模版中有一个嵌套路由
        const t1 = {
            template: `<div>
<p>父亲</p>
<router-view style="width: 50%;height:100px;border: #000000 1px solid;"></router-view>
        </div>`
        };
        const t2 = {
            template: `<p>第一个孩子</p>`
        };
        const t3 = {
            template: `<p>第二个孩子</p>`
        };

        // 定义路由规则
        const myrouter = new VueRouter({
            routes: [{
                path: "/a",
                component: t1,
                // 声明子路由规则,路径/a/c1,/a/c2,即可显示内容
                children: [{
                    path: "c1",
                    component: t2
                },
                           {
                               path: "c2",
                               component: t3
                           }
                          ]
            }, ]
        })
        // 引用路由
        var app = new Vue({
            el: "#app",
            router: myrouter
        })
    </script>
</body>
编程式导航
<body>
    <div id="app">
        <button type="button" @click="test1">按钮</button>
        <button type="button" @click="test2">back</button>
        <router-view></router-view>
    </div>
    <script type="application/javascript">
        const t1 = {
            template: `<div style="width:300px;height:300px;border: 1px #000000 solid;">
<p>input {{$route.params.id}}</p>
        </div>`
        };

        // 定义路由规则
        const myrouter = new VueRouter({
            routes: [{
                path: "/b",
                name: "r1",
                component: t1,
            }]
        })
        // 引用路由
        var app = new Vue({
            el: "#app",
            router: myrouter,
            methods: {
                test1: function() {
                    // js代码实现路由跳转,编程式导航

                    // 1. 字符串
                    myrouter.push("/b");

                    // 2.对象
                    // myrouter.push({path:"/b"});

                    // 3.命名的路由
                    // myrouter.push({name:"r1"});

                    // 4.URL传值("/b?id=101")
                    // myrouter.push({path:"/b",query:{id:101}});

                    // 5.路由传参
                    // myrouter.push({name:"r1",params:{id:101}})

                    // 6. replace 没有历史记录。之前用push是有历史记录的,可以退回上一个链接
                    // myrouter.replace("/b");
                },
                test2:function()
                {
                    // 表示退回上一个链接,数字代表后退多少步,反之,整数就是前进
                    myrouter.go(-1);
                }
            }
        })
    </script>
</body>
命名路由
<body>
    <div id="app">
        <input type="text" v-model="rname"/>
        <!-- 链接到命名路由 -->
        <router-link :to="{name:rname}">t1</router-link>
        <button type="button" @click="test1">t2</button>

        <router-view></router-view>
    </div>

    <script type="application/javascript">
        const t1 = {
            template: `<div style="width:300px;height:300px;border: 1px #000000 solid;">
<p>t1</p>
        </div>`
        };
        const t2 = {
            template: `<div style="width:300px;height:300px;border: red 1px  solid;">
<p>t2</p>
        </div>`
        };

        // 定义路由规则
        const myrouter = new VueRouter({
            routes: [{
                path: "/a",
                name: "r1",
                component: t1
            },
                     {
                         path: "/b",
                         name: "r2",
                         component: t2
                     }
                    ]
        })
        // 引用路由
        var app = new Vue({
            el: "#app",
            router: myrouter,
            data: {
                rname: "r1"
            },
            methods: {
                test1: function() {
                    myrouter.push({name:"r2"});
                }
            }
        })
    </script>
</body>
命名视图
<body>
    <div id="app">
        <router-link to="/a">t1</router-link>
        <router-link to="/b">t2</router-link>

        <!-- 当一个链接有多个视图需要显示时,给视图命名,然后在components里面配置对应的模板 -->
        <router-view name="v1"></router-view>
        <router-view name="v2"></router-view>
    </div>

    <script type="application/javascript">
        const t11 = {
            template: `<div style="width:300px;height:300px;border: 1px #000000 solid;">
<p>t1</p>
        </div>`
        };
        const t12 = {
            template: `<div style="width:300px;height:300px;background:pink;border: 1px #000000 solid;">
<p>t1</p>
        </div>`
        };
        const t21 = {
            template: `<div style="width:300px;height:300px;border: red 1px  solid;">
<p>t2</p>
        </div>`
        };
        const t22 = {
            template: `<div style="width:300px;height:300px;background:pink;border: red 1px  solid;">
<p>t2</p>
        </div>`
        };

        // 定义路由规则
        const myrouter = new VueRouter({
            routes: [{
                path: "/a",
                name: "r1",
                // 配置模版对应的视图
                components:{
                    v1:t11,
                    v2:t12
                }
            },
                     {
                         path: "/b",
                         name: "r2",
                         components:{
                             v1:t21,
                             v2:t22
                         }
                     }
                    ]
        })
        // 引用路由
        var app = new Vue({
            el: "#app",
            router: myrouter
        })
    </script>
</body>
重定向与路由别名
    <body>
        <div id="app">
            <router-link to="/a">t1</router-link>
            <!-- 根据路由规则别名访问链接 -->
            <router-link to="/wahaha">t1-1</router-link>
            <router-link to="/b">t2</router-link>

            <router-view></router-view>
        </div>

        <script type="application/javascript">
            const t1 = {
                template: `<div style="width:300px;height:300px;border: 1px #000000 solid;">
                <p>index</p>
                </div>`
            };

            // 定义路由规则
            const myrouter = new VueRouter({
                routes: [{
                        path: "/a",
                        name: "r1",
                        // 路径别名
                        alias: "/wahaha",
                        component: t1
                    },
                    {
                        path: "/b",
                        // 直接根据路径重定向
                        // redirect:"/a"

                        // 根据路由规则名称重定向
                        redirect: {
                            name: "r1"
                        }
                    }
                ]
            })
            // 引用路由
            var app = new Vue({
                el: "#app",
                router: myrouter
            })
        </script>
    </body>
组件传参
- 第一种方式
<div id="app">
    <router-link to="/a/101">t1</router-link>

    <router-view></router-view>
</div>

<script type="application/javascript">
    const t1 = {
        template: `<div style="width:300px;height:300px;border: 1px #000000 solid;">
<p>index {{$route.params.id}}</p>
    </div>`
    };
    // 定义路由规则
    const myrouter = new VueRouter({
        routes: [{
            path: "/a/:id",
            component: t1
        }
                ]
    })
    // 引用路由
    var app = new Vue({
        el: "#app",
        router: myrouter
    })
</script>
- 第二种方式
<body>
    <div id="app">
        <router-link to="/a/101">t1</router-link>

        <router-view></router-view>
    </div>

    <script type="application/javascript">
        const t1 = {
            // 设置参数
            props:["id"],
            template: `<div style="width:300px;height:300px;border: 1px #000000 solid;">
<p>index {{id}}</p>
        </div>`
        };
        // 定义路由规则
        const myrouter = new VueRouter({
            routes: [{
                path: "/a/:id",
                component: t1,
                // 允许组件设置参数
                props:true
            }
                    ]
        })
        // 引用路由
        var app = new Vue({
            el: "#app",
            router: myrouter
        })
    </script>
</body>

若有收获,就点个赞吧
0 人点赞
