一、冒泡排序的优化
1.内层循环次数递减
function sort(arr){const {length} = arr;for (let i=0 ; i<length ; i++){for (let j=0 ; j<length-i-1;j++){swap(arr,j,j+1)}}return(arr) //一定要有!!};function swap(arr,a,b){if (arr[a]>arr[b]){var temp = arr[a];arr[a] = arr[b];arr[b] = temp;}}
原理:体现在第二轮的for循环的j<length-i-1条件语句,起效是因为第i轮代表排好了第i大的数(在序列的末尾),故之后的循环可以省略这些已经排好序的数值
2.监控内层交换
2.1 哨兵的作用
(1)暂时存放待插入的元素
(2)防止数组下标越界。(避免对已经排好序的序列再做排序)
2.2 代码实现
原理:监控内层是否发生过交换,如过某次内层没有发生过交换直接返回。
function sort(arr){const {length} = arr;for (var i = length-1 ; i>=1 ; i--){var swaped = false; // 设置哨兵,用来监控内层是否发生交换for (var j = 0 ; j<i ; j++){if (arr[j]>arr[j+1]){swap(arr,j,j+1);swaped = true; //true表示发生了交换}}if (!swaped){break; //若整轮下来都不需要发生交换即swaped始终为false,则可直接结束循环}}return arr};
【注释】因为有if循环在,所以只要是没有全部排好序,都会将第n个大的数轮到倒数第n个的地方。而只有当全部排好序了,故而只要开始外循环之后在该轮中,有一次swaped为false则代表该次循环并没有再进行交换排序,则可以说明全部数值已经排序完成了!可以结束。。
二、链表
1. 接口的实现
// Node类表示我们想要添加到链表中的项。它的element 属性表示要加入链表元素的值;next 属性是指向链表中下一个元素的指针。class Node {constructor(element) {this.element = element;this.next = undefined;}}function defaultEquals(a,b) {return a === b;}//创建LinkedList 类的“骨架”class LinkedList {constructor(equalsFn = defaultEquals) {this.count = 0;this.head = undefined; // 保存第一个函数的引用this.equalsFn = equalsFn;}}class DoublyNode extends Node {constructor(element, next, prev) {super(element, next);this.prev = prev; // 新增的}}class DoublyLinkedList extends LinkedList { // 表明是在扩展 LinkedList 类(constructor(equalsFn = defaultEquals) {super(equalsFn);this.tail = undefined; // 新增的 用来保存对最后一个元素的引用}}
1.1 生成链表
- 单链表
//尾插法push(element) {const node = new Node(element); // 把 element 作为值传入let current; //current 变量总是为对所循环列表的当前元素if (this.head == null) { // 判断原列表是否为空this.head = node;} else {current = this.head; // 我们只有第一个元素的引用(所以是head),并在此基础上进行循环while (current.next != null) { // 直到找到最后一项,跳出whilecurrent = current.next;}current.next = node; // 将其 next 赋为新元素,建立链接}this.count++; //}

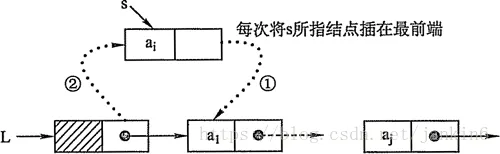
//头插法(成为第二个)push2(element) {const node = new Node(element); // 把 element 作为值传入let current; //current 变量总是为对所循环列表的当前元素if (this.head == null) { // 判断原列表是否为空this.head = node;} else {let previous = this.head;let current = previous.next;previous.next = node;node.next = current;}this.count++;}
-
1.2 判断链表是否为空
单链表
isEmpty () {return this.size() === 0;}
双向链表
push(element) {const node = new DoublyNode(element);if (this.head == null) {this.head = node;this.tail = node;} else {this.tail.next = node;node.prev = this.tail;this.tail = node;}this.count++;}
循环链表
push(element) {const node = new Node(element);let current;if (this.head == null) {this.head = node;} else {current = this.getElementAt(this.size() - 1); //找到最后一个元素current.next = node;}node.next = this.head;this.count++;}
-
1.3 链表的清空
单链表
clear (){this.count = 0;this.head = undefined;}
双向链表
clear() {super.clear(); //this.tail = undefined;}
循环链表
clear (){this.count = 0;this.head = undefined;}
1.4 结点的插入
单链表
insert(element,index){if (index>=0 && index<=this.count){const node = new Node(element);if (index === 0){const current = this.head;node.next = current;this.head = node;} else {const previous = this.getElementAt(index-1);const current = previous.next;node.next = current;previous.next = node;}this.count++;}return false;}
双向链表
insert(element,index){if (index>=0 && index<=this.count){const node = new DoublyNode(element); //let current = this.head;if (index === 0){ //加在第一项if (this.head == null) { // 新增的this.head = node;this.tail = node;} else {node.next = this.head; //current.prev = node; // 新增的this.head = node; //}} else if (index === this.count) { // 新增的 //加在最后一项current = this.tail;current.next = node;node.prev = current;this.tail = node;} else {//找到index前后的两个元素const previous = this.getElementAt(index - 1); // 找到添加位置的前一位元素current = previous.next; // 找到原来在index上的元素(即将往后挪一位)//为新加入的元素添加4条相关链接previous.next = node; // 定义新的previous.next是新插入的元素node.next = current; //current.prev = node; // 新增的node.prev = previous; // 新增的}this.count++;return true;}return false;}
循环链表
insert(element, index) {if (index >= 0 && index <= this.count) {const node = new Node(element);let current = this.head;if (index === 0) {if (this.head == null) {this.head = node;node.next = this.head; // 新增的} else {node.next = current; // 此时current的值是原本的第一个元素current = this.getElementAt(this.size()); // 将current重新定义为最后一个元素// 更新最后一个元素this.head = node; // 将新元素插在头部current.next = this.head; // 实现头尾循环的链接}} else { //不变const previous = this.getElementAt(index - 1);node.next = previous.next;previous.next = node;}this.count++;return true;}return false;}
1.5 结点的删除
单链表
remove(element) {const index = this.indexOf(element);return this.removeAt(index);}
双向链表
removeAt(index) {if (index >= 0 && index < this.count) {let current = this.head;if (index === 0) { //移走头部this.head = current.next; // 定义了新的头部// 如果只有一项,更新 tail,直接undefined // 新增的if (this.count === 1) { //this.tail = undefined;} else {this.head.prev = undefined;}} else if (index === this.count - 1) { //新增的current = this.tail;this.tail = current.prev;this.tail.next = undefined;} else {current = this.getElementAt(index); // {7}const previous = current.prev; // {8}// 将 previous 与 current 的下一项链接起来,跳过 current ,达到移除currentprevious.next = current.next;current.next.prev = previous; // 新增的}this.count--;return current.element;}return undefined;}
循环链表
removeAt(index) {if (index >= 0 && index < this.count) {let current = this.head;if (index === 0) {if (this.size() === 1) {this.head = undefined;} else {const removed = this.head;current = this.getElementAt(this.size() - 1);this.head = this.head.next;current.next = this.head;current = removed;}} else {const previous = this.getElementAt(index - 1);current = previous.next;previous.next = current.next;}this.count--;return current.element;}return undefined;}
1.6 返回第i个结点
getElementAt (index){if (index>=0 && index<=this.count){ //循环迭代链表直到目标位置let node = this.head;for (let i = 0; i<index; i++){node = node.next; //相当于随上面remove中的current移动而移动}return node;}return undefined;}
1.7 返回链表的结点个数
- 单链表
size(){return this.count}
1.8 根据给定值,返回该值在链表出现的第一个位置
indexOf (element) {let current = this.head;for (let i = 0; i < this.count && current != null; i++){if (this.equalsFn(element, current.element)){return i}current = current.next;}return -1}
2. 链表和传统的顺序表的优缺点对比
| 项目 | 优点 | 缺点 |
|---|---|---|
| 链表 | 插入删除比较方便(因为有指针的存在); 分配空间不固定(动态),元素个数无限制,适用于元素数目变化较大或者数目不确定的情况 |
随机储存没有顺序表方便; 存在空间浪费(结构性开销),查找不方便 |
| 顺序表 | 随机访问较快,查找方便; 创建比较简单,便于随机储存; 没有空间浪费,适用于元素数目一定或者较少的情况 |
插入删除比较麻烦; 分配的空间是固定的,元素个数不能超过预定的长度 |
三、栈和队列
栈是一种遵从后进先出(LIFO)原则的有序集合。
队列是遵循先进先出(FIFO,也称为先来先服务)原则的一组有序的项。
1. 接口的实现
class Stack {constructor() {this.count = 0; // 作items对象的键名this.items = {}; // 选择数组保存栈内元素}}
class Queue {constructor() {this.count = 0; // 是用来控制队列的大小而非直接就是队列的长度this.lowestCount = 0; // 用来追踪第一个元素(即使移除了元素,其前对应的“位置序号”还是原来的数值)this.items = {};}}
1.1 元素入栈
push(element) {this.items[this.count] = elementthis.count++}
1.2 元素出栈
pop(){if (this.isEmpty()) {return undefined;}this.count--;const removed = this.items[this.count];delete this.items[this.count];return removed;}
1.3 返回栈的长度
size(){return this.count}
1.4 判断是否为空栈
isEmpty() {return this.count === 0;}
1.5 栈的清空
clear() {this.items = {};this.count = 0; // 很有必要不要遗漏!}
2. 关于栈的上溢和下溢
2.1 栈上溢
(1)情况一: 栈已满的前提下,继续执行入栈操作
(2)情况二: 设置了死循环
2.2 栈下溢
3.栈的真溢出和假溢出
3.1 栈的真溢出
3.2 栈的假溢出
3.3 解决方案
- 解决递归调用栈溢出的方法是通过尾递归优化,事实上尾递归和循环的效果是一样的,所以,把循环看成是一种特殊的尾递归函数也是可以的。(递归很容易发生“栈溢出”,而ES6 中只要使用尾递归,就不会发生栈溢出
(原理:使递归本身无论调用多少次,都只占用一个栈帧)
四、队列
1. 接口的实现
1.1 元素入队
enqueue(element) {this.items[this.count] = element;this.count++;}
1.2 元素出队
dequeue(){if (this.isEmpty()) {return undefined}const removed = this.items[this.lowestCount];delete this.items[this.lowestCount];this.lowestCount++;return removed;}
1.3 返回队列的长度
size() {return this.count - this.lowestCount;}
1.4 判断队列是否为空
isEmpty() {return this.size() === 0;}
1.5 队列的清空
clear(){this.items = {};this.count = 0;this.lowestCount = 0;}
2. 队列的真溢出和假溢出
2.1 真溢出:
2.2 假溢出
当队列中的存储空间没满时,但是由于来的元素堵在队尾,此时如果还有元素要入队的话,就会报错,发生溢出
2.3 解决方案
- 按最大可能的进队操作次数设置顺序队列的最多元素个数,比如说如果要操作16次,则可以存储8个元素;但是这个方法很浪费空间,一般不用这个方法;
- 修改出队操作算法,使每次出队后都把队列中剩余的操作元素向队头移动一个位置;
- 修改入队算法,增加判断条件,当发生“假性溢出”时,把数据元素向队头移动;
- 采用循环队列;
(参考链接:如何解决队列的“假性溢出”问题?)
五、双端队列
1.接口的实现
1.1 元素入队
// 在后端添加元素addBack(element) {this.items[this.count] = element;this.count++;}
// 在前端添加元素addFront(element){if (this.isEmpty()) {this.addBack(element);}else if(this.lowestCount>0){ //之前有元素被移出去了// 直接将新元素插在最前面this.lowestCount--; // 先设置现在新的第一个位置this.items[this.lowestCount]=element; // 将新元素插在最前面}else{ // 没有移动过元素的情况(此时的lowestCount=0)for (let i = this.count;i>0;i--){ //从后往前会更加便利(因为最后一个位置初始状态是空的,如果从前往后则需要中间量)this.items[i] = this.items[i-1]}this.count++;this.items[0] = element;}}
1.2 元素出队
// 在后面出队removeFront(){if (this.isEmpty()) {return undefined}const removed = this.items[this.lowestCount];delete this.items[this.lowestCount];this.lowestCount++;return removed;}
// 在前面出队removeBack(){if (this.isEmpty()){return undefined;}else{const removed = this.items[this.count-1]delete this.items[this.count-1];this.count--;return removed}}
1.3 返回队列的长度
size() {return this.count - this.lowestCount;}
1.4 判断队列是否为空
isEmpty() {return this.size() === 0;}
1.5 队列的清空
clear(){this.items = {};this.count = 0;this.lowestCount = 0;}

若有收获,就点个赞吧
0 人点赞
