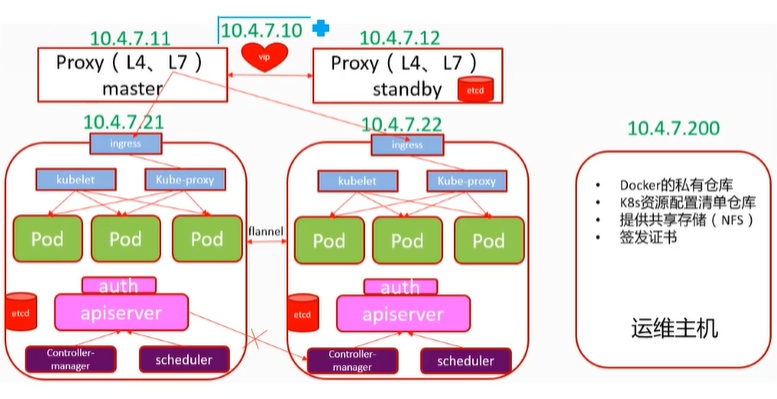
1、部署架构
2、部署准备
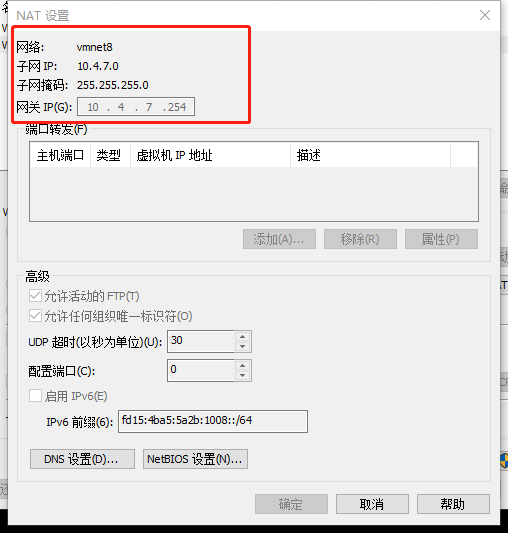
1、准备5台虚拟机
设置虚拟网络编辑器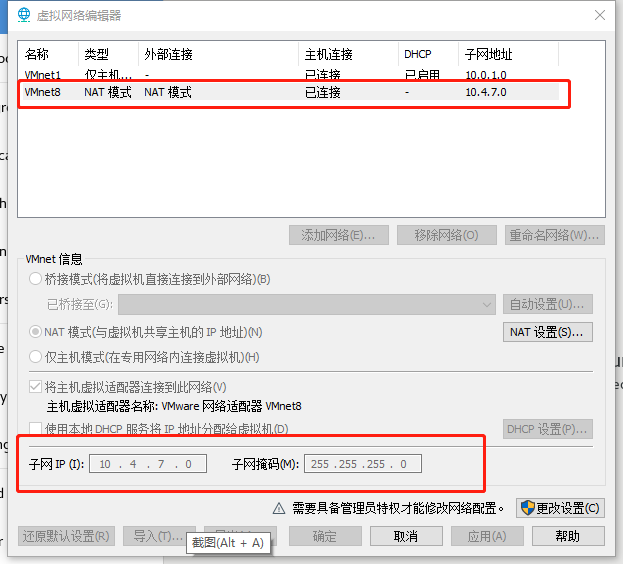
2、设置各台虚拟机主机名
hostnamectl set-hostname hdss7-11.host.com
hostnamectl set-hostname hdss7-12.host.com
hostnamectl set-hostname hdss7-21.host.com
hostnamectl set-hostname hdss7-22.host.com
hostnamectl set-hostname hdss7-200.host.com
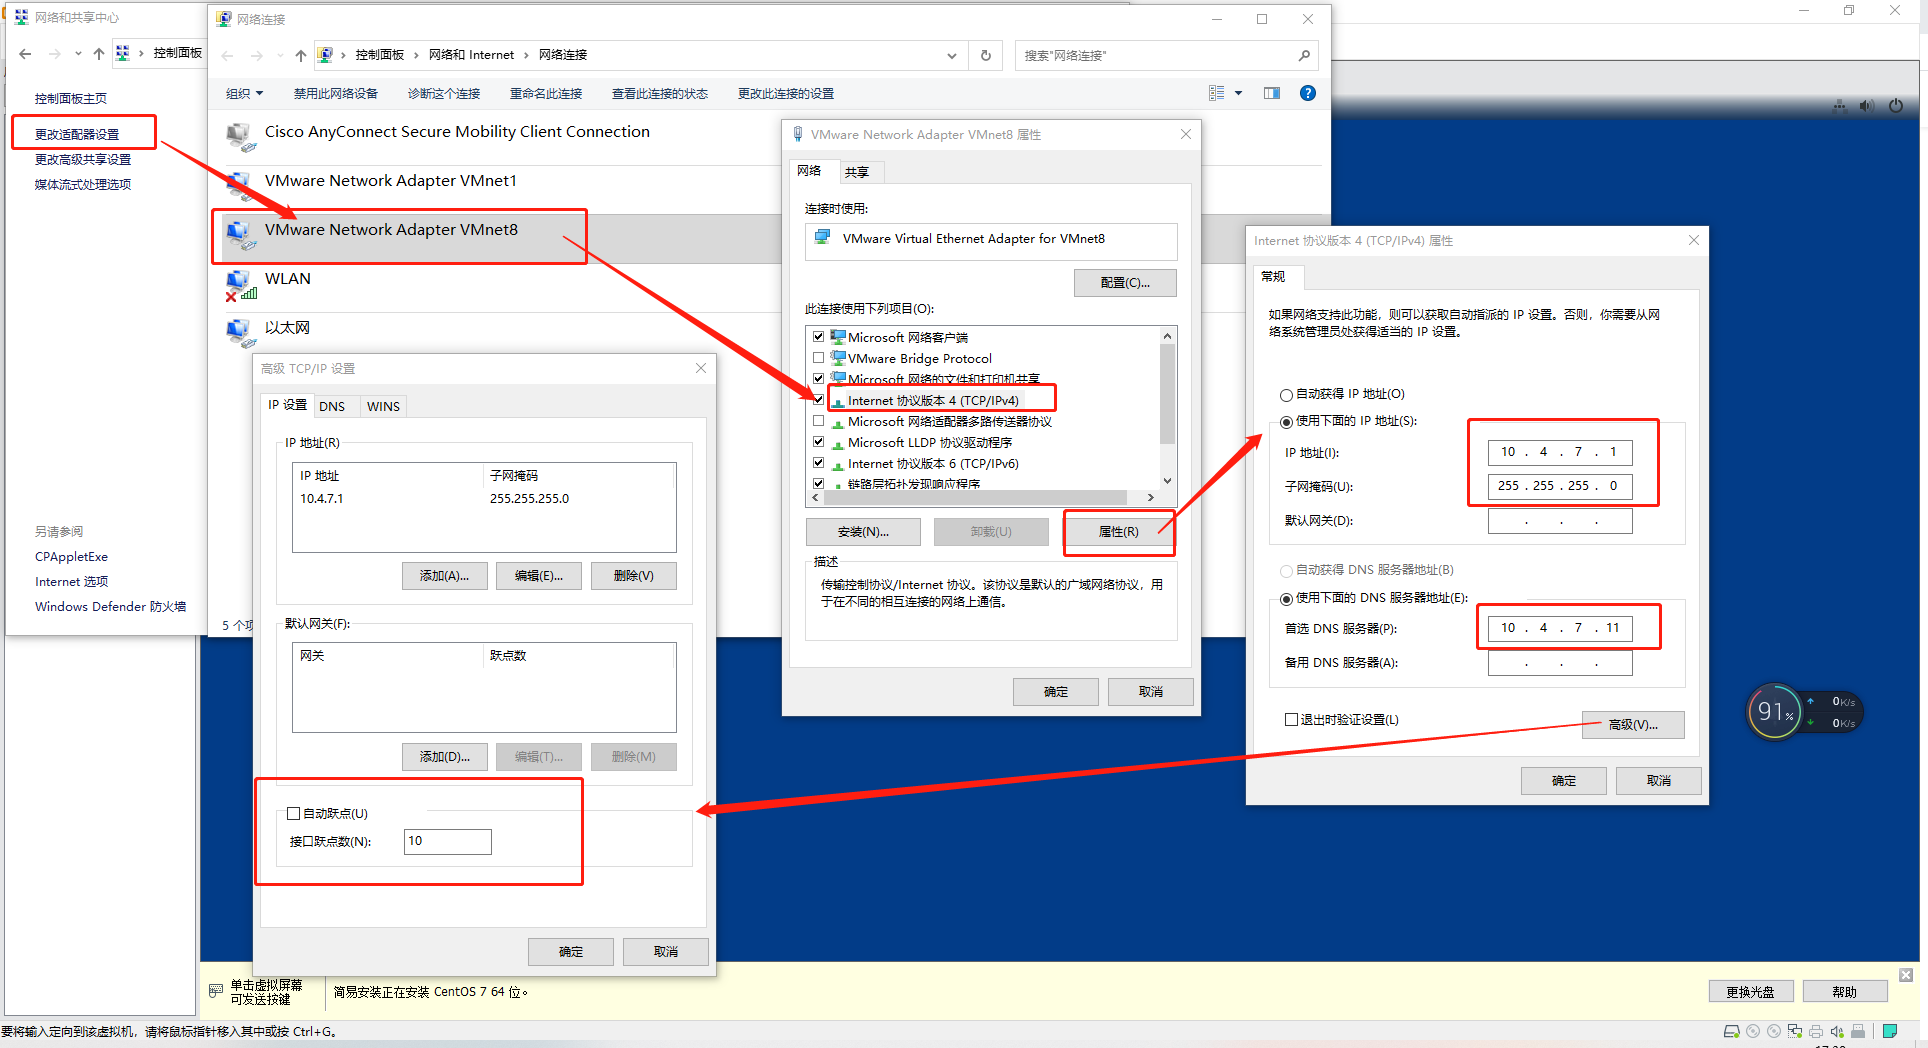
3、设置每台虚拟机网络配置
mv /etc/sysconfig/network-scripts/ifcfg-ens33 /etc/sysconfig/network-scripts/ifcfg-eth0
vi /etc/sysconfig/network-scripts/ifcfg-eth0
TYPE=Ethernet
BOOTPROTO=none
NAME=eth0
DEVICE=eth0
ONBOOT=yes
IPADDR=10.4.7.11
NETMASK=255.255.255.0
GATEWAY=10.4.7.254
DNS1=10.4.7.254
HWADDR=00:0c:29:c5:de:70
HWADDR为硬件地址:通过ip addr命令查看
1: lo:
inet 127.0.0.1/8 scope host lo
valid_lft forever preferred_lft forever
inet6 ::1/128 scope host
valid_lft forever preferred_lft forever
2: eth0:
link/ether00:0c:29:c5:de:70 brd ff:ff:ff:ff:ff:ff
inet 10.4.7.11/24 brd 10.4.7.255 scope global eth0
valid_lft forever preferred_lft forever
inet6 fe80::20c:29ff:fec5:de70/64 scope link
valid_lft forever preferred_lft forever
3: virbr0:
link/ether 52:54:00:0a:a3:73 brd ff:ff:ff:ff:ff:ff
inet 192.168.122.1/24 brd 192.168.122.255 scope global virbr0
valid_lft forever preferred_lft forever
4: virbr0-nic:
link/ether 52:54:00:0a:a3:73 brd ff:ff:ff:ff:ff:ff
4、放开防火墙
命令:systemctl stop firewalld.service && systemctl disable firewalld.service
5、关闭selinux
vi /etc/selinux/config
将SELINUX=enforcing该为SELINUX=disabled
6、关闭swap分区
先临时关闭,命令:swapoff -a
注释掉/etc/fstab下关于swap的配置
在/etc/sysctl.conf下添加一行配置:vm.swappiness=0
7、允许 iptables 检查桥接流量
为了让你的 Linux 节点上的 iptables 能够正确地查看桥接流量,你需要确保在你的 sysctl 配置中将 net.bridge.bridge-nf-call-iptables 设置为 1:命令如下
vi /etc/sysctl.conf
并将
net.bridge.bridge-nf-call-ip6tables = 1
net.bridge.bridge-nf-call-iptables = 1
复制到该文件下保存
8、安装epel源
yum install epel-release -y
或
curl -o /etc/yum.repos.d/epel.repo http://mirrors.aliyun.com/repo/epel-7.repo
9、安装必要工具
yum install wget net-tools telnet tree nmap sysstat lrzsz dos2unix bind-utils -y
10、安装bind9 DNS服务
hdss7-11上:yum install bind -y
dns named服务的安装与配置:https://www.jianshu.com/p/a66bc4d13243
1、配置bind
vi /etc/named.conf
//// named.conf
//
// Provided by Red Hat bind package to configure the ISC BIND named(8) DNS
// server as a caching only nameserver (as a localhost DNS resolver only).
//
// See /usr/share/doc/bind*/sample/ for example named configuration files.
//
// See the BIND Administrator’s Reference Manual (ARM) for details about the
// configuration located in /usr/share/doc/bind-{version}/Bv9ARM.html
options {
listen-on port 53 { 10.4.7.11; };
listen-on-v6 port 53 { ::1; }; 删除
directory “/var/named”;
dump-file “/var/named/data/cache_dump.db”;
statistics-file “/var/named/data/named_stats.txt”;
memstatistics-file “/var/named/data/named_mem_stats.txt”;
recursing-file “/var/named/data/named.recursing”;
secroots-file “/var/named/data/named.secroots”;
allow-query { any; };
forwarders { 10.4.7.254; };
/*<br /> - If you are building an AUTHORITATIVE DNS server, do NOT enable recursion.<br /> - If you are building a RECURSIVE (caching) DNS server, you need to enable<br /> recursion.<br /> - If your recursive DNS server has a public IP address, you MUST enable access<br /> control to limit queries to your legitimate users. Failing to do so will<br /> cause your server to become part of large scale DNS amplification<br /> attacks. Implementing BCP38 within your network would greatly<br /> reduce such attack surface<br /> */<br /> recursion yes;dnssec-enable no;<br /> dnssec-validation no;/* Path to ISC DLV key */<br /> bindkeys-file "/etc/named.root.key";managed-keys-directory "/var/named/dynamic";pid-file "/run/named/named.pid";<br /> session-keyfile "/run/named/session.key";<br />};
logging {
channel default_debug {
file “data/named.run”;
severity dynamic;
};
};
zone “.” IN {
type hint;
file “named.ca”;
};
include “/etc/named.rfc1912.zones”;
include “/etc/named.root.key”;
检查修改有没有问题:named-checkconf
2、区域配置文件
vi /etc/named.rfc1912.zones
加入:
zone “host.com” IN {
type master;
file “host.com.zone”;
allow-update { 10.4.7.11; };
};
zone “jack.com” IN {
type master;
file “jack.com.zone”;
allow-update { 10.4.7.11; };
};
3、配置区域数据文件
vi /var/named/host.com.zone
$ORIGIN host.com.
$TTL 600 ; 10 minutes
@ IN SOA dns.host.com. dnsadmin.host.com. (
2021061401 ; serial
10800 ; refresh (3 hours)
900 ; retry (15 minutes)
604800 ; expire (1 week)
86400 ; minimum (1 day)
)
NS dns.host.com.
$TTL 60 ; 1 minute
dns A 10.4.7.11
HDSS7-11 A 10.4.7.11
HDSS7-12 A 10.4.7.12
HDSS7-21 A 10.4.7.21
HDSS7-22 A 10.4.7.22
HDSS7-200 A 10.4.7.200
vi /var/named/jack.com.zone
$ORIGIN jack.com.
$TTL 600 ; 10 minutes
@ IN SOA dns.jack.com. dnsadmin.jack.com. (
2021081201 ; serial
10800 ; refresh (3 hours)
900 ; retry (15 minutes)
604800 ; expire (1 week)
86400 ; minimum (1 day)
)
NS dns.jack.com.
$TTL 60 ; 1 minute
dns A 10.4.7.11
执行命令: named-checkconf检查配置是否有误
执行命令:systemctl start named启动named
报错:
Job for named.service failed because the control process exited with error code. See “systemctl status named.service” and “journalctl -xe” for details.
执行:systemctl status named.service查看错误详情
解决:/etc/sysconfig/named 加入 DISABLE_ZONE_CHECKING=”yes”(解决链接:https://blog.csdn.net/FengqiangDu/article/details/90451580)
执行命令:systemctl enable named开机自启named
输出:
Created symlink from /etc/systemd/system/multi-user.target.wants/named.service to /usr/lib/systemd/system/named.service.
查看启动后运行进程端口:netstat -luntp|grep 53
tcp 0 0 10.4.7.11:53 0.0.0.0: LISTEN 11625/named tcp 0 0 192.168.122.1:53 0.0.0.0: LISTEN 2497/dnsmasq
tcp 0 0 127.0.0.1:953 0.0.0.0: LISTEN 11625/named
tcp6 0 0 ::1:53 ::: LISTEN 11625/named
tcp6 0 0 ::1:953 ::: LISTEN 11625/named
udp 0 0 0.0.0.0:5353 0.0.0.0: 613/avahi-daemon: r
udp 0 0 10.4.7.11:53 0.0.0.0: 11625/named
udp 0 0 192.168.122.1:53 0.0.0.0: 2497/dnsmasq
udp6 0 0 ::1:53 :::* 11625/named
dig工具检查:dig -t A HDSS7-200.host.com @10.4.7.11 +short
输出:
10.4.7.200
配置客户端,使linux服务于windows服务都能使用这个dns
vi /etc/sysconfig/network-scripts/ifcfg-eth0
TYPE=EthernetBOOTPROTO=none
NAME=eth0
DEVICE=eth0
ONBOOT=yes
IPADDR=10.4.7.11
NETMASK=255.255.255.0
GATEWAY=10.4.7.254
DNS1=10.4.7.11
HWADDR=00:0c:29:c5:de:70
将几个虚拟机的/etc/sysconfig/network-scripts/ifcfg-eth0文件的dns1都改为10.4.7.11
systemctl restart network
检查自建dns解析外部网站:ping www.baidu.com
检查内部域名:ping hdss7-21.host.com
配置短域名:
vi /etc/resolv.conf
加入:search host.com

若有收获,就点个赞吧
0 人点赞
