- 初始化流程
- 一、调用webpack函数
- 二、注册文件系统
- 三、根据参数进行Webpack注册
- 四、compiler构建执行流程
- 五、创建compilation对象
- 2、执行编译过程
- 3、封装模块
- 4、普通模块的ejs模版
- 5、将模版内容写入文件
- 总结:
- 1、基本流程
- Webpack的基本流程可以分成三个阶段:
- 在产出阶段中,主要有三个步骤:模版hash的生成、模版渲染chunk、生成文件。细化到具体的代码层次,大概可以分为:
- Compilation是构建打包的事情,主要内容有:
- 递归完后得到每个文件的最终结果,根据entry配置生成chunk,输入所有chunk到对应的output路径中。
- Webpack的工作流程中,Tapable始终贯穿其中,Tapable各种钩子组成了Webpack完整的生命周期。
- 总结:Webpack打包流程从配置文件的读取开始,分别经过准备阶段、modules产出阶段、chunks产出阶段、bundle产出阶段。在各自阶段,分别有不同的角色参与,整个Webpack打包流程是通过compiler控制的,而每次打包的过程是通过compilation来控制的。在普通模式下,webpack的compiler和compilation是一一对应的关系;watch模式下,Webpack的Compiler会因为文件变化而产生多次打包流程,所以Compiler和Compilation是一对多的关系。
- 2、流程图如下:
- 1、基本流程
- 参考:
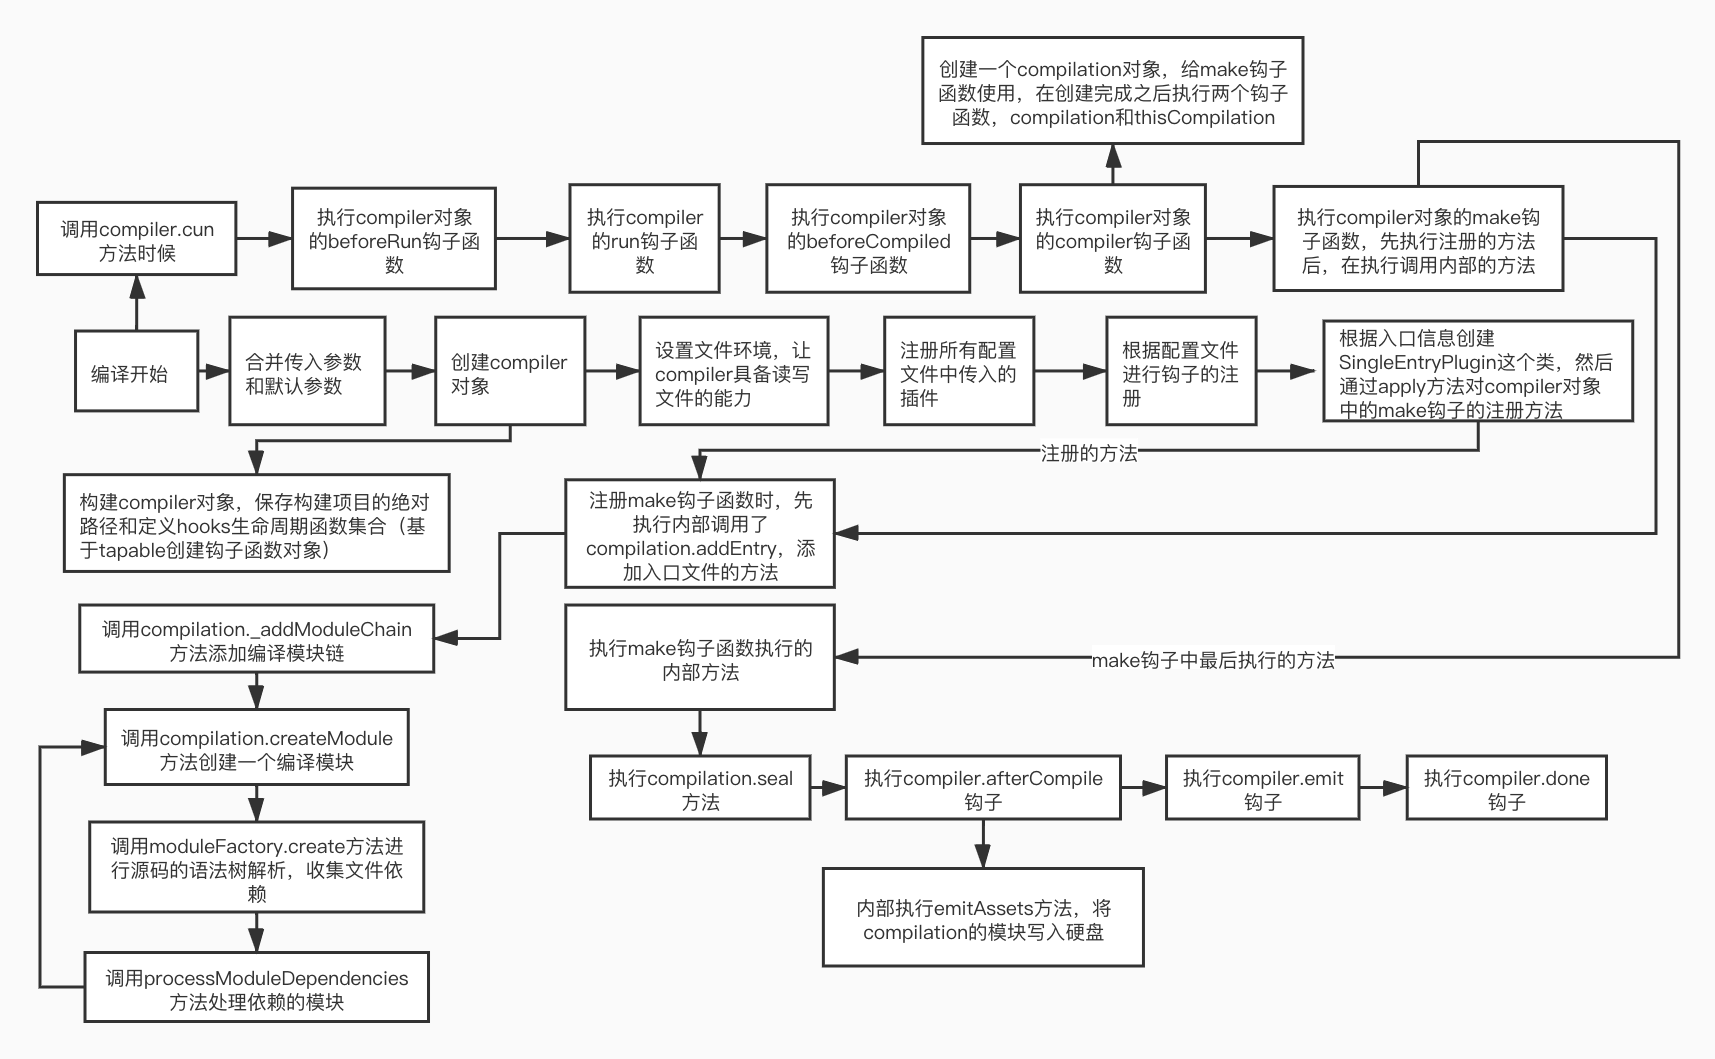
初始化流程
首先需要理解compiler和compilation
Webpack中两大核心的类Compiler和Compilation。Compiler是每次Webpack全部的生命周期对象,而Compilation是Webpack中每次构建过程中的生命周期。Compilation是通过Compiler创建的实例。两个类都有自己的生命周期,即是自己的hook,通过添加hook事件,可以拿到各自生命周期的关键性数据和对象。Compilation有个很重要的对象是Stats对象,通过这个对象可以拿到Webpack打包后所有的module、chunk和assets信息,通过分析stats对象可以得到很多信息。
调用webpack函数,传入自定义的配置项,经过webpack加工后返回一个compiler对象。返回的complier对象可以调用它的run方法,传入一个回调函数,回调函数中接收错误信息和构建完成的信息。
一、调用webpack函数
- 首先创建一个complier实例,传入的参数是自定义选项中的项目的绝对路径
- 将传入的自定义选项绑定给complier实例上的options属性上
- 采用插件的方式,将fs的读写模块绑定给complier对象
- 配置文件是否传入了plugins插件,如果传入挂载所有配置文件的plugins插件
- 根据配置文件中的选项执行
返回complier对象
const webpack = function(options) {let compiler = new Compiler(options.context);compiler.options = options;new NodeEnvironmentPlugin().apply(complier); // 让complier具备文件读写的能力if (options.plugins && Array.isArray(options.plugins)) {for (const plugin of options.plugins) {plugin.apply(complier);}}new WebpackOptionsApply().process(options, complier);return compiler;}
以上就是webpack主文件的大致内容,下面我们依次来拆解每一步流程。
二、注册文件系统
注册的文件系统就是让compiler对象有读写文件的能力,就是将fs模块的功能进行绑定
class NodeEnvironmentPlugin {applay(compiler) {compiler.inputFileSystem = fs;compiler.outputFileSystem = fs;}}
三、根据参数进行Webpack注册
根据webpack参数进行注册,调用process方法进打包入口的确定以及make钩子函数的注册
调用process函数,传入配置参数和compiler对象
- 注册一个入口选项的插件,传入一个compiler对象,内部会注册一个entryOption钩子函数
- entryOption这个钩子函数内会创建一个类,执行apply方法后注册一个make钩子函数
- 注册的make钩子函数中,会调用compilation的addEntry方法从入口开始进行打包
调用entryOption这个钩子函数
class SingleEntryPlugin { // 单入口的注册方法constructor(context, entry, name) {this.context = context;this.entry = entry;this.name = name;}apply(compiler) {// 注册make钩子函数compiler.hooks.make.tapAsync('SingleEntryOption', (compilation, callback) => {// 拿到项目的绝对路径,入口名称,打包后文件的名字const { context, entry, name } = this;// 调用compilation的添加入口的方法compilation.addEntry(context, entry, name, callback);})}}class EntryOptionsPlugin { // 根据入口文件进行注册apply(compiler) {// 注册entryOption这个钩子函数compiler.hooks.entryOption.tap('EntryOptionPlugin', (context, entry) => {if (typeof entry === 'string') { // 如果是单入口// 创建一个类型注册make钩子函数new SingleEntryPlugin(context, entry, 'main').apply(compiler);}})}}class WebpackOptionsApply { // 根据参数进行webpack相关内容注册process(options, compiler) {new EntryOptionPlugin().apply(compiler); // 注册entryOption这个钩子函数// 调用entryOption这个钩子函数compiler.hooks.entryOption.call(options.context, options.entry);}}
四、compiler构建执行流程
1、初始化complier对象
初始化complier对象,传入配置文件中的项目的绝对路径
接收构建对象时传入的配置文件中的上下文绝对路径
初始化生命周期的hooks钩子,hooks钩子中的生命周期是基于tapable的,后续文章中会详细介绍
class Complier {constructor(context) {this.context = context;this.hooks = {// 当编译完成之后就会触发这个钩子函数执行done: new AsyncSeriesHook(['stats']),// 确定完成配置文件中入口参数执行的钩子,需要传入项目的绝对路径和入口文件的路径entryOption: new SyncBailHook(['context', 'entry']),beforeRun: new AsyncSeriesHook(['complier']), // compiler运行前run: new AsyncSeriesHook(['complier']), // compiler运行时beforeCompile: new AsyncSeriesHook(['params']), // compiler编译前compile: new AsyncSeriesHook(['params']), // 编译时// make构建,会创建一个compilation和thisCompilation实例make: new AsyncParalleHook(['compilation']),// 开始一个新的编译thisCompilation: new SyncHook(['compilation', parmas]),// 创建完成一个compilation实例compilation: new SyncHook(['compilation', 'params']),afterCompile: new AsyncSeriesHook(['compilation']), // 完成编译emit: new AsyncSeriesHook(['compilation']) // 发射写入文件}}}
2、执行compiler的run方法
执行compiler的run方法开始编译
run方法首先执行beforeRun这个钩子函数,在这个钩子函数内部执行run这个钩子函数
- run钩子执行内部调用compiler对象的compiler方法,传入一个onCompiled方法
onCompiled方法内部会执行写入文件的方法
run(callback) {// 正在编译的函数const onCompiled = (err, compilation) => {// 执行写入文件的方法this.emitAssets(comiplation, err => {let stats = new Stats(compilation); // 创建一个stats实例,传入compilation对象// 执行编译完成的方法,将stats信息和错误信息抛出this.hooks.done.callAsync(stats, err => {callback(err, stats)})})}// 执行compiler运行前的钩子函数this.hook.beforeRun.callAsync(this, () => {// 执行compiler运行时的钩子函数this.hook.run.callAsync(this, () => {// 编译开始的方法,传入正在编译的函数this.compiler(onCompiled);})})}
3、执行compiler方法
执行compiler对象的compiler方法
compiler方法接收一个函数
构建compilation参数,创建compilation之前要创建一个普通工厂函数
- 执行正在编译的钩子函数
- 创建一个compilation对象,执行thisCompilation和compilation钩子函数
- 创建完成compilation对象后,执行make这个钩子函数
- make钩子函数执行内部,会去执行compilation对象的seal封装代码块的函数
- seal方法应该传入一个回调函数,回调函数内部首先执行afterCompile的钩子函数
afterCompiled钩子函数中执行run方法中传入函数
newCompilationParams() { // 创建compilation参数return {// 在创建compilation之前创建一个普通工厂函数normalModuleFactory: new NormalModuleFactory();}}newCompilation(params) { // 创建依次新的编译const compilation = new Compilation(this); // 创建compilation对象// 执行thisCompilation钩子函数this.hooks.thisCompilation.call(compilation, params);this.hooks.compilation.call(compilation, params);// 执行compilation钩子函数return compilation;}compiler(onCompiled) { // 编译执行函数const params = new newCompilationParams();this.hooks.compile.call(params); // 执行开始编译的钩子函数const compilation = this.newCompilation(params); // 创建compilation对象// 执行make这个钩子函数this.hooks.make.callAsync(compilation, err => {// 执行compilation对象的seal封装代码块函数compilation.seal(() => {// 执行编译完成后的钩子函数this.hooks.afterCompile.callAsync(compilation, err => {onCompiled(err, compilation);})})})}
4、执行onCompiled方法文件写入
当conpiler方法中执行afterCompile钩子函数时,内部会执行一个onCompiled方法,会将compilation编译对象传入,最后根据conpilation对象进行磁盘文件写入。
执行emit这个钩子函数,内部使用mkdir这个包,创建目录,执行回调函数
- 回调函数中,拿到所有compilation的构建资源,拿到输出的目录
- 遍历所有构建完成的资源,拿到文件资源,确定好写入的文件名称,调用写入系统写入磁盘中
- 最后构建完成
emitAssets(compilation, callback) { // 写入文件的方法const emitFiles = () => {const assets = compilation.assets;const ouputPath = this.options.output.path;for (let file of assets) {const source = assets[file];const targetPath = path.posix.join(ouputPath, file);this.outputFileSystem.writeFileSync(targetPath, targetPath, 'utf8');}callback();}this.hooks.emit.callAsync(compilation, () => {mkdir(this.options.output.path, emitFiles);})}
五、创建compilation对象
创建compilation类
```javascript const async = require(‘neo-async’);
class Compilation { constructor(compiler) { this.compiler = compiler; this.options = compiler.options; this.context = compiler.context; this.entris = []; // 入口的数组,放着所有入口的模块 this.modules = []; // 模块的数组,这里放着所有的模块 this._modules = {}; // key是模块的id,值是模块对象 this.chunks = []; // 这里是所有的代码块 this.files = []; // 这里是本次编译产出的所有文件名称 this.assets = {}; // 这里是所有的资源 this.inputFileSystem = compiler.inputFileSystem; this.outputFileSystem = compiler.outputFileSystem; this.hooks = { // 当构建完成一个模块后会触发这个钩子 successModules: new SyncHook([‘module’]), seal: new SyncHook(), // 封装代码块 beforeChunks: new SyncHook(), // 生成代码块之前 afterChunk: new SyncHook() // 生成代码块之后 } } }
<a name="lIWEk"></a>#### 1、执行addEntry方法<a name="ksIvn"></a>##### 在确定入口的时候注册了一个make钩子函数,当compiler执行compiler时候会触发make钩子执行,在注册make钩子函数中,会调用compilation的addEntry方法进行模块的解析- 创建一个普通模块工厂对象,调用create方法生成模块信息- 把模块的路径作为模块的id保存- 把生成的模块放入入口信息数组、模块信息数组中- 执行模块的buildModule方法,开始执行编译- 当编译执行完成之后,看是否有依赖的模块,如果有依赖的模块进行递归解析- 内部有一个机制,就是一个入口依赖的文件,解析后所有模块的name都和入口文件的name相同```javascriptconst parser = (source) => {return babylon.parese(source, {sourceType: 'modules',plugins: ['dynamicImport']})}addEntry(context, entry, name, callback) {// 增加编译模块链this._addModuleChain(context, entry, name, (err, module) => {callback(err, module);});}_addModuleChain(context, rawRequest, name, callback) {this.createModule({name,context,rawRequest,resource: path.posix.join(context, rawRequest),parser}, entryModule => this.entries.push(entryModule), callback);}createModule(data, addEntryCallback, callback) {// 创建一个模块工厂const normalModuleFactory = new NormalModuleFactory();const module = normalModuleFactory.create(data);module.moduleId = './' + path.posix.relative(this.context, module.resource);addEntryCallback && addEntryCallback(module); // 添加一个入口文件this.modules.push(module); // 添加一个模块this._module[module.moduleId] = module; // 保存对应信息this.buildModule(module, (err, module) => {if (module.dependencies.length > 0) {this.processModuleDependencies(module, err => {callback(err, module);})} else {callback(err, module);}})}processModuleDependencies(module, callback) {// 获取当前模块的依赖模块const dependencies = module.dependencies;// 遍历依赖模块,全部开始编译,当所有模块全部编译完成后才会调用callbackasync.forEach(dependencies, (dependency, done) => {const { name, context, resource, moduleId } = dependency;this.createModule({name,context,rawRequest: './' + path.posix.relative(context, resource),resource,parser,moduleId}, null, done);}, callback);}buildModule(module, callback) {// 这一步就是真正的执行编译的过程module.build(this, err => {// 意味着一个module已经完成编译this.hooks.successModule.call(module);callback(err, module);})}
2、执行编译过程
在执行addEntry方法确定入口的时候,创建了一个普通模块工厂,这个类内部会执行构建的方法
- 创建一个普通模块工厂,调用create方法,返回一个普通模块的实例。
- 创建一个普通模块实例,调用build方法进行构建.
- 根据文件路径读取文件内的内容,将文件内容赋值给当前实例。
- 调用parser方法将文件内容转成抽象语法树(ast),遍历抽象语法树。
将节点require或者import节点进行转换,并且收集内部依赖的模块放入依赖队列中后,编译完成。
class NormalModuleFactory {
  create(data) {
    return new NormalModule(data);
}
}
class NormalModule {
  constructor({ name, context, rawRequest, resource, parser, moduleId }) {
    this.name = name; // 打包出来的名字
  this.context = context; // 跟路径
  this.rawRequest = rawRequest; // 请求文件路径
  this.resource = resource; // 资源路径
  this.parser = parser; // 转成ast的babel方法
  this.moduleId = moduleId; // 模块的id
  this._source; // 模块对应的源代码
  this.ast; // 抽象语法树
  this.dependencies = []; // 当前模块的依赖信息
  this.moduleId = moduleId || ('./' + path.posix.relative(context, resource))
}
build(compilation, callback) {
  this.doBuild(compilation, () => {
      this.ast = this.parser.parse(this._source);
    traverse(this._ast, {
        CallExpression: (nodePath) => {
        let node = nodePath.node; // 获取节点
        if (node.callee.name === 'require' || node.callee.name === 'important') { // 如果方法名是require方法的话
          node.callee.name = '__webpack_require__'; // 对方法名称进行修改,从require改成__webpack_require__
          console.log(node.callee.name)
          const moduleName = node.arguments[0].value; // 模块的名称
          const extName = moduleName.split(path.posix.sep).pop().indexOf('.') === -1 ? '.js' : ''; // 进行后缀补全,可能的扩展名
          // 获取依赖模块的绝对路径
          const depResource = path.posix.join(path.posix.dirname(this.resource), moduleName + extName);
          // 获取模块的ID,
          const depModuleId = './' + path.posix.relative(this.context, depResource);
          node.arguments = [types.stringLiteral(depModuleId)]; // 把require模块路径从./title改成./src/title.js
          const chunk = {
            name: this.name,
            context: this.context, // 根目录
            rawRequest: moduleName, // 模块的原始路径
            moduleId: depModuleId, // 模块id,相对于根目录的相对路径,以./开头
            resource: depResource // 依赖模块的绝对路径
          };
          this.dependencies.push(chunk)
        }
      }
    })
    this._source = generate(this._ast);
    callback();
  })

}
doBuild(compilation, callback) {
    compilation.inputFileSystem.readFile(this.resource, 'utf8', (err, source) => {
      this._source = source;
    callback();
  })
}
}
3、封装模块
在compiler执行中,当make执行完成之后会执行compilation实例上的seal方法对模块进行封装。
首先执行seal、beforeChunk两个钩子函数函数。
- 遍历入口队列,拿到每一个入口,用入口生成一个chunk,将这个chunk放入chunks队列。
- 找到和当前模块name相同的模块,将模块放入当前chunk的modules队列中。
- 执行afterChunk这个钩子函数,遍历chunks队列,根据chunkName和modules的依赖关系,根据ejs模版生成资源。
class Chunk {
constructor(entryModule) {
  this.entryModule = entryModule; // 此代码块的入口模块
  this.name = entryModule.name; // 代码块的名字
  this.files = []; // 这个代码块生成了那些文件
  this.modules = []; // 这个代码块包含那些模块
}
}
seal(callback) {
this.hooks.seal.call();
this.hooks.beforeChunk.call();
for (const entryModule of this.entris) {
    const chunk = new Chunk(entryModule);
  this.chunks.push(chunk);
  chunk.modules = this.modules.find(a => a.name === chunk.name);
}
this.hooks.afterChunk.call();
this.createAssets()
callback()
}
createAssets() {
  for(let i = 0; i < this.chunks.length; i++) {
    const chunk = chunks[i];
  const file = chunk.name + '.js'; // 拿到了文件名字
  chunk.files.push(file);
  const source = mainRender({
    entryModuleId: chunk.entryModule.moduleId, // 模块的名字
    modules: chunk.modules // 代码块对应的模块数组
  })
  this.assets[file] = source;
  this.files.push(file);
}
}
4、普通模块的ejs模版
根据ejs模版生成
(function (modules) {
var installedModules = {};
function __webpack_require__(moduleId) {
  if (installedModules[moduleId]) {
    return installedModules[moduleId].exports;
  }
  var module = installedModules[moduleId] = {
    i: moduleId,
    l: false,
    exports: {}
  };
  modules[moduleId].call(module.exports, module, module.exports, __webpack_require__);
  module.l = true;
  return module.exports;
}
return __webpack_require__("<%-entryModuleId%>");
})
({
<%
for(let module of modules)
{%>
"<%-module.moduleId%>":
(function (module, exports, __webpack_require__) {
  <%-module._source%>
}),
  <%}
    %>
});
5、将模版内容写入文件
compilation的seal方法是在compiler中执行的,当执行完成之后会执行afterCompile这个钩子函数,会调用emitAssets方法把转换完成的文件写入硬盘中。执行过程到第四步中的第4个过程。
总结:
1、基本流程
Webpack的基本流程可以分成三个阶段:
- 准备阶段:主要任务是创建Compiler和Compilation对象。
- 编译阶段:这个阶段是完成modules的解析,并且生成chunks。module解析主要是创建实例、loaders应用和依赖的收集,chunks生成主要是找到每个chunks所包含的modules。
-
在产出阶段中,主要有三个步骤:模版hash的生成、模版渲染chunk、生成文件。细化到具体的代码层次,大概可以分为:
初始化参数:包含从配置文件和shell中读取和合并参数,然后得到最终的参数,shell中的参数由于配置文件的参数。
- 使用上一个得到的参数实例化一个Compiler类,注册所有的插件,给对应的webpack构建生命周期绑定对应的Hook。
开始编译:执行Compiler类的run方法执行编译,compiler.run方法调用compiler.compile,在compile内实例化一个Compilation类。
Compilation是构建打包的事情,主要内容有:
查找入口:根据entry入口配置,找到全部入口文件。
- 编译模块:根据文件类型和loader配置,使用对应的loader对文件进行转换处理。
- 解析文件的AST语法树,找出文件的依赖关系,递归编译依赖的模块。
递归完后得到每个文件的最终结果,根据entry配置生成chunk,输入所有chunk到对应的output路径中。
Webpack的工作流程中,Tapable始终贯穿其中,Tapable各种钩子组成了Webpack完整的生命周期。
总结:Webpack打包流程从配置文件的读取开始,分别经过准备阶段、modules产出阶段、chunks产出阶段、bundle产出阶段。在各自阶段,分别有不同的角色参与,整个Webpack打包流程是通过compiler控制的,而每次打包的过程是通过compilation来控制的。在普通模式下,webpack的compiler和compilation是一一对应的关系;watch模式下,Webpack的Compiler会因为文件变化而产生多次打包流程,所以Compiler和Compilation是一对多的关系。
2、流程图如下:
参考:
webpack文档
了不起的 Webpack 构建流程学习指南
webpack 工程化实践总结之webpack 核心模块、Compiler 和 Compilation、基本流程和 HMR

若有收获,就点个赞吧
0 人点赞
