从 KubeSphere v3.0.0 开始,KubeSphere 将基于 ansible 的安装程序更改为使用 Go 语言开发的名为 KubeKey 的新安装程序。使用 KubeKey,您可以轻松、高效、灵活地单独或整体安装 Kubernetes 和 KubeSphere。
前置要求
| 组件 | 是否必须 | 安装文档 |
|---|---|---|
| docker | 是 | 离线安装docker |
| Harbor | 否,但推荐安装 | 离线安装Harbor |
| socat | 是 | |
| conntrack | 是 |
1.安装socat & conntrack
在可以联网的机器下载 socat 和 conntrack
yum -y install socat --downloadonly --downloaddir /home/socatyum -y install conntrack --downloadonly --downloaddir /home/conntrack
将下载好的安装文件上传到需要安装的服务器中,然后执行如下命令安装。
rpm -Uvh *.rpm --nodeps --force
2.网络和 DNS 要求
如果服务器已经配置了DNS可以忽略此步骤
- 确保
/etc/resolv.conf中的 DNS 地址可用。否则,可能会导致群集中出现某些 DNS 问题。
将集群中所有服务器的 DNS 和 GATEWAY 设置成相同的IP地址。
例如,所有服务器的 DNS 和 GATEWAY 都设置成 master 节点的服务器地址 192.168.28.160 。
| IP地址 | 节点 | GATEWAY | DNS1 |
|---|---|---|---|
| 192.168.28.160 | master | 192.168.28.160 | 192.168.28.160 |
| 192.168.28.161 | node1 | 192.168.28.160 | 192.168.28.160 |
| 192.168.28.162 | node2 | 192.168.28.160 | 192.168.28.160 |
vi /etc/sysconfig/network-scripts/ifcfg-ens33
添加如下内容:
GATEWAY=192.168.28.160
DNS1=192.168.28.160
- 如果您的网络配置使用防火墙或安全组,则必须确保基础结构组件可以通过特定端口相互通信。建议您关闭防火墙或遵循链接配置:网络访问。
1. 下载KubeSphere离线安装包
curl -Ok https://kubesphere-installer.pek3b.qingstor.com/offline/v3.0.0/kubesphere-all-v3.0.0-offline-linux-amd64.tar.gz2. 解压安装包
tar -zxvf kubesphere-all-v3.0.0-offline-linux-amd64.tar.gz3. 创建集群配置文件
安装包解压后进入kubesphere-all-v3.0.0-offline-linux-amd64
生成集群配置文件cd kubesphere-all-v3.0.0-offline-linux-amd64./kk create config --with-kubernetes v1.18.6 --with-kubesphere v3.0.04. 修改集群配置文件
修改上一步骤中生成的配置文件config-sample.yaml,也可使用-f参数自定义配置文件路径。kk详细用法可参考:https://github.com/kubesphere/kubekey
注意填写正确的私有仓库地址privateRegistry(如已准备好私有仓库可设置为已有仓库地址,若计划使用kubekey创建私有仓库,则该参数设置为:dockerhub.kubekey.local)
vi config-sample.yaml
如下是需要添加的配置:
如果有Harbor私有仓库建议使用Harbor。
registry:
    #privateRegistry: dockerhub.kubekey.local
    privateRegistry: 192.168.28.150:8001/kubespshere-install # Harbor仓库地址
addons:
  - name: nfs-client
    namespace: kube-system
    sources:
      chart:
        name: nfs-client-provisioner
        path: /home/kubesphere-all-v3.0.0-offline-linux-amd64/charts
        values: /home/kubesphere-all-v3.0.0-offline-linux-amd64/charts/nfs-client-provisioner/values.yaml
完整的配置如下:
apiVersion: kubekey.kubesphere.io/v1alpha1
kind: Cluster
metadata:
  name: sample
spec:
  hosts:
  - {name: master, address: 192.168.28.140, internalAddress: 192.168.28.140, user: root, password: root}
  - {name: node1, address: 192.168.28.141, internalAddress: 192.168.28.141, user: root, password: root}
  - {name: node2, address: 192.168.28.142, internalAddress: 192.168.28.142, user: root, password: root}
  roleGroups:
    etcd:
    - master
    master:
    - master
    worker:
    - node1
    - node2
  controlPlaneEndpoint:
    domain: lb.kubesphere.local
    address: ""
    port: "6443"
  kubernetes:
    version: v1.18.6
    imageRepo: kubesphere
    clusterName: cluster.local
  network:
    plugin: calico
    kubePodsCIDR: 10.233.64.0/18
    kubeServiceCIDR: 10.233.0.0/18
  registry:
    registryMirrors: []
    insecureRegistries: []
    #privateRegistry: dockerhub.kubekey.local
    privateRegistry: 192.168.28.150:8001/kubespshere-install # Harbor仓库地址
  addons:
  - name: nfs-client
    namespace: kube-system
    sources:
      chart:
        name: nfs-client-provisioner
        path: /home/kubesphere-all-v3.0.0-offline-linux-amd64/charts
        values: /home/kubesphere-all-v3.0.0-offline-linux-amd64/charts/nfs-client-provisioner/values.yaml


---
apiVersion: installer.kubesphere.io/v1alpha1
kind: ClusterConfiguration
metadata:
  name: ks-installer
  namespace: kubesphere-system
  labels:
    version: v3.0.0
spec:
  local_registry: ""
  persistence:
    storageClass: ""
  authentication:
    jwtSecret: ""
  etcd:
    monitoring: true
    endpointIps: localhost
    port: 2379
    tlsEnable: true
  common:
    es:
      elasticsearchDataVolumeSize: 20Gi
      elasticsearchMasterVolumeSize: 4Gi
      elkPrefix: logstash
      logMaxAge: 7
    mysqlVolumeSize: 20Gi
    minioVolumeSize: 20Gi
    etcdVolumeSize: 20Gi
    openldapVolumeSize: 2Gi
    redisVolumSize: 2Gi
  console:
    enableMultiLogin: false  # enable/disable multi login
    port: 30880
  alerting:
    enabled: false
  auditing:
    enabled: false
  devops:
    enabled: false
    jenkinsMemoryLim: 2Gi
    jenkinsMemoryReq: 1500Mi
    jenkinsVolumeSize: 8Gi
    jenkinsJavaOpts_Xms: 512m
    jenkinsJavaOpts_Xmx: 512m
    jenkinsJavaOpts_MaxRAM: 2g
  events:
    enabled: false
    ruler:
      enabled: true
      replicas: 2
  logging:
    enabled: false
    logsidecarReplicas: 2
  metrics_server:
    enabled: true
  monitoring:
    prometheusMemoryRequest: 400Mi
    prometheusVolumeSize: 20Gi
  multicluster:
    clusterRole: none  # host | member | none
  networkpolicy:
    enabled: false
  notification:
    enabled: false
  openpitrix:
    enabled: false
  servicemesh:
    enabled: false
5. NFS客户端存储配置
5.1.安装NFS服务端
1.安装包
  在可以联网的机器上下载NFS安装包,以后在服务端和客户端安装使用。
yum -y install nfs-utils --downloadonly --downloaddir /home/nfs
  下载好后打包上传到要安装的服务器中,执行下面命令开始安装
rpm -Uvh *.rpm --nodeps --force

2.编辑配置文件
⚠️配置文件中的*是允许所有网段,根据自己实际情况写明网段
cat >/etc/exports <<EOF
/mnt/kubesphere *(insecure,rw,async,no_root_squash)
EOF

3.创建目录并修改权限
⚠️这里为了方便实验授予了挂载目录权限为777,请根据实际情况修改目录权限和所有者
mkdir /mnt/kubesphere && chmod 777 /mnt/kubesphere

4.启动服务
systemctl enable nfs-server rpcbind && systemctl start nfs-server rpcbind
5.2.安装NFS客户端
在所有node节点中安装NFS客户端
rpm -Uvh *.rpm --nodeps --force
在生产环境中不建议使用自带的OpenEBS作为存储,这里使用NFS,在此之前需要准备好NFS服务端
修改如下路径配置文件:
vi /home/kubesphere-all-v3.0.0-offline-linux-amd64/charts/nfs-client-provisioner/values.yaml
如下是需要添加的配置:
image:
  repository: 192.168.28.150:8001/kubesphere-install/kubesphere/nfs-client-provisioner
  tag: v3.1.0-k8s1.11
  pullPolicy: IfNotPresent

nfs:
  server: 192.168.28.140 # nfs服务端ip地址
  path: /mnt/kubernetes # nfs服务端共享存储目录
storageClass:
    defaultClass: true # 设置为默认的存储卷
完整的配置如下:
# Default values for nfs-client-provisioner.
# This is a YAML-formatted file.
# Declare variables to be passed into your templates.

replicaCount: 1
strategyType: Recreate

image:
  repository: 192.168.28.150:8001/kubesphere-install/kubesphere/nfs-client-provisioner
  tag: v3.1.0-k8s1.11
  pullPolicy: IfNotPresent

nfs:
  server: 192.168.28.140
  path: /mnt/kubernetes
  mountOptions:

# For creating the StorageClass automatically:
storageClass:
  create: true

  # Set a provisioner name. If unset, a name will be generated.
  # provisionerName:

  # Set StorageClass as the default StorageClass
  # Ignored if storageClass.create is false
  defaultClass: true

  # Set a StorageClass name
  # Ignored if storageClass.create is false
  name: nfs-client

  # Allow volume to be expanded dynamically
  allowVolumeExpansion: true

  # Method used to reclaim an obsoleted volume
  reclaimPolicy: Delete

  # When set to false your PVs will not be archived by the provisioner upon deletion of the PVC.
  archiveOnDelete: true

## For RBAC support:
rbac:
  # Specifies whether RBAC resources should be created
  create: true

# If true, create & use Pod Security Policy resources
# https://kubernetes.io/docs/concepts/policy/pod-security-policy/
podSecurityPolicy:
  enabled: false

## Set pod priorityClassName
# priorityClassName: ""

serviceAccount:
  # Specifies whether a ServiceAccount should be created
  create: true

  # The name of the ServiceAccount to use.
  # If not set and create is true, a name is generated using the fullname template
  name:

resources: {}
  # limits:
  #  cpu: 100m
  #  memory: 128Mi
  # requests:
  #  cpu: 100m
  #  memory: 128Mi

nodeSelector: {}

tolerations: []

affinity: {}
6. 环境初始化
若已安装相关依赖,并且已经准备好镜像仓库,可略过该步骤,直接从第7步开始。 (为避免依赖问题的产生,建议提前安装相关依赖或使用已安装相关依赖的系统镜像执行安装)
注意:如需使用
kk创建自签名镜像仓库,则会在当前机器启动docker registry服务,请确保当前机器存在registry:2,如没有,可从kubesphere-images-v3.0.0/registry.tar中导入,导入命令:docker load < registry.tar注意:由kk启动的镜像仓库端口为443,请确保所有机器均可访问当前机器443端口。镜像数据存储到本地/mnt/registry(建议单独挂盘)。dependencies目录中仅提供了ubuntu16.04 (ubuntu-16.04-amd64-debs.tar.gz)、ubuntu18.04 (ubuntu-18.04-amd64-debs.tar.gz)以及centos7 (centos-7-amd64-rpms.tar.gz)的相关依赖包,其它操作系统可自行制作rpm或deb依赖包。打包规则为 ${releaseID}-${versionID}-${osArch}-${debs or rpms}.tar.gz
6.1 导入register.tar
cd /home/kubesphere-all-v3.0.0-offline-linux-amd64/kubesphere-images-v3.0.0/
docker load < registry.tar
6.2 使用kk创建自签名镜像仓库
可执行如下命令:
./kk init os -f config-sample.yaml -s ./dependencies/ --add-images-repo
7. 导入KubeSphere所需镜像
进入/home/kubesphere-all-v3.0.0-offline-linux-amd64/kubesphere-images-v3.0.0
cd /home/kubesphere-all-v3.0.0-offline-linux-amd64/kubesphere-images-v3.0.0
7.1.使用push-images.sh将镜像导入之前准备的仓库中(不推荐)
#脚本后镜像仓库地址请填写真实仓库地址
./push-images.sh dockerhub.kubekey.local
7.2.导入镜像到Harbor(推荐)
7.2.1修改docker的daemon.json文件
vi /etc/docker/daemon.json
如果不配置后续在安装KubeSphere组件时候回发送htts请求,这里我们是使用的http,因为在内网离线环境中不需要使用https
{
  "insecure-registries":
        ["192.168.28.150:8001"]
}
7.2.2.重启docker
systemctl daemon-reload
systemctl restart docker
7.2.2.登录harbor
docker login 192.168.28.150:8001 -u 用户名 -p 密码
7.2.3.使用push-images.sh将镜像导入到Harbor仓库中
./push-images.sh 192.168.28.150:8001/kubesphere-install
Harbor管理页面如下,创建了一个**kubesphere-install**项目用于存放KubeSphere安装包,共128个。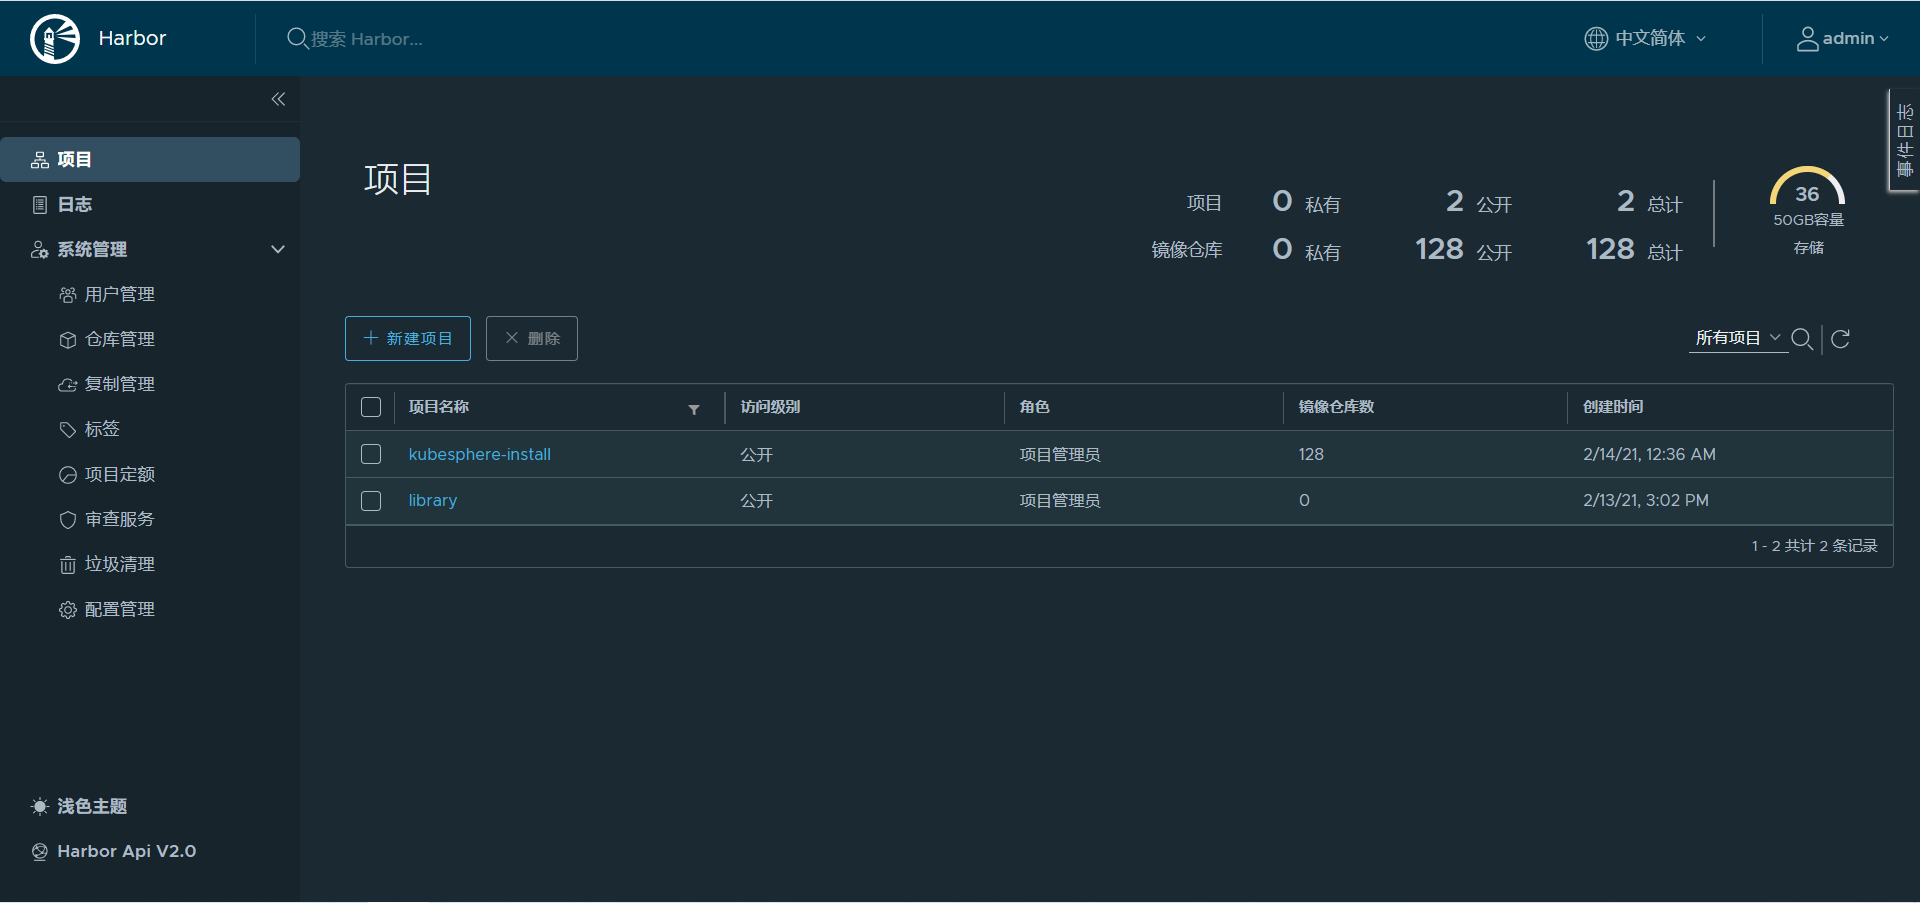
如需自行到入镜像,可参考如下方法:
以kubesphere/kube-apiserver:v1.17.9为例
docker tag kubesphere/kube-apiserver:v1.17.9 dockerhub.kubesphere.local/kubesphere/kube-apiserver:v1.17.9
#导入镜像到Harbor
docker tag kubesphere/kube-apiserver:v1.17.9 192.168.28.150:8001/kubesphere-install/kubesphere/kube-apiserver:v1.17.9
注意: retag镜像时需要保留原始镜像的namespace
8. 部署安装KubeSphere
以上准备工作完成且再次检查配置文件无误后,执行安装。
如下命令执行安装:
./kk create cluster -f config-sample.yaml
出现如下日志,除最后两个组件没其他必须是 y 才可以继续安装。
+--------+------+------+---------+----------+-------+-------+-----------+--------+------------+-------------+------------------+--------------+
| name   | sudo | curl | openssl | ebtables | socat | ipset | conntrack | docker | nfs client | ceph client | glusterfs client | time         |
+--------+------+------+---------+----------+-------+-------+-----------+--------+------------+-------------+------------------+--------------+
| node2  | y    | y    | y       | y        | y     | y     | y         | y      | y          |             |                  | CST 17:33:29 |
| master | y    | y    | y       | y        | y     | y     | y         | y      | y          |             |                  | CST 17:33:39 |
| node1  | y    | y    | y       | y        | y     | y     | y         | y      | y          |             |                  | CST 17:33:49 |
+--------+------+------+---------+----------+-------+-------+-----------+--------+------------+-------------+------------------+--------------+

This is a simple check of your environment.
Before installation, you should ensure that your machines meet all requirements specified at
https://github.com/kubesphere/kubekey#requirements-and-recommendations
查看KubeSphere安装日志:
kubectl logs -n kubesphere-system $(kubectl get pod -n kubesphere-system -l app=ks-install -o jsonpath='{.items[0].metadata.name}') -f
8.1安装过程中出现的问题
如下图问题是因为在安装过程中kk工具会自动在/etc/hosts文件中配置私有docker地址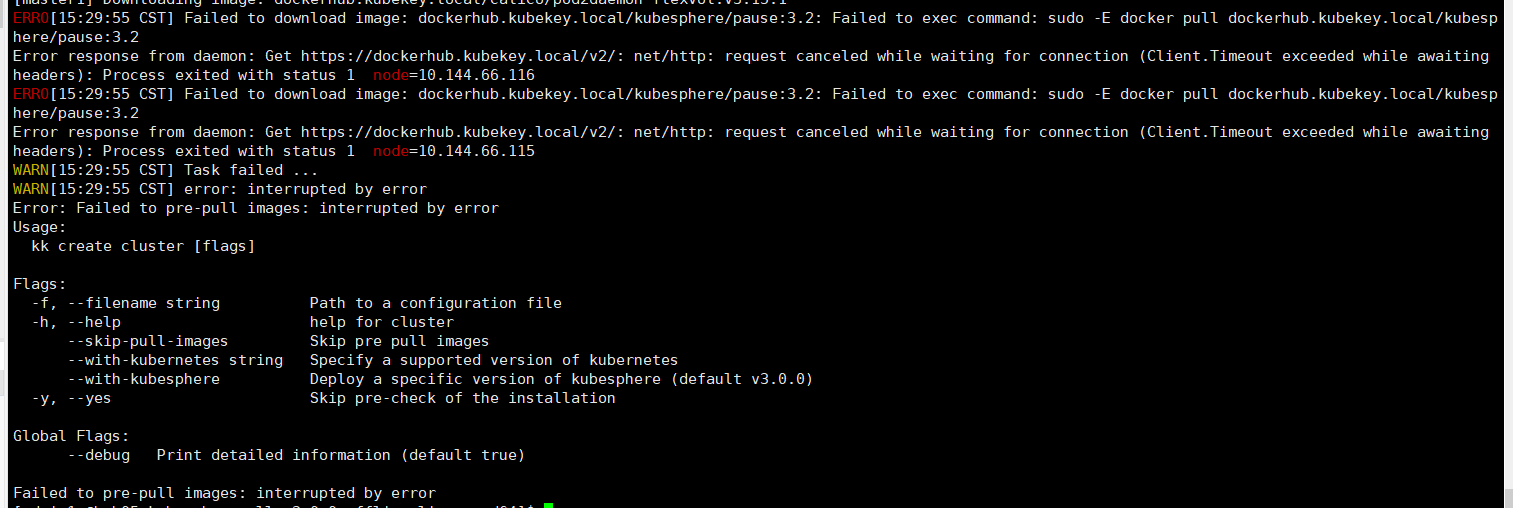
vi /etc/hosts
192.168.28.140 dockerhub.kubekey.local
9.登录KubeSphere
安装成功后日志会显示如下内容
#####################################################
###              Welcome to KubeSphere!           ###
#####################################################

Console: http://192.168.28.140:30880
Account: admin
Password: P@88w0rd

NOTES:
  1. After logging into the console, please check the
     monitoring status of service components in
     the "Cluster Management". If any service is not
     ready, please wait patiently until all components
     are ready.
  2. Please modify the default password after login.

#####################################################
https://kubesphere.io             2021-01-03 15:44:32
#####################################################
10.安装PorterLB负载均衡器
用于Kubernetes 在裸机、边缘和虚拟化中的负载均衡器实现
官网:https://porterlb.io/
参考:离线在Kubernetes上安装 PorterLB负载均衡器
11.卸载KubeSphere和Kubernetes
./kk delete cluster -f config-sample.yaml

若有收获,就点个赞吧
0 人点赞
