参考KubeSphere官方提供的文档->基于SpringBoot构建流水线
前置条件
- 准备KubeSphere和kubernete环境
- 创建企业空间、项目、帐户和角色(包含创建DevOps工程)
- 准备Harbor
- 准备GitLab
-
1.在kubernete集群中添加私有镜像(已经设置过可忽略)
如果没有配置https证书需要设置私有镜像仓库地址,否则在推送镜像时会报https相关错误,docker默认是使用https访问私有仓库。
编辑Kubernete集群中每个节点的daemon.json文件,输入如下命令:vi /etc/docker/daemon.json
添加如下内容,192.168.28.150:8001为你自己安装的
Harbor地址"insecure-registries": [ "192.168.28.150:8001" ]完整的daemon.json内容
{
"log-opts": {
 "max-size": "5m",
 "max-file":"3"
},
"exec-opts": ["native.cgroupdriver=systemd"],
"insecure-registries": [
 "192.168.28.150:8001"
]
}
重启docker
systemctl daemon-reload
systemctl restart docker
2.创建凭证
用
project-regular用户登录KubeSphere进入demo-devops项目中点击凭证创建如下三个凭证。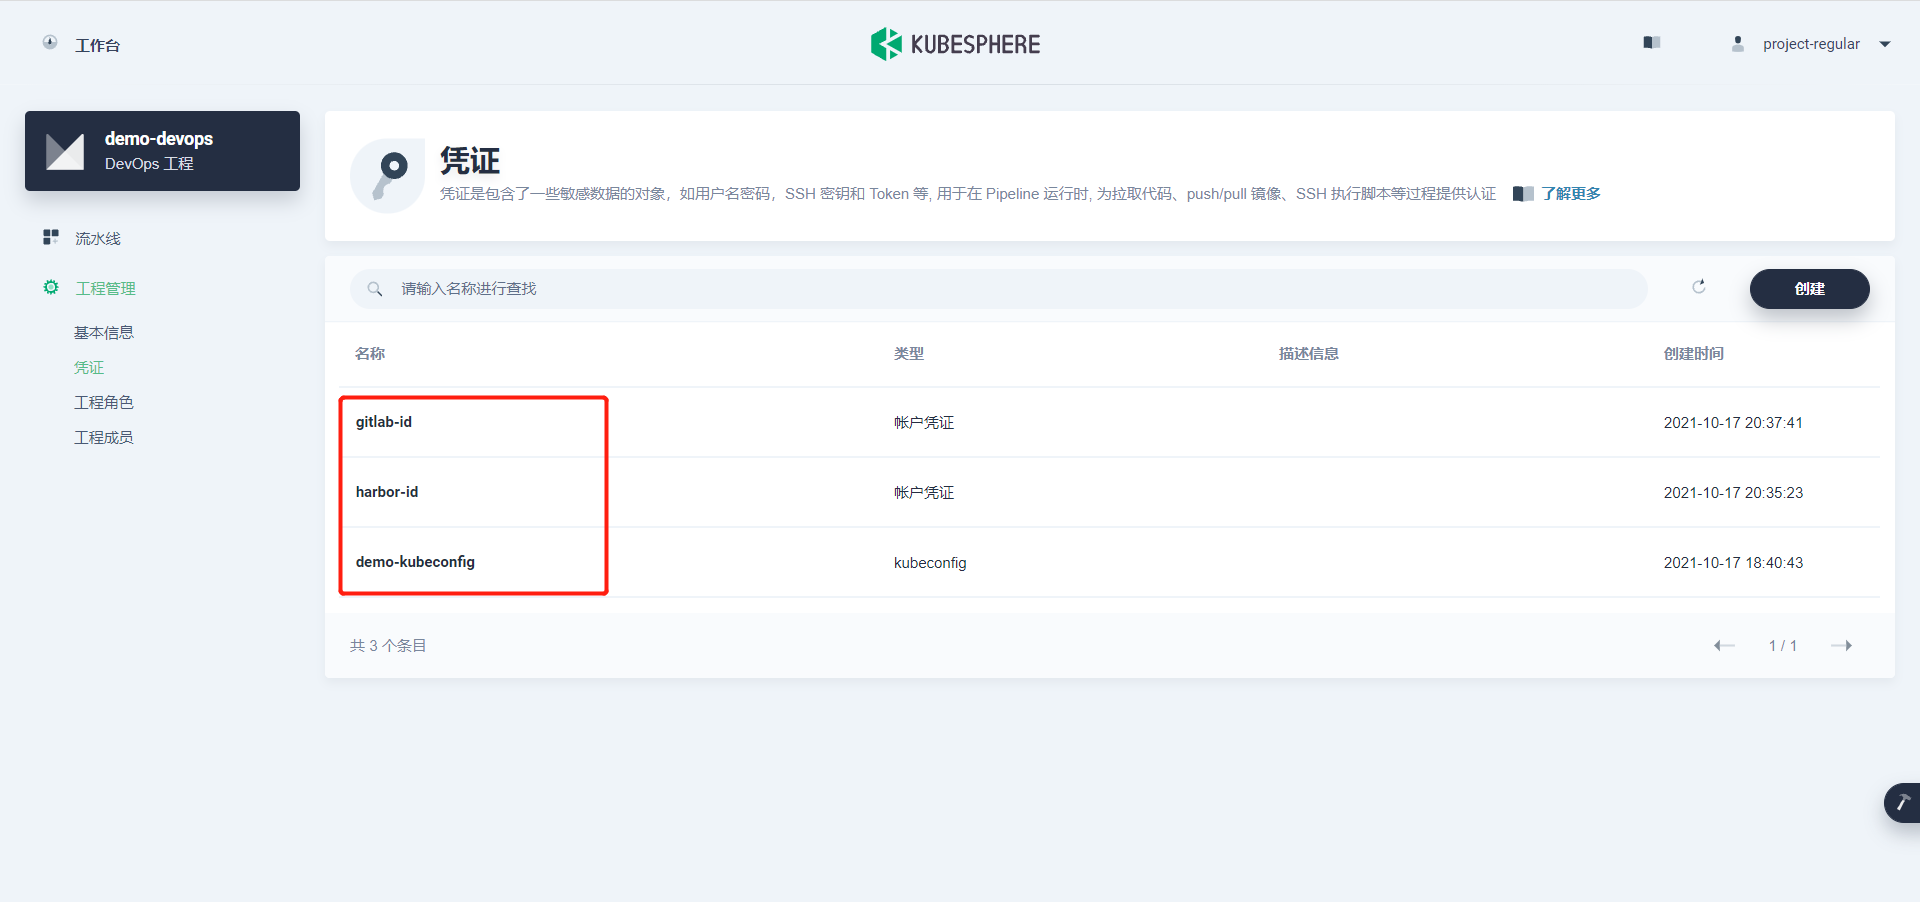
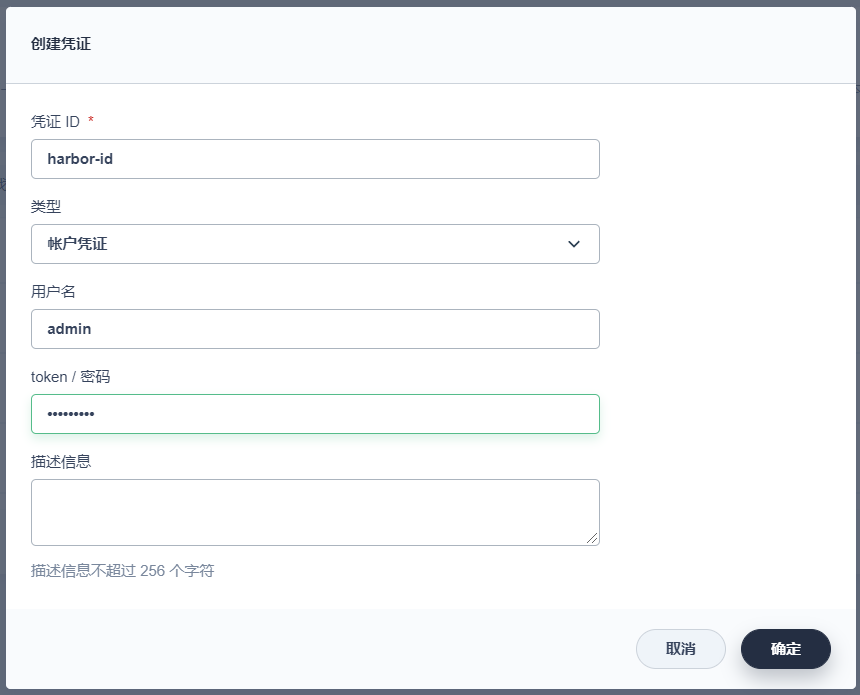
1.创建Harbor凭证
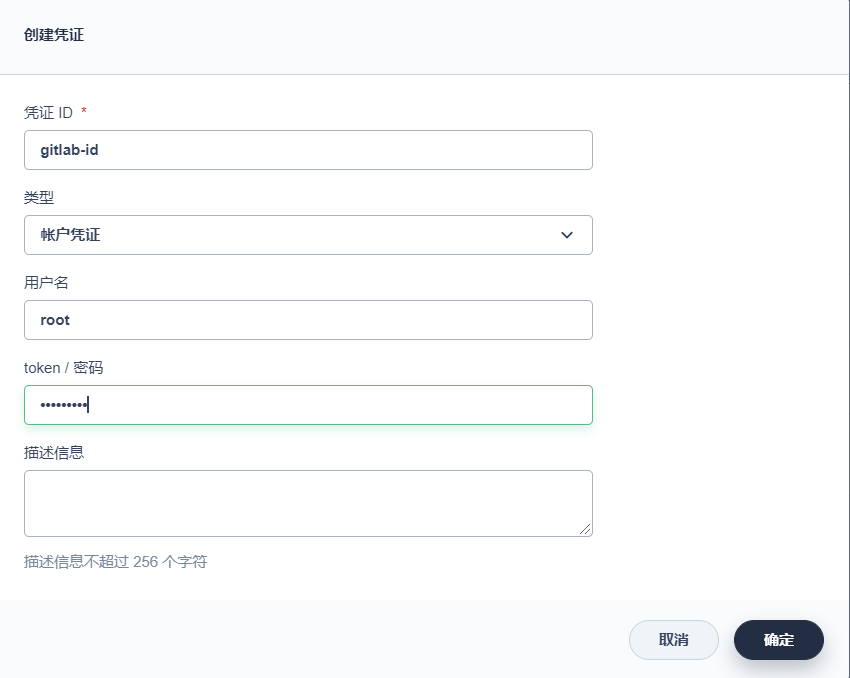
2.创建GitLab凭证
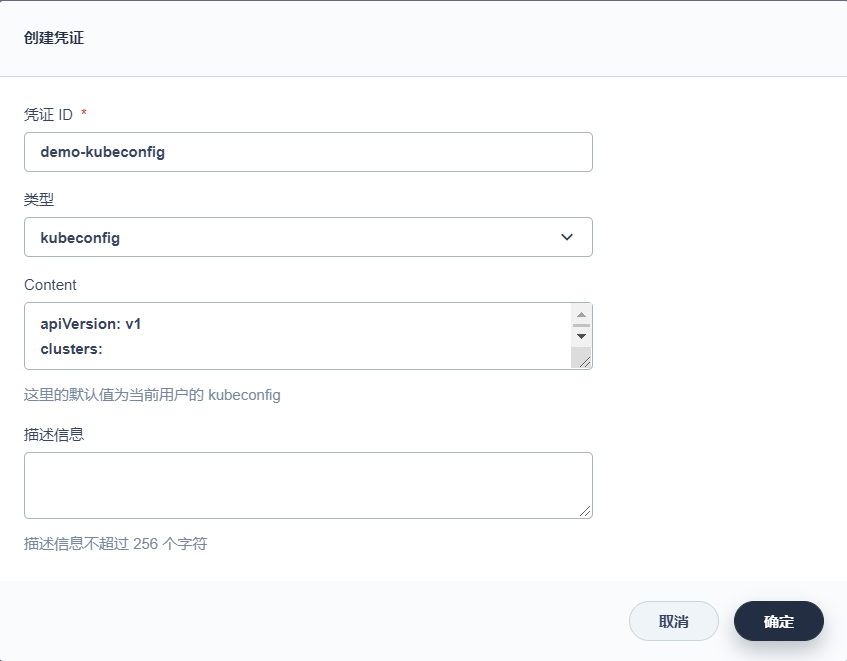
3.创建kubeconfig凭证
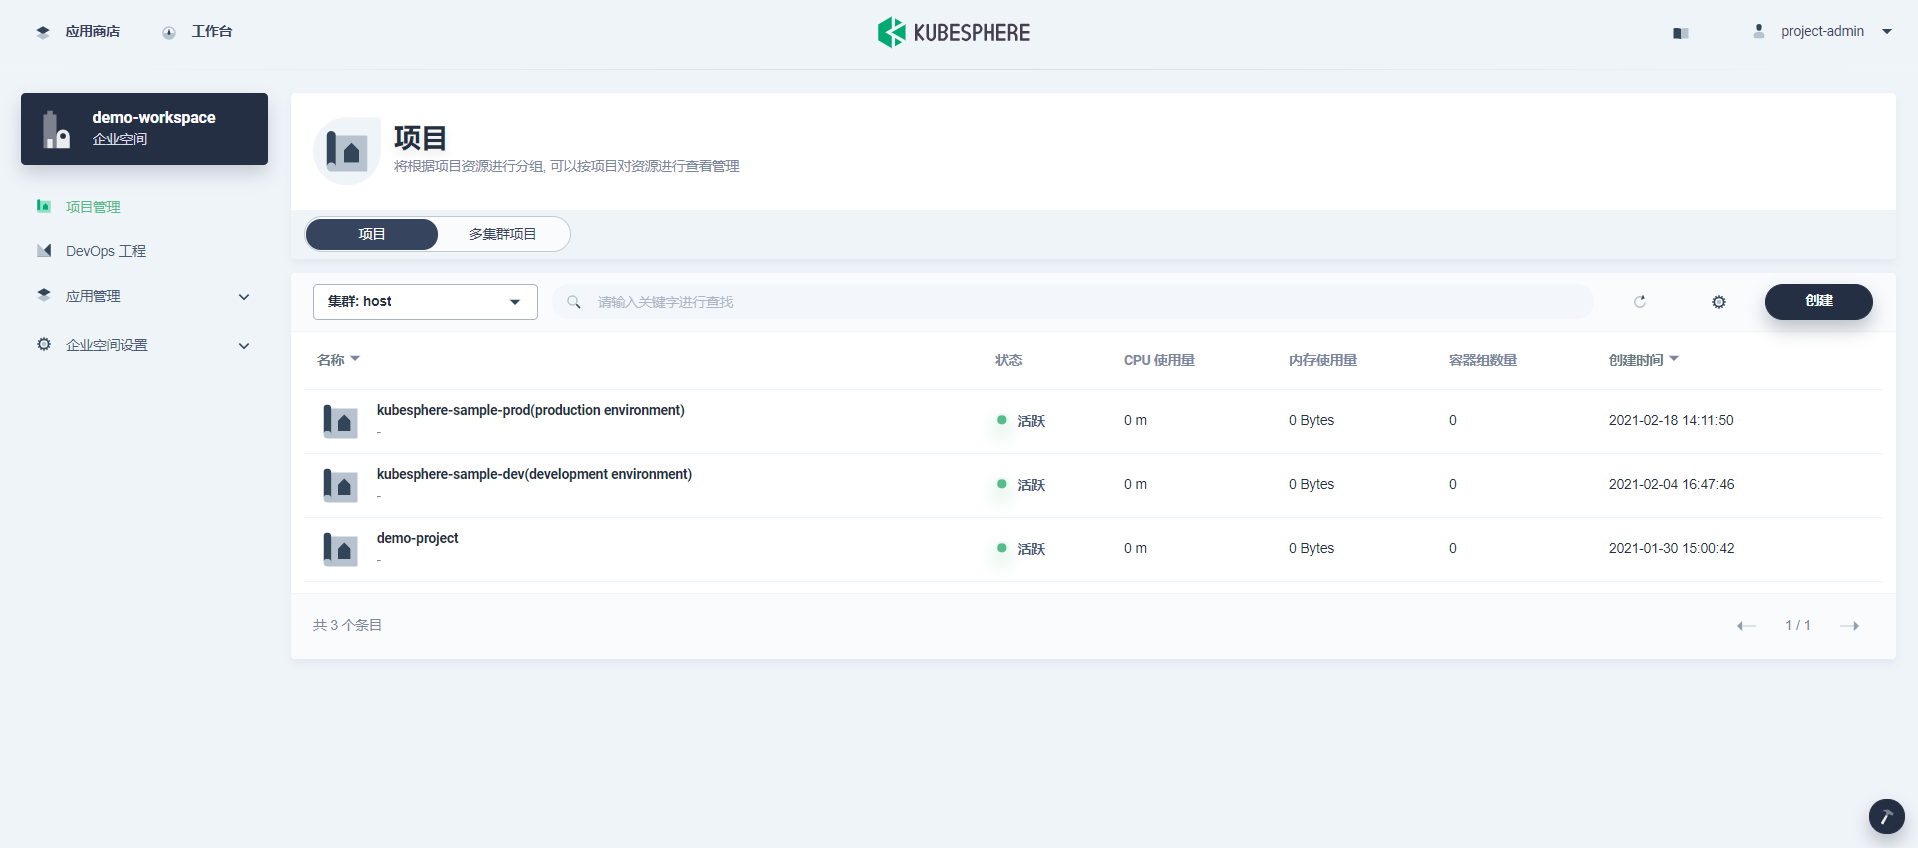
3.创建项目
您需要创建两个项目,例如
kubesphere-sample-dev和kubesphere-sample-prod,分别代表开发环境和生产环境。待流水线成功运行,将在这两个项目中自动创建应用程序的相关部署 (Deployment) 和服务 (Service)。 以
project-admin身份登录 KubeSphere。在您创建 DevOps 工程的企业空间中创建以下两个项目。请确保邀请project-regular帐户至这两个项目中并赋予operator角色。 | 项目名称 | 别名 | | —- | —- | | kubesphere-sample-dev | development environment | | kubesphere-sample-prod | production environment |项目创建后,会显示在项目列表中,如下所示:
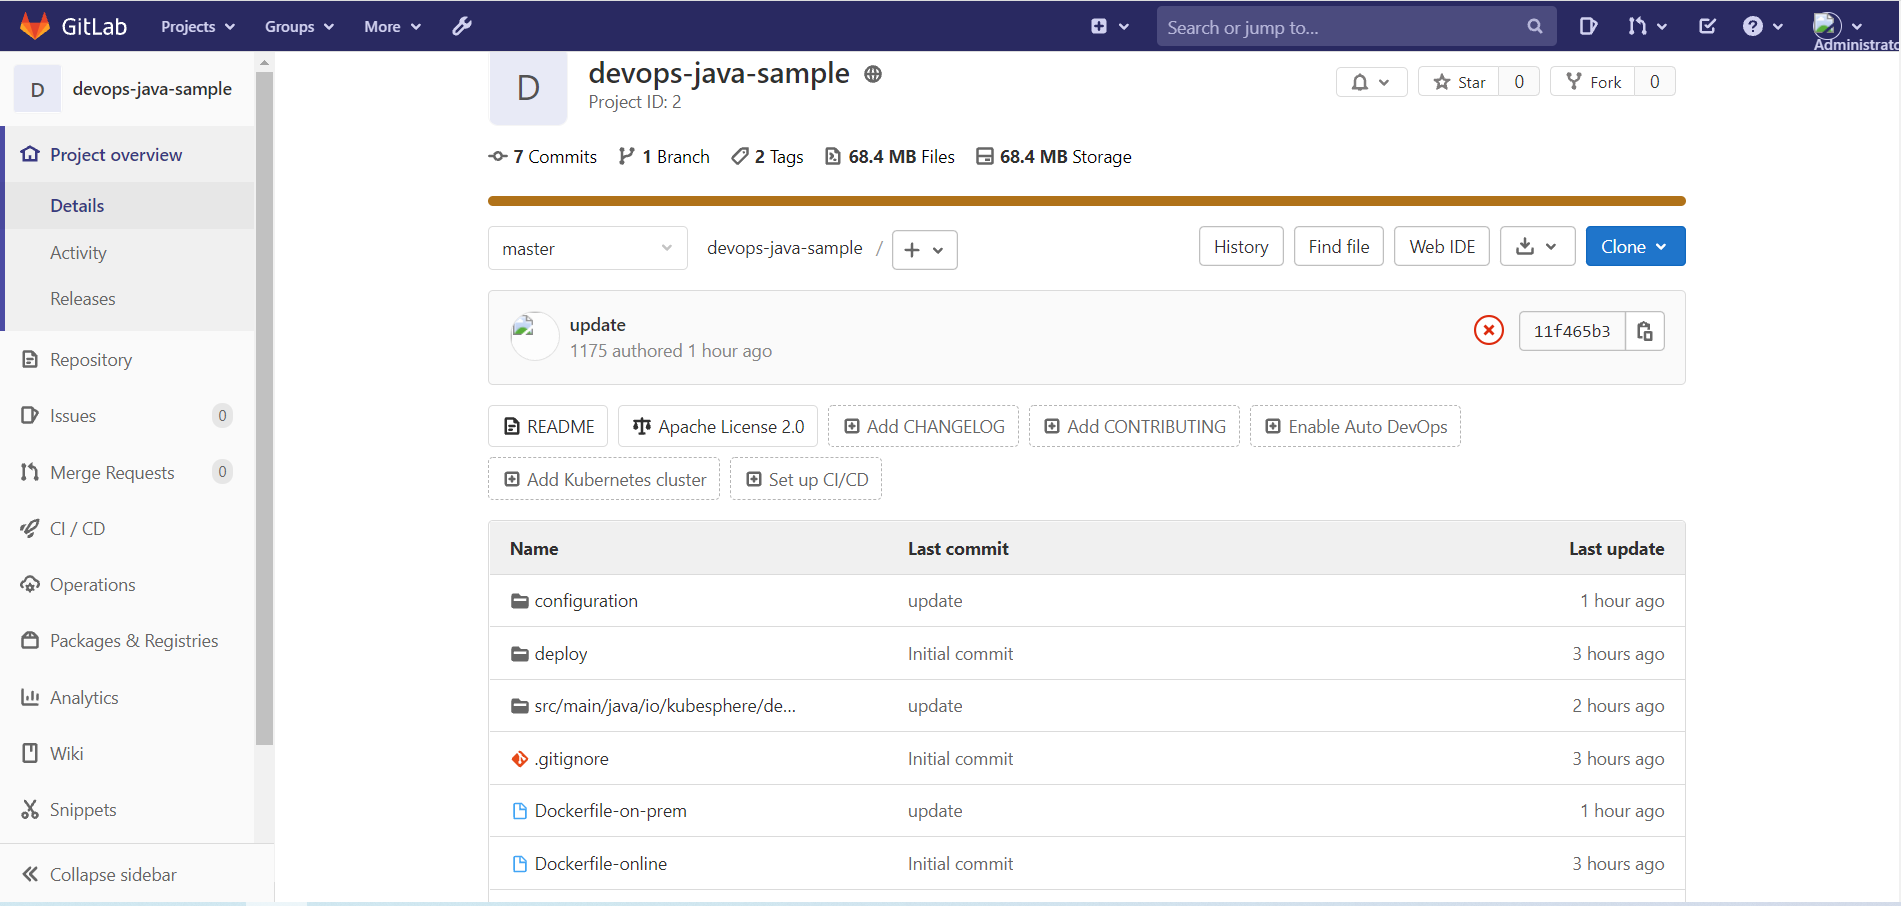
4.下载kubeSphere官方提供的demo项目
https://github.com/kubesphere/devops-java-sample
5.修改devops-java-sample项目配置
1.修改JenkinsFile-on-prem文件
- 设置
environment中的环境变量,添加创建凭证,harbor-id、gitlab-id、demo-kubeconfig - 84行修改自己的
gitlab地址 mvn命令去掉-opipeline { agent { node { label 'maven' } } parameters { string(name:'TAG_NAME',defaultValue: '',description:'') } environment { HARBOR_CREDENTIAL_ID = 'harbor-id' GITLAB_CREDENTIAL_ID = 'gitlab-id' KUBECONFIG_CREDENTIAL_ID = 'demo-kubeconfig' REGISTRY = '192.168.28.150:8001' HARBOR_NAMESPACE = 'library' GITLAB_ACCOUNT = 'root' APP_NAME = 'devops-java-sample' } stages { stage ('checkout scm') { steps { checkout(scm) } } stage ('unit test') { steps { container ('maven') { sh 'mvn clean -gs `pwd`/configuration/settings.xml test' } } } stage ('build & push') { steps { container ('maven') { sh 'mvn -Dmaven.test.skip=true -gs `pwd`/configuration/settings.xml clean package' sh 'docker build -f Dockerfile-on-prem -t $REGISTRY/$HARBOR_NAMESPACE/$APP_NAME:SNAPSHOT-$BRANCH_NAME-$BUILD_NUMBER .' withCredentials([usernamePassword(passwordVariable : 'DOCKER_PASSWORD' ,usernameVariable : 'DOCKER_USERNAME' ,credentialsId : "$HARBOR_CREDENTIAL_ID" ,)]) { sh 'echo "$DOCKER_PASSWORD" | docker login $REGISTRY -u "$DOCKER_USERNAME" --password-stdin' sh 'docker push $REGISTRY/$HARBOR_NAMESPACE/$APP_NAME:SNAPSHOT-$BRANCH_NAME-$BUILD_NUMBER' } } } } stage('push latest'){ when{ branch 'master' } steps{ container ('maven') { sh 'docker tag $REGISTRY/$HARBOR_NAMESPACE/$APP_NAME:SNAPSHOT-$BRANCH_NAME-$BUILD_NUMBER $REGISTRY/$HARBOR_NAMESPACE/$APP_NAME:latest ' sh 'docker push $REGISTRY/$HARBOR_NAMESPACE/$APP_NAME:latest ' } } } stage('deploy to dev') { when{ branch 'master' } steps { input(id: 'deploy-to-dev', message: 'deploy to dev?') kubernetesDeploy(configs: 'deploy/dev/**', enableConfigSubstitution: true, kubeconfigId: "$KUBECONFIG_CREDENTIAL_ID") } } stage('push with tag'){ when{ expression{ return params.TAG_NAME =~ /v.*/ } } steps { container ('maven') { input(id: 'release-image-with-tag', message: 'release image with tag?') withCredentials([usernamePassword(credentialsId: "$GITLAB_CREDENTIAL_ID", passwordVariable: 'GIT_PASSWORD', usernameVariable: 'GIT_USERNAME')]) { sh 'git config --global user.email "kubesphere@yunify.com" ' sh 'git config --global user.name "kubesphere" ' sh 'git tag -a $TAG_NAME -m "$TAG_NAME" ' sh 'git push http://$GIT_USERNAME:$GIT_PASSWORD@192.168.28.150:8002/$GITLAB_ACCOUNT/devops-java-sample.git --tags --ipv4' } sh 'docker tag $REGISTRY/$HARBOR_NAMESPACE/$APP_NAME:SNAPSHOT-$BRANCH_NAME-$BUILD_NUMBER $REGISTRY/$HARBOR_NAMESPACE/$APP_NAME:$TAG_NAME ' sh 'docker push $REGISTRY/$HARBOR_NAMESPACE/$APP_NAME:$TAG_NAME ' } } } stage('deploy to production') { when{ expression{ return params.TAG_NAME =~ /v.*/ } } steps { input(id: 'deploy-to-production', message: 'deploy to production?') kubernetesDeploy(configs: 'deploy/prod/**', enableConfigSubstitution: true, kubeconfigId: "$KUBECONFIG_CREDENTIAL_ID") } } } }2.修改Dockerfile-on-prem文件
将FROM后面的地址修改为Harbor的地址,修改后的完整Dockerfile-on-prem文件内容如下: ``` FROM 192.168.28.150:8001/kubesphere-install/library/java:openjdk-8-jre-alpine
WORKDIR /home
COPY target/*.jar /home
ENTRYPOINT java -jar *.jar
<a name="t9UdX"></a>
## 3.修改settings.xml文件
路径:`configuration/settings.xml`

1. 添加`server`标签配置`nexus`
1. 修改`mirror`标签指定`nexus maven`仓库地址
```xml
<settings>
  <localRepository>${PWD}/artifacts/m2</localRepository>
  <pluginGroups>
  </pluginGroups>
  <proxies>
  </proxies>
  <servers>
    <server>
      <id>nexus</id>
      <username>admin</username>
      <password>Nexus12345</password>
    </server>
  </servers>
  <mirrors>
    <mirror>
      <id>nexus</id>
      <name>nexus repository</name>
      <url>http://192.168.28.150:8003/repository/group-maven/</url>
      <mirrorOf>central</mirrorOf>
    </mirror>
  </mirrors>
  <profiles>
    <profile>
      <id>jdk-1.8</id>
      <activation>
        <activeByDefault>true</activeByDefault>
        <jdk>1.8</jdk>
      </activation>
      <properties>
        <maven.compiler.source>1.8</maven.compiler.source>
        <maven.compiler.target>1.8</maven.compiler.target>
        <maven.compiler.compilerVersion>1.8</maven.compiler.compilerVersion>
      </properties>
    </profile>
  </profiles>
</settings>
4.修改pom.xml文件
- 去掉
junit依赖 删除
repositories、pluginRepositories标签<?xml version="1.0" encoding="UTF-8"?> <project xmlns="http://maven.apache.org/POM/4.0.0" xmlns:xsi="http://www.w3.org/2001/XMLSchema-instance" xsi:schemaLocation="http://maven.apache.org/POM/4.0.0 http://maven.apache.org/xsd/maven-4.0.0.xsd"> <modelVersion>4.0.0</modelVersion> <groupId>io.kubesphere.devops</groupId> <artifactId>devops-sample</artifactId> <version>0.0.1-SNAPSHOT</version> <name>devops-sample :: HelloWorld Demo</name> <properties> <project.build.sourceEncoding>UTF-8</project.build.sourceEncoding> <project.reporting.outputEncoding>UTF-8</project.reporting.outputEncoding> </properties> <!-- Spring Boot 启动父依赖 --> <parent> <groupId>org.springframework.boot</groupId> <artifactId>spring-boot-starter-parent</artifactId> <version>2.1.11.RELEASE</version> </parent> <dependencies> <dependency> <groupId>org.springframework.boot</groupId> <artifactId>spring-boot-starter-web</artifactId> </dependency> </dependencies> <build> <plugins> <plugin> <groupId>org.jacoco</groupId> <artifactId>jacoco-maven-plugin</artifactId> <version>0.8.2</version> <configuration> <append>true</append> </configuration> <executions> <execution> <id>agent-for-ut</id> <goals> <goal>prepare-agent</goal> </goals> </execution> <execution> <id>agent-for-it</id> <goals> <goal>prepare-agent-integration</goal> </goals> </execution> <execution> <id>jacoco-site</id> <phase>verify</phase> <goals> <goal>report</goal> </goals> </execution> </executions> </plugin> <plugin> <groupId>org.springframework.boot</groupId> <artifactId>spring-boot-maven-plugin</artifactId> <configuration> <fork>true</fork> </configuration> </plugin> <plugin> <groupId>org.sonarsource.scanner.maven</groupId> <artifactId>sonar-maven-plugin</artifactId> <version>3.6.0.1398</version> </plugin> </plugins> </build> </project>5.devops-sample.yaml配置文件解释
部署配置文件 ```yaml apiVersion: apps/v1 kind: Deployment metadata: labels: app: kubesphere component: ks-sample tier: backend name: ks-sample namespace: kubesphere-sample-prod #命名空间名称和上面刚创建的项目名称保持一致 spec: progressDeadlineSeconds: 600 replicas: 2 # 部署副本数量 selector: matchLabels: app: kubesphere component: ks-sample tier: backend strategy: rollingUpdate: maxSurge: 100% maxUnavailable: 100% type: RollingUpdate template: metadata: labels:
 app: kubesphere
 component: ks-sample
 tier: backend
spec: containers:
 - env:
     - name: CACHE_IGNORE
       value: js|html
     - name: CACHE_PUBLIC_EXPIRATION
       value: 3d
   image: $REGISTRY/$HARBOR_NAMESPACE/$APP_NAME:$TAG_NAME
   readinessProbe:
     httpGet:
       path: / #项目部署成功后默认发送请求地址
       port: 8080 #项目端口和application.yml配置文件中指定的server.prot端口一致
     timeoutSeconds: 10
     failureThreshold: 30
     periodSeconds: 5
   imagePullPolicy: Always
   name: ks
   ports:
     - containerPort: 8080
       protocol: TCP
   resources:
     limits:
       cpu: 300m
       memory: 600Mi
     requests:
       cpu: 100m
       memory: 100Mi
   terminationMessagePath: /dev/termination-log
   terminationMessagePolicy: File
dnsPolicy: ClusterFirst restartPolicy: Always terminationGracePeriodSeconds: 30
<a name="gaBKH"></a>
## 6.devops-sample-svc.yaml配置文件解释
服务配置文件
```yaml
apiVersion: v1
kind: Service
metadata:
  labels:
    app: kubesphere
    component: ks-sample
  name: ks-sample
  namespace: kubesphere-sample-prod #命名空间名称和上面刚创建的项目名称保持一致
spec:
  ports:
    - name: http
      port: 8080 #项目端口和application.yml配置文件中指定的server.prot端口一致
      protocol: TCP
      targetPort: 8080 #项目端口和application.yml配置文件中指定的server.prot端口一致
      nodePort: 30961 #对外提供访问的端口
  selector:
    app: kubesphere
    component: ks-sample
    tier: backend
  sessionAffinity: None
  type: NodePort
7.上传maven依赖所需要的jar包nexus中
将devops-java-sample项目用IntelliJIDEA开发工具打开,并下载好maven依赖的所以jar包文件,然后上传到nexus中央maven仓库中。
参考批量上传本地maven仓库到Nexus中
6.将项目上传到GitLab中
7.创建流水线
1.以 project-regular 身份重新登录,转到 DevOps 工程 demo-devops,点击创建构建新流水线。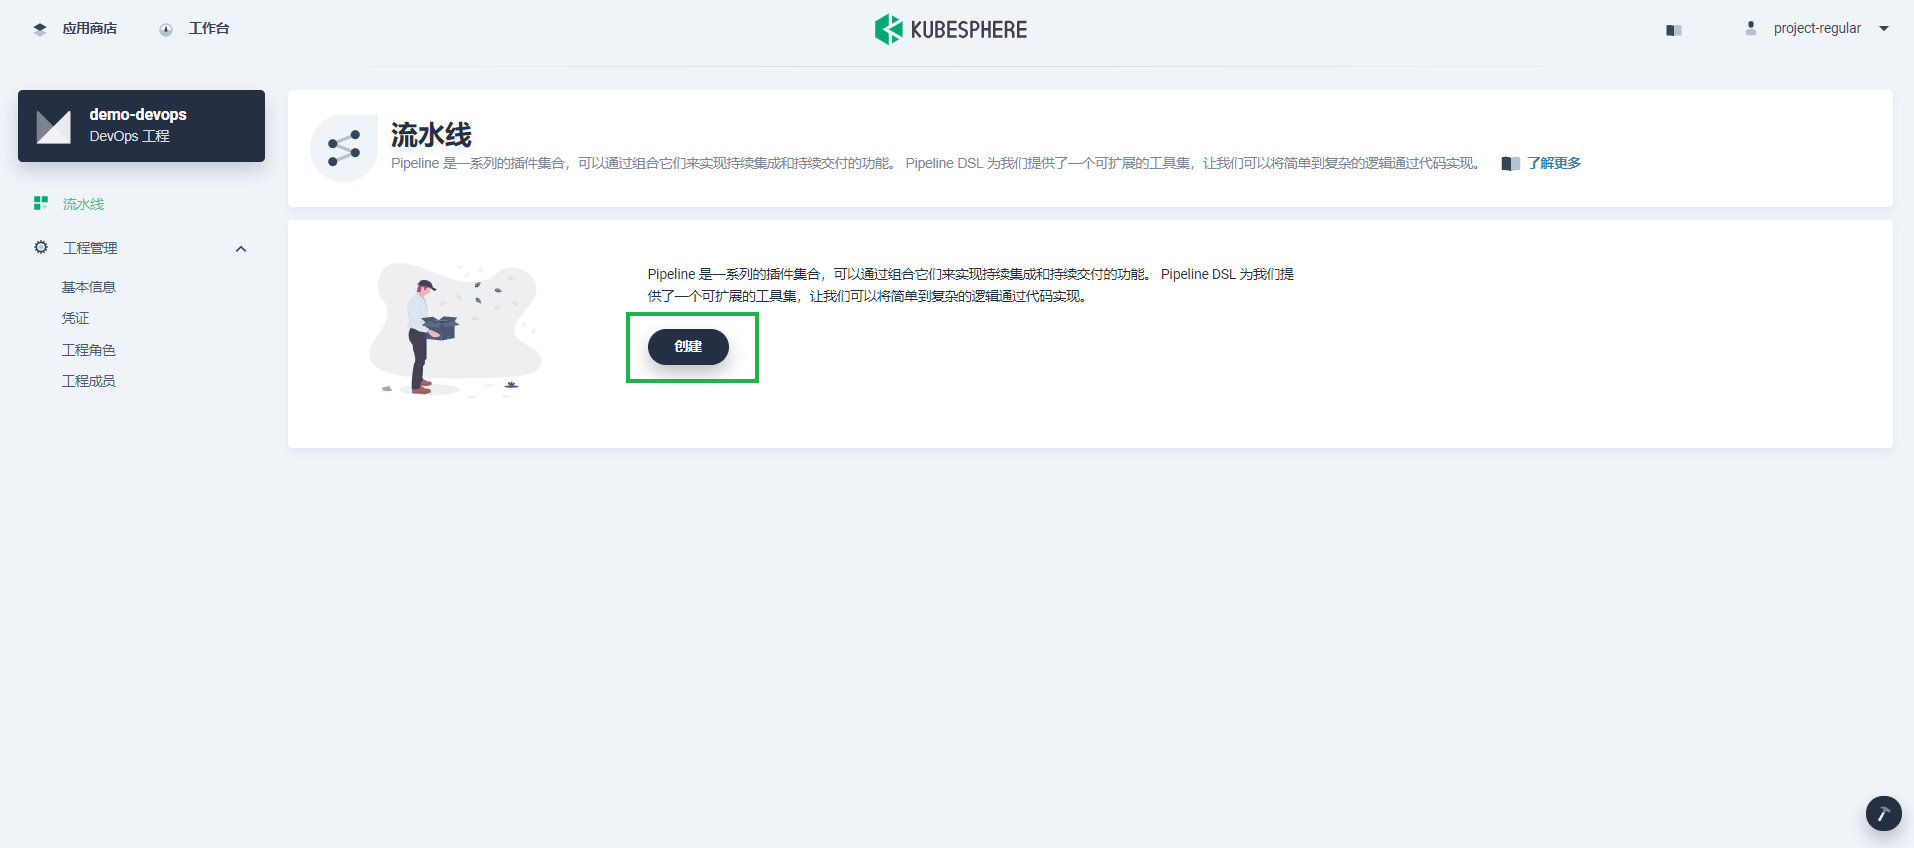
2.在弹出对话框中填入基本信息,将其命名为 jenkinsfile-in-scm 并选择一个代码仓库。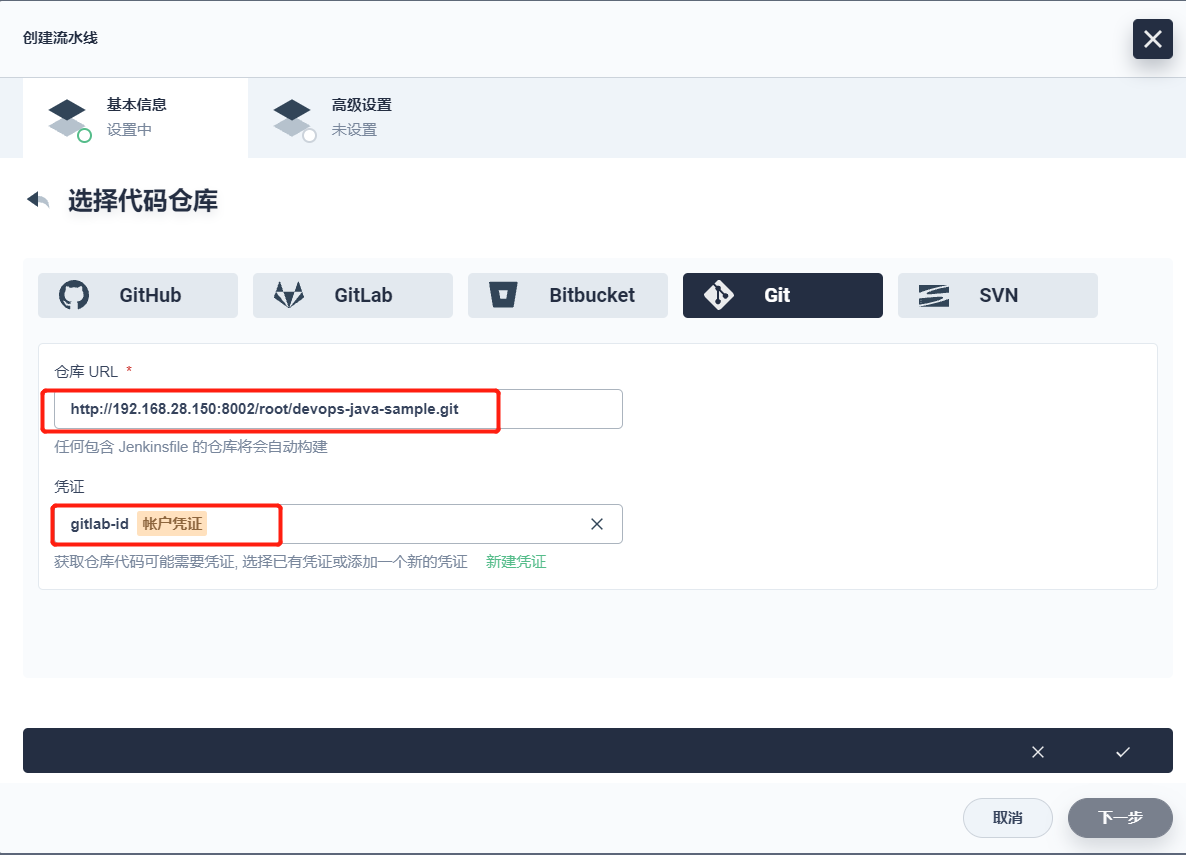
3.在高级设置中,选中丢弃旧的分支旁边的方框。本教程中,您可以为保留分支的天数和保留分支的最大个数使用默认值。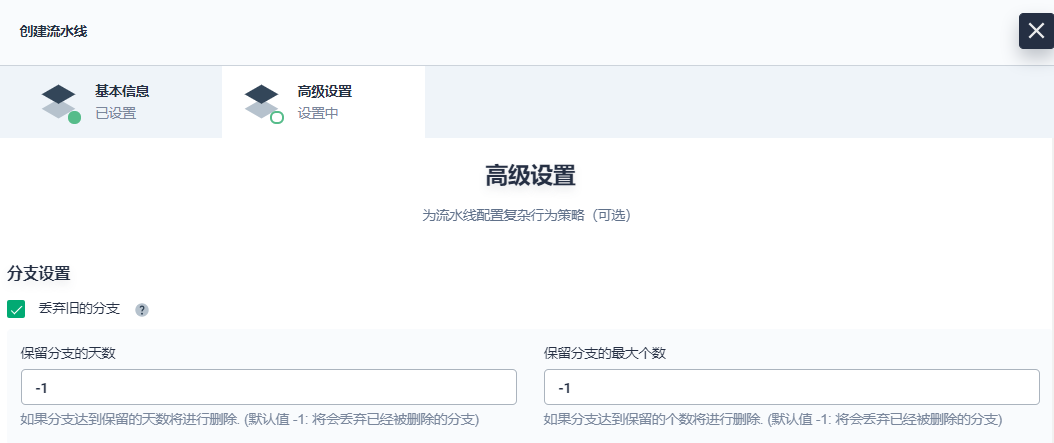
丢弃旧的分支意味着您将一并丢弃分支记录。分支记录包括控制台输出、已归档制品以及特定分支的其他相关元数据。更少的分支意味着您可以节省 Jenkins 正在使用的磁盘空间。KubeSphere 提供两个选项来确定何时丢弃旧分支:
- 保留分支的天数:在一定天数之后,丢弃分支。
- 保留分支的最大个数:分支达到一定数量后,丢弃最旧的分支。
保留分支的天数和保留分支的最大个数可以同时应用于分支。只要某个分支满足其中一个字段所设置的条件,则会丢弃该分支。例如,如果您将保留天数和最大分支数分别指定为 2 和 3,待某个分支的保留天数超过 2 或者分支保留数量超过 3,则会丢弃该分支。KubeSphere 默认用 -1 预填充这两个字段,表示已删除的分支将被丢弃。
4.在行为策略中,KubeSphere 默认提供四种策略。本示例中不会使用从 Fork 仓库中发现 PR 这条策略,因此您可以删除该策略。您无需修改设置,可以直接使用默认值。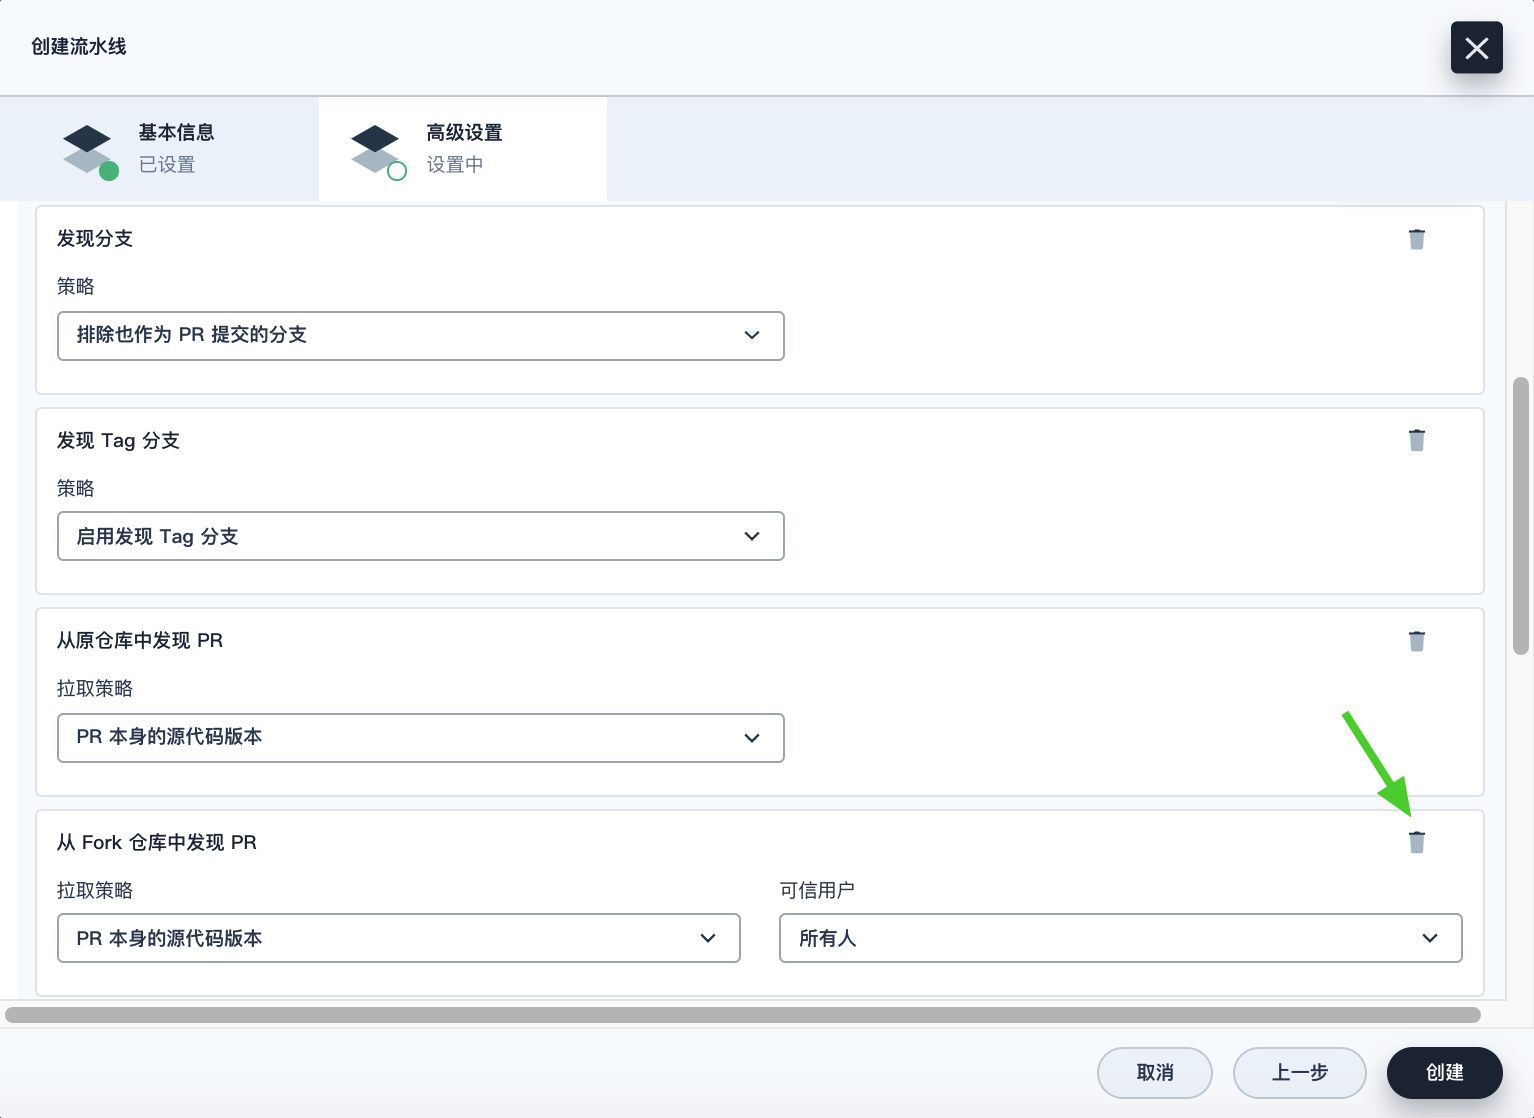
Jenkins 流水线运行时,开发者提交的 Pull Request (PR) 也将被视为一个单独的分支。
发现分支
- 排除也作为 PR 提交的分支:不扫描源分支,例如源仓库的 master 分支。需要合并这些分支。
- 只有被提交为 PR 的分支:仅扫描 PR 分支。
- 所有分支:拉取源仓库中的所有分支。
从原仓库中发现 PR
- PR 与目标分支合并后的源代码版本:PR 合并到目标分支后,基于源代码创建并运行流水线。
- PR 本身的源代码版本:根据 PR 本身的源代码创建并运行流水线。
- 发现 PR 时会创建两个流水线:KubeSphere 创建两个流水线,一个流水线使用 PR 与目标分支合并后的源代码版本,另一个使用 PR 本身的源代码版本。
5.向下滚动到脚本路径。该字段指定代码仓库中的 Jenkinsfile 路径。它表示仓库的根目录。如果文件位置变更,则脚本路径也需要更改。请将其更改为 Jenkinsfile-on-prem,这是示例仓库中位于根目录下的 Jenkinsfile 的文件名。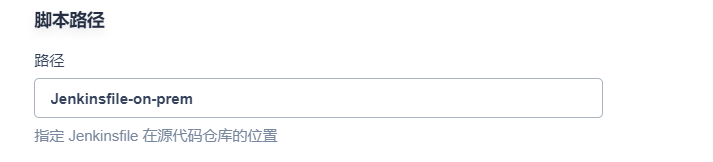
6.在扫描 Repo Trigger 中,点击如果没有扫描触发,则定期扫描并设置时间间隔为 5 分钟。点击创建完成配置。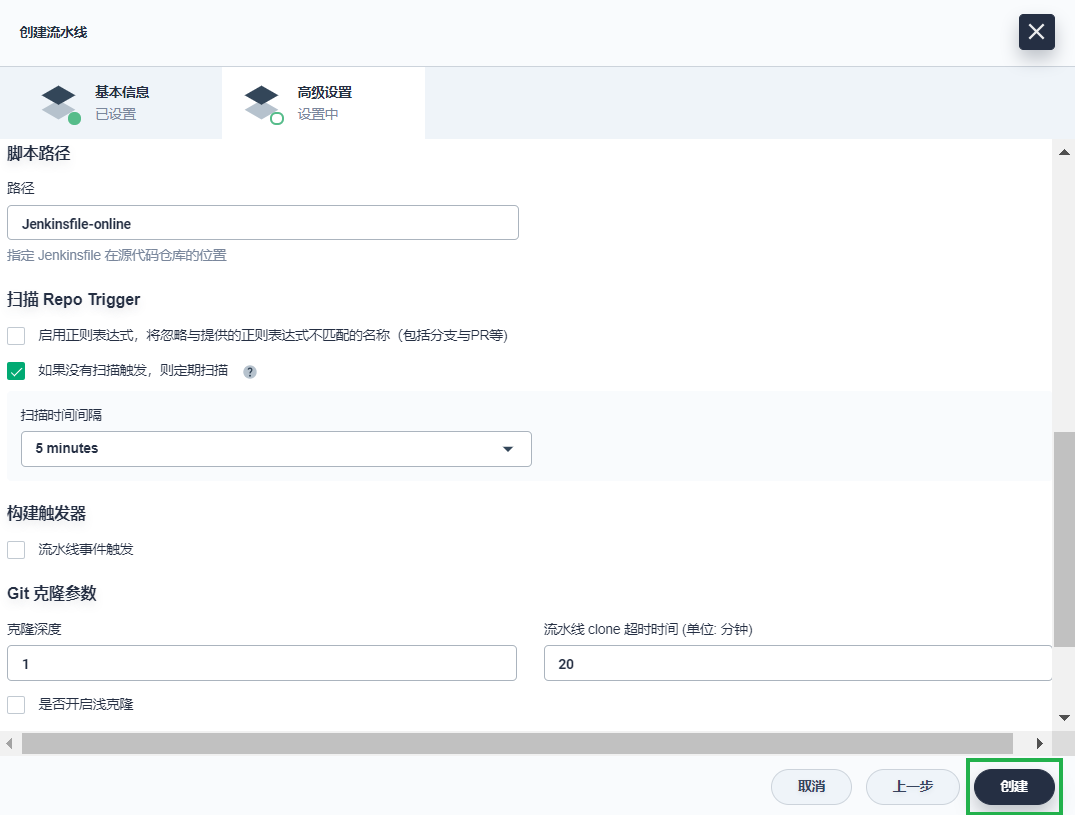
您可以设置特定的时间间隔让流水线扫描远程仓库,以便根据您在行为策略中设置的策略来检测代码更新或新的 PR。
8.运行流水线

若有收获,就点个赞吧
0 人点赞
