![H_1HN7CQF_F@$6R42PU%DN.png
搭建流程及建议.
1. web(部署wordpress,phpshe)连接db
2. 挂载nfs存储
3. web2
4. web前面加上lb负载均衡
5. lb2
6. keepalived高可用
7. https(如果lb上部署有坑,那么lb,web都部署https)
8. 全网备份,nfs实时同步
9.ansible 也可以搭建一个服务,搞一个ansible
搭建一台最小化web
首先,打开vm全部机器,然后开始配置密钥认证。
#!/bin/bash#author: Rdymy#desc 一键自动化创建和分发公钥ip_list="lb01 db01 nfs01 backup web01 web02 web03 lb02"ssh_root_pass="root"echo '--------------------------------------------'echo '1. 创建 key'echo '--------------------------------------------'# 创建密钥对并指定私钥路径和使用私钥时的密码短语ssh-keygen -f ~/.ssh/id_rsa -P ''echo '--------------------------------------------'echo '2. 分发 pub key'echo '--------------------------------------------'for ip in $ip_listdo# ssh填密码的工具sshpass,需yum下载 指定公钥地址 暂时停止主机验证 连接的ipsshpass -p$ssh_root_pass ssh-copy-id -i ~/.ssh/id_rsa.pub -o StrictHostKeyChecking=no root@$ipdone
ansible测试是否都可以使用!
- 配置主机清单 ```bash [lb] lb01 lb02 [web] web01 web02 web03 [nfs] nfs01 [back] backup [db] db01
2. `ansible all -a 'hostname'`

安装nginx,php

- 配置yum源
```bash
[nginx-stable]
name=nginx stable repo
baseurl=http://nginx.org/packages/centos/$releasever/$basearch/
gpgcheck=1
enabled=1
gpgkey=https://nginx.org/keys/nginx_signing.key
module_hotfixes=true

[webtatic-php]
name = php Repository
baseurl = http://us-east.repo.webtatic.com/yum/el7/x86_64/
enabled = 1
gpgcheck = 0
安装
yum install -y php72w php72w-cli php72w-common php72w-devel php72w-embedded php72w-gd php72w-mbstring php72w-pdo php72w-xml php72w-fpm php72w-mysqlnd php72w-opcache php72w-pecl-memcached php72w-pecl-redis php72w-pecl-mongodb nginx
开机自启动
systemctl start nginx systemctl enable nginx systemctl status nginx ss -lntup |grep nginx ps -ef | grep nginx
先改配置文件 vim /etc/php-fpm.d/www.conf
systemctl enable php-fpm systemctl start php-fpm systemctl status php-fpm ss -lntup |grep php-fpm ps -ef |grep php-fpm
获取源代码,创建虚拟主机,创建站点目录
```bash
# 创建站点目录
mkdir /app/code/blog -p
mkdir /app/code/shop -p

# 将源代码解压到对应目录
/app/code/blog
/app/code/shop

# 创建虚拟主机
touch blog.oldboylinux.cn.conf
touch phpshe.oldboylinux.cn.conf
touch default.conf

# blog
server{
  listen 80;
  server_name  blog.oldboylinux.cn;
  root /app/code/blog;
  access_log /var/log/nginx/blog.oldboylinux.cn-access.log main;
  error_log /var/log/nginx/blog.oldboylinux.cn-error.log notice;


  location / {
    index index.php;
  }

  location ~ \.php$ {
   fastcgi_pass 127.0.0.1:9000;
   fastcgi_param SCRIPT_FILENAME $document_root$fastcgi_script_name;
   include fastcgi_params;
 }
}

# shop
server{
  listen 80;
  server_name  phpshe.oldboylinux.cn;
  root /app/code/shop;
  access_log /var/log/nginx/phpshe.oldboylinux.cn-access.log main;
  error_log /var/log/nginx/phpshe.oldboylinux.cn.log notice;

  location / {
    index index.php;
  }

  location ~ \.php$ {
   fastcgi_pass 127.0.0.1:9001;
   fastcgi_param SCRIPT_FILENAME $document_root$fastcgi_script_name;
   include fastcgi_params;
 }
}

# 默认
server {
    listen       80 default_server;
    server_name  "";
    default_type text/plain;
    return 200 "no miao";
}
增加php端口, 修改网站源代码权限,
cp www.conf phpshe.conf
中括号里的www改掉phpshe
listen XXXXX:9001

php-fpm -t
systemctl restart php-fpm

# 修改权限,放到下面了
安装创建数据库,数据库用户
# 前往db01 服务器
yum install -y mariadb-server

systemctl start mariadb
systemctl enable mariadb

mysql_secure_installation

create databse blog;
grant all on blog.* to 'blog'@'172.16.1.%' identified by 'blog';
create databse shop;
grant all on shop.* to 'shop'@'172.16.1.%' identified by 'shop';
# 8.0不能这么玩https://blog.csdn.net/li_0891/article/details/80915780

select user,host from mysql.user
show databases
测试页面和数据库( 两个网站
<?php
phpinfo();
?>

<?php
//$link_id=mysqli_connect('数据库服务器的ip','用户','密码');
//数据库与php在一起  ip位置写为localhost.
//不在一起          ip位置写数据库的ip.
$link_id=mysqli_connect('172.16.1.51','blog','blog')  ;
if($link_id){
 echo "mysql successfuly ! \n";
 }else{
 echo "you conn is down mysql error \n";
 }
?>
搭建完毕,测试上传图片
# blog
#发现不行,创建一个文件mkdir /app/code/blog/wp-content/uploads  && chown nginx.nginx /app/code/blog/wp-content/uploads
# 或者直接给/app/code/blog/wp-content   切换用户为nginx

#phpshe
chown -R nginx.nginx   config.php install/ data/
http://shop.azisamememe.shop/install
# 进后台
http://shop.azisamememe.shop/admin.php
# 别急着登陆,先执行下面的
chown -R nginx.nginx /var/lib/php/session/ # 文件session,不如redis
vim config.php
# 关闭伪静态
$pe['url_model'] = 'php'; #url模式,可选项(pathinfo/pathinfo_safe/php)
# 删除根目录下install目录
cd /app/code/shop && mv install /tmp
搭建nfs
yum install -y nfs-utils
systemctl enable rpcbind
systemctl start rpcbind
systemctl enable nfs
systemctl start nfs
rpcinfo -p

mkdir -p /nfsdata/blog
mkdir -p /nfsdata/phpshe

vim /etc/exports
/nfsdata/blog 172.16.1.0/24(rw,all_squash)
/nfsdata/phpshe 172.16.1.0/24(rw,all_squash)

chown nfsnobody.nfsnobody /nfsdata/ -R
systemctl reload nfs

# 客户端
yum install -y nfs-utils
mount nfs01:/nfsdata/blog /app/code/blog/wp-content/uploads/
# 电商不知道挂哪个目录
配置web02
# 打包网站源代码
# 在app/code下,写绝对路径也可以(但是路径会从/app开始),注意不要在结尾加斜线,要不然排除失败
tar zcvf ./blog.tar.gz blog --exclude=blog/wp-content/uploads
tar zcvf ./phpshe.tar.gz shop --exclude=不到啊,电商不设置nfs了,不知道上传目录是那哪个

# web02
mkdir -p /app/code
mkdir -p /server/tools
# web01
scp blog.tar.gz root@web02:/server/tools
scp phpshe.tar.gz root@web02:/server/tools

# web02
cd /server/tools && tar xf blog.tar.gz -C /app/code
cd /server/tools && tar xf phpshe.tar.gz -C /app/code
数据库和nfs不用在配置了,搞一下nginx,php
# 复制yum源
scp /etc/yum.repos.d/nginx.repo root@web02:/etc/yum.repos.d/
scp /etc/yum.repos.d/php.repo root@web02:/etc/yum.repos.d/
# 安装
yum install -y php72w php72w-cli php72w-common php72w-devel php72w-embedded php72w-gd php72w-mbstring php72w-pdo php72w-xml php72w-fpm php72w-mysqlnd php72w-opcache php72w-pecl-memcached php72w-pecl-redis php72w-pecl-mongodb nginx nfs-utils

systemctl enable php-fpm
systemctl enable nginx

# 复制nginx配置、
# 复制php配置
scp /etc/nginx/conf.d/* root@web02:/etc/nginx/conf.d/
cd /etc/php-fpm.d/ && scp * root@web02:/etc/php-fpm.d

# 启动nginx和php
systemctl start nginx php-fpm

# 挂载一下nfs
mkdir /app/code/blog/wp-content/uploads  && chown nginx.nginx /app/code/blog/wp-content/uploads

mount nfs01:/nfsdata/blog /app/code/blog/wp-content/uploads/
配置负载均衡 ( 才两个web,就不需要动静分离了
# 配置安装nginx
scp /etc/yum.repos.d/nginx.repo root@lb01:/etc/yum.repos.d/
yum install -y nginx
systemctl enable nginx

# 书写配置文件(blog

upstream default_pools {
  least_conn;
  server 10.0.0.7:80 weight=1 max_fails=3 fail_timeout=15;
  server 10.0.0.8:80 weight=1 max_fails=3 fail_timeout=15;
}


server{
  listen 80;
  server_name  blog.oldboylinux.cn;
  root /app/code/blog;
  access_log /var/log/nginx/blog.oldboylinux.cn-access.log main;
  error_log /var/log/nginx/blog.oldboylinux.cn-error.log notice;

  location / {
    proxy_pass http://default_pools;
    proxy_set_header X-Forwarded-For $proxy_add_x_forwarded_for;
    proxy_set_header Host $http_host;
    expires 10d;
}


location ~*\.(jsp|php)$ {
  proxy_pass http://default_pools;
  proxy_set_header X-Forwarded-For $proxy_add_x_forwarded_for;
  proxy_set_header Host $http_host;
  }

}

# 书写配置文件(phpshe  ,注意两个网站池子的名字不能一样
upstream default_pools_php {
  least_conn;
  server 10.0.0.7:80 weight=1 max_fails=3 fail_timeout=15;
  server 10.0.0.8:80 weight=1 max_fails=3 fail_timeout=15;
}


server{
  listen 80;
  server_name  phpshe.oldboylinux.cn;
  root /app/code/shop;
  access_log /var/log/nginx/phpshe.oldboylinux.cn-access.log main;
  error_log /var/log/nginx/phpshe.oldboylinux.cn-error.log notice;

  location / {
  proxy_pass http://default_pools_php;
  proxy_set_header X-Forwarded-For $proxy_add_x_forwarded_for;
  proxy_set_header Host $http_host;
  expires 10d;
}


location ~*\.(jsp|php)$ {
  proxy_pass http://default_pools_php;
  proxy_set_header X-Forwarded-For $proxy_add_x_forwarded_for;
  proxy_set_header Host $http_host;
  }

}


# 启动nginx
nginx -t
systemctl startnginx
自行创建测试文件测试 fuzaiceshi.html
会话保持,如果两个网站的绘画保持技术栈不一样,后端语言运行环境要监听一个新的端口防止出现问题,这里用web03装redis。废物利用
yum install -y redis

# 如果指定了bind,则说明只允许来自指定网卡的Redis请求。
vim /etc/redis.conf
bind 172.16.1.9  # web03

systemctl enable redis
systemctl start redis

redis-cli -h 172.16.1.9
keys *


# 修改web01、02 php的配置

vim /etc/php-fpm.d/phpshe.conf
php_value[session.save_handler] = redis
php_value[session.save_path]    = tcp://172.16.1.9:6379

# 重启web01/web02 php
systemctl reload php-fpm

# 去web03
redis-cli -h 172.16.1.9
keys *

配置负载均衡2号 以及keepalived高可用
# 安装nginx
yum install nginx -y
# 去lb01复制
scp /etc/nginx/conf.d/* root@lb02:/etc/nginx/conf.d/
systemctl enable nginx
systemctl start nginx
# 安装keepalived (web01 web02
yum install -y keepalived
#lb01 配置
vim /etc/keepalived/keepalived.conf
! Configuration File for keepalived
global_defs {
router_id keepalived_lb01
}
vrrp_script check_lb {
script /server/scripts/check_lb.sh
interval 1
timeout 30
weight 1
}
vrrp_instance lb_vip01 {
state MASTER
interface eth0
virtual_router_id 51
priority 100
advert_int 1
authentication {
auth_type PASS
auth_pass 1111
}
virtual_ipaddress {
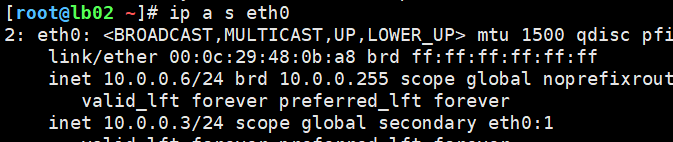
10.0.0.3/24 dev eth0 label eth0:1
}
track_script {
check_lb
}
}
systemctl start keepalived
# lb02
vim /etc/keepalived/keepalived.conf
! Configuration File for keepalived
global_defs {
router_id keepalived_lb02
}
vrrp_script check_lb {
script /server/scripts/check_lb.sh
interval 1
timeout 30
weight 1
}
vrrp_instance lb_vip01 {
state BACKUP
interface eth0
virtual_router_id 51
priority 50
advert_int 1
authentication {
auth_type PASS
auth_pass 1111
}
virtual_ipaddress {
10.0.0.3/24 dev eth0 label eth0:1
}
track_script {
check_lb
}
}
systemctl start keepalived
vim /server/scripts/check_lb.sh

#!/bin/bash
#author: lidao996
#desc: check nginx port
#1.检查端口是否存在,个数
count=`ss -lntup|grep nginx |wc -l`
#2.如果端口数量为0,则关闭keepalived
if [ $count -eq 0 ];then
  systemctl stop keepalived
fi

chmod +x /server/scripts/check_lb.sh
检查
检查完,重新打开 # lb01 的 nginx和keepalived
https
# lb01 blog

upstream default_pools {
  least_conn;
  server 10.0.0.7:80 weight=1 max_fails=3 fail_timeout=15;
  server 10.0.0.8:80 weight=1 max_fails=3 fail_timeout=15;
}

server {
 listen 80;
 server_name blog.oldboylinux.cn;
 return 302 https://blog.oldboylinux.cn;
}

server{
  listen 443 ssl;
  server_name  blog.oldboylinux.cn;
  access_log /var/log/nginx/blog.oldboylinux.cn-access.log main;
  error_log /var/log/nginx/blog.oldboylinux.cn-error.log notice;
  ssl_certificate /etc/nginx/verify/6710962_blog.oldboylinux.cn.pem;
  ssl_certificate_key /etc/nginx/verify/6710962_blog.oldboylinux.cn.key;

  location / {
    proxy_pass http://default_pools;
    proxy_set_header X-Forwarded-For $proxy_add_x_forwarded_for;
    proxy_set_header Host $http_host;
    expires 10d;
}


  location ~*\.(jsp|php)$ {
    proxy_pass http://default_pools;
    proxy_set_header X-Forwarded-For $proxy_add_x_forwarded_for;
    proxy_set_header Host $http_host;
  }

}

# lb01 shop

upstream default_pools_php {
  least_conn;
  server 10.0.0.7:80 weight=1 max_fails=3 fail_timeout=15;
  server 10.0.0.8:80 weight=1 max_fails=3 fail_timeout=15;
}

server {
 listen 80;
 server_name phpshe.oldboylinux.cn;
 return 302 https://phpshe.oldboylinux.cn;
}


server{
  listen 443 ssl;
  server_name  phpshe.oldboylinux.cn;
  access_log /var/log/nginx/phpshe.oldboylinux.cn-access.log main;
  error_log /var/log/nginx/phpshe.oldboylinux.cn-error.log notice;
  ssl_certificate /etc/nginx/verify/6792020_phpshe.oldboylinux.cn.pem;
  ssl_certificate_key /etc/nginx/verify/6792020_phpshe.oldboylinux.cn.key;

  location / {
    proxy_pass http://default_pools_php;
    proxy_set_header X-Forwarded-For $proxy_add_x_forwarded_for;
    proxy_set_header Host $http_host;
    expires 10d;
}


  location ~*\.(jsp|php)$ {
    proxy_pass http://default_pools_php;
    proxy_set_header X-Forwarded-For $proxy_add_x_forwarded_for;
    proxy_set_header Host $http_host;
  }

}

# 复制给lb02
mkdir /server/tools
# 把证书拉进对应目录

# lb02
mkdir /etc/nginx/verify
scp lb01:/etc/nginx/verify/* /etc/nginx/verify


# lb01 lb02
nginx -t
systemctl reload nginx
测试前记得先改win的hosts,win+r,drivers etc/hosts
出现了,只做负载https的坑, css被吃,连接不完全安全
(如果lb上部署有坑,那么lb,web都部署https)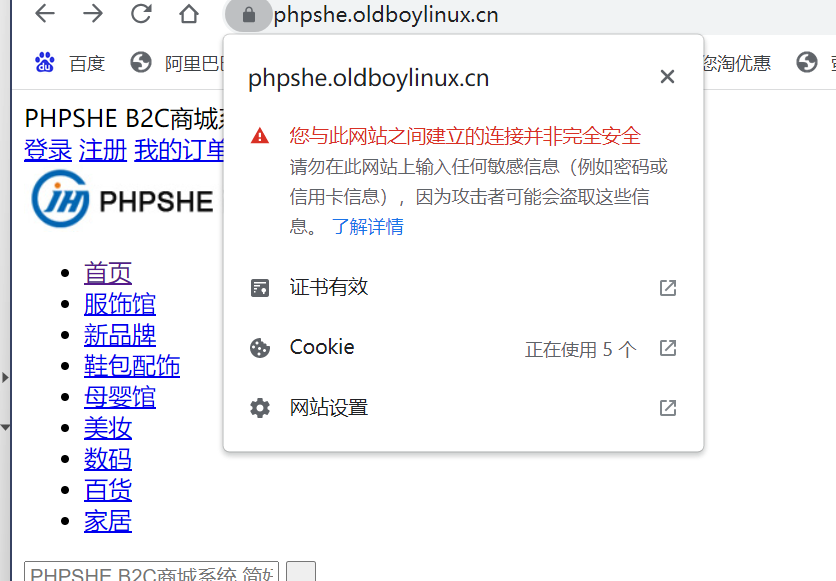
cd /etc/nginx

mkdir verify
scp lb01:/etc/nginx/verify/* verify/

server{
  listen 443 ssl;
  server_name  phpshe.oldboylinux.cn;
  root /app/code/shop;
  access_log /var/log/nginx/phpshe.oldboylinux.cn-access.log main;
  error_log /var/log/nginx/phpshe.oldboylinux.cn-error.log notice;
  ssl_certificate /etc/nginx/verify/6792020_phpshe.oldboylinux.cn.pem;
  ssl_certificate_key /etc/nginx/verify/6792020_phpshe.oldboylinux.cn.key;

  location / {
    index index.php;
  }

  location ~ \.php$ {
   fastcgi_pass 127.0.0.1:9001;
   fastcgi_param SCRIPT_FILENAME $document_root$fastcgi_script_name;
   include fastcgi_params;
 }
}
#web01 操作web02
scp conf.d/phpshe.oldboylinux.cn.conf root@web02:/etc/nginx/conf.d/

# 去web02
cd /etc/nginx

mkdir verify
scp lb01:/etc/nginx/verify/* verify/

# 去 lb01/02  改http为https,池子里的80改成443

# 重启web和负载的nginx
nginx -t
systemctl reload nginx

# !!!!圆满解决
最后rsync,resync
# rsync需要配置的机器非常多,我就偷个懒,只装web
# 备份/app/code /etc/ 意思一下


vim /etc/rsyncd.conf

##rsyncd.conf start##
##rsyncd 20221111
fake super = yes
uid =rsync
gid =rsync
use chroot = no
max connections = 200
timeout = 300
pid file = /var/run/rsyncd.pid
lock file = /var/run/rsync.lock
log file = /var/log/rsyncd.log
ignore errors
read only = false
list = false
#hosts allow = 172.16.1.0/24
##hosts deny = 0.0.0.0/32
auth users = rsync_backup
secrets file = /etc/rsync.password
[data]
comment = "backup dir by Rdymy"
path = /data
[backup]
comment= "backup all !nfs"
path = /backup
[sersync]
comment = "backup nfs"
path = /nfsbackup


useradd -s /sbin/nologin -M rsync
echo 'rsync_backup:1' >/etc/rsync.password
chmod 600 /etc/rsync.password


#创建同步目录
mkdir xxx(data backup nfsbackup)
chown rsync.rsync xxx

systemctl restart rsyncd
systemctl enable rsyncd
ps -ef | grep rsync  # 检查服务是否启动
ss -lntup | grep rsync  # 检查端口是否开启

# 客户端web01,理论上web01和02是一摸一样的,所以,接下来只处理web01就可以了。

echo '1' >/etc/rsync.pass
chmod 600 /etc/rsync.pass

rsync -avz /etc/hosts rsync_backup@backup::data --password-file=/etc/rsync.pass
#less /var/log/rsyncd.log  # 有问题可以看看日志

# 写脚本
vim /server/scripts/backup.sh

#! /bin/bash
#author: Rdymy
#desc: 备份各种目录
. /etc/profile

ip=`hostname -I |awk '{print $2}'`
time=`date +%F`

mkdir -p /backup/$ip
tar zcf /backup/$ip/etc.$time.tar.gz /etc
tar zcf blog.tar.gz /app/code/blog/  --exclude=/app/code/blog/wp-content/uploads

find /backup -name '*.tar.gz' -type f |xargs md5sum >/backup/$ip/$ip.md5

rsync -a /backup/ rsync_backup@backup::backup --password-file=/etc/rsync.pass


# 写定时任务
crontab -e
# backup peizhi to backup_server by Rdymy
00 00 * * * sh /server/scripts/backup.sh &>/dev/null

#backup服务器发邮件

不写了,浪费时间
sersync只要装在nfs就可以了
cd /server/tools
tar xvf sersync2.5.4_64bit_binary_stable_final.tar.gz -C /app/tools

cd /app/tools
mv GNU-Linux-x86 sersync
cd sersync
mv sersync2 sersync
ln -s /app/tools/sersync/sersync /bin/

chmod 644 confxml.xml
cp confxml.xml confxml.xml.bak
<sersync>
    <localpath watch="/nfsdata">  # 监控哪个目录!!!
        <remote ip="10.0.0.41" name="sersync"/>  # rsync服务端的地址和模块名!!!
        <!--<remote ip="192.168.8.39" name="tongbu"/>-->
        <!--<remote ip="192.168.8.40" name="tongbu"/>-->
    </localpath>
    <rsync>
        <commonParams params="-artuz"/>  # rsync具体命令,虽然没写,但默认会加--delete
        <auth start="yes" users="rsync_bakcup" passwordfile="/etc/rsync.pass"/>  # 是否开启auth,rsync用户选择和passwordfile路径!!!
        <userDefinedPort start="false" port="874"/><!-- port=874 -->
        <timeout start="false" time="100"/><!-- timeout=100 -->
        <ssh start="false"/>
    </rsync>
    <failLog path="/var/log/rsync_fail_log.sh" timeToExecute="60"/><!--default every 60mins execute once-->  # 日志存放目录!!!
    <crontab start="false" schedule="600"><!--600mins-->
        <crontabfilter start="false">
        <exclude expression="*.php"></exclude>
        <exclude expression="info/*"></exclude>
        </crontabfilter>
    </crontab>
    <plugin start="false" name="command"/>
</sersync>
cd /app/tools/sersync
sersync -dro /app/tools/sersync/confxml.xml
# 启动demon,传输目录,指定文件

大功告成!!!!!

若有收获,就点个赞吧
0 人点赞
