springboot微信支付项目
项目介绍和前期准备
中大型公司里面项目开发流程讲解
1、一个中大型项目的开发流程,从需求调研到项目上线2、需求评审(产品/设计/前端/后端/测试/运营)->UI设计->开发(前端架构->开发/ 后端架构->开发)-> 前端后端联调->项目提测->BugFix->回归测试->运维和开发部署上线->灰度发布->全量发布->维护和运营
在线教育站点需求分析和架构设计
1、开发的功能:
    首页视频列表
    视频详情  (自己开发)
    微信扫码登录
    下单微信支付
    我的订单列表 (自己开发)

2、架构设计
    前端后端分离 -> 方案:node渲染
    动静分离    -> 方案:静态资源如html,js放在cdn或者nginx服务器上

技术选择:
    后端技术选择:Eclipse + Springboot2.0 + redis4.0+ HttpClient + mysql + ActiveMQ消息队列

    前端技术选择:HTML5 + bootstrapt + jquery

    测试要求:
        首页和视频详情页qps单机qps要求 2000+
在线教育后台数据库设计
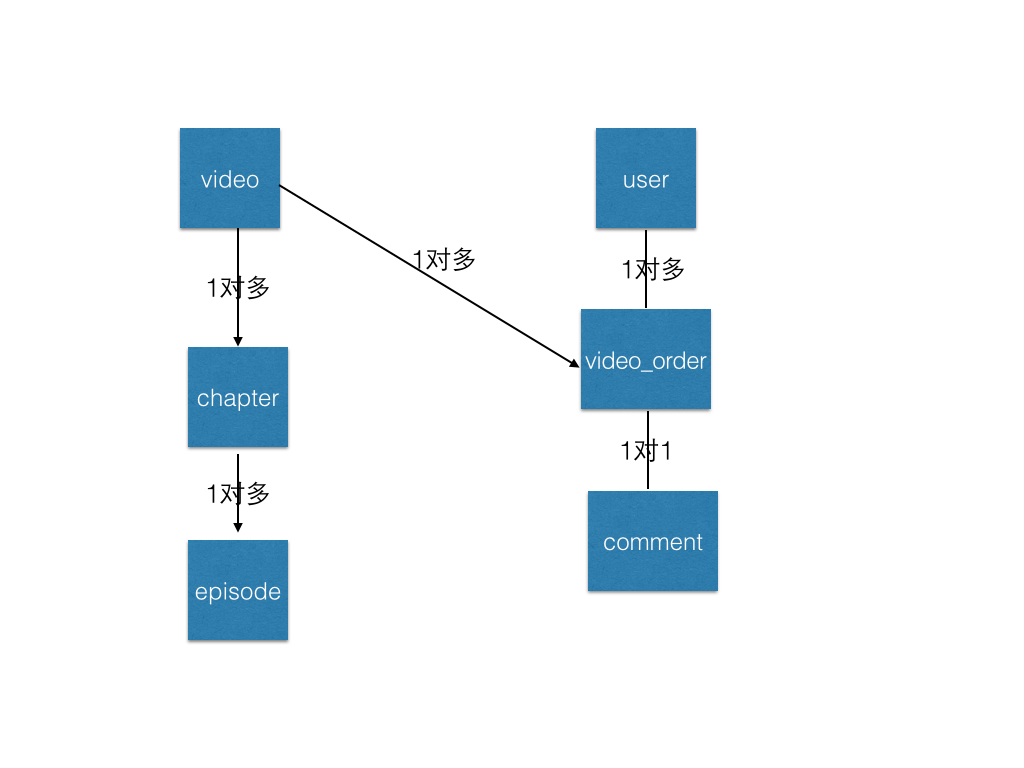
    1、数据库设计:
             er图:
             实体对象:矩形
             属性:椭圆
             关系:菱形
                  video表
                  video_order表
                  user表
                  comment表
                  chapter张
                  episode节

    2、字段冗余:
            什么是字段冗余
            什么时候选择字段冗余
            优缺点

    3、Mysql测试数据导入

    4、mysql客户端软件
            苹果系统:sequel pro
            windows:navicat
    5、没有一成不变的架构,没有通用的设计方案
            一定跟业务结合
评论表中有用户名和头像,是为了减少关联查询,可以在更新用户的时候更新,或者消息队列
项目基础环境搭建和逆向工程构建
快速搭建SpringBoot项目,采用Eclipse
注意事项:
如果一开始没加mysql的信息,则在pom.xml里面注解掉mysql相关依赖
1、站点地址:http://start.spring.io/
2、需要依赖
spring-boot-starter-web
spring-boot-starter-data-redis
mybatis-spring-boot-starter
mysql-connector-java

用什么包导什么包

注意事项:
如果一开始没加mysql的信息,则在pom.xml里面注解掉mysql相关依赖


3、启动项目hello world

4、访问入口:localhost:8080/test
快速搭建SpringBoot项目,采用IDEA
参考资料:
IDEA使用文档
http://wiki.jikexueyuan.com/project/intellij-idea-tutorial/
热部署在Eclipse和IDE里面的使用
讲解热部署的好处及使用注意事项,在eclipse里面默认开启,在IDE里面默认关闭
1、增加依赖
<dependency>
<groupId>org.springframework.boot</groupId>
<artifactId>spring-boot-devtools</artifactId>
<optional>true</optional>
</dependency>

2、eclipse热部署默认自动开启

3、idea里面要设置
1、相关偏好里开启自动编译
2、Shift+Ctrl+Alt+/,选择Registry
选 compiler.automake.allow.when.app.running
重启项目就可以了

参考:
https://www.cnblogs.com/aqsunkai/p/6690574.html
compiler.automake.allow.when.app.running
后端项目分层分包及资源文件处理
简介:项目基本目录结构,包名称建立,配置文件建立
        1、基本目录结构
            controller
            service
                impl
            mapper
            utils
            domain
            config
            interceoter
            dto
        2、application.properties配置文件
           配置启动端口
           server.port=8082
开源工具的优缺点选择和抽象方法的建议
深度分页
1、开源工具
    好处:开发方便,使用简单,使用aop方式进行分页,只需要引入相关依赖,然后PageHelper.startPage(page, size);  开启分页

    弊端:对于分库分表等情况下使用有问题,深度分页逻辑判断会复杂

    mysql资料:
            深度分页常用案例:
                https://www.cnblogs.com/lpfuture/p/5772055.html
                https://blog.csdn.net/li772030428/article/details/52839987
            推荐书籍:
                https://book.douban.com/subject/23008813/

2、封装的好坏
        关于抽象和不抽象的选择,比如tk这些工具,通用mapper,service,controller
        好处:
            代码量大大减少,开发新模块可以马上进行使用
        弊端:
            对应过度封装,新手等比较难理解,不能保证团队里面所有人都有对应的水平,或者有高度封装的思想,也不是过度封装

        课程案例:
            分页采用pageHelper
            封装通用工具类,如缓存操作等
            利于解耦,如切换缓存框架
Mysql逆向工程效率神器之使用IDE自动生成Java实体类
    1、IDEA连接数据库
            菜单View→Tool Windows→Database打开数据库工具窗口

    2、左上角添加按钮“+”,选择数据库类型

    3、mysql主机,账户密码
            119.23.28.97
            root
    4、通过IDEA生成实体类
    选中全部表,右键,go to scripts dir
     自定义包名
                com.xdclass.xdvideo.domain
            常用类型
                java.util.Date

            选中一张表,右键--->Scripted Extensions--->选择Generate POJOS.groovy,选择需要存放的路径,完成

    5、大家一定要遵守规范
接口配置文件自动映射到属性和实体类配置
1、添加 @Component或者Configuration 注解;

2、使用 @PropertySource 注解指定配置文件位置;(属性名称规范: 大模块.子模块.属性名)
        #=================================微信相关==================
        #公众号
        wxpay.appid=wx5beac15ca207cdd40c
        wxpay.appsecret=554801238f17fdsdsdd6f96b382fe548215e9
3、必须 通过注入IOC对象Resource 进来 , 才能在类中使用获取的配置文件值。
        @Autowired
        private WeChatConfig weChatConfig;
        例子:
        @Configuration
        @PropertySource(value="classpath:application.properties")
        public class WeChatConfig {
                @Value("${wxpay.appid}")
        private String appId;
package com.xdclass.xdvideo.config;

import org.springframework.beans.factory.annotation.Value;
import org.springframework.context.annotation.Configuration;
import org.springframework.context.annotation.PropertySource;

/**
 * 微信配置类
 */
@Configuration
@PropertySource(value="classpath:application.properties")
public class WeChatConfig {

    /**
     * 公众号appid
     */
    @Value("${wxpay.appid}")
    private String appId;

    /**
     * 公众号密钥
     */
    @Value("${wxpay.appsecret}")
    private String appsecret;

    public String getAppId() {
        return appId;
    }

    public void setAppId(String appId) {
        this.appId = appId;
    }

    public String getAppsecret() {
        return appsecret;
    }

    public void setAppsecret(String appsecret) {
        this.appsecret = appsecret;
    }
}
视频列表相关接口开发
整合Mybatis访问数据库和阿里巴巴数据源
整合mysql 加入mybatis依赖,和加入alibaba druid数据源
1、加入依赖(可以用 http://start.spring.io/ 下载)


        <!-- 引入starter-->
        <dependency>
            <groupId>org.mybatis.spring.boot</groupId>
            <artifactId>mybatis-spring-boot-starter</artifactId>
            <version>1.3.2</version>
        </dependency>

        <!-- MySQL的JDBC驱动包  -->
        <dependency>
            <groupId>mysql</groupId>
            <artifactId>mysql-connector-java</artifactId>
            <scope>runtime</scope>
        </dependency>
        <!-- 引入第三方数据源 -->
        <dependency>
            <groupId>com.alibaba</groupId>
            <artifactId>druid</artifactId>
            <version>1.1.12</version>
        </dependency>


        2、加入配置文件
            #可以自动识别
            #spring.datasource.driver-class-name =com.mysql.jdbc.Driver

            spring.datasource.url=jdbc:mysql://localhost:3306/movie?useUnicode=true&characterEncoding=utf-8
            spring.datasource.username =root
            spring.datasource.password =password
            #如果不使用默认的数据源 (com.zaxxer.hikari.HikariDataSource)
            spring.datasource.type =com.alibaba.druid.pool.DruidDataSource

        加载配置,注入到sqlSessionFactory等都是springBoot帮我们完成

        3、启动类增加mapper扫描

            @MapperScan("net.xdclass.xdvideo.mapper")
        4、开发mapper
            VideoMapper类例子
                @Select("SELECT * FROM video")
                @Results({
                        @Result(column = "create_time",property = "createTime")  //javaType = java.util.Date.class
                })
                List<Video> getAll();


            参考语法 http://www.mybatis.org/mybatis-3/zh/java-api.html
            xml配置:http://www.mybatis.org/mybatis-3/zh/configuration.html
使用Mybatis注解开发视频列表增删改查
使用Mybatis3.x注解方式 增删改查实操, 控制台打印sql语句
          技巧:保存对象,获取数据库自增id
                 @Options(useGeneratedKeys=true, keyProperty="id", keyColumn="id")

         技巧:
            数据库字段下划线和Java实体类映射
            # mybatis 下划线转驼峰配置,两者都可以
            #mybatis.configuration.mapUnderscoreToCamelCase=true
            mybatis.configuration.map-underscore-to-camel-case=true
        技巧:控制台打印sql语句
            #增加打印sql语句,一般用于本地开发测试
            mybatis.configuration.log-impl=org.apache.ibatis.logging.stdout.StdOutImpl

2、增加mapper代码
package com.xdclass.xdvideo.mapper;

import com.xdclass.xdvideo.domain.Video;
import org.apache.ibatis.annotations.*;

import java.util.List;

/**
 * video数据访问层
 */
public interface VideoMapper {

    @Select("SELECT * FROM video")
    List<Video> findAll();

    @Select("SELECT * FROM video WHERE id = #{id}")
    Video findById(int id);

    @Update("UPDATE video SET title=#{title} WHERE id =#{id}")
    int update(Video Video);

    @Delete("DELETE FROM video WHERE id =#{id}")
    int delete(int id);

    @Insert("INSERT INTO `video` ( `title`, `summary`, " +
            "`cover_img`, `view_num`, `price`, `create_time`," +
            " `online`, `point`)" +
            "VALUES" +
            "(#{title}, #{summary}, #{coverImg}, #{viewNum}, #{price},#{createTime}" +
            ",#{online},#{point});")
    @Options(useGeneratedKeys=true, keyProperty="id", keyColumn="id")
    int save(Video video);
}
package com.xdclass.xdvideo.service.impl;

import com.xdclass.xdvideo.domain.Video;
import com.xdclass.xdvideo.mapper.VideoMapper;
import com.xdclass.xdvideo.service.VideoService;
import org.springframework.beans.factory.annotation.Autowired;
import org.springframework.stereotype.Service;

import java.util.List;

@Service
public class VideoServiceImpl implements VideoService {

    @Autowired
    private VideoMapper videoMapper;

    @Override
    public List<Video> findAll() {
        return videoMapper.findAll();
    }

    @Override
    public Video findById(int id) {
        return videoMapper.findById(id);
    }

    @Override
    public int update(Video video) {
        return videoMapper.update(video);
    }

    @Override
    public int delete(int id) {
        return videoMapper.delete(id);
    }

    @Override
    public int save(Video video) {
        int rows = videoMapper.save(video);
        System.out.println(video.getId());
        return rows;
    }
}
package com.xdclass.xdvideo.controller;

import com.xdclass.xdvideo.domain.Video;
import com.xdclass.xdvideo.service.VideoService;
import org.springframework.beans.factory.annotation.Autowired;
import org.springframework.web.bind.annotation.*;

@RestController
@RequestMapping("/api/v1/video")
public class VideoController {
    @Autowired
    private VideoService videoService;

    @GetMapping("page")
    public Object pageVideo(){
        return videoService.findAll();
    }

    @GetMapping("find_by_id")
    public Object findById(int videoId){
        return videoService.findById(videoId);
    }

    @DeleteMapping("del_by_id")
    public int delById(int videoId){
        return videoService.delete(videoId);
    }

    @PutMapping("update_by_id")
    public int update(int videoId,String title){
        Video video = new Video();
        video.setId(videoId);
        video.setTitle(title);
        return videoService.update(video);
    }

    @PostMapping("save")
    public int save(String title){
        Video video = new Video();
        video.setTitle(title);
        return videoService.save(video);
    }
}
Vidoe相关接口完善和规范协议
1、save接口保存对象
            1)@RequestParam(value = "page", defaultValue)int  videoId
                可以设置默认值,比如分页

            2)@RequestBody 请求体映射实体类
                需要指定http头为 content-type为application/json charset=utf-8

2、统一入参协议
动态Sql语句Mybaties SqlProvider
提供动态sql语句,多用于update字段
1、
    @UpdateProvider(type=VideoSqlProvider.class,method="updateVideo")  更新
    @InsertProvider   插入
    @DeleteProvider   删除
    @SelectProvider   查询

2、写法
    public String updateVideo(final Video video){
         return new SQL(){{
               UPDATE("video");

               //条件写法.
               if(video.getAuthorId()!= null){
                  SET("author_id=#{authorId}");
               }
               if(video.getTotalEpisode()!= null){
                   SET("total_episode=#{totalEpisode}");
               }

               WHERE("id=#{id}");
           }}.toString();
        }
3、参考资料
        https://www.cnblogs.com/zhangminghui/p/4903351.html
package com.xdclass.xdvideo.provider;

import com.xdclass.xdvideo.domain.Video;
import org.apache.ibatis.jdbc.SQL;

/**
 * video构建动态sql语句
 */
public class VideoSqlProvider {

    /**
     * 更新video动态语句
     * @param video
     * @return
     */
    public String updateVideo(final Video video){
        return new SQL(){{
            UPDATE("video");

            //条件写法.
            if(video.getTitle()!=null){
                SET("title=#{title}");
            }

            if(video.getSummary()!=null){
                SET("summary=#{summary}");
            }

            if(video.getCoverImg()!=null){
                SET("cover_img=#{coverImg}");
            }

            if(video.getViewNum()!=null){
                SET("view_num=#{viewNum}");
            }

            if(video.getPrice()!=null){
                SET("price=#{price}");
            }

            if(video.getOnline()!=null){
                SET("online=#{online}");
            }

            if(video.getPoint()!=null){
                SET("point=#{point}");
            }

            WHERE("id=#{id}");
        }}.toString();
    }
}
PageHelper分页插件使用
1、引入依赖
<!-- 分页插件依赖 -->
<dependency>
<groupId>com.github.pagehelper</groupId>
<artifactId>pagehelper</artifactId>
<version>4.1.0</version>
</dependency>
2、增加配置文件
@Configuration
public class MyBatisConfig {
@Bean
public PageHelper pageHelper(){
PageHelper pageHelper = new PageHelper();
Properties p = new Properties();
p.setProperty("offsetAsPageNum","true");
p.setProperty("rowBoundsWithCount","true");
p.setProperty("reasonable","true");
pageHelper.setProperties(p);
return pageHelper;
}
}
3、包装类
PageHelper.startPage(page, size);
PageInfo<VideoOrder> pageInfo = new PageInfo<>(list);
/**
* 分页接口
* @param page 当前页码 默认第一页
* @param size 每页大小
* @return
*/
@GetMapping("page")
public Object pageVideo(@RequestParam(value="page",defaultValue = "1")int page,
@RequestParam(value="size",defaultValue = "10")int size){
PageHelper.startPage(page, size);
List<Video> videos = videoService.findAll();
PageInfo<Video> pageInfo = new PageInfo<>(videos);
Map<String,Object> data = new HashMap<>();
data.put("total_size",pageInfo.getTotal());//总条数
data.put("total_page",pageInfo.getPages());//总页数
data.put("current_page",page);//当前页码
data.put("data",pageInfo.getList());//数据
return data;
}
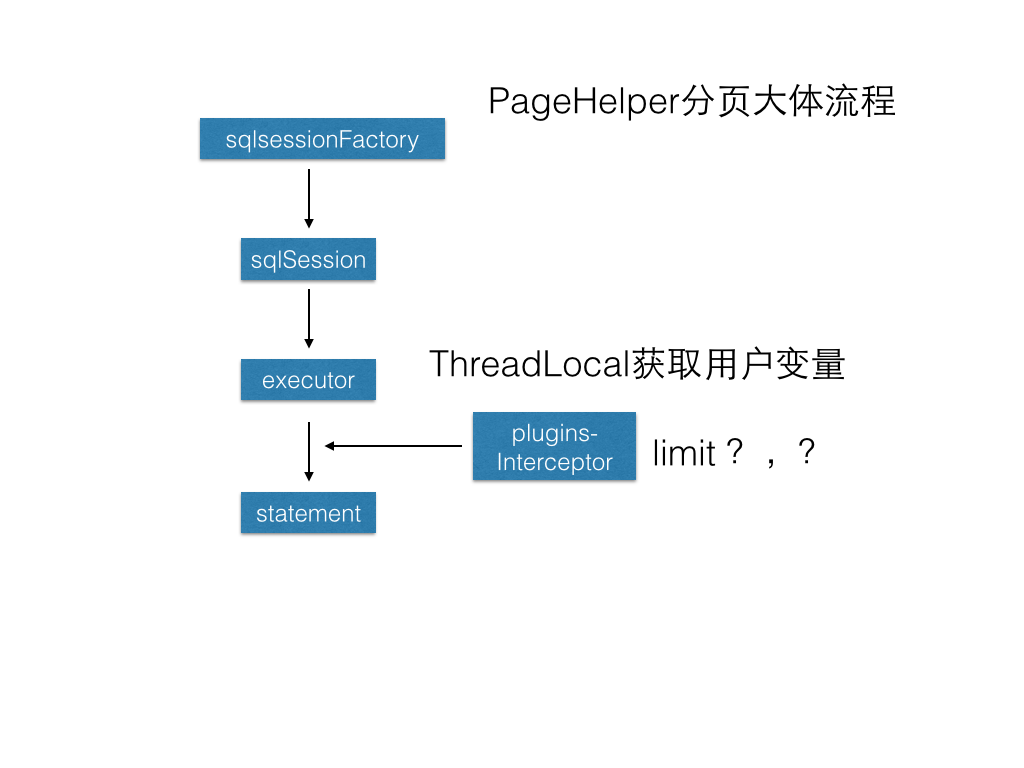
4、基本原理
sqlsessionFactory -> sqlSession-> executor -> mybatis sql statement
通过mybatis plugin 增加拦截器,然后拼装分页
org.apache.ibatis.plugin.Interceptor
JWT微服务下的用户登录权限校验
单机和分布式应用的登录检验
1、单机tomcat应用登录检验
            sesssion保存在浏览器和应用服务器会话之间
            用户登录成功,服务端会保证一个session,当然会给客户端一个sessionId,
            客户端会把sessionId保存在cookie中,每次请求都会携带这个sessionId

2、分布式应用中session共享
            真实的应用不可能单节点部署,所以就有个多节点登录session共享的问题需要解决
            1)tomcat支持session共享,但是有广播风暴;用户量大的时候,占用资源就严重,不推荐
            2)使用redis存储token:
             服务端使用UUID生成随机64位或者128位token,放入redis中,然后返回给客户端并存储在cookie中
             用户每次访问都携带此token,服务端去redis中校验是否有此用户即可
微服务下登录检验解决方案 JWT
微服务下登录检验解决方案 JWT讲解 json wen token
1、JWT 是一个开放标准,它定义了一种用于简洁,自包含的用于通信双方之间以 JSON 对象的形式安全传递信息的方法。
JWT 可以使用 HMAC 算法或者是 RSA 的公钥密钥对进行签名

简单来说,就是通过一定规范来生成token,然后可以通过解密算法逆向解密token,这样就可以获取用户信息
            {
                id:888,
                name:'小D',
                expire:10000
            }

            funtion 加密(object, appsecret){
                xxxx
                return base64( token);
            }

            function 解密(token ,appsecret){

                xxxx
                //成功返回true,失败返回false
            }

            优点:
                1)生产的token可以包含基本信息,比如id、用户昵称、头像等信息,避免再次查库

                2)存储在客户端,不占用服务端的内存资源

            缺点:
                token是经过base64编码,所以可以解码,因此token加密前的对象不应该包含敏感信息
                如用户权限,密码等

2、JWT格式组成 头部、负载、签名
           header+payload+signature

           头部:主要是描述签名算法
           负载:主要描述是加密对象的信息,如用户的id等,也可以加些规范里面的东西,如iss签发者,exp 过期时间,sub 面向的用户
           签名:主要是把前面两部分进行加密,防止别人拿到token进行base解密后篡改token

3、关于jwt客户端存储
            可以存储在cookie,localstorage和sessionStorage里面
登录检验JWT实战之封装通用方法
引入相关依赖并开发JWT工具类
        1、加入相关依赖

            <!-- JWT相关 -->
            <dependency>
                <groupId>io.jsonwebtoken</groupId>
                <artifactId>jjwt</artifactId>
                <version>0.7.0</version>
            </dependency>

        2、开发生产token方法


        3、开发检验token方法
package com.xdclass.xdvideo.utils;

import com.xdclass.xdvideo.domain.User;
import io.jsonwebtoken.Claims;
import io.jsonwebtoken.Jwts;
import io.jsonwebtoken.SignatureAlgorithm;

import java.util.Date;

/**
 * JWT工具类
 */
public class JwtUtils {

    public static final String SUBJECT = "xdclass";

    public static final long EXPIRE = 1000*60*60*24*7;  //过期时间,毫秒,一周

    //秘钥
    public static final  String APPSECRET = "xd666";

    /**
     * 生成jwt
     * @param user
     * @return
     */
    public static String geneJsonWebToken(User user){
        if(user == null || user.getId() == null || user.getName() == null
                || user.getHeadImg()==null){
            return null;
        }
        String token = Jwts.builder().setSubject(SUBJECT)
                .claim("id",user.getId())
                .claim("name",user.getName())
                .claim("img",user.getHeadImg())
                .setIssuedAt(new Date())
                .setExpiration(new Date(System.currentTimeMillis()+EXPIRE))
                .signWith(SignatureAlgorithm.HS256,APPSECRET).compact();

        return token;
    }

    /**
     * 校验token
     * @param token
     * @return
     */
    public static Claims checkJWT(String token){

        try{
            final Claims claims =  Jwts.parser().setSigningKey(APPSECRET).
                    parseClaimsJws(token).getBody();
            return  claims;

        }catch (Exception e){ }
        return null;

    }
}
微信授权用户接口开发
数据信息安全—微信授权一键登录功能介绍
        1、手机号或者邮箱注册
                    优点:
                        1)企业获取了用户的基本资料信息,利于后续业务发展
                            推送营销类信息
                        2)用户可以用个手机号或者邮箱获取对应的app福利
                            注册送优惠券
                        3)反馈信息的时候方便,直接报手机号即可
                            账户出问题,被盗等

                缺点:
                    1)步骤多
                    2)如果站点不安全,如站点被攻击,泄漏了个人信息,如手机号,密码等
                    3)少量不良企业贩卖个人信息,如手机号

        2、OAuth2.0一键授权登录
            例子:
                豆瓣:www.douban.com
                小D课堂:www.xdclass.net

            优点:
                使用快捷,用户体验好,数据相对安全
            缺点:
                1、反馈问题麻烦,比较难知道唯一标识
                2、如果是企业下面有多个应用,其中有应用不支持Auth2.0登录,则没法做到用户信息打通,积分                 不能复用等
                    如app接入了微信授权登录,但是网站没有,则打不通,
                    或者授权方只提供了一种终端授权,则信息无法打通,

        3、选择方式:
            1)看企业和实际业务情况
            2)务必区分,普通密码和核心密码
微信扫一扫功能开发前期准备
        1、微信开放平台介绍(申请里面的网站应用需要企业资料)
                    网站:https://open.weixin.qq.com/

        2、什么是appid、appsecret、授权码code
            appid和appsecret是 资源所有者向申请人分配的一个id和秘钥
            code是授权凭证,A->B 发起授权,想获取授权用户信息,那a必须携带授权码,才可以向B获取授权信息

            (你要从我这里拿东西出去,就必须带身份证)
微信Oauth2.0交互流程讲解
参考:https://open.weixin.qq.com/cgi-bin/showdocument?action=dir_list&t=resource/res_list&verify=1&id=open1419316505&token=&lang=zh_CN


        1、区分角色 用户,第三应用,微信开放平台
            画图讲解

        2、如果想看时序图知识,请跳转到微信支付章节,时序图知识讲解
微信授权一键登录开发之授权URL获取
获取微信开放平台扫码连url地址
1、增加结果工具类,JsonData;  增加application.properties配置
        #微信开放平台配置
        wxopen.appid=
        wxopen.appsecret=
        #重定向url
        wxopen.redirect_url=http://test/pub/api/v1/wechat/user/callback1

      wechatConfig里面增加属性

    /**
     * 微信开放平台二维码连接
     */
    private final static String OPEN_QRCODE_URL= "https://open.weixin.qq.com/connect/qrconnect?appid=%s&redirect_uri=%s&response_type=code&scope=snsapi_login&state=%s#wechat_redirect";


    2、拼接url
#=================================微信相关==================
#公众号
wxpay.appid=wx5beac15ca207cdd40c
wxpay.appsecret=554801238f17fdsdsdd6f96b382fe548215e9

#微信开放平台配置
wxopen.appid=wx025575eac69a2d5b
wxopen.appsecret=deeae310a387fa9d3e8f3830ce64caac
#重定向url
wxopen.redirect_url=http://wesell.natapp1.cc/pub/api/v1/wechat/user/callback1
package com.xdclass.xdvideo.config;

import org.springframework.beans.factory.annotation.Value;
import org.springframework.context.annotation.Configuration;
import org.springframework.context.annotation.PropertySource;

/**
 * 微信配置类
 */
@Configuration
@PropertySource(value="classpath:application.properties")
public class WeChatConfig {


    /**
     * 公众号appid
     */
    @Value("${wxpay.appid}")
    private String appId;

    /**
     * 公众号秘钥
     */
    @Value("${wxpay.appsecret}")
    private String appsecret;


    /**
     * 开放平台appid
     */
    @Value("${wxopen.appid}")
    private String openAppid;

    /**
     * 开放平台appsecret
     */
    @Value("${wxopen.appsecret}")
    private String openAppsecret;


    /**
     * 开放平台回调url
     */
    @Value("${wxopen.redirect_url}")
    private String openRedirectUrl;


    /**
     * 微信开放平台二维码连接
     */
    private final static String OPEN_QRCODE_URL= "https://open.weixin.qq.com/connect/qrconnect?appid=%s&redirect_uri=%s&response_type=code&scope=snsapi_login&state=%s#wechat_redirect";


    public static String getOpenQrcodeUrl() {
        return OPEN_QRCODE_URL;
    }

    public String getOpenAppid() {
        return openAppid;
    }

    public void setOpenAppid(String openAppid) {
        this.openAppid = openAppid;
    }

    public String getOpenAppsecret() {
        return openAppsecret;
    }

    public void setOpenAppsecret(String openAppsecret) {
        this.openAppsecret = openAppsecret;
    }

    public String getOpenRedirectUrl() {
        return openRedirectUrl;
    }

    public void setOpenRedirectUrl(String openRedirectUrl) {
        this.openRedirectUrl = openRedirectUrl;
    }

    public String getAppId() {
        return appId;
    }

    public void setAppId(String appId) {
        this.appId = appId;
    }

    public String getAppsecret() {
        return appsecret;
    }

    public void setAppsecret(String appsecret) {
        this.appsecret = appsecret;
    }
}
package com.xdclass.xdvideo.controller;

import com.xdclass.xdvideo.config.WeChatConfig;
import com.xdclass.xdvideo.domain.JsonData;
import org.springframework.beans.factory.annotation.Autowired;
import org.springframework.stereotype.Controller;
import org.springframework.web.bind.annotation.GetMapping;
import org.springframework.web.bind.annotation.RequestMapping;
import org.springframework.web.bind.annotation.RequestParam;
import org.springframework.web.bind.annotation.ResponseBody;

import java.io.UnsupportedEncodingException;
import java.net.URLEncoder;

@Controller
@RequestMapping("/api/v1/wechat")
public class WechatController {

    @Autowired
    private WeChatConfig weChatConfig;

    /**
     * 拼装微信扫一扫登录url
     * @return
     */
    @GetMapping("login_url")
    @ResponseBody
    public JsonData loginUrl(@RequestParam(value = "access_page",required = true)String accessPage) throws UnsupportedEncodingException {

        String redirectUrl = weChatConfig.getOpenRedirectUrl(); //获取开放平台重定向地址

        String callbackUrl = URLEncoder.encode(redirectUrl,"GBK"); //进行编码

        String qrcodeUrl = String.format(weChatConfig.getOpenQrcodeUrl(),weChatConfig.getOpenAppid(),callbackUrl,accessPage);

        return JsonData.buildSuccess(qrcodeUrl);
    }

}
HttpClient4.x工具获取使用
httpClient4.x相关依赖,并封装基本方法。
 1、加入依赖
        <dependency>
                <groupId>org.apache.httpcomponents</groupId>
                <artifactId>httpclient</artifactId>
                <version>4.5.3</version>
            </dependency>
            <dependency>
                <groupId>org.apache.httpcomponents</groupId>
                <artifactId>httpmime</artifactId>
                <version>4.5.2</version>
            </dependency>

            <dependency>
                <groupId>commons-codec</groupId>
                <artifactId>commons-codec</artifactId>
            </dependency>
            <dependency>
                <groupId>commons-logging</groupId>
                <artifactId>commons-logging</artifactId>
                <version>1.1.1</version>
            </dependency>
                    <dependency>
                    <groupId>org.apache.httpcomponents</groupId>
                    <artifactId>httpcore</artifactId>
            </dependency>


        <!-- gson工具,封装http的时候使用 -->
        <dependency>
            <groupId>com.google.code.gson</groupId>
            <artifactId>gson</artifactId>
            <version>2.8.0</version>
        </dependency>

    2、封装工具类的使用
        封装doGet doPost
package com.xdclass.xdvideo.utils;


import com.google.gson.Gson;
import org.apache.http.HttpEntity;
import org.apache.http.HttpResponse;
import org.apache.http.client.config.RequestConfig;
import org.apache.http.client.methods.CloseableHttpResponse;
import org.apache.http.client.methods.HttpGet;
import org.apache.http.client.methods.HttpPost;
import org.apache.http.entity.StringEntity;
import org.apache.http.impl.client.CloseableHttpClient;
import org.apache.http.impl.client.HttpClients;
import org.apache.http.util.EntityUtils;

import java.util.HashMap;
import java.util.Map;

/**
 * 封装http请求
 */
public class HttpUtils {

    private static  final Gson gson = new Gson();

    /**
     * get方法
     * @param url
     * @return
     */
    public static Map<String,Object> doGet(String url){

        Map<String,Object> map = new HashMap<>();
        CloseableHttpClient httpClient =  HttpClients.createDefault();

        RequestConfig requestConfig =  RequestConfig.custom().setConnectTimeout(5000) //连接超时
                .setConnectionRequestTimeout(5000)//请求超时
                .setSocketTimeout(5000)
                .setRedirectsEnabled(true)  //允许自动重定向
                .build();

        HttpGet httpGet = new HttpGet(url);
        httpGet.setConfig(requestConfig);

        try{
            HttpResponse httpResponse = httpClient.execute(httpGet);
            if(httpResponse.getStatusLine().getStatusCode() == 200){

                String jsonResult = EntityUtils.toString( httpResponse.getEntity());
                map = gson.fromJson(jsonResult,map.getClass());
            }

        }catch (Exception e){
            e.printStackTrace();
        }finally {
            try {
                httpClient.close();
            }catch (Exception e){
                e.printStackTrace();
            }
        }
        return map;
    }


    /**
     * 封装post
     * @return
     */
    public static String doPost(String url, String data,int timeout){
        CloseableHttpClient httpClient =  HttpClients.createDefault();
        //超时设置

        RequestConfig requestConfig =  RequestConfig.custom().setConnectTimeout(timeout) //连接超时
                .setConnectionRequestTimeout(timeout)//请求超时
                .setSocketTimeout(timeout)
                .setRedirectsEnabled(true)  //允许自动重定向
                .build();


        HttpPost httpPost  = new HttpPost(url);
        httpPost.setConfig(requestConfig);
        httpPost.addHeader("Content-Type","application/json; chartset=UTF-8");

        if(data != null && data instanceof  String){ //使用字符串传参
            StringEntity stringEntity = new StringEntity(data,"UTF-8");
            httpPost.setEntity(stringEntity);
        }
        System.out.println("Executing request " + httpPost.getRequestLine());
        try{

            CloseableHttpResponse httpResponse = httpClient.execute(httpPost);
            HttpEntity httpEntity = httpResponse.getEntity();
            if(httpResponse.getStatusLine().getStatusCode() == 200){
                String result = EntityUtils.toString(httpEntity);
                return result;
            }

        }catch (Exception e){
            e.printStackTrace();
        }finally {
            try{
                httpClient.close();
            }catch (Exception e){
                e.printStackTrace();
            }
        }

        return null;

    }
}
微信扫码登录回调本地域名映射工具Ngrock
1、为什么要用这个,微信扫码需要配置回调,需要配置对应的域名
           在本地电脑开发,微信没法回调,所以需要配置个地址映射,就是微信服务器
           可以通过这个地址访问当前开发电脑的地址

2、使用文档:
            https://mp.weixin.qq.com/s/oakwABv56Jc6u450AHt9iA
授权登录获取微信用户个人信息实战
使用授权码code获取用户个人信息接口
关键点:看微信文档,字段尽量用拷贝

        1、通过code获取access_token
        文档:
            https://open.weixin.qq.com/cgi-bin/showdocument?action=dir_list&t=resource/res_list&verify=1&id=open1419316505&token=7e1296c8174816ac988643825ae16f25d8c7e781&lang=zh_CN

        2、通过access_token获取微信用户头像和昵称等基本信息

        文档:https://open.weixin.qq.com/cgi-bin/showdocument?action=dir_list&t=resource/res_list&verify=1&id=open1419316518&token=7e1296c8174816ac988643825ae16f25d8c7e781&lang=zh_CN
用户模块开发之保存微信用户信息
开发User数据访问层,保存微信用户信息
        问题:
            微信回调 用户昵称乱码
            解决:
                nickname = new String(nickname.getBytes("ISO-8859-1"), "UTF-8");

        1、封装User对象


        2、插入数据库
            获取openid后,查询是否有此用户,如果有则不发请求去获取用户信息
            方法:保存用户,根据id查询用户,根据openid查询用户

        3、mybatis参数注意
            取值用 #{} ,别用${},因为存在sql注入风险
使用JWT生成用户Token回写客户端
用户授权登录后,需要生成登录凭证重定向到页面上
        1、获取当前页面访问地址

        2、根据User基本信息生成token

        3、重定向到指定页面
Springboot2.x用户登录拦截器开发实战
实战开发用户登录拦截器拦截器 LoginInterceptor
1、实现接口 LoginInterceptor implements HandlerInterceptor

        2、重写preHandler
             String accessToken = request.getHeader("token");
            if(accessToken == null){
                accessToken = request.getParameter("token");
            }
            if (accessToken != null ) {
                Claims claims = JWTUtils.checkJWT(accessToken);
                Integer id = (Integer)claims.get("id");
                String  name = (String)claims.get("name");
                request.setAttribute("user_id",id);
                request.setAttribute("name",name);
                //普通用户
                return true;

            }
            return false;
        3、配置拦截器
        @Configuration
        InterceptorConfig implements WebMvcConfigurer

         @Override
        public void addInterceptors(InterceptorRegistry registry) {

            registry.addInterceptor(new LoginInterceptor()).addPathPatterns("/user/api/v1/*/**");

            WebMvcConfigurer.super.addInterceptors(registry);
        }


        4、响应前端数据

        public static void sendJsonMessage(HttpServletResponse response, Object obj) throws Exception {
            Gson g = new Gson();
            response.setContentType("application/json; charset=utf-8");
            PrintWriter writer = response.getWriter();
            writer.print(g.toJson(obj));
            writer.close();
            response.flushBuffer();
        }
接入微信扫一扫网页支付
常用的第三方支付和聚合支付介绍
1、什么是第三方支付
        第三方支付是指具备一定实力和信誉保障的独立机构,采用与各大银行签约的方式,通过与银行支付结算系统接口对接而促成交易双方进行交易的网络支付模式。

        通俗的例子:
            支付宝,微信支付,百度钱包,PayPal(主要是欧美国家)

            拉卡拉(中国最大线下便民金融服务提供商)

        优点:
            1、支付平台降低了政府、企业、事业单位直连银行的成本,满足了企业专注发展在线业务的收付要求。

            2、使用方便。对支付者而言,他所面对的是友好的界面,不必考虑背后复杂的技术操作过程

        缺点:
            1、风险问题,
            在电子支付流程中,资金都会在第三方支付服务商处滞留即出现所谓的资金沉淀,如缺乏有效的流动性管理,则可能存在资金安全和支付的风险

            2、电子支付经营资格的认知、保护和发展问题

    2、什么是聚合支付
        解释:
            聚合支付是相对之前的第三方支付而言的,作为对第三方支付平台服务的拓展,第三方支付是介于银行和商户之间的,而聚合支付是介于第三方支付和商户之间

        出现的场景:
            一堆第三方支付出现,并通过大量的钱补贴线上商家使用它们的支付,导致商户收银台堆满各种
            POS机器,扫码设备,商户还需要去各家支付公司申请账号,结算等


        解决的问题:聚合支付公司提供的二维码,支付多种方式支付,不再是一种,各个公司的竞争,就是支付渠道和方式的支持

        了解更多:https://www.zhihu.com/question/50426677
申请微信支付介绍和不同场景的支付方式
介绍微信商户平台,支付方式和使用场景,申请微信支付流程
        1、什么是微信商户平台:
                    地址:https://pay.weixin.qq.com
                    提供给商家使用,用于查看交易数据,提现等信息

        2、常用的支付方式 公众号支付,扫码支付,app支付,小程序支付
            官方地址:https://pay.weixin.qq.com/wiki/doc/api/index.html
            案例演示: https://pay.weixin.qq.com/guide/webbased_payment.shtml

        3、微信支付申请流程 https://pay.weixin.qq.com/guide/qrcode_payment.shtml
            1)申请公众号(服务号)  认证费 300
            2)开通微信支付
微信网站扫码支付介绍
        1、扫码支付文档:https://pay.weixin.qq.com/wiki/doc/api/native.php?chapter=2_2

        2、名称理解

            appid:公众号唯一标识
            appsecret:公众号的秘钥

            mch_id:商户号,申请微信支付的时候分配的
            key:支付交易过程生成签名的秘钥,设置路径
                微信商户平台(pay.weixin.qq.com)-->账户中心-->账户设置-->API安全-->密钥设置


        3、和微信支付交互方式
            1、post方式提交
            2、xml格式的协议
            3、签名算法MD5

            4、交互业务规则 先判断协议字段返回,再判断业务返回,最后判断交易状态
            5、接口交易单位为 分
            6、交易类型:JSAPI--公众号支付、NATIVE--原生扫码支付、APP--app支付


            7、商户订单号规则:
                商户支付的订单号由商户自定义生成,仅支持使用字母、数字、中划线-、下划线_、竖线|、星号*这些英文半角字符的组合,请勿使用汉字或全角等特殊字符,微信支付要求商户订单号保持唯一性

            8、安全规范:
                 签名算法:https://pay.weixin.qq.com/wiki/doc/api/native.php?chapter=4_3
                 校验工具:https://pay.weixin.qq.com/wiki/doc/api/native.php?chapter=20_1

            9、采用微信支付扫码模式二(不依赖商户平台设置回调url)
互联网架构知识时序图讲解
微信支付时序图 官方文档:
        https://pay.weixin.qq.com/wiki/doc/api/native.php?chapter=6_5

        1、什么是时序图
            是一种UML交互图,描述了对象之间传递消息的时间顺序, 用来表示用例中的行为顺序, 是强调消息时间           顺序的交互图;

            通俗解释:就是交互流程图 (把大象装冰箱分几步)


        2、时序图包括四个元素 对象(Object), 生命线(Lifeline), 激活(Activation), 消息(Message);

            对象:时序图中的对象在交互中扮演的角色就是对象,使用矩形将对象名称包含起来, 名称下有下划线

            生命线:生命线是一条垂直的虚线, 这条虚线表示对象的存在, 在时序图中, 每个对象都有生命线

            激活:代表时序图中对象执行一项操作的时期, 表示该对象被占用以完成某个任务,当对象处于激活时期, 生命线可以拓宽为矩形

            消息:对象之间的交互是通过相互发消息来实现的,箭头上面标出消息名,一个对象可以请求(要求)另一个对象做某件事件
            消息从源对象指向目标对象,消息一旦发送便将控制从源对象转移到目标对象,息的阅读顺序是严格自上而下的

            消息交互中的实线:请求消息
            消息交互中的虚线:响应返回消息

            自己调用自己的方法:反身消息

    参考:https://www.cnblogs.com/langtianya/p/3825764.html
微信网页扫码支付时序图讲解和统一下单接口
讲解微信网页扫码支付时序图讲解和统一下单接口
1、时序图地址:https://pay.weixin.qq.com/wiki/doc/api/native.php?chapter=6_5

2、统一下单接口介绍:
        商户系统先调用该接口在微信支付服务后台生成预支付交易单,返回正确的预支付交易会话标识后再按扫码、JSAPI、APP等不同场景生成交易串调起支付。
微信支付订单接口开发之订单增删改查
微信扫码支付之统一下单接口开发之订单增删改查
package com.xdclass.xdvideo.mapper;

import com.xdclass.xdvideo.domain.VideoOrder;
import org.apache.ibatis.annotations.*;

import java.util.List;

/**
 * 订单dao层
 */
public interface VideoOrderMapper {


    /**
     * 保存订单,返回包含主键
     * @param videoOrder
     * @return
     */
    @Insert("INSERT INTO `video_order` (`openid`, `out_trade_no`, `state`, `create_time`," +
            " `notify_time`, `total_fee`, `nickname`, `head_img`, `video_id`, `video_title`," +
            " `video_img`, `user_id`, `ip`, `del`)" +
            "VALUES" +
            "(#{openid},#{outTradeNo},#{state},#{createTime},#{notifyTime},#{totalFee}," +
            "#{nickname},#{headImg},#{videoId},#{videoTitle},#{videoImg},#{userId},#{ip},#{del});")
    @Options(useGeneratedKeys = true,keyProperty = "id",keyColumn = "id")
    int insert(VideoOrder videoOrder);


    /**
     * 根据主键查找订单
     * @param id
     * @return
     */
    @Select("select * from video_order where id=#{order_id} and del=0")
    VideoOrder findById(@Param("order_id") int id);


    /**
     * 根据交易订单号获取订单对象
     * @param outTradeNo
     * @return
     */
    @Select("select * from video_order where out_trade_no=#{out_trade_no} and del=0")
    VideoOrder findByOutTradeNo(@Param("out_trade_no") String outTradeNo);


    /**
     * 逻辑删除订单
     * @param id
     * @param userId
     * @return
     */
    @Update("update video_order set del=0 where id=#{id} and user_id =#{userId}")
    int del(@Param("id") int id, @Param("userId") int userId);


    /**
     * 查找我的全部订单
     * @param userId
     * @return
     */
    @Select("select * from video_order where user_id =#{userId}")
    List<VideoOrder> findMyOrderList(int userId);


    /**
     * 根据订单流水号更新
     * @param videoOrder
     * @return
     */
    @Update("update video_order set state=#{state}, notify_time=#{notifyTime}, openid=#{openid}" +
            " where out_trade_no=#{outTradeNo} and state=0 and del=0")
    int updateVideoOderByOutTradeNo(VideoOrder videoOrder);


}
IDE生成订单接口单元测试和断言开发
service接口函数上右键 转到测试 创建测试
        1、 核心注解
                    @RunWith(SpringRunner.class)
                    @SpringBootTest

        2、根据公司情况,写单元测试,核心接口一定要写,非核心的尽量写

        3、断言类型,可以细化
package com.xdclass.xdvideo.mapper;

import com.xdclass.xdvideo.domain.VideoOrder;
import org.junit.Test;
import org.junit.runner.RunWith;
import org.springframework.beans.factory.annotation.Autowired;
import org.springframework.boot.test.context.SpringBootTest;
import org.springframework.test.context.junit4.SpringRunner;

import static org.junit.Assert.*;

@RunWith(SpringRunner.class)
@SpringBootTest
public class VideoOrderMapperTest {

    @Autowired
    private VideoOrderMapper videoOrderMapper;

    @Test
    public void insert() {
        VideoOrder videoOrder = new VideoOrder();
        videoOrder.setDel(0);
        videoOrder.setTotalFee(111);
        videoOrder.setHeadImg("xxxxdfsdfs");
        videoOrder.setVideoTitle("springBoot高级视频教程");
        videoOrderMapper.insert(videoOrder);
        assertNotNull(videoOrder.getId());
    }

    @Test
    public void findById() {
        VideoOrder videoOrder = videoOrderMapper.findById(1);
        assertNotNull(videoOrder);
    }

    @Test
    public void findByOutTradeNo() {
    }

    @Test
    public void del() {
    }

    @Test
    public void findMyOrderList() {
    }

    @Test
    public void updateVideoOderByOutTradeNo() {
    }
}
微信统一下单接口开发CommonUtils和WXpayUtils开发
封装常用工具类CommonUtils和WXpayUtils
从微信开发者文档获取部分代码 https://pay.weixin.qq.com/wiki/doc/api/native.php?chapter=11_1

    1、CommonUtils包含方法 md5,uuid等
        //生成 uuid, 即用来标识一笔单,也用做 nonce_str
        public static String generateUUID() {
            return UUID.randomUUID().toString().replaceAll("-", "")
                    .substring(0, 32);
        }

        //MD5工具类
        public static String MD5(String data)  {
            try {
                java.security.MessageDigest md = MessageDigest.getInstance("MD5");
                byte[] array = md.digest(data.getBytes("UTF-8"));
                StringBuilder sb = new StringBuilder();
                for (byte item : array) {
                    sb.append(Integer.toHexString((item & 0xFF) | 0x100).substring(1, 3));
                }
                return sb.toString().toUpperCase();
            } catch (Exception exception) {
            }
            return null;

        }

    2、WXPayUtil包含方法 xmlToMap,mapToXml,createSign,isCorrectPaySign
微信支付Controller下单API接口开发
讲解下单接口开发,开发技巧和支付配置文件设置
        1、开发controller,开发期间不加入拦截器登录校验
        2、iputils工具类介绍
        3、加入微信支付配置
            #微信商户平台
            wxpay.mer_id=1503808832
            wxpay.key=xdclasss20182018xdclass2018x018d
            wxpay.callback=16web.tunnel.qydev.com/pub/api/v1/wechat/order/callback1
微信支付下单API接口和签名开发
下单接口开发和微信支付签名生成开发,并设置微信回调地址(用于用户微信支付成功后,通知我们服务器完成更新订单状态)
1、统一下单参数需要微信签名,签名规则如下
            文档地址:https://pay.weixin.qq.com/wiki/doc/api/native.php?chapter=4_3
            签名生成的通用步骤如下:

            第一步,设所有发送或者接收到的数据为集合M,将集合M内非空参数值的参数按照参数名ASCII码从小到大排序(字典序),使用URL键值对的格式(即key1=value1&key2=value2…)拼接成字符串stringA。

            第二步,在stringA最后拼接上key得到stringSignTemp字符串,并对stringSignTemp进行MD5运算,再将得到的字符串所有字符转换为大写,得到sign值signValue。key设置路径:微信商户平台(pay.weixin.qq.com)-->账户设置-->API安全-->密钥设置

            参数
                SortedMap<String, String> params = new TreeMap<>();
                params.put("appid", wxPayConfig.getAppId());  //公众账号ID
                params.put("mch_id", wxPayConfig.getMchId());  //商户号
                params.put("nonce_str", CommonUtil.generateNonceStr());  //随机字符串
                params.put("body", videoOrder.getVideoTitle());  // 商品描述
                params.put("out_trade_no", videoOrder.getOutTradeNo()); //商户订单号,商户系统内部订单号,要求32个字符内,只能是数字、大小写字母_-|* 且在同一个商户号下唯一
                params.put("total_fee", videoOrder.getTotalFee().toString());  //标价金额   分
                params.put("spbill_create_ip", videoOrder.getIp());
                params.put("notify_url", wxPayConfig.getDomain()+wxPayConfig.getCallbackUrl()); //通知地址
                params.put("trade_type", "NATIVE");  //交易类型 JSAPI 公众号支付 NATIVE 扫码支付 APP APP支付

                //生成签名
                String sign = WXPayUtil.createSign(params, wxPayConfig.getKey());
                params.put("sign", sign);
                //参数转xml
                String requestXMl = WXPayUtil.mapToXml(params);

                生成签名后,通过工具去校验
                https://pay.weixin.qq.com/wiki/doc/api/native.php?chapter=20_1

        2、测试地址:localhost:8081/api/v1/order/add?video_id=2


        3、课程测试签名结果

            sign: 85118C91DFCB052FB02AC183BF3D57D2

            <?xml version="1.0" encoding="UTF-8" standalone="no"?>
            <xml>
            <appid>wx5beac15ca207cdd40c</appid>
            <body>高级教程666</body>
            <mch_id>1503808832</mch_id>
            <nonce_str>b11446ae6fc14ddb89c9bc5fa291dc43</nonce_str>
            <notify_url>16web.tunnel.qydev.com/pub/api/v1/wechat/order/callback1</notify_url>
            <out_trade_no>2a273e4b9f8c453380a08c7930fc3b6b</out_trade_no>
            <sign>85118C91DFCB052FB02AC183BF3D57D2</sign>
            <spbill_create_ip>0:0:0:0:0:0:0:1</spbill_create_ip>
            <total_fee>500</total_fee>
            <trade_type>NATIVE</trade_type>
            </xml>
注意连接字符串在 &前有没有空格,最好加上trim
调用微信统一下单接口实战
调用微信统一下单接口实战,发送post请求,并获取响应转成map,获取交易会话的二维码链接code_url。
1、配置统一下单接口
        2、发送请求验证
            微信统一下单响应
                <xml><return_code><![CDATA[SUCCESS]]></return_code>
                <return_msg><![CDATA[OK]]></return_msg>
                <appid><![CDATA[wx5beac15ca207c40c]]></appid>
                <mch_id><![CDATA[1503809911]]></mch_id>
                <nonce_str><![CDATA[Go5gDC2CYL5HvizG]]></nonce_str>
                <sign><![CDATA[BC62592B9A94F5C914FAAD93ADE7662B]]></sign>
                <result_code><![CDATA[SUCCESS]]></result_code>
                <prepay_id><![CDATA[wx262207318328044f75c9ebec2216783076]]></prepay_id>
                <trade_type><![CDATA[NATIVE]]></trade_type>
                <code_url><![CDATA[weixin://wxpay/bizpayurl?pr=hFq9fX6]]></code_url>
                </xml>
        3、获取code_url

            遇到问题,根据错误码解决
            https://pay.weixin.qq.com/wiki/doc/api/native.php?chapter=9_1
本地ip会出现问题,随便模拟一个ip
package com.xdclass.xdvideo.service.impl;

import com.xdclass.xdvideo.config.WeChatConfig;
import com.xdclass.xdvideo.domain.User;
import com.xdclass.xdvideo.domain.Video;
import com.xdclass.xdvideo.domain.VideoOrder;
import com.xdclass.xdvideo.dto.VideoOrderDto;
import com.xdclass.xdvideo.mapper.UserMapper;
import com.xdclass.xdvideo.mapper.VideoMapper;
import com.xdclass.xdvideo.mapper.VideoOrderMapper;
import com.xdclass.xdvideo.service.VideoOrderService;
import com.xdclass.xdvideo.utils.CommonUtils;
import com.xdclass.xdvideo.utils.HttpUtils;
import com.xdclass.xdvideo.utils.WXPayUtil;
import org.springframework.beans.factory.annotation.Autowired;
import org.springframework.stereotype.Service;

import java.util.Date;
import java.util.Map;
import java.util.SortedMap;
import java.util.TreeMap;

@Service
public class VideoOrderServiceImpl implements VideoOrderService {

    @Autowired
    private WeChatConfig weChatConfig;

    @Autowired
    private VideoMapper videoMapper;

    @Autowired
    private VideoOrderMapper videoOrderMapper;

    @Autowired
    private UserMapper userMapper;

    @Override
    public String save(VideoOrderDto videoOrderDto) throws Exception {
        //查找视频信息
        Video video =  videoMapper.findById(videoOrderDto.getVideoId());

        //查找用户信息
        User user = userMapper.findByid(videoOrderDto.getUserId());


        //生成订单
        VideoOrder videoOrder = new VideoOrder();
        videoOrder.setTotalFee(video.getPrice());
        videoOrder.setVideoImg(video.getCoverImg());
        videoOrder.setVideoTitle(video.getTitle());
        videoOrder.setCreateTime(new Date());
        videoOrder.setVideoId(video.getId());
        videoOrder.setState(0);
        videoOrder.setUserId(user.getId());
        videoOrder.setHeadImg(user.getHeadImg());
        videoOrder.setNickname(user.getName());

        videoOrder.setDel(0);
        videoOrder.setIp(videoOrderDto.getIp());
        videoOrder.setOutTradeNo(CommonUtils.generateUUID());

        videoOrderMapper.insert(videoOrder);

        String codeUrl =  unifiedOrder(videoOrder);


        return codeUrl;
    }
    /**
     * 统一下单方法
     * @return
     */
    private String unifiedOrder(VideoOrder videoOrder) throws Exception {

        //生成签名
        SortedMap<String,String> params = new TreeMap<>();
        params.put("appid",weChatConfig.getAppId());
        params.put("mch_id", weChatConfig.getMchId());
        params.put("nonce_str",CommonUtils.generateUUID());
        params.put("body",videoOrder.getVideoTitle().trim());
        params.put("out_trade_no",videoOrder.getOutTradeNo());
        params.put("total_fee",videoOrder.getTotalFee().toString());
        params.put("spbill_create_ip",videoOrder.getIp());
        params.put("notify_url",weChatConfig.getPayCallbackUrl());
        params.put("trade_type","NATIVE");

        //sign签名
        String sign = WXPayUtil.createSign(params, weChatConfig.getKey());
        params.put("sign",sign);

        //map转xml
        String payXml = WXPayUtil.mapToXml(params);

        System.out.println(payXml);
        //统一下单

        String orderStr = HttpUtils.doPost(WeChatConfig.getUnifiedOrderUrl(),payXml,4000);
        if(null == orderStr) {
            return null;
        }

        Map<String, String> unifiedOrderMap =  WXPayUtil.xmlToMap(orderStr);
        System.out.println(unifiedOrderMap.toString());
        if(unifiedOrderMap != null) {
            return unifiedOrderMap.get("code_url");
        }

        return null;
    }
}
谷歌二维码工具生成扫一扫支付二维码
使用谷歌二维码工具根据code_url生成扫一扫支付二维码
1、生成二维码返回页端

            加入依赖
                <!-- google二维码生成包 -->
                <dependency>
                    <groupId>com.google.zxing</groupId>
                    <artifactId>javase</artifactId>
                    <version>3.3.0</version>
                </dependency>

                <dependency>
                    <groupId>com.google.zxing</groupId>
                    <artifactId>core</artifactId>
                    <version>2.0</version>
                </dependency>


        2、使用微信扫码完成支付


        参考资料:https://blog.csdn.net/shenfuli/article/details/68923393
                https://www.cnblogs.com/lanxiamo/p/6293580.html

                二维码知识:https://coolshell.cn/articles/10590.html
package com.xdclass.xdvideo.controller;

import com.google.zxing.BarcodeFormat;
import com.google.zxing.EncodeHintType;
import com.google.zxing.MultiFormatWriter;
import com.google.zxing.client.j2se.MatrixToImageWriter;
import com.google.zxing.common.BitMatrix;
import com.google.zxing.qrcode.decoder.ErrorCorrectionLevel;
import com.xdclass.xdvideo.domain.JsonData;
import com.xdclass.xdvideo.dto.VideoOrderDto;
import com.xdclass.xdvideo.service.VideoOrderService;
import com.xdclass.xdvideo.utils.IpUtils;
import org.springframework.beans.factory.annotation.Autowired;
import org.springframework.web.bind.annotation.GetMapping;
import org.springframework.web.bind.annotation.RequestMapping;
import org.springframework.web.bind.annotation.RequestParam;
import org.springframework.web.bind.annotation.RestController;

import javax.servlet.http.HttpServletRequest;
import javax.servlet.http.HttpServletResponse;
import java.io.OutputStream;
import java.util.HashMap;
import java.util.Map;

@RestController
//@RequestMapping("/api/v1/user/order")
@RequestMapping("/api/v1/order")
public class OrderController {

    @Autowired
    private VideoOrderService videoOrderService;


    @GetMapping("add")
    public void saveOrder(@RequestParam(value = "video_id", required = true) int videoId,
                          HttpServletRequest request,
                          HttpServletResponse response
    ) throws Exception {

        //String ip = IpUtils.getIpAddr(request);
        //int userId = request.getAttribute("user_id");
        int userId = 1;
        String ip = "120.25.1.43";
        VideoOrderDto videoOrderDto = new VideoOrderDto();
        videoOrderDto.setUserId(userId);
        videoOrderDto.setVideoId(videoId);
        videoOrderDto.setIp(ip);

        String codeUrl = videoOrderService.save(videoOrderDto);
        if (codeUrl == null) {
            throw new NullPointerException();
        }

        try {
            //生成二维码配置
            Map<EncodeHintType, Object> hints = new HashMap<>();

            //设置纠错等级
            hints.put(EncodeHintType.ERROR_CORRECTION, ErrorCorrectionLevel.L);
            //编码类型
            hints.put(EncodeHintType.CHARACTER_SET, "UTF-8");

            BitMatrix bitMatrix = new MultiFormatWriter().encode(codeUrl, BarcodeFormat.QR_CODE, 400, 400, hints);
            OutputStream out = response.getOutputStream();

            MatrixToImageWriter.writeToStream(bitMatrix, "png", out);

        } catch (Exception e) {
            e.printStackTrace();
        }
    }
}
微信支付扫码回调开发实战
使用Ngrock本地接收微信回调,并开发回调接口
文档:https://pay.weixin.qq.com/wiki/doc/api/app/app.php?chapter=9_7&index=3

         1 、开发支付回调接口

         //读取回调输入流
           StringBuffer sb = new StringBuffer();
           InputStream inputStream = request.getInputStream();
           String line ;
           BufferedReader in = new BufferedReader(new InputStreamReader(inputStream, "UTF-8"));
           while ((line = in.readLine()) != null){
               sb.append(line);
           }
           in.close();
           inputStream.close();

           //解析xml成map
           //{transaction_id=4200000141201805266700247361, nonce_str=cbb67accd8044c9ea48f3318b99d88e4, bank_type=CFT, openid=oiNKG03vVY4PHlGUEwT-ztFo8K8Y, sign=0575804DBE4E9FFF6545046FA062BC4C, fee_type=CNY, mch_id=1503809911, cash_fee=1, out_trade_no=78902e694bab485b8e7745b61e05dbfe, appid=wx5beac15ca207c40c, total_fee=1, trade_type=NATIVE, result_code=SUCCESS, time_end=20180526162759, is_subscribe=Y, return_code=SUCCESS}
           Map<String, String> callbackMap = WXPayUtil.xmlToMap(sb.toString());

           //获取有序map
           SortedMap<String, String> sortedMap = CommonUtil.getSortedMap(callbackMap) ;


           回调数据:
            <xml><appid><![CDATA[wx5beac15ca207c40c]]></appid><bank_type><![CDATA[CFT]]></bank_type><cash_fee><![CDATA[10]]></cash_fee><fee_type><![CDATA[CNY]]></fee_type><is_subscribe><![CDATA[Y]]></is_subscribe><mch_id><![CDATA[1503809911]]></mch_id><nonce_str><![CDATA[de019d5f1e5d40649cd76de33f18b13e]]></nonce_str><openid><![CDATA[oiNKG03vVY4PHlGUEwT-ztFo8K8Y]]></openid><out_trade_no><![CDATA[4d8cea4a916440368583edaf82488624]]></out_trade_no><result_code><![CDATA[SUCCESS]]></result_code><return_code><![CDATA[SUCCESS]]></return_code><sign><![CDATA[FA799B7DF70C2BAC558E839E01EF341A]]></sign><time_end><![CDATA[20180626230347]]></time_end><total_fee>10</total_fee><trade_type><![CDATA[NATIVE]]></trade_type><transaction_id><![CDATA[4200000142201806264038572903]]></transaction_id></xml>

            转成map:
                {transaction_id=4200000142201806264038572903, nonce_str=de019d5f1e5d40649cd76de33f18b13e, bank_type=CFT, openid=oiNKG03vVY4PHlGUEwT-ztFo8K8Y, sign=FA799B7DF70C2BAC558E839E01EF341A, fee_type=CNY, mch_id=1503809911, cash_fee=10, out_trade_no=4d8cea4a916440368583edaf82488624, appid=wx5beac15ca207c40c, total_fee=10, trade_type=NATIVE, result_code=SUCCESS, time_end=20180626230347, is_subscribe=Y, return_code=SUCCESS}


        2、注意点:

            回调要用post方式,微信文档没有写回调的通知方式
            可以用这个注解 @RequestMapping

            问题:一定要看日志
微信回调处理之更新订单状态和幂等性讲解
微信支付回调处理之更新订单状态和讲解什么是接口的幂等性**
微信回调通知规则(通知频率为15/15/30/180/1800/1800/1800/1800/3600,单位:秒)

         幂等性: 同样的参数和值,不管调用你的接口多少次,响应结果都和调用一次是一样的

        1、校验签名是否正确,防止伪造回调

        2、查询订单是否已经更新

        3、若没更新则更新订单状态

        4、回应微信,SUCCESS 或者 FAIL
            response.setContentType("text/xml");
            response.getWriter().println("success");
package com.xdclass.xdvideo.controller;

import com.xdclass.xdvideo.config.WeChatConfig;
import com.xdclass.xdvideo.domain.JsonData;
import com.xdclass.xdvideo.domain.User;
import com.xdclass.xdvideo.domain.VideoOrder;
import com.xdclass.xdvideo.service.UserService;
import com.xdclass.xdvideo.service.VideoOrderService;
import com.xdclass.xdvideo.utils.JwtUtils;
import com.xdclass.xdvideo.utils.WXPayUtil;
import org.springframework.beans.factory.annotation.Autowired;
import org.springframework.stereotype.Controller;
import org.springframework.web.bind.annotation.GetMapping;
import org.springframework.web.bind.annotation.RequestMapping;
import org.springframework.web.bind.annotation.RequestParam;
import org.springframework.web.bind.annotation.ResponseBody;

import javax.servlet.http.HttpServletRequest;
import javax.servlet.http.HttpServletResponse;
import java.io.*;
import java.net.URLEncoder;
import java.util.Date;
import java.util.Map;
import java.util.SortedMap;

@Controller
@RequestMapping("/api/v1/wechat")
public class WechatController {

    @Autowired
    private WeChatConfig weChatConfig;

    @Autowired
    private UserService userService;

    @Autowired
    private VideoOrderService videoOrderService;

    /**
     * 拼装微信扫一扫登录url
     * @return
     */
    @GetMapping("login_url")
    @ResponseBody
    public JsonData loginUrl(@RequestParam(value = "access_page",required = true)String accessPage) throws UnsupportedEncodingException {

        String redirectUrl = weChatConfig.getOpenRedirectUrl(); //获取开放平台重定向地址

        String callbackUrl = URLEncoder.encode(redirectUrl,"GBK"); //进行编码

        String qrcodeUrl = String.format(weChatConfig.getOpenQrcodeUrl(),weChatConfig.getOpenAppid(),callbackUrl,accessPage);

        return JsonData.buildSuccess(qrcodeUrl);
    }

    /**
     * 微信扫码回调
     * @param code
     * @param state
     * @param response
     * @throws IOException
     */
    @GetMapping("/user/callback")
    public void wechatUserCallback(@RequestParam(value = "code",required = true) String code,
                                   String state, HttpServletResponse response) throws IOException {

        User user = userService.saveWeChatUser(code);
        if(user!=null){
            String token =  JwtUtils.geneJsonWebToken(user);
            //发送的时候地址需要加上http://
            response.sendRedirect(state+"?token="+token+"&head_img="+user.getHeadImg()+"&name="+URLEncoder.encode(user.getName(),"utf-8"));
        }

    }

    @GetMapping("test_login")
    @ResponseBody
    public JsonData testLogin() {

        User user = new User();
        user.setId(1);
        user.setName("niliv");
        user.setHeadImg("https://niliv-technology-1252830662.cos.ap-chengdu.myqcloud.com/java/%E5%88%86%E9%A1%B5%E6%8F%92%E4%BB%B6%E6%B5%81%E7%A8%8B.001.png");
        String token = JwtUtils.geneJsonWebToken(user);

        return JsonData.buildSuccess(token);
    }

    /**
     * 微信支付回调
     */
    @RequestMapping("/order/callback")
    public void orderCallback(HttpServletRequest request, HttpServletResponse response) throws Exception {

        InputStream inputStream =  request.getInputStream();

        //BufferedReader是包装设计模式,性能更搞
        BufferedReader in =  new BufferedReader(new InputStreamReader(inputStream,"UTF-8"));
        StringBuffer sb = new StringBuffer();
        String line ;
        while ((line = in.readLine()) != null){
            sb.append(line);
        }
        in.close();
        inputStream.close();
        Map<String,String> callbackMap = WXPayUtil.xmlToMap(sb.toString());
        System.out.println(callbackMap.toString());

        SortedMap<String,String> sortedMap = WXPayUtil.getSortedMap(callbackMap);

        //判断签名是否正确
        if(WXPayUtil.isCorrectSign(sortedMap,weChatConfig.getKey())){

            if("SUCCESS".equals(sortedMap.get("result_code"))){

                String outTradeNo = sortedMap.get("out_trade_no");

                VideoOrder dbVideoOrder = videoOrderService.findByOutTradeNo(outTradeNo);

                if(dbVideoOrder != null && dbVideoOrder.getState()==0){  //判断逻辑看业务场景
                    VideoOrder videoOrder = new VideoOrder();
                    videoOrder.setOpenid(sortedMap.get("openid"));
                    videoOrder.setOutTradeNo(outTradeNo);
                    videoOrder.setNotifyTime(new Date());
                    videoOrder.setState(1);
                    int rows = videoOrderService.updateVideoOderByOutTradeNo(videoOrder);
                    if(rows == 1){ //通知微信订单处理成功
                        response.setContentType("text/xml");
                        response.getWriter().println("success");
                        return;
                    }
                }
            }
        }
        //都处理失败
        response.setContentType("text/xml");
        response.getWriter().println("fail");
    }

}
微信支付之下单事务处理
讲解下单接口增加事务和常见的事务选择
        1、springboot开启事务,启动类里面增加 @EnableTransactionManagement
        2、需要事务的方法上加 @Transactional(propagation = Propagation.REQUIRED)
        3、aop的管理事务的好处和选择
            增,删,改  开启事务
全局异常处理和日志打点统计
配置SpringBoot2.0全局自定义异常
springboot全局自定义异常的使用
1、自定义异常类
2、配置使用
package com.xdclass.xdvideo.exception;


/**
 * 自定义异常类
 */
public class XdException extends RuntimeException {


    /**
     * 状态码
     */
    private Integer code;
    /**
     * 异常消息
     */
    private String msg;


    public XdException(int code, String msg){
        super(msg);
        this.code = code;
        this.msg = msg;
    }

    public Integer getCode() {
        return code;
    }

    public void setCode(Integer code) {
        this.code = code;
    }

    public String getMsg() {
        return msg;
    }

    public void setMsg(String msg) {
        this.msg = msg;
    }
}
package com.xdclass.xdvideo.exception;


import com.xdclass.xdvideo.domain.JsonData;
import org.springframework.web.bind.annotation.ControllerAdvice;
import org.springframework.web.bind.annotation.ExceptionHandler;
import org.springframework.web.bind.annotation.ResponseBody;

/**
 * 异常处理控制器
 */
@ControllerAdvice
public class XdExceptionHandler {


    @ExceptionHandler(value = Exception.class)
    @ResponseBody
    public JsonData Handler(Exception e){

        if(e instanceof XdException){
            XdException xdException =  (XdException)e;
            return JsonData.buildError(xdException.getMsg(),xdException.getCode());
        }else{
            return JsonData.buildError("全局异常,未知错误");
        }
    }
}
使用Logback整合SpringBoot打点日志
使用日志框架整合SpringBoot,并进行打点统计
        1、日志不仅用于排查问题,查看应用运行情况

        2、更可以用于统计,虽然统计可以通过数据库进行统计,但是存在风险,如果用日志,并且建立一个日志系统用于分析
       这样就方便产品和运营人员进行查看分析数据

        3、写日志,可以加缓冲buffer,也可也进行异步
        参考资料:https://blog.csdn.net/zhuyucheng123/article/details/21524549
logback
https://blog.csdn.net/Appleyk/article/details/78717388
前后端联调和跨域处理
联调效果演示和还原接口代码
1、演示效果
2、拦截器开启拦截
3、下单接口还原配置
动静分离之前端项目静态页面引入和相关js包使用
引入前端框架bootstrap和jquery,使用cdn
1、bootstap和jquery介绍和学习资料
            bootstapt:https://v3.bootcss.com/getting-started/
            jquery:http://www.w3school.com.cn/jquery/index.asp

2、知识拓展:什么是内容分发网络,CDN的好处
前后端分离 跨域问题
http://www.spring4all.com/article/177
https://juejin.im/post/5c8f77a05188252d9637fdc8
1、跨域:浏览器同源策略
            1995年,同源政策由 Netscape 公司引入浏览器。目前,所有浏览器都实行这个政策。
            最初,它的含义是指,A网页设置的 Cookie,B网页不能打开,除非这两个网页"同源"。所谓"同源"指的是"三个相同"

            协议相同  http https
            域名相同     www.xdcass.ent
            端口相同  80  81

            一句话:浏览器从一个域名的网页去请求另一个域名的资源时,域名、端口、协议任一不同,都是跨域

            浏览器控制台跨域提示:
            No 'Access-Control-Allow-Origin' header is present on the requested resource. Origin 'null' is therefore not allowed access.


        2、解决方法
            1)JSONP
            2)Http响应头配置允许跨域

                nginx层配置
                    https://www.cnblogs.com/hawk-whu/p/6725699.html


                程序代码中处理
                    SpringBoot自带配置

                @Configuration
                public class Cors extends WebMvcConfigurerAdapter {
                    @Override
                    public void addCorsMappings(CorsRegistry registry) {
                        registry.addMapping("/**")
                                .allowedOrigins("*")
                                .allowedMethods("GET", "POST", "PUT", "OPTIONS", "DELETE", "PATCH")
                                .allowCredentials(true).maxAge(3600);
                    }

                }

        注意点:假如接口报错,则跨域配置不生效
首页视频列表页联调
微信扫一扫登录联调
        1、回调需要配置ngrock和前端页面访问端口(通过工具 webstorm)

        2、微信回调,在url上携带参数

            http://localhost:63343/static/index.html?token=eyJhbGciOiJIUzI1NiJ9.eyJzdWIiOiJ4ZGNsYXNzIiwiaWQiOjQsIm5hbWUiOiLlsI_kuowiLCJpbWciOiJodHRwOi8vdGhpcmR3eC5xbG9nby5jbi9tbW9wZW4vdmlfMzIvUTBqNFR3R1RmVExnS2dqazR0R2hQVmZKaWFWN1FqalNtVFl6dDVPd1hyMG55MnNqSkhmTjREWEV0WE04a25ZZ1JGSlQxQ2txRWpSbEtmUWh4cDdPd2FBLzEzMiIsImlhdCI6MTUzMDQyNzE3NCwiZXhwIjoxNTMxMDMxOTc0fQ.o5xpfafwPLIzUuOmo-nnFZQnvk6aEBp5KozPfq6TmiA&head_img=http://thirdwx.qlogo.cn/mmopen/vi_32/Q0j4TwGTfTLgKgjk4tGhPVfJiaV7QjjSmTYzt5OwXr0ny2sjJHfN4DXEtXM8knYgRFJT1CkqEjRlKfQhxp7OwaA/132&name=%E5%B0%8F%E4%BA%8C

        3、CDN工具地址

            http://www.bootcdn.cn/jquery-cookie/
网页扫码支付联调
微信网页扫码支付联调
生产环境搭建部署
云服务器介绍和阿里云服务器ECS服务器选购
1、阿里云、腾讯云、亚马逊云
    阿里云:https://www.aliyun.com/
    腾讯云:https://cloud.tencent.com/
    亚马逊云:https://aws.amazon.com/
阿里云服务器远程登录和常用工具
    1、windows工具   putty,xshell, security
        参考资料:
            https://jingyan.baidu.com/article/e75057f210c6dcebc91a89dd.html
            https://www.jb51.net/softjc/88235.html


    2、苹果系统MAC: 通过终端登录
        ssh root@ip  回车后输入密码

        ssh root@120.25.1.38


    3、可以尝试自己通过百度进行找文档, 安装mysql jdk  nginx maven git redis elk
阿里云Linux服务器Centos7 安装JDK8环境
        1、官方地址:http://www.oracle.com/technetwork/java/javase/downloads/jdk8-downloads-2133151.html

        2、使用wget 下载或者本地上传
            wget --no-check-certificate --no-cookies --header "Cookie: oraclelicense=accept-securebackup-cookie" 复制下载地址


        示例:
            wget --no-check-certificate --no-cookies --header "Cookie: oraclelicense=accept-securebackup-cookie" http://download.oracle.com/otn-pub/java/jdk/8u171-b11/512cd62ec5174c3487ac17c61aaa89e8/jdk-8u171-linux-x64.tar.gz

        3、配置全局环境变量
            解压:tar -zxvf jdk-8u171-linux-x64.tar.gz

            vim  /etc/profile

            配置
            #set java environment
            JAVA_HOME=/usr/local/soft/jdk1.8.0_171
            CLASSPATH=$JAVA_HOME/lib/
            PATH=$PATH:$JAVA_HOME/bin
            export PATH JAVA_HOME CLASSPATH
        4、环境变量立刻生效
            source /etc/profile

        5、查看安装情况
            java -version


        6、linux图形操作工具
            mac: filezilla
            windows: winscp
                资料:https://jingyan.baidu.com/article/ed2a5d1f346fd409f6be179a.html
互联网架构知识之网站部署上线基础准备
         1、一个http请求的故事

         2、什么是cname和a记录
                A记录和CNAME只可以同时生效一个,A记录优先

         3、域名和ip的关系,DNS作用


         参考资料:
            https://blog.csdn.net/benbenzhuhwp/article/details/44704319

            https://www.baidu.com/s?ie=utf-8&f=8&rsv_bp=0&rsv_idx=1&ch=1&tn=98050039_dg&wd=%E4%B8%80%E4%B8%AAhttp%E8%AF%B7%E6%B1%82%E7%9A%84%E8%AF%A6%E7%BB%86%E8%BF%87%E7%A8%8B&rsv_pq=80a65c5f00005961&rsv_t=a5fcWreuJzILdSwr4gI8pFqlO7HSu5BlhjwalyVzPiV9w2L%2BKEj78pPi1Qn6Vx4wXxI&rqlang=cn&rsv_enter=1&rsv_sug3=8&rsv_sug1=8&rsv_sug7=100&sug=%25E4%25B8%2580%25E4%25B8%25AAhttp%25E8%25AF%25B7%25E6%25B1%2582%25E7%259A%2584%25E8%25AF%25A6%25E7%25BB%2586%25E8%25BF%2587%25E7%25A8%258B&rsv_n=1
域名购买和配置解析实战
 1、购买域名,备案
            阿里云 备案地址:https://beian.aliyun.com/
 2、购买服务器,阿里云,腾讯云,亚马逊云aws

 3、配置域名解析到服务器
生产环境Linux服务器上Nginx介绍和安装
        1、安装依赖
            yum -y install gcc zlib zlib-devel pcre-devel openssl openssl-devel

        2、//创建一个文件夹
            cd /usr/local
            mkdir nginx
            cd nginx
            //下载tar包
            wget http://nginx.org/download/nginx-1.13.7.tar.gz
            tar -xvf nginx-1.13.7.tar.g

            //执行命令
            ./configure
            make
            make install

        3、拓展知识:
            https://blog.csdn.net/u012809062/article/details/70307130
            https://blog.csdn.net/csdn_lqr/article/details/53334583
线上环境应用集群部署
视频应用阿里云服务器部署安装
        1、打包上传
                  打包命令,各个系统通用,只要按照maven

            mvn install -Dmaven.test.skip=true

          2、启动应用指定外部文件

           nohup java -jar xxxx.jar  --Dspring.config.location=application.properties &

           修改配置文件:
                端口
                开放平台微信登录回调域名
                微信支付回调域名
                数据库连接,账户密码
前后端启动接入Nginx代理服务器
        1.后端接口地址 16web.net:8080

          导入数据

           数据库配置
           119.23.28.97
           root
            Apple1688.


            阿里云机器:
            ssh root@47.106.120.173

        注意点:
            微信登录授权域名
            支付回调域名确认好
            application.properties确认
高可用处理之多节点集群部署
        1、多节点启动
                    节点1:120.79.160.143:8082/
                    节点2:47.106.120.173:8080

        2、配置nginx集群访问

             upstream lbs {

                server 120.79.160.143:8082;
                server 127.0.0.1:8080;

            }


            location /api/ {
                    proxy_pass http://lbs;
                    proxy_redirect default;
                }

            location /user/ {
                    proxy_pass http://lbs;
                    proxy_redirect default;
                }


         3、重启nginx命令
            ./nginx -s reload
课程总结和第二季课程介绍
课程总结和常见问题处理
小D课堂,愿景:让编程不在难学,让技术与生活更加有趣
相信我们,这个是可以让你学习更加轻松的平台,里面的课程绝对会让你技术不断提升
欢迎加小D讲师的微信: jack794666918
我们官方网站:https://xdclass.net
千人IT技术交流QQ群: 718617859
重点来啦:免费赠送你干货文档大集合,包含前端,后端,测试,大数据,运维主流技术文档(持续更新)

若有收获,就点个赞吧
0 人点赞
