0. 回顾
前七篇,我们介绍了 TypeScript 命令行工具 tsc 的编译过程。
我们主要探索了 TypeScript 词法分析 & 语法分析、类型检查、代码生成,这几个部分。

本文开始,我们来研究 tsserver 相关的代码逻辑。tsserver 可以作为独立的进程来启动,它包装了 TypeScript Compiler 以及相关语言服务,
我们可以通过 JSON 格式的消息,借 stdio 完成进程间通信。
下文我们把 tsserver 的例子跑起来看看。
1. 进程间通信
我们知道 Node.js 可以通过 child.stdin.write 向子进程的 stdin 写入消息,
然后监听,child.stdout.on('data', data => ...},可以获取子进程 stdout 回来的消息。
新建两个文件 index.js 和 child.js。
.├── child.js└── index.js
(1)index.js 文件内容如下
const { spawn } = require('child_process');const child = spawn('node', ['./child.js',]);child.stdout.on('data', data => {console.log('child.stdout.on:data', data.toString());});child.on('close', code => {console.log('child.on:close', code);});child.stdin.write('world');
(2)child.js 文件内容如下
process.stdin.on('data', data => {process.stdout.write(`hello ${data}`);});
(3)运行一下
$ node index.jschild.stdout.on:data hello world(挂住)
2. 调试子进程
VSCode 的断点是无法跑到子进程中的,要调试子进程,我们需要用 attach 方式。
(1)启动进程是传入 --inspect-brk 参数
const { spawn } = require('child_process');const child = spawn('node', ['--inspect-brk=9002', // <- 加了这一行'./child.js',]);child.stdout.on('data', data => {console.log('child.stdout.on:data', data.toString());});child.on('close', code => {console.log('child.on:close', code);});child.stdin.write('world');
(2)添加 VSCode 调试配置,.vscode/launch.json 的内容如下
{"version": "0.2.0","configurations": [{"type": "node","request": "attach","name": "Attach to child_process","port": 9002,"skipFiles": ["<node_internals>/**"]}]}
值得注意的是,index.js 中的调试端口号 --inspect-brk=9002,
应与 .vscode/launch.json 中的 port: 9002 保持一致。
(3)运行,然后 attach
$ node index.js(挂住)
然后 VSCode 中调试面板中点击调试,或者按 F5,我们发现断点停在了 child.js 的第一行。
在第二行打个断点,按 F5 继续运行,就可以看到子进程接收到消息了,
使用 attach,我们就可以对 child_process 进行调试了。
3. 准备调试 tsserver
为了主进程和子进程两边都可以调试,我们需要打开两个 VSCode 实例。
(1)client 端,通过 launch 方式调试主进程
client├── .vscode│ └── launch.json└── index.js
(2)server 端,通过 attach 方式调试 tsserver 子进程
server└── .vscode└── launch.json
(3)为了能调试 .ts 文件,我们还要修改 TypeScript 源码仓库的 bin/tsserver。
3.1 bin/tsserver
修改 bin/tsserver 为
#!/usr/bin/env noderequire('../built/local/tsserver.js');
之前 require 的地址为 ../lib/tsserver.js,
我们修改为了 gulp LKG 后的地址,为了在调试时,能直接调试 .ts 文件。
gulp LKG 会将 src/ 文件夹中的源文件 .ts 编译到了 built/local/ 中,细节可参考第一篇。
所以,在修改 bin/tsserver 之前,应确保 TypeScript 仓库已安装依赖,且 gulp LKG 成功。
3.2 client
client├── .vscode│ └── launch.json└── index.js

index.js 的内容如下,
const path = require('path');const { spawn } = require('child_process');const root = '/Users/.../TypeScript'; // <- 这是 TypeScript 源码仓库的根目录const child = spawn('node', ['--inspect-brk=9002', // <- 调试 tsserver 需要 attach 这个 portpath.join(root, 'bin/tsserver'),]);child.stdout.on('data', data => {console.log(data.toString());});child.on('close', code => {console.log(code);});const filePath = path.join(root, 'debug/index.ts');const openFile = {seq: 0,type: 'request',command: 'open',arguments: {file: filePath,}};const getQuickInfo = {seq: 1,type: 'request',command: 'quickinfo',arguments: {file: filePath,line: 1,offset: 7}};child.stdin.write(`${JSON.stringify(openFile)}\n`);child.stdin.write(`${JSON.stringify(getQuickInfo)}\n`);
.vscode/launch.json 文件内容如下,
{"version": "0.2.0","configurations": [{"type": "node","request": "launch","name": "Launch Client","skipFiles": ["<node_internals>/**"],"program": "${workspaceFolder}/index.js"}]}
这里有很多值得注意的地方,
(1).vscode/launch.json 中的 program 字段了调试入口为 VSCode 根目录中的 index.js,因此 index.js 不能随意取。
(2)以上 index.js 代码不能直接复制出去用,要将 root 变量改成自己 TypeScript 源码仓库根目录的绝对地址。
(3)spawn 一个 bin/tsserver,就是启动了一个 tsserver 子进程。
(4)--inspect-brk=9002 是 tsserver 的 attach 端口号,要与下文介绍的 server 端调试配置保持一致。
(5)filePath 我们使用了前几篇用过的 debug/index.ts 文件,内容如下,
const i: number = 1;
(6)child.stdin.write 中的字符串,需要以 \n 结尾,这是因为 tsserver 只监控了 line,下文会介绍。
3.3 server
server 端是另外一个 VSCode 实例,它只有一个 .vscode/launch.json 文件,
为了查看文件方便,我们也可以在 TypeScript 源码仓库中,添加如此这样的一个调试配置。
server└── .vscode└── launch.json
.vscode/launch.json 内容如下,
{"version": "0.2.0","configurations": [{"type": "node","request": "attach","name": "Attach to tsserver","port": 9002,"skipFiles": ["<node_internals>/**"]}]}
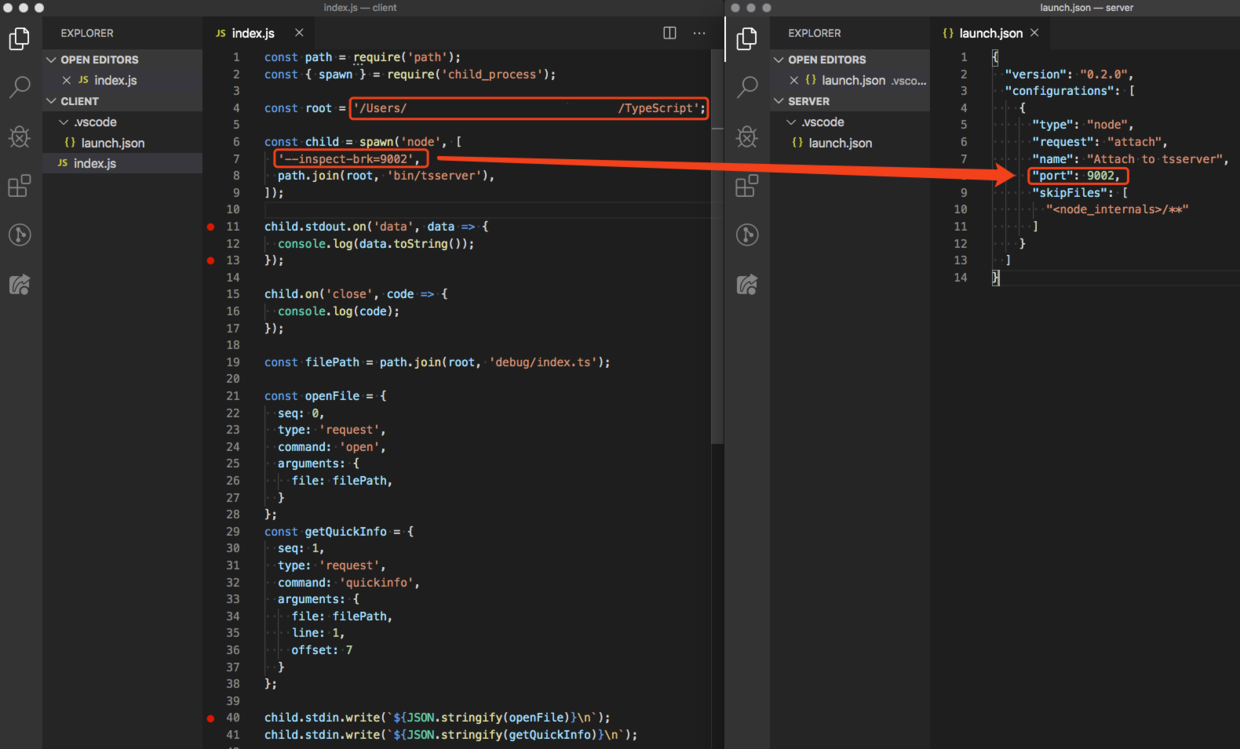
注意,client 端 index.js 中的 --inspect-brk=9002,
应该与 server 端 .vscode/launch.json 中的 port: 9002 保持一致。
总结
本文介绍了主进程与子进程,怎样通过 stdio 进行通信,以及使用 VSCode 如何调试子进程。
最后,我们启动了两个 VSCode 实例,分别配置了 client 和 server 端,用来调试 tsserver。
这样准备工作就做好了,下文我们来向 tsserver 发送几个简单消息,
探索一下 tsserver 与主进程是怎样通信的。
参考
TypeScript v3.7.3
Debugging in Visual Studio Code
github: debug-tsserver_client
github: debug-tsserver_server

若有收获,就点个赞吧
0 人点赞
