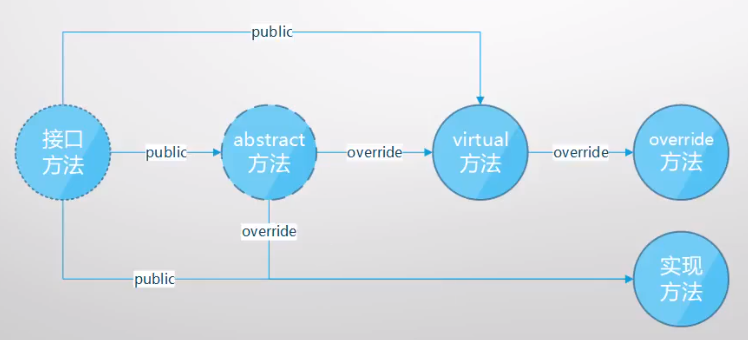
接口与抽象类的区别
基本定义
- 访问级别的区别
- 接口中的成员方法必须是public,且必须省略
- 抽象类中的成员方法只要不是private即可,可以是protected、internal
- 本质的区别
- 接口的本质是服务的调用者(消费者)与服务的提供者之间的契约,所以方法必须完全暴露出来
- 抽象类的成员被protected修饰的只能给子类使用,被internal修饰的成员只能在本程序集中使用,因此抽象类中被protected和internal修饰的成员都不是给服务的调用者准备的,各有都有特点的可见目标
示例1:不使用接口
- 对一组整数进行求和、求平均值的操作(不使用接口) ```csharp using System; using System.Collections;
namespace InterfaceExample { class Program { static void Main(string[] args) { //供方:int[]的基类是Array,Array类和ArrayList类都实现了IEnumerable接口,遵循契约,可以被迭代 int[] nums1 = new int[] { 1, 2, 3, 4, 5 }; ArrayList nums2 = new ArrayList { 1, 2, 3, 4, 5 };
int x = Sum(nums1);double y = Avg(nums1);Console.WriteLine(x);//输出:15Console.WriteLine(y);//输出:3int a = Sum(nums2);double b = Avg(nums2);Console.WriteLine(a);//输出:15Console.WriteLine(b);//输出:3}//需方:要求被传进来的参数能被foreach迭代即可static int Sum(int[] nums){int sum = 0;foreach (var n in nums){sum += n;}return sum;}//需方:要求被传进来的参数能被foreach迭代即可static double Avg(int[] nums){int sum = 0;double count = 0;foreach (var n in nums){sum += n;count++;}return sum / count;}//需方static int Sum(ArrayList nums){int sum = 0;foreach (var n in nums){sum += (int)n;}return sum;}//需方static double Avg(ArrayList nums){int sum = 0;double count = 0;foreach (var n in nums){sum += (int)n;count++;}return sum / count;}}
}
<a name="fQ4h1"></a>## 示例2:使用接口- 由于供需双方都遵循可迭代的契约,使用接口对代码进行改写,如下:```csharpusing System;using System.Collections;namespace InterfaceExample{class Program{static void Main(string[] args){//供方:int[]的基类是Array,Array类和ArrayList类都实现了IEnumerable接口,遵循契约,可以被迭代int[] nums1 = new int[] { 1, 2, 3, 4, 5 };ArrayList nums2 = new ArrayList { 1, 2, 3, 4, 5 };int x = Sum(nums1);double y = Avg(nums1);Console.WriteLine(x);//输出:15Console.WriteLine(y);//输出:3int a = Sum(nums2);double b = Avg(nums2);Console.WriteLine(a);//输出:15Console.WriteLine(b);//输出:3}//需方:要求被传进来的参数能被foreach迭代即可static int Sum(IEnumerable nums){int sum = 0;foreach (var n in nums){sum += (int)n;}return sum;}//需方:要求被传进来的参数能被foreach迭代即可static double Avg(IEnumerable nums){int sum = 0;double count = 0;foreach (var n in nums){sum += (int)n;count++;}return sum / count;}}}
依赖与紧耦合
基本定义
- 依赖:面向对象是现实世界的抽象,因此在面向对象世界中,类与类之间也有合作和分工。合作的术语在软件中称为依赖。依赖越直接,耦合越紧。
示例1:紧耦合示例
using System;

namespace InterfaceExample
{
    class Program
    {
        static void Main(string[] args)
        {
            var engine = new Engine();
            var car = new Car(engine);
            car.Run(3);
            Console.WriteLine(car.Speed);
        }
    }

    class Engine
    {
        public int RPM { get; private set; }
        public void Work(int gas)
        {
            this.RPM = gas * 1000;
        }
    }

    class Car
    {
        private Engine _engine;//此处已经产生了紧耦合,Car完全依赖在Engine类上
        public Car(Engine engine)
        {
            _engine = engine;
        }

        public int Speed { get; private set; }
        public void Run(int gas)
        {
            _engine.Work(gas);
            this.Speed = _engine.RPM / 100;
        }
    }
}
示例2:松耦合示例
- 紧耦合缺点:如果基础类Engine类中逻辑出了问题,与之耦合的Car类也必将出现问题,而且比较难发现问题所在(几十个上百个类的紧耦合)。这样即不好调试,也会影响团队工作,因此在开发时,尽可能避免紧耦合,接口可以有效地降低耦合度,如下示例:人和手机之间的松耦合关系 ```csharp using System;
namespace InterfaceExample { class Program { static void Main(string[] args) { var user = new PhoneUser(new NokiaPhone()); user.UsePhone(); //输出:Nokia calling… // Hello! // Nokia message ring… // Hello,Nokia!
        //如果NokiaPhone坏了,只需改成EricssonPhone即可,不需要改PhoneUser、NokiaPhone和EricssonPhone类中的任何代码
        var user2 = new PhoneUser(new EricssonPhone());
        user2.UsePhone();
        //输出:Ericsson calling...
        //      Hi,This's Tim!
        //      Ericsson ring...
        //      Good evening!

        // var user2 = new PhoneUser(new EricssonPhone());中也有耦合,
        //可以通过反射实现不用改new EricssonPhone(),在程序外的某个配置文件中设置即可
    }
}

class PhoneUser
{
    private IPhone _phone;
    public PhoneUser(IPhone phone)
    {
        _phone = phone;
    }

    public void UsePhone()
    {
        _phone.Dail();
        _phone.PickUp();
        _phone.Receive();
        _phone.Send();
    }
}

interface IPhone
{
    void Dail();
    void PickUp();
    void Send();
    void Receive();
}

class NokiaPhone : IPhone
{
    public void Dail()
    {
        Console.WriteLine("Nokia calling...");
    }

    public void PickUp()
    {
        Console.WriteLine("Hello!");
    }

    public void Receive()
    {
        Console.WriteLine("Nokia message ring...");
    }

    public void Send()
    {
        Console.WriteLine("Hello,Nokia!");
    }
}

class EricssonPhone : IPhone
{
    public void Dail()
    {
        Console.WriteLine("Ericsson calling...");
    }

    public void PickUp()
    {
        Console.WriteLine("Hi,This's Tim!");
    }

    public void Receive()
    {
        Console.WriteLine("Ericsson ring...");
    }

    public void Send()
    {
        Console.WriteLine("Good evening!");
    }
}
}
- 在代码中,若有可以代换的地方,那么一定会有接口的存在。接口就是为了解耦而生,松耦合最大的好处就是为了让功能的提供方变得可替换,从而降低了不能替换所带来的高风险和高成本
<a name="NI2zQ"></a>
# 依赖反转原则
<a name="OMocz"></a>
## 基本定义
- 解耦在代码中的表现即为依赖反转,单元测试其实就是依赖反转在开发中直接应用和直接受益者
- 依赖反转:用于"平衡"自顶向下,逐步求精的思维方式,如下:
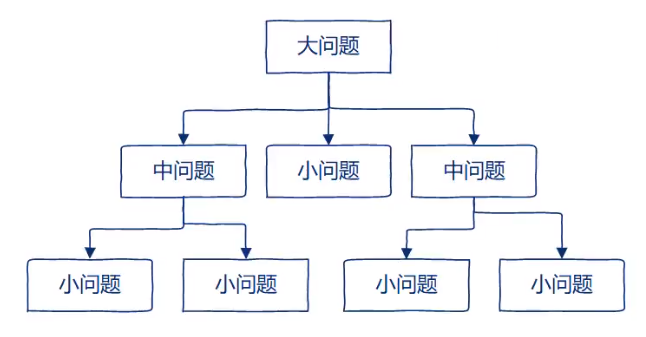 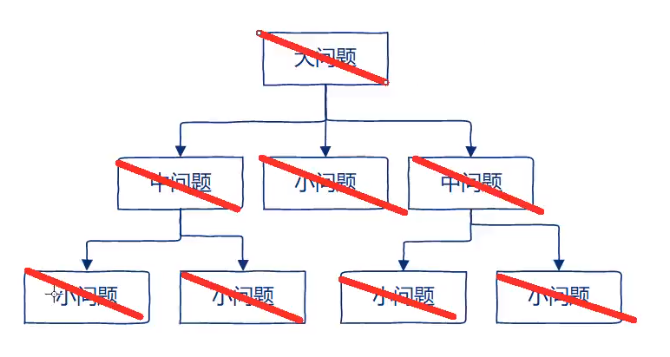
- 逐步进化的原理图过程如下: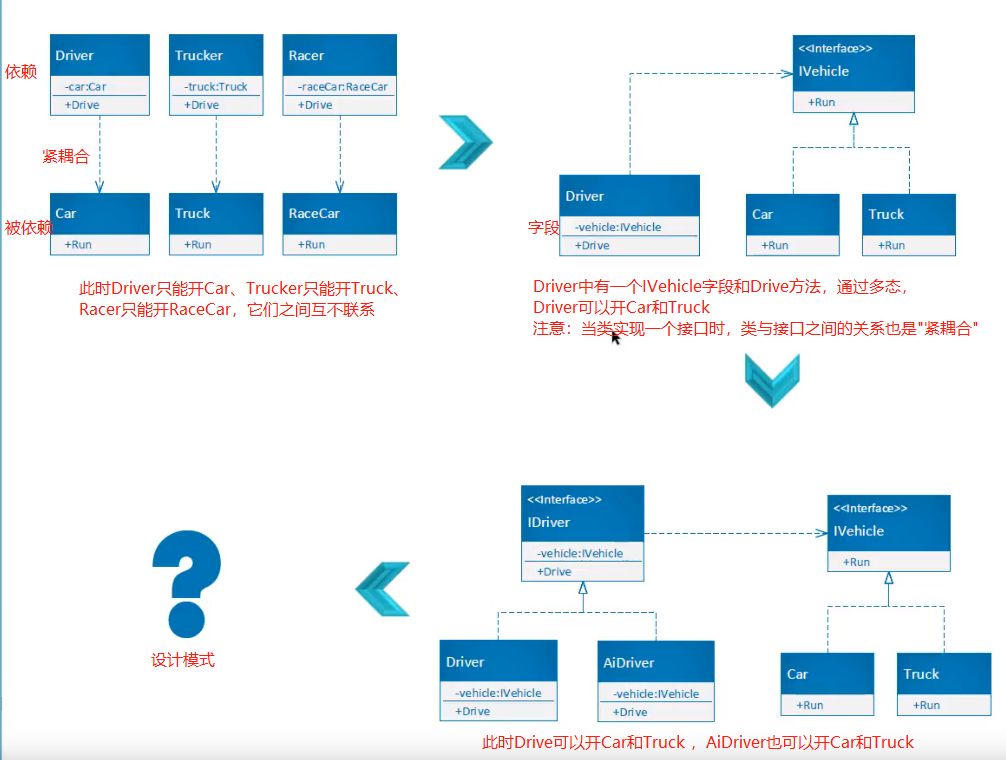
<a name="ZbsQz"></a>
## 示例:接口、解耦、依赖倒置原则如何被单元测试所应用。
<a name="MzH7j"></a>
### 示例1:紧耦合方式
```csharp
using System;
namespace InterfaceExample
{
class Program
{
static void Main(string[] args)
{
var fan = new DeskFan(new PowerSupply());
Console.WriteLine(fan.Work());
}
}
class PowerSupply
{
public int GetPower()
{
return 100;
}
}
class DeskFan
{
private PowerSupply _powerSupply;
public DeskFan(PowerSupply powerSupply)
{
_powerSupply = powerSupply;
}
public string Work()
{
int power = _powerSupply.GetPower();
if (power<=0)
{
return "Won't work.";
}
else if (power<100)
{
return "Slow";
}
else if (power<200)
{
return "Work fine";
}
else
{
return "Warning";
}
}
}
}
- 此时如果想测试DeskFan是否工作,必须直接改写PowerSupply类中GetPower的值,违反了开闭原则,即不能随意改变一个类中的代码。如果不止是一个DeskFan或者其他供电设备连在PowerSupply上,那么与之相连的供电设备会因为PowerSupply改变了值而把设备内部烧坏。
示例2:使用接口进行改写并进行单元测试
using System;

namespace InterfaceExample
{
    class Program
    {
        static void Main(string[] args)
        {
            var fan = new DeskFan(new PowerSupply());
            Console.WriteLine(fan.Work());
        }
    }

    public interface IPowerSupply
    {
        int GetPower();
    }

    public class PowerSupply:IPowerSupply
    {
        public int GetPower()
        {
            return 100;
        }
    }

    public class DeskFan
    {
        private IPowerSupply _powerSupply;
        public DeskFan(IPowerSupply powerSupply)
        {
            _powerSupply = powerSupply;
        }

        public string Work()
        {
            int power = _powerSupply.GetPower();
            if (power<=0)
            {
                return "Won't work.";
            }
            else if (power<100)
            {
                return "Slow";
            }
            else if (power<200)
            {
                return "Work fine";
            }
            else
            {
                return "Explode!";
            }
        }
    }
}
- 为了更方便测试,再去创建一个专门测试的类,专门输出超出范围的电流,再将此类的实例传给DeskFan。测试过程应在单元测试项目中完成,而非Main函数中
- 创建单元测试方法:在Solution -> Add -> New Project -> xUnit Test Project -> 命名为InterfaceExample.Tests(即xxxx.Tests格式) -> 创建好后添加项目引用,如下:

- 在InterfaceExample.Tests名称空间中写入以下代码: ```csharp using System; using Xunit;
namespace InterfaceExample.Tests { public class DeskFanTests { [Fact] public void PowerLowerThanZero_OK() { var fan = new DeskFan(new PowerSupplyLowerThanZero()); var expected = “Won’t work.”; var actual = fan.Work(); Assert.Equal(expected, actual); } }
class PowerSupplyLowerThanZero : IPowerSupply
{
    public int GetPower()
    {
        return 0;
    }
}
}
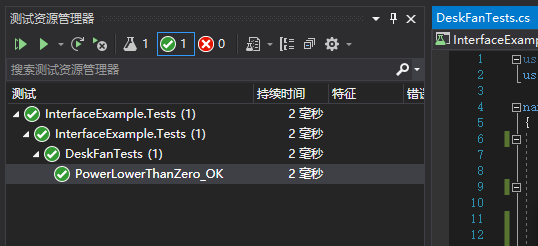
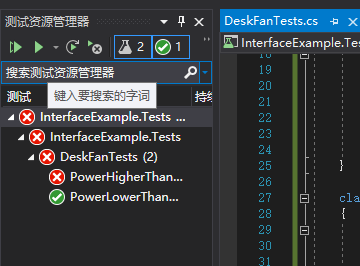
- 打开:VS菜单栏 -> 测试 -> 测试资源管理器,并展开左侧弹出的测试栏,在最底层中的PowerLowerThanZero_OK中右键运行,此时所有运行结果都为绿勾,如下:
<a name="p0J3f"></a>
### 示例3:单元测试不通过的情况
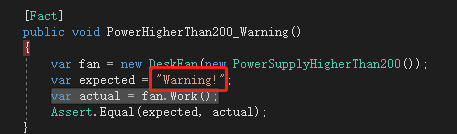
- 如果此时在InterfaceExample.Tests名称空间中继续增加测试case,故意将测试中的var expected = "Warning!";与对应DeskFan类中值写成不一样,如下:
```csharp
using System;
using Xunit;
namespace InterfaceExample.Tests
{
public class DeskFanTests
{
[Fact]
public void PowerLowerThanZero_OK()
{
var fan = new DeskFan(new PowerSupplyLowerThanZero());
var expected = "Won't work.";
var actual = fan.Work();
Assert.Equal(expected, actual);
}
[Fact]
public void PowerHigherThan200_Warning()
{
var fan = new DeskFan(new PowerSupplyHigherThan200());
var expected = "Warning!";
var actual = fan.Work();//DeskFan中等于220的结果为"Explode!"
Assert.Equal(expected, actual);//两者不相等
}
}
class PowerSupplyLowerThanZero : IPowerSupply
{
public int GetPower()
{
return 0;
}
}
class PowerSupplyHigherThan200 : IPowerSupply
{
public int GetPower()
{
return 220;
}
}
}
- 以上PowerHigherThan200_Warning方法中两者结果不相等,在测试中不会通过,打红叉,如下:
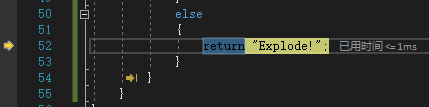
- 可在出错的测试case,PowerHigherThan200_Warning方法中打断点,右击单元测试中的PowerHigherThan200_Warning进行调试,逐步进行调试,发现进入DeskFan的Work方法后返回值为Explode!,与PowerHigherThan200_Warning方法中的不一致,如下:
- 将Work方法中的”Explode!”改为”Warning!”,重新测试即可通过。如下:

示例4:使用Mock进行单元测试
- 在工作中写测试case与写代码同等重要,如果没有测试case来监控代码的话,就不确定写出代码的可靠程度
- 上例中,存在一个很大的问题,即在单元测试中为了测试不同的情况,就得创建不同的接口实现类,会造成看起来很丑的类越来越多,使用Mock可以解决这一问题,从而简化单元测试
- 首先右击InterfaceExample.Tests -> 管理NuGet程序包 -> 搜索Moq -> 进行安装
- 引用Moq名称空间
- 对InterfaceExample.Tests名称空间中测试代码进行改写,如下: ```csharp using System; using Xunit; using Moq;
namespace InterfaceExample.Tests
{
public class DeskFanTests
{
[Fact]
public void PowerLowerThanZero_OK()
{
var mock = new Mock
    [Fact]
    public void PowerHigherThan200_Warning()
    {
        var mock = new Mock<IPowerSupply>();
        mock.Setup(ps => ps.GetPower()).Returns(() => 220);
        var fan = new DeskFan(mock.Object);
        var expected = "Warning!";
        var actual = fan.Work();
        Assert.Equal(expected, actual);
    }
}
} ```
- 继续运行测试case看结果,都为对勾
- 运用MockFramework,可以简化单元测试,而不用专门创建很多用来测试的类
接口与单元测试
- 接口的产生:自底向上(重构),自顶向下(设计)
- C#接口的实现(隐式,显示,多接口)
- 语言对面向对象设计的内建支持,依赖反转,接口隔离,开闭原则…

若有收获,就点个赞吧
0 人点赞
