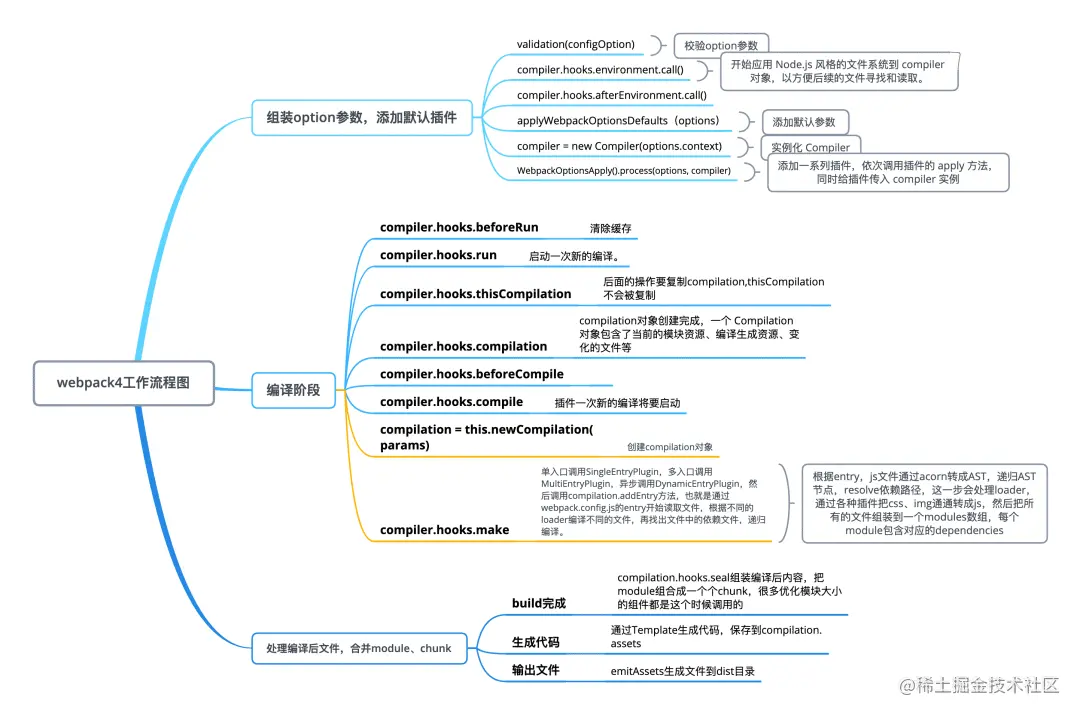
为了既实现 Webpack 打包的功能,又只实现核心代码。我们对这个流程做一些简化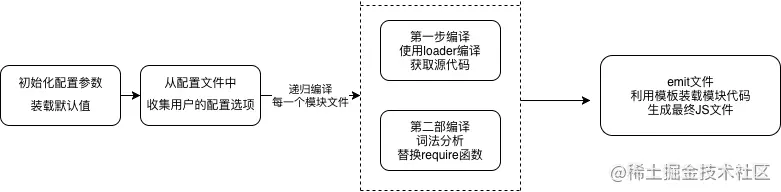
例子
// webpack.config.jsconst resolve = dir => require('path').join(__dirname, dir)module.exports = {// 入口文件地址entry: './src/index.js',// 输出文件地址output: {path: resolve('dist'),fileName: 'bundle.js'},// loadermodule: {rules: [{test: /\.(js|jsx)$/,// 编译匹配include路径的文件include: [resolve('src')],use: 'babel-loader'}]},plugins: [new HtmlWebpackPlugin()]}
入口
const Compiler = require('./compiler')

function webpack(config, callback) {
  // 此处应有参数校验
  const compiler = new Compiler(config)
  // 开始编译
  compiler.run()
}

module.exports = webpack
构建配置信息
class Compiler {
  constructor(config, _callback) {
    const { entry, output, module, plugins } = config;
    // 入口
    this.entryPath = entry;
    // 输出文件路径
    this.distPath = output.path;
    // 输出文件名称
    this.distName = output.fileName;
    // 需要使用的loader
    this.loaders = module.rules;
    // 需要挂载的plugin
    this.plugins = plugins;
    // 根目录
    this.root = process.cwd();
    // 编译工具类Compilation
    this.compilation = {};
    // 入口文件在module中的相对路径,也是这个模块的id
    this.entryId = getRootPath(this.root, entry, this.root);
    this.hooks = {
      // 生命周期事件
      beforeRun: new AsyncSeriesHook(["compiler"]), // compiler代表我们将向回调事件中传入一个compiler参数
      afterRun: new AsyncSeriesHook(["compiler"]),
      beforeCompile: new AsyncSeriesHook(["compiler"]),
      afterCompile: new AsyncSeriesHook(["compiler"]),
      emit: new AsyncSeriesHook(["compiler"]),
      failed: new AsyncSeriesHook(["compiler"]),
    };
    this.mountPlugin();
  }
  // 注册所有的plugin
  mountPlugin() {
    for (let i = 0; i < this.plugins.length; i++) {
      const item = this.plugins[i];
      if ("apply" in item && typeof item.apply === "function") {
        // 注册各生命周期钩子的发布订阅监听事件
        item.apply(this);
      }
    }
  }
  // 当运行run方法的逻辑之前
  run() {
    // 在特定的生命周期发布消息,触发对应的订阅事件
    this.hooks.beforeRun.callAsync(this); // this作为参数传入,对应之前的compiler
    .......
  }
}
- 每一个 plugin Class 都必须实现一个 apply 方法,这个方法接收 compiler 实例,然后将真正的钩子函数挂载到 compiler.hook 的某一个声明周期上。
- 如果我们声明了一个hook但是没有挂载任何方法,在 call 函数触发的时候是会报错的。但是实际上 Webpack 的每一个生命周期钩子除了挂载用户配置的 plugin ,都会挂载至少一个 Webpack 自己的 plugin,所以不会有这样的问题。更多关于 tapable 的用法也可以移步 Tapable
编译
- Compilation,这个类主要是执行编译工作
在 Compilation 的构造函数中,先接收来自Compiler 下发的信息并且挂载在自身属性中
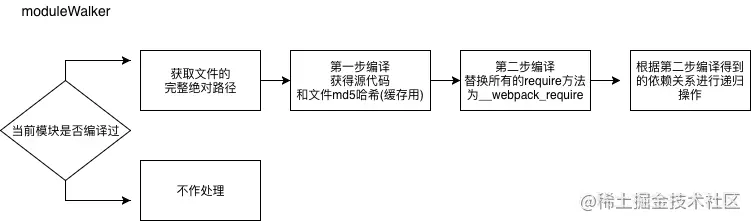
class Compilation {
constructor(props) {
  const {
    entry,
    root,
    loaders,
    hooks
  } = props
  this.entry = entry
  this.root = root
  this.loaders = loaders
  this.hooks = hooks
}
// 开始编译
async make() {
  await this.moduleWalker(this.entry)
}
// dfs遍历函数
async moduleWalker(){ }
async loaderParse(){ }
}
因为我们需要将打包过程中引用过的文件都编译到最终的代码包里,所以需要声明一个深度遍历函数 moduleWalker (这个名字是原作者者(@凹凸实验室)取的,不是webpack官方取的),顾名思义,这个方法将会从入口文件开始,依次对文件进行第一步和第二步编译,并且收集引用到的其他模块,递归进行同样的处理
第一步是使用所有满足条件的 loader 对其进行编译并且返回编译之后的源代码
- 第二步相当于是 Webpack 自己的编译步骤,目的是构建各个独立模块之间的依赖调用关系。我们需要做的是将所有的 require 方法替换成 Webpack 自己定义的 webpack_require 函数。因为所有被编译后的模块将被 Webpack 存储在一个闭包的对象 moduleMap 中,而 webpack_require 函数则是唯一一个有权限访问 moduleMap 的方法。
- 一句话解释 webpack_require的作用就是:
- 将模块之间原本 文件地址 -> 文件内容 的关系替换成了 对象的key -> 对象的value(文件内容) 这样的关系。
- 在完成第二步编译的同时,会对当前模块内的引用进行收集,并且返回到 Compilation 中, 这样moduleWalker 才能对这些依赖模块进行递归的编译。当然其中大概率存在循环引用和重复引用,我们会根据引用文件的路径生成一个独一无二的 key 值,在 key 值重复时进行跳过。
- moduleWalker
moduleMap = {};

// 根据依赖将所有被引用过的文件都进行编译
async moduleWalker(sourcePath) {
  if (sourcePath in this.moduleMap) return;
  // 在读取文件时,我们需要完整的以.js结尾的文件路径
  sourcePath = completeFilePath(sourcePath);
  const [sourceCode, md5Hash] = await this.loaderParse(sourcePath);
  const modulePath = getRootPath(this.root, sourcePath, this.root);
  // 获取模块编译后的代码和模块内的依赖数组
  const [moduleCode, relyInModule] = this.parse(
    sourceCode,
    path.dirname(modulePath)
  );
  // 将模块代码放入ModuleMap
  this.moduleMap[modulePath] = moduleCode;
  this.assets[modulePath] = md5Hash;
  // 再依次对模块中的依赖项进行解析
  for (let i = 0; i < relyInModule.length; i++) {
    await this.moduleWalker(relyInModule[i], path.dirname(relyInModule[i]));
  }
}
loaderParse
async loaderParse(entryPath) {
  // 用utf8格式读取文件内容
  let [ content, md5Hash ] = await readFileWithHash(entryPath)
  // 获取用户注入的loader
  const { loaders } = this
  // 依次遍历所有loader
  for(let i=0;i<loaders.length;i++) {
    const loader = loaders[i]
    const { test : reg, use } = loader
    if (entryPath.match(reg)) {
      // 判断是否满足正则或字符串要求
      // 如果该规则需要应用多个loader,从最后一个开始向前执行
      if (Array.isArray(use)) {
        // 遍历use
        while(use.length) {
          const cur = use.pop()
          const loaderHandler =
            typeof cur.loader === 'string'
            // loader也可能来源于package包例如babel-loader
            // 从node_module中引入
              ? require(cur.loader)
              : (
                typeof cur.loader === 'function'
                ? cur.loader : _ => _
              )
          content = loaderHandler(content)
        }
      } else if (typeof use.loader === 'string') {
        const loaderHandler = require(use.loader)
        content = loaderHandler(content)
      } else if (typeof use.loader === 'function') {
        const loaderHandler = use.loader
        content = loaderHandler(content)
      }
    }
  }
  return [ content, md5Hash ]
}
于是,在获得了 loader 处理过的代码之后,理论上任何一个模块都已经可以在浏览器或者单元测试中直接使用了。但是我们的代码是一个整体,还需要一种合理的方式来组织代码之间互相引用的关系
parse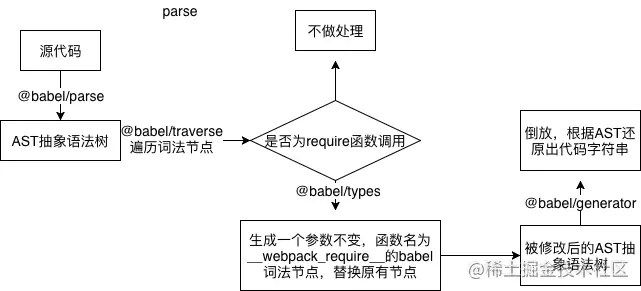
parse 函数中我们需要做的事情其实很简单,就是将所有模块中的 require 方法的函数名称替换成 webpack_require 即可。我们在这一步使用的是 babel 全家桶。
const parser = require('@babel/parser')
const traverse = require('@babel/traverse').default
const types = require('@babel/types')
const generator = require('@babel/generator').default
...
// 解析源码,替换其中的require方法来构建ModuleMap
parse(source, dirpath) {
  const inst = this
  // 将代码解析成ast
  const ast = parser.parse(source)
  const relyInModule = [] // 获取文件依赖的所有模块
  traverse(ast, {
    // 遍历ast
    // 检索所有的词法分析节点,当遇到函数调用表达式的时候执行,对ast树进行改写
    CallExpression(p) {
      // 有些require是被_interopRequireDefault包裹的
      // 所以需要先找到_interopRequireDefault节点
      if (p.node.callee && p.node.callee.name === '_interopRequireDefault') {
        const innerNode = p.node.arguments[0]
        if (innerNode.callee.name === 'require') {
          inst.convertNode(innerNode, dirpath, relyInModule)
        }
      } else if (p.node.callee.name === 'require') {
        inst.convertNode(p.node, dirpath, relyInModule)
      }
    }
  })
  // 将改写后的ast树重新组装成一份新的代码, 并且和依赖项一同返回
  const moduleCode = generator(ast).code
  return [ moduleCode, relyInModule ]
}
/**
 * 将某个节点的name和arguments转换成我们想要的新节点
 */
convertNode = (node, dirpath, relyInModule) => {
  node.callee.name = '__webpack_require__'
  // 参数字符串名称,例如'react', './MyName.js'
  let moduleName = node.arguments[0].value
  // 生成依赖模块相对【项目根目录】的路径
  let moduleKey = completeFilePath(getRootPath(dirpath, moduleName, this.root))
  // 收集module数组
  relyInModule.push(moduleKey)
  // 将__webpack_require__的参数字符串替换为moduleKey,因为这个字符串也是对应模块的moduleKey,需要保持统一,
  // 因为ast树中的每一个元素都是babel节点,所以需要使用'@babel/types'来进行生成
  node.arguments = [ types.stringLiteral(moduleKey) ]
}
emit 生成bundle文件
执行到这一步, compilation 的使命其实就已经完成了。如果我们平时有去观察生成的 js 文件的话,会发现打包出来的样子是一个立即执行函数,主函数体是一个闭包,闭包中缓存了已经加载的模块 installedModules ,以及定义了一个 webpack_require 函数,最终返回的是函数入口所对应的模块。而函数的参数则是各个模块的 key-value 所组成的对象。
我们在这里通过 ejs 模板去进行拼接,将之前收集到的 moduleMap 对象进行遍历,注入到ejs模板字符串中去。
为了方便我们使用 eval 函数将字符串解析成直接可读的代码。当然这只是求快的方式,对于 JS 这种解释型语言,如果一个一个模块去解释编译的话,速度会非常慢。事实上真正的生产环境会将模块内容封装成一个 IIFE(立即自执行函数表达式)
// template.ejs
(function(modules) { // webpackBootstrap
  // 缓存模块
  var installedModules = {};

  function __webpack_require__(moduleId) {
      // 检查是否被缓存
      if(installedModules[moduleId]) {
          return installedModules[moduleId].exports;
      }
      // 创建新模块(并将其放入缓存)
      var module = installedModules[moduleId] = {
          i: moduleId,
          l: false,
          exports: {}
      };
      // 执行模块功能
      modules[moduleId].call(module.exports, module, module.exports, __webpack_require__);
      // 将模块标记为已加载
      module.l = true;
      // 返回模块的导出
      return module.exports;
  }
  // 加载输入模块并返回导出
  return __webpack_require__(__webpack_require__.s = "<%-entryId%>");
})({
  // 遍历之前得到的 moduleMap
 <%for(let key in modules) {%>
     "<%-key%>":
         (function(module, exports, __webpack_require__) {
             eval(
                 `<%-modules[key]%>`
             );
         }),
     <%}%>
});
//__webpack_require__ 模块加载,先判断 installedModules 是否已加载,加载过了就直接返回 exports 数据,没有加载过该模块就通过 modules[moduleId].call(module.exports, module, module.exports, __webpack_require__) 执行模块并且将 module.exports 给返回。

/**
 * 发射文件,生成最终的bundle.js
 */
emitFile() { // 发射打包后的输出结果文件
  // 首先对比缓存判断文件是否变化
  const assets = this.compilation.assets
  const pastAssets = this.getStorageCache()
  if (loadsh.isEqual(assets, pastAssets)) {
    // 如果文件hash值没有变化,说明无需重写文件
    // 只需要依次判断每个对应的文件是否存在即可
    // 这一步省略!
  } else {
    // 缓存未能命中
    // 获取输出文件路径
    const outputFile = path.join(this.distPath, this.distName);
    // 获取输出文件模板
    // const templateStr = this.generateSourceCode(path.join(__dirname, '..', "bundleTemplate.ejs"));
    const templateStr = fs.readFileSync(path.join(__dirname, '..', "template.ejs"), 'utf-8');
    // 渲染输出文件模板
    const code = ejs.render(templateStr, {entryId: this.entryId, modules: this.compilation.moduleMap});

    this.assets = {};
    this.assets[outputFile] = code;
    // 将渲染后的代码写入输出文件中
    fs.writeFile(outputFile, this.assets[outputFile], function(e) {
      if (e) {
        console.log('[Error] ' + e)
      } else {
        console.log('[Success] 编译成功')
      }
    });
    // 将缓存信息写入缓存文件
    fs.writeFileSync(resolve(this.distPath, 'manifest.json'), JSON.stringify(assets, null, 2))
  }
}

若有收获,就点个赞吧
0 人点赞
