图片素材:
参考:https://www.jianshu.com/p/0b436eb50620
https://wenku.baidu.com/video/courseview/029469dc5022aaea998f0f21?fr=baidu&fromplaylist=1
https://www.aigei.com/view/71984.html
bg_start.pngbg1.pngbullet.pngenemy_plane.pngplayer_plane.gif
一、简介
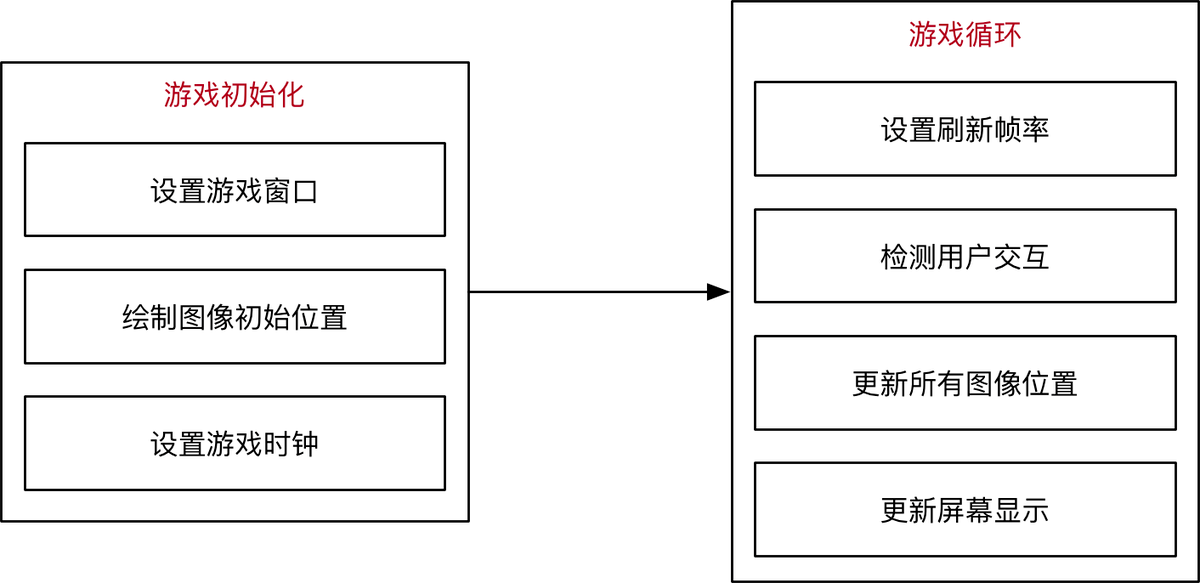
二、安装
#使用pip安装pygamepip install pygame#验证安装python -m pygame.examples.aliens
出现以下游戏画面,表示pygame模块安装成功!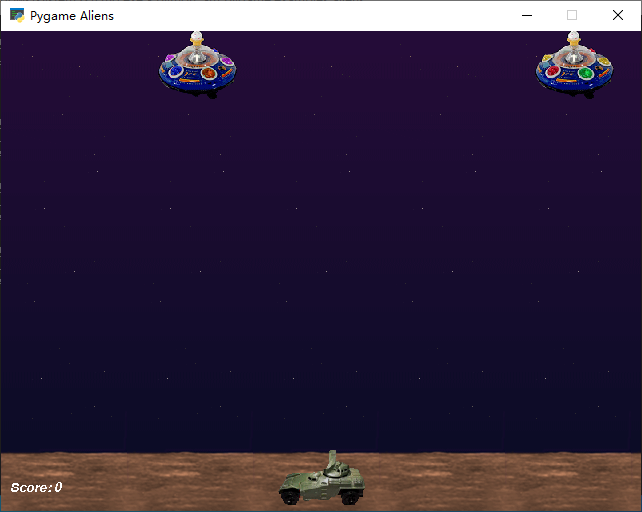
三、小试牛刀
import pygame#初始化pygame.init()#设置显示屏幕screen = pygame.display.set_mode((800, 600))bg=pygame.image.load("bg.jpg")clock=pygame.time.Clock()running=Truewhile running:#屏幕依次绘制图片screen.blit(bg,(0,0))#事件判断for event in pygame.event.get():if event.type==pygame.QUIT:running=Falseclock.tick(60)#屏幕显示更新pygame.display.update()#退出pygame.quit()
四、【Python游戏】1小时开发飞机大战游戏-Pygame版本
点击查看【bilibili】
1、基本设置
程序的基本框架:设置窗口和背景,退出
import pygame#初始化pygame.init()#设置显示屏幕screen = pygame.display.set_mode((800, 600))bg=pygame.image.load("bg.jpg")running=Truewhile running:#屏幕依次绘制图片screen.blit(bg,(0,0))#事件判断for event in pygame.event.get():if event.type==pygame.QUIT:running=False#屏幕显示更新pygame.display.update()#退出pygame.quit()
2、绘制主角
import pygame#初始化pygame.init()#设置显示屏幕screen = pygame.display.set_mode((800, 600))bg=pygame.image.load("bg.jpg")running=Truewhile running:#屏幕依次绘制图片screen.blit(bg,(0,0))#事件判断for event in pygame.event.get():if event.type==pygame.QUIT:running=False#屏幕显示更新pygame.display.update()#退出pygame.quit()
pygame.draw模块
绘图函数仅能在 Surface 对象的剪切区域生效。这些函数返回一个 Rect,表示包含实际绘制图形的矩形区域。
- pygame.draw.rect() — 绘制矩形
- pygame.draw.polygon() — 绘制多边形
- pygame.draw.circle() — 根据圆心和半径绘制圆形
- pygame.draw.ellipse() — 根据限定矩形绘制一个椭圆形
- pygame.draw.arc() — 绘制弧线
- pygame.draw.line() — 绘制线段
- pygame.draw.lines() — 绘制多条连续的线段
- pygame.draw.aaline() — 绘制抗锯齿的线段
- pygame.draw.aalines() — 绘制多条连续的线段(抗锯齿)
[
](https://blog.csdn.net/qq_41556318/article/details/86302600)
其它核心语句
1、绘制进度条
pygame.draw.rect(screen,(192,192,192),(5,100,490,20))pygame.draw.rect(screen,(0,0,255),(5,100,step % 490,20))

若有收获,就点个赞吧
0 人点赞
