1.在控制节点安装网络节点Neutron,安装数据库Neutron,并设置访问权限的设置
mysql -u root -p123456MariaDB [(none)]> CREATE DATABASE neutron;MariaDB [(none)]> GRANT ALL PRIVILEGES ON neutron.* TO 'neutron'@'localhost' IDENTIFIED BY '123456';MariaDB [(none)]> GRANT ALL PRIVILEGES ON neutron.* TO 'neutron'@'%' IDENTIFIED BY '123456';(weizhixing)MariaDB [(none)]> GRANT ALL PRIVILEGES ON neutron.* TO 'neutron'@'openstackpro01' IDENTIFIED BY '123456';
2.创建Neutron的服务凭证
[root@openstackpro01 ~]# openstack user create --domain default --password-prompt neutron[root@openstackpro01 ~]# openstack role add --project service --user neutron admin[root@openstackpro01 ~]# openstack service create --name neutron --description "OpenStack Networking" network
结果:截图
3.创建Neutron服务的API端点
创建服务凭证[root@openstackpro01 ~]# openstack user create --domain default --password-prompt neutron[root@openstackpro01 ~]# openstack role add --project service --user neutron admin[root@openstackpro01 ~]# openstack service create --name neutron --description "OpenStack Networking" network[root@openstackpro01 ~]# openstack endpoint create --region RegionOne network public http://192.168.253.130:9696[root@openstackpro01 ~]# openstack endpoint create --region RegionOne network internal http://192.168.253.130:9696[root@openstackpro01 ~]# openstack endpoint create --region RegionOne network admin http://192.168.253.130:9696
结果: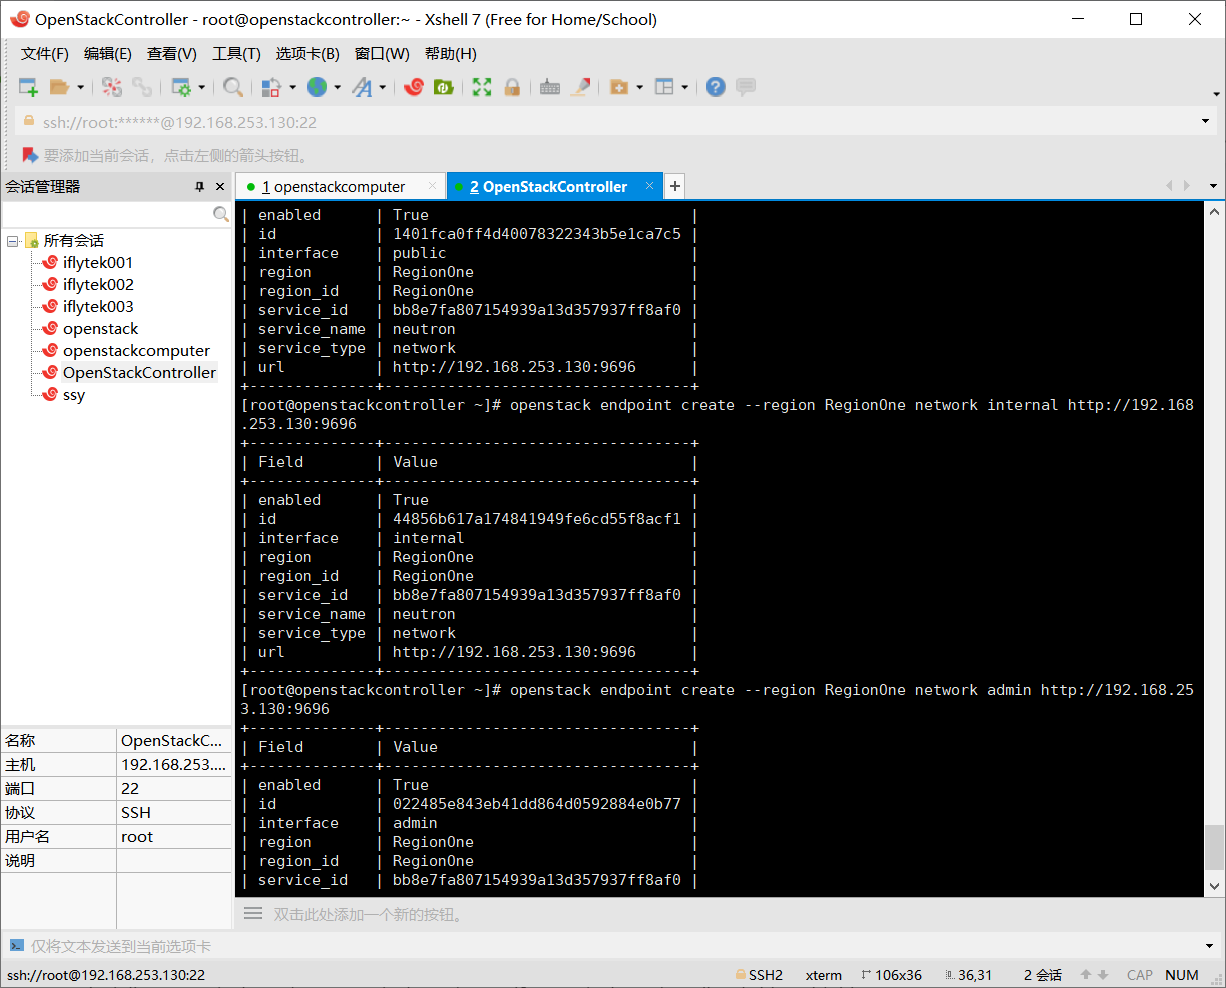
4.配置网络选项
根据要部署的虚拟网络类型配置网络选项(Provider networks、Self-service networks)由于Self-service networks也支持Provider networks,所以安装Self-service networks
yum install -y openstack-neutron openstack-neutron-ml2 openstack-neutron-linuxbridge ebtables
5.编辑/etc/neutron/neutron.conf文件进行Neutron的相关配置
[database]connection=mysql+pymysql://neutron:123456@192.168.253.130/neutron[DEFAULT]core_plugin=ml2service_plugins=routerallow_overlapping_ips=truetransport_url=rabbit://openstack:123456@192.168.253.130auth_strategy=keystonenotify_nova_on_port_status_changes=truenotify_nova_on_port_data_changes=true[keystone_authtoken]auth_uri=http://192.168.253.130:5000auth_url=http://192.168.253.130:5000memcached_servers=192.168.253.130:11211auth_type=passwordproject_domain_name=defaultuser_domain_name=defaultproject_name=serviceusername=neutronpassword=123456[nova]# ...auth_url=http://192.168.253.130:5000auth_type=passwordproject_domain_name=defaultuser_domain_name=defaultregion_name=RegionOneproject_name=serviceusername=novapassword=123456[oslo_concurrency]lock_path = /var/lib/neutron/tmp
6.Configure the Modular Layer 2 (ML2) plug-in 编辑/etc/neutron/plugins/ml2/ml2_conf.ini文件
[ml2]type_drivers=flat,vlan,vxlantenant_network_types=vxlanmechanism_drivers=linuxbridge,l2populationextension_drivers=port_security[ml2_type_flat]flat_networks=provider[ml2_type_vxlan]vni_ranges=1:1000[securitygroup]enable_ipset=true
7.Configure the Linux bridge agent 编辑文件
/etc/neutron/plugins/ml2/linuxbridge_agent.ini
[linux_bridge]physical_interface_mappings=provider:PROVIDER_INTERFACE_NAME(待配)[vxlan]enable_vxlan=truelocal_ip=192.168.253.130l2_population=true[securitygroup]enable_security_group=truefirewall_driver=neutron.agent.linux.iptables_firewall.IptablesFirewallDriver
8.Configure the layer-3 agent Edit the /etc/neutron/l3_agent.ini file
[DEFAULT]interface_driver = linuxbridge
9.Configure the DHCP agent Edit the /etc/neutron/dhcp_agent.ini file
[DEFAULT]interface_driver = linuxbridgedhcp_driver = neutron.agent.linux.dhcp.Dnsmasqenable_isolated_metadata = true
10.Configure the metadata agent Edit the /etc/neutron/metadata_agent.ini file
[DEFAULT]nova_metadata_host=192.168.253.130metadata_proxy_shared_secret = METADATA_SECRET
11.nova.conf文件配置neutron节点
[neutron]url = http://192.168.253.130:9696auth_url = http://192.168.253.130:35357auth_type = passwordproject_domain_name=defaultuser_domain_name=defaultregion_name=RegionOneproject_name=serviceusername=neutronpassword=123456service_metadata_proxy=truemetadata_proxy_shared_secret=METADATA_SECRET
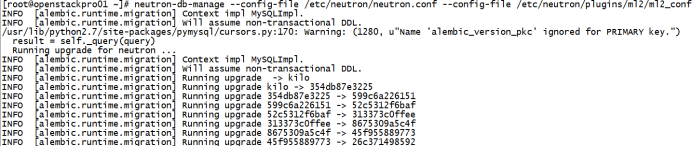
12.对网络服务进行软链接
[root@openstackpro01 ~]# ln -s /etc/neutron/plugins/ml2/ml2_conf.ini /etc/neutron/plugin.ini[root@openstackpro01 ~]# neutron-db-manage --config-file /etc/neutron/neutron.conf --config-file /etc/neutron/plugins/ml2/ml2_conf.ini upgrade head
13.配置相关API服务
[root@openstackpro01 ~]# systemctl restart openstack-nova-api.service[root@openstackpro01 ~]# systemctl enable neutron-server.service[root@openstackpro01 ~]# systemctl start neutron-server.service[root@openstackpro01 ~]# systemctl enable neutron-linuxbridge-agent.service[root@openstackpro01 ~]# systemctl start neutron-linuxbridge-agent.service[root@openstackpro01 ~]# systemctl enable neutron-dhcp-agent.service[root@openstackpro01 ~]# systemctl start neutron-dhcp-agent.service[root@openstackpro01 ~]# systemctl enable neutron-metadata-agent.service[root@openstackpro01 ~]# systemctl start neutron-metadata-agent.service[root@openstackpro01 ~]# systemctl enable neutron-l3-agent.service[root@openstackpro01 ~]# systemctl start neutron-l3-agent.service

若有收获,就点个赞吧
0 人点赞
