- 云服务器CVM
- 轻量云服务器
- 域名绑定实例IP
- MX记录
- 关掉sendmail(系统自带的邮件服务)
- 安装postfix.
- 安装sendEmail
- 测试方法一
- 直接在命令行中输入sendmail指令
sendEmail -f 发件人 -t 收件人 -u 标题 -xu 发件人 -xp 密码(无则输入123) -m 内容 -a 附件地址 -o message-header=utf8 -o message-charset=utf-8 -o message-content-type=html -o tls=no - 反垃圾邮件安全配置
- https://dmarcly.com/tools/spf-record-generator
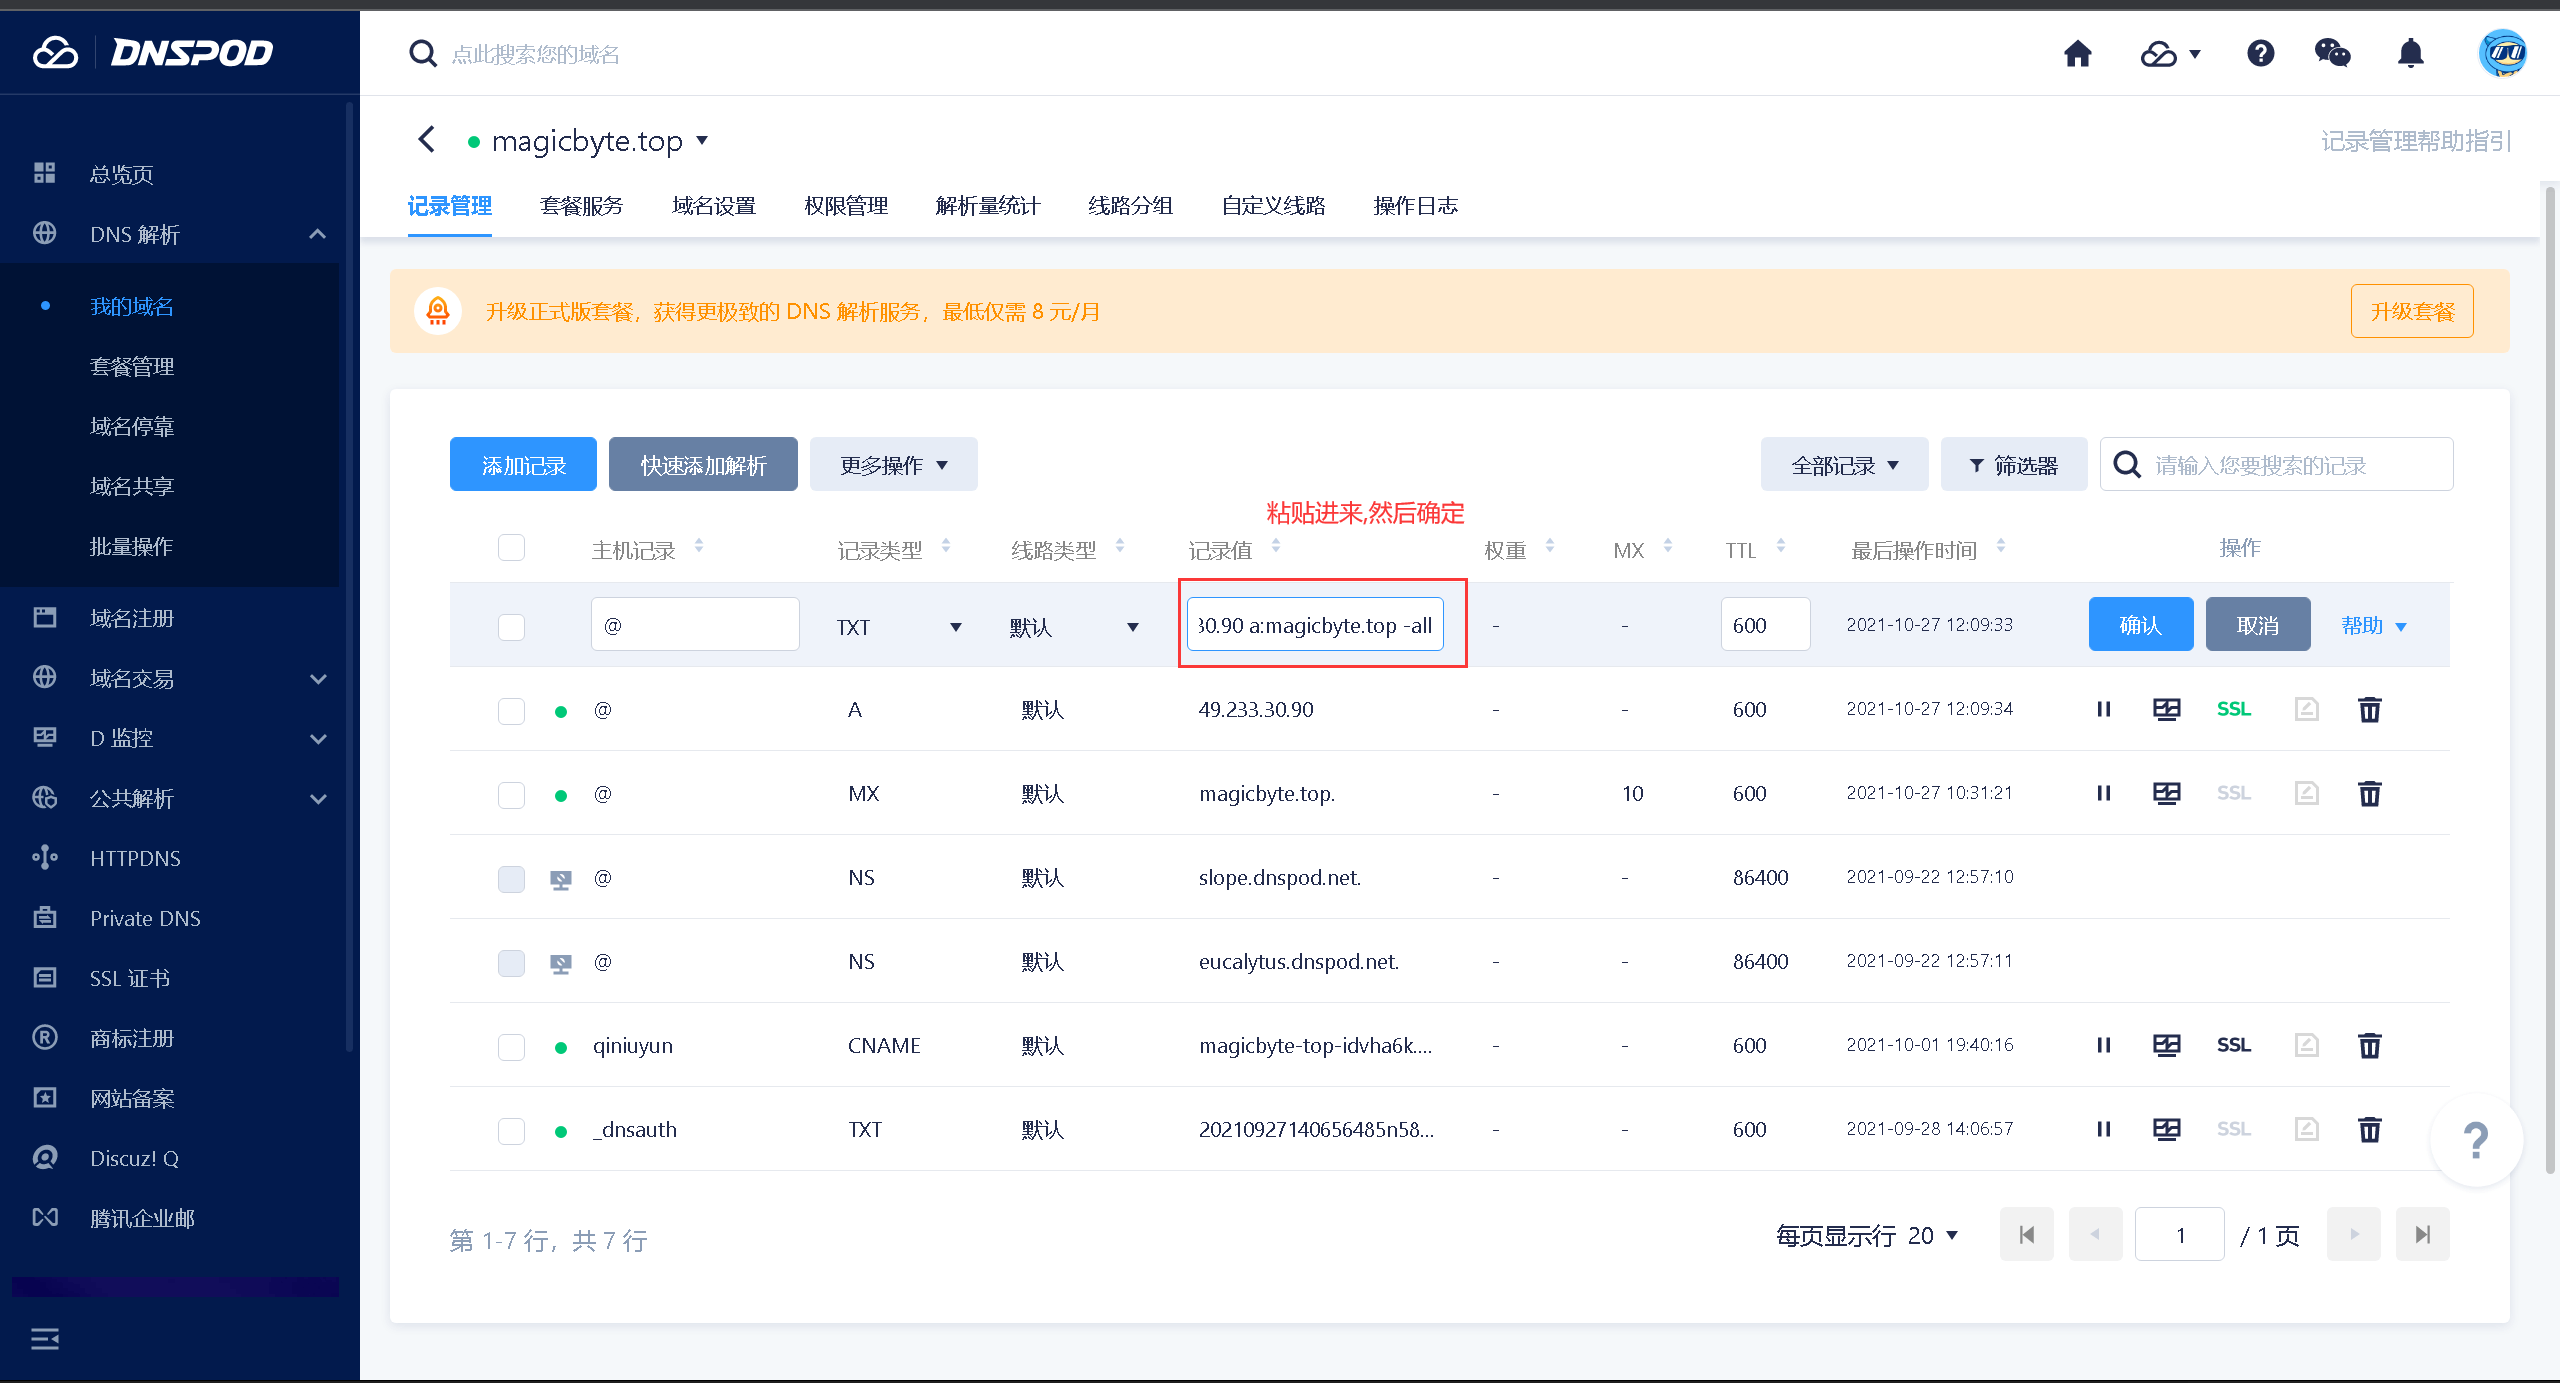 ">这个为通用的,a:a记录, mx:mx记录
v=spf1 a mx ~all
打开spf记录生成工具https://dmarcly.com/tools/spf-record-generator

- DKIM(邮件签名)
- PTR反向解析(rDNS)
- BIND v9版本的文件目录与之前的版本大不相同,所以在配置时需要注意
apt-get install bind9 - 正向检查
dig 域名
#反向检查
dig -x xx.xx.xx.xx - 正向解析
nslookup 你的域名
#反向解析
nslookup -qt=ptr 你所配置的IP - 宝塔的配置
- Dovecot configuration file
- http://wiki2.dovecot.org/QuickConfiguration">If you’re in a hurry, see http://wiki2.dovecot.org/QuickConfiguration
- “doveconf -n” command gives a clean output of the changed settings. Use it
# instead of copy&pasting files when posting to the Dovecot mailing list. - ‘#’ character and everything after it is treated as comments. Extra spaces
# and tabs are ignored. If you want to use either of these explicitly, put the
# value inside quotes, eg.: key = “# char and trailing whitespace “ - Most (but not all) settings can be overridden by different protocols and/or
# source/destination IPs by placing the settings inside sections, for example:
# protocol imap { }, local 127.0.0.1 { }, remote 10.0.0.0/8 { } - Default values are shown for each setting, it’s not required to uncomment
# those. These are exceptions to this though: No sections (e.g. namespace {})
# or plugin settings are added by default, they’re listed only as examples.
# Paths are also just examples with the real defaults being based on configure
# options. The paths listed here are for configure —prefix=/usr
# —sysconfdir=/etc —localstatedir=/var - Protocols we want to be serving.
protocols = imap pop3 lmtp - A comma separated list of IPs or hosts where to listen in for connections.
# ““ listens in all IPv4 interfaces, “::” listens in all IPv6 interfaces.
# If you want to specify non-default ports or anything more complex,
# edit conf.d/master.conf.
#listen = , :: - Base directory where to store runtime data.
#base_dir = /var/run/dovecot/ - Name of this instance. In multi-instance setup doveadm and other commands
# can use -ito select which instance is used (an alternative
# to -c). The instance name is also added to Dovecot processes
# in ps output.
#instance_name = dovecot - Greeting message for clients.
#login_greeting = Dovecot ready. - Space separated list of trusted network ranges. Connections from these
# IPs are allowed to override their IP addresses and ports (for logging and
# for authentication checks). disable_plaintext_auth is also ignored for
# these networks. Typically you’d specify your IMAP proxy servers here.
#login_trusted_networks = - Space separated list of login access check sockets (e.g. tcpwrap)
#login_access_sockets = - With proxy_maybe=yes if proxy destination matches any of these IPs, don’t do
# proxying. This isn’t necessary normally, but may be useful if the destination
# IP is e.g. a load balancer’s IP.
#auth_proxy_self = - Show more verbose process titles (in ps). Currently shows user name and
# IP address. Useful for seeing who are actually using the IMAP processes
# (eg. shared mailboxes or if same uid is used for multiple accounts).
#verbose_proctitle = no - Should all processes be killed when Dovecot master process shuts down.
# Setting this to “no” means that Dovecot can be upgraded without
# forcing existing client connections to close (although that could also be
# a problem if the upgrade is e.g. because of a security fix).
#shutdown_clients = yes - If non-zero, run mail commands via this many connections to doveadm server,
# instead of running them directly in the same process.
#doveadm_worker_count = 0
# UNIX socket or host:port used for connecting to doveadm server
#doveadm_socket_path = doveadm-server - Space separated list of environment variables that are preserved on Dovecot
# startup and passed down to all of its child processes. You can also give
# key=value pairs to always set specific settings.
#import_environment = TZ - Dictionary can be used to store key=value lists. This is used by several
# plugins. The dictionary can be accessed either directly or though a
# dictionary server. The following dict block maps dictionary names to URIs
# when the server is used. These can then be referenced using URIs in format
# “proxy::“. - Most of the actual configuration gets included below. The filenames are
# first sorted by their ASCII value and parsed in that order. The 00-prefixes
# in filenames are intended to make it easier to understand the ordering.
!include conf.d/*.conf - A config file can also tried to be included without giving an error if
# it’s not found:
!include_try local.conf - System V init adopted top level configuration
- https://rspamd.com/doc/tutorials/writing_rules.html for details">Please don’t modify this file as your changes might be overwritten with
# the next update.
#
# You can modify ‘$LOCAL_CONFDIR/rspamd.conf.local.override’ to redefine
# parameters defined on the top level
#
# You can modify ‘$LOCAL_CONFDIR/rspamd.conf.local’ to add
# parameters defined on the top level
#
# For specific modules or configuration you can also modify
# ‘$LOCAL_CONFDIR/local.d/file.conf’ - to add your options or rewrite defaults
# ‘$LOCAL_CONFDIR/override.d/file.conf’ - to override the defaults
#
# See https://rspamd.com/doc/tutorials/writing_rules.html for details - Local fuzzy storage is disabled by default
- See /usr/share/postfix/main.cf.dist for a commented, more complete version
- Debian specific: Specifying a file name will cause the first
# line of that file to be used as the name. The Debian default
# is /etc/mailname.
#myorigin = /etc/mailname - appending .domain is the MUA’s job.
append_dot_mydomain = no - Uncomment the next line to generate “delayed mail” warnings
#delay_warning_time = 4h - http://www.postfix.org/COMPATIBILITY_README.html — default to 2 on
# fresh installs.
compatibility_level = 2">See http://www.postfix.org/COMPATIBILITY_README.html — default to 2 on
# fresh installs.
compatibility_level = 2 - tomcat服务器
- 数据库
- 项目部署
云服务器CVM
轻量云服务器
前期准备
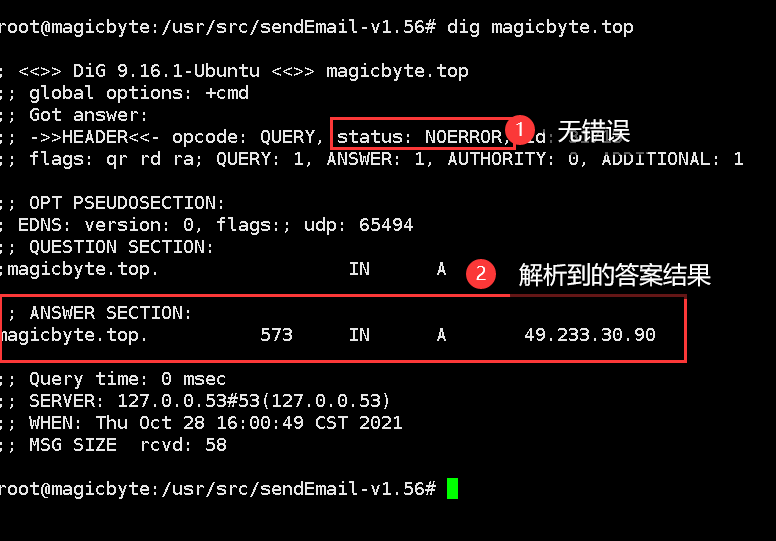
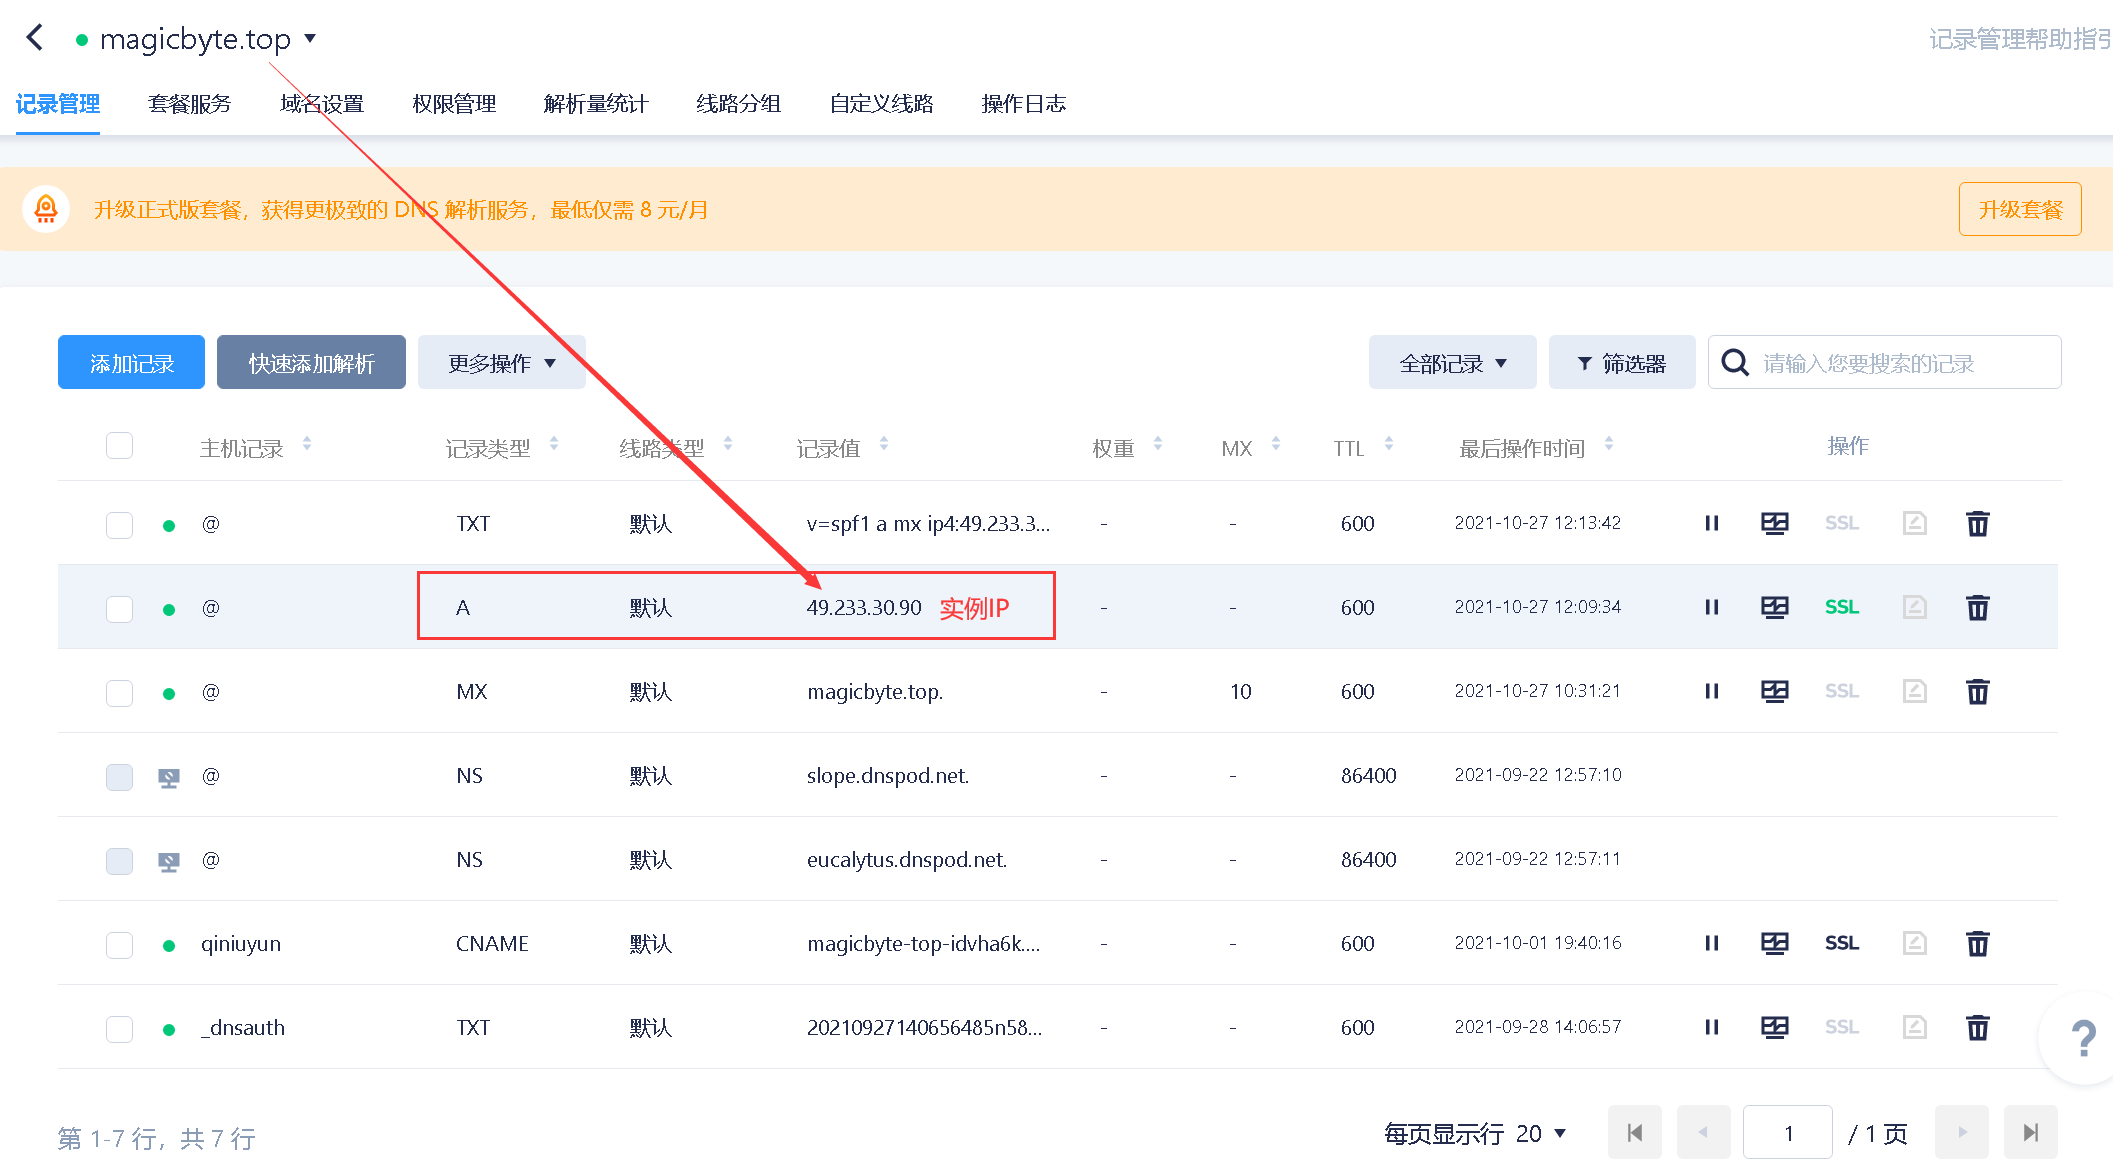
域名绑定实例IP
域名生效检查
域名设置解析后需要过一段时间才会生效,通过 ping 命令检查域名是否生效 [?],如:ping yourdomain.com
如果 ping 命令返回的信息中含有你设置的解析的 IP 地址,说明解析成功。
(使用 ctrl + c 停止)
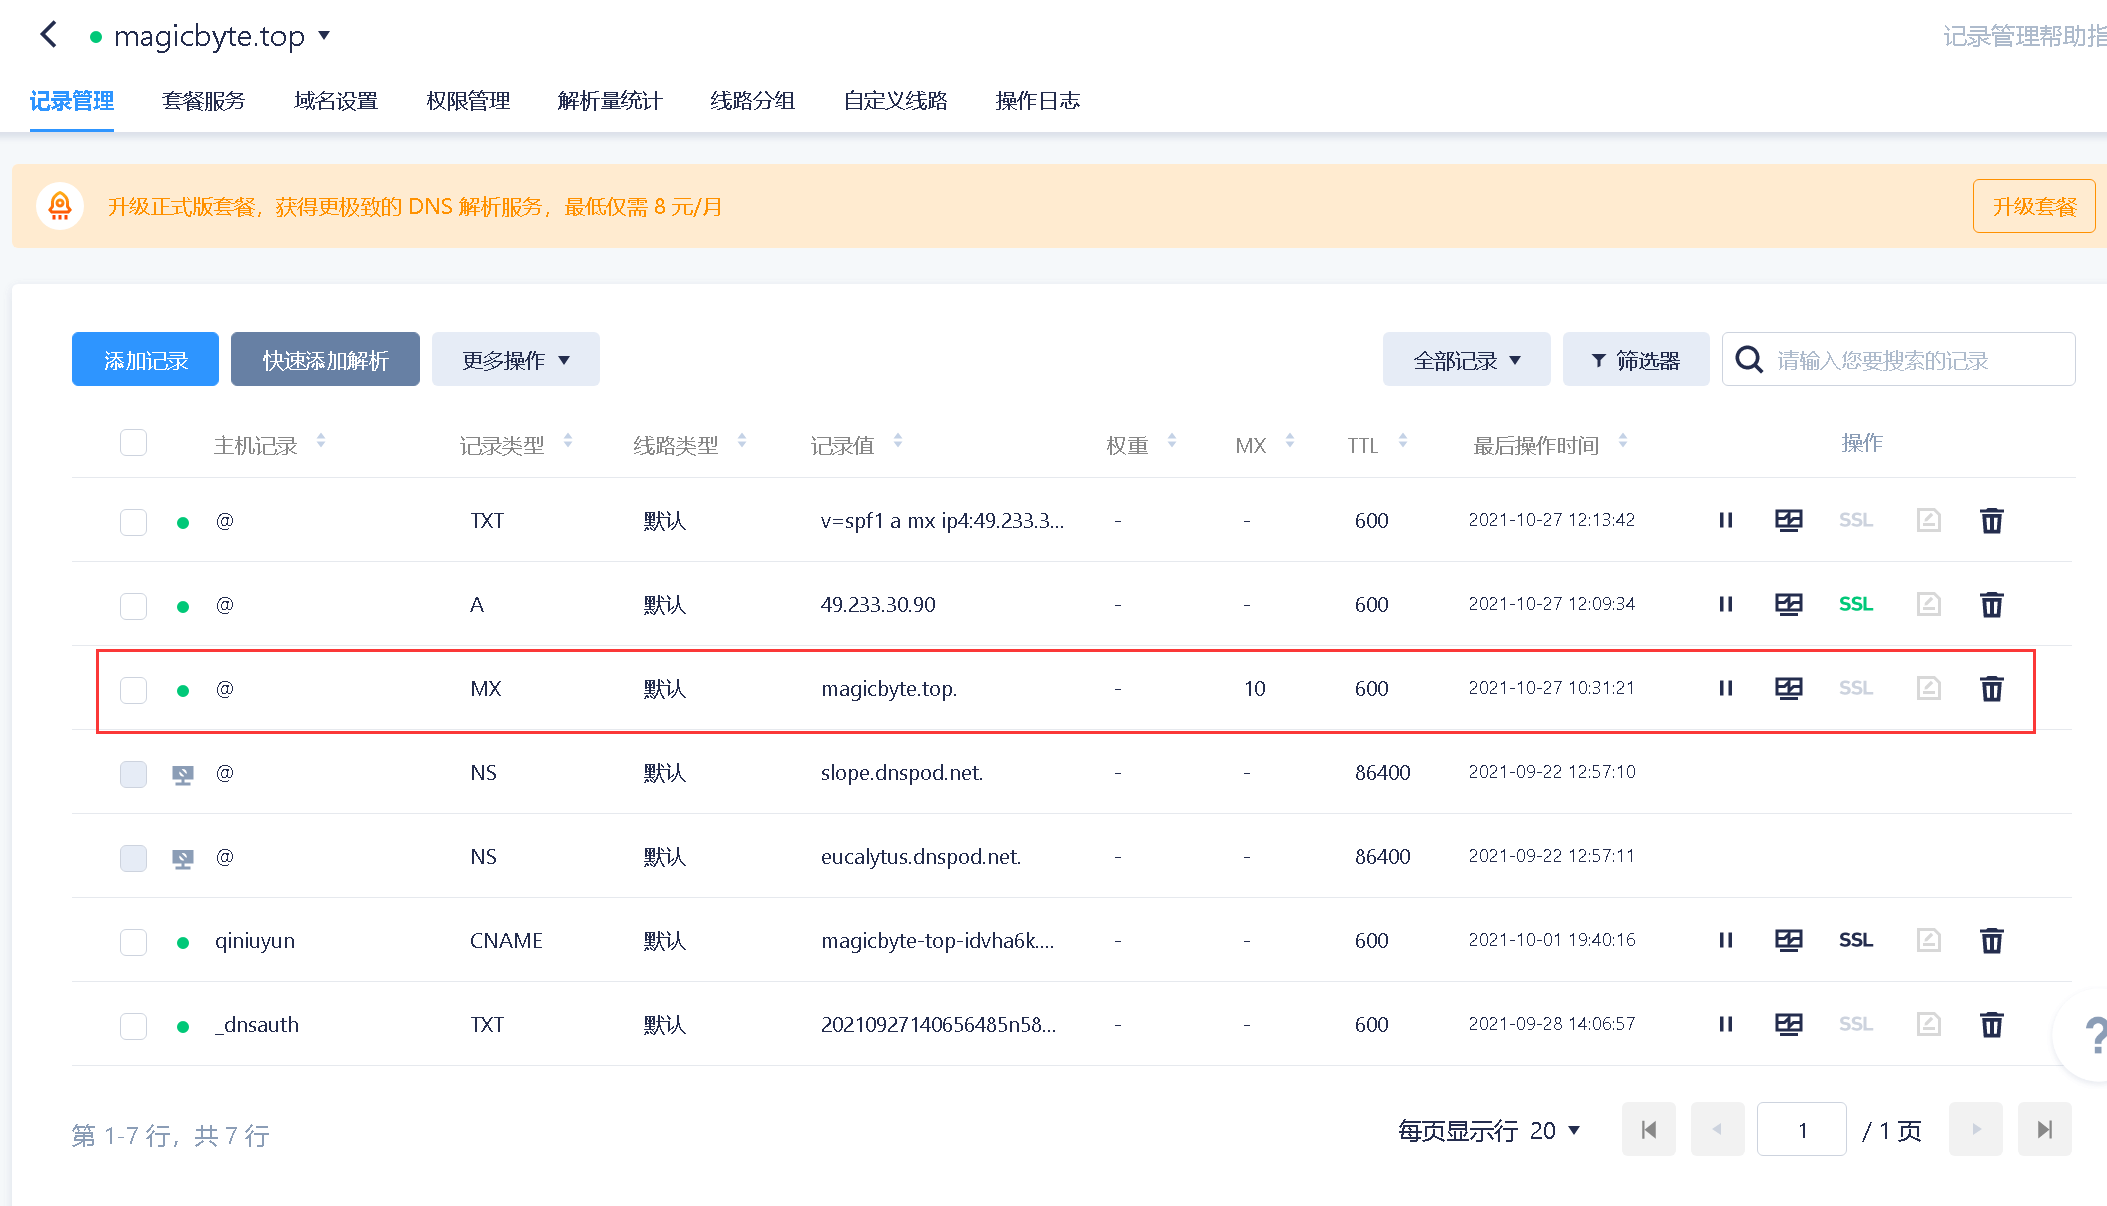
MX记录
配置方法及其简单,直接在域名解析添加MX记录即可
检查 MX 记录
替换下面命令中的 yourdomain.com 为您自己的注册的域名:
nslookup -q=mx 你的域名
如果 nslookup 命令返回的信息中含有你设置的域名的记录值,说明解析成功。
关掉sendmail(系统自带的邮件服务)
service sendmail stopsysv-rc-conf sendmail off如果出现Unable to locate package sysv-rc-conf#第一步vi /etc/apt/sources.list#第二步deb http://archive.ubuntu.com/ubuntu/ trusty main universe restricted multiverse第三步apt-get update第四步apt-get install sysv-rc-conf第五步sysv-rc-conf sendmail off
安装postfix.
apt-get install postfix
然后就会跳出postfix的配置菜单,一下就按默认的来就可以了,其他配置等安装完成后再进行更改
第一步选择:Internet with smarthost
No configuration 表示不要做任何配置
Internet Site 表示直接使用本地SMTP服务器发送和接收邮件
Internet with smarthost 表示使用本地SMTP服务器接收邮件,但发送邮件时不直接使用本地SMTP服务器,而是使用第三方smart host来转发邮件,比如收件人的邮件域名是QQ时,就去让QQ服务器的进行发送
Statellite system 表示所有邮件都会被外部服务器进行转发
Local only 表示邮件只能在本机用户之间发送和接收
第二步(设置邮件后缀域名):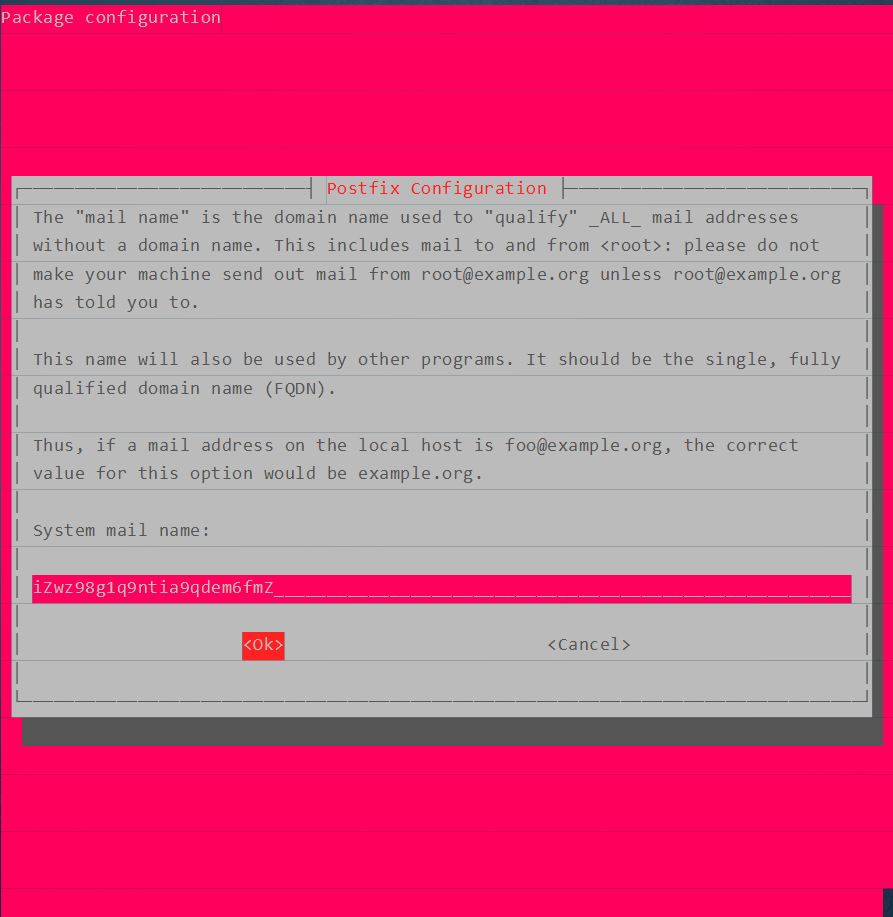
如果以上哪一步不小心按错了,那么建议你重新来一遍
#卸载
apt-get purge postfix
#查看postfix的版本
postconf mail_version
#查看postfix的端口监听情况
netstat -lnpt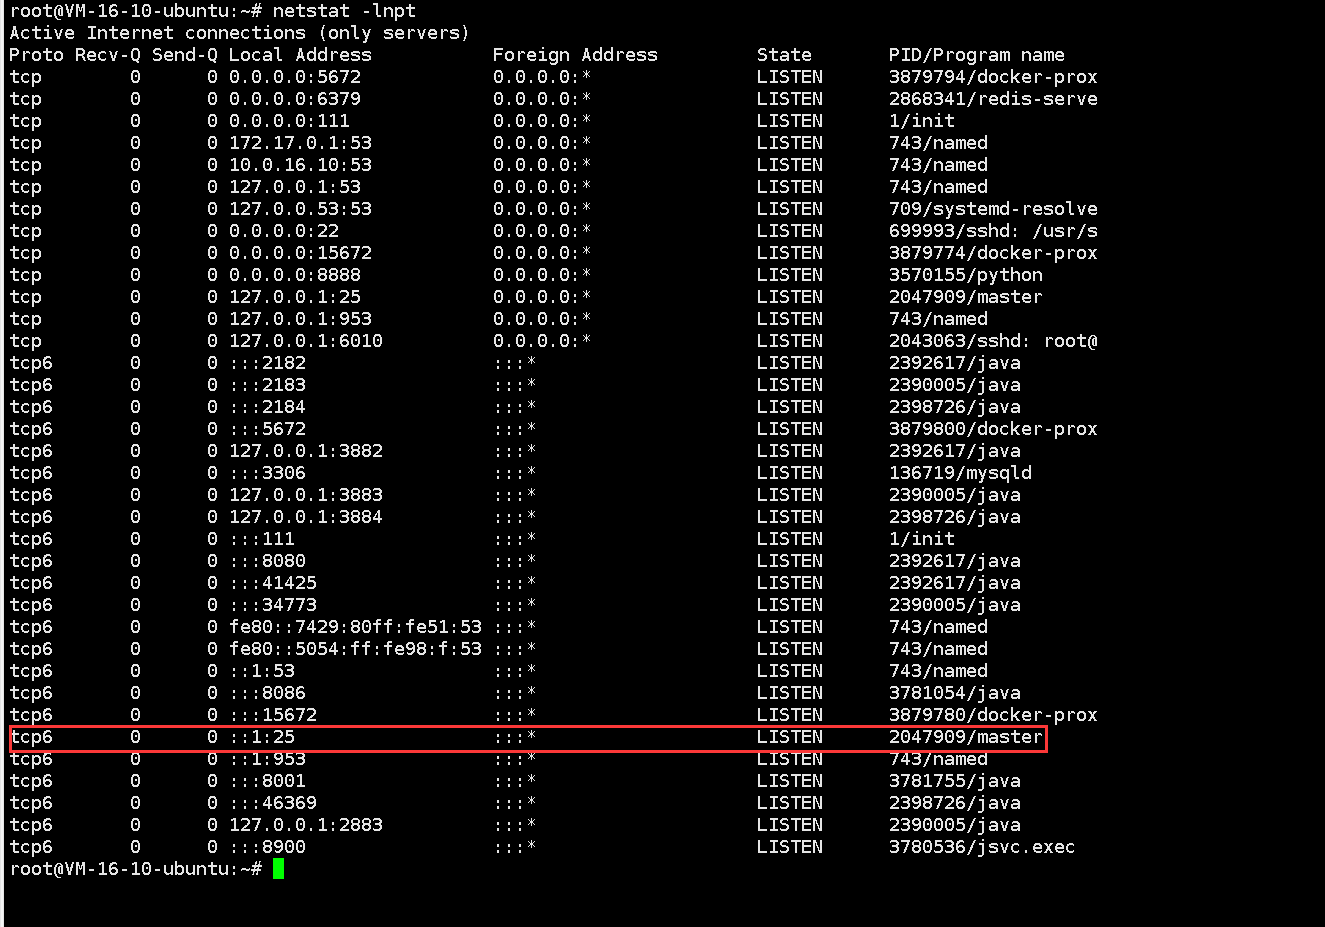
我们现在需求是只发不收,所以只需要25端口,如果需要接收请参阅dovecot相关手册进行配置
第三步:更改配置
vi /etc/postfix/main.cf
改成一下配置
myhostname = localhost.localdomain #域名的A记录主机IPmydomain = $myhostname #域名myorigin= $mydomain #发件人的后缀alias_maps = hash:/etc/aliasesalias_database = hash:/etc/aliasesmydestination = $myhostname, localhost.$myhostname, localhost,$mydomain #发给本地的域名mynetworks = 127.0.0.0/8 [::ffff:127.0.0.0]/104 [::1]/128mailbox_command = procmail -a "$EXTENSION"mailbox_size_limit = 0recipient_delimiter = +inet_interfaces = allinet_protocols = allhome_mailbox=Maildir/
修改后重启服务service postfix restart
测试发送
echo ‘main content’ | mail -s ‘titile’ lin986823307@foxmail.com
如果提示
apt install mailutils
#安装mail工具后再测试发送
发送的日志可以在/var/log/mail.log中查看
安装sendEmail
原生的postfix发送html格式Java无法调用,所以引入sendEmail插件进行发送
注意:sendmail:系统自带的发送程序,sendEmail是linux开源的邮件发送插件
#从网路上下载,下载会直接保存在当前目录,所以下载前请选择合适的文件目录
#cd /opt
wget http://caspian.dotconf.net/menu/Software/SendEmail/sendEmail-v1.56.tar.gz
#解压
tar -zxvf sendEmail-v1.56.tar.gz
#将sendEmail(这是一个文件,不是文件夹)复制,粘贴到/usr/bin文件夹下,赋予可执行权限
cp /opt/sendEmail-v1.56/sendEmail /usr/bin
#赋予可执行权限
chmod 777 /usr/bin/sendEmail
测试方法一
直接在命令行中输入sendmail指令
sendEmail -f 发件人 -t 收件人 -u 标题 -xu 发件人 -xp 密码(无则输入123) -m 内容 -a 附件地址 -o message-header=utf8 -o message-charset=utf-8 -o message-content-type=html -o tls=no
测试方法二
在/usr/src/sendEmail-V1.5.6中新建一个shell脚本,名字符合规范就行,粘贴以下代码
#!/bin/bash#处理中文乱码export LANG="zh_CN.UTF-8"export LC_ALL="zh_CN.UTF-8"#收件箱EMAIL_RECIVER=$1#邮件标题EMAIL_TITLE=$2#邮件正文EMAIL_CONTENT="$3"#发送者邮箱EMAIL_SENDER="root@localhost.localdomain"#邮件授权码(可选)EMAIL_PASSWORD="123456"#附件路径FILE1_PATH=$4#执行发送邮件sendEmail -f ${EMAIL_SENDER} -t ${EMAIL_RECIVER} -u ${EMAIL_TITLE} -xu ${EMAIL_SENDER} -xp ${EMAIL_PASSWORD} -m ${EMAIL_CONTENT} -a ${FILE1_PATH} -o message-charset=utf-8 -o message-content-type=html -o tls=no
接着给这个文件赋予可执行权限
#测试语法如下 在这个文件所在目录下执行./脚本名称.sh 收件人 标题 邮件内容(html)
执行脚本时你可能会看到以下警告
这说明你的系统里面没有支持这些语言,可通过安装语言来解决这个问题apt-get -y install language-pack-zh-hans
成功效果
反垃圾邮件安全配置
前置知识点:http://abbypan.github.io/2017/12/13/mail
邮件检测网站(检测你邮件服务器发出来的邮件分数):https://www.mail-tester.com/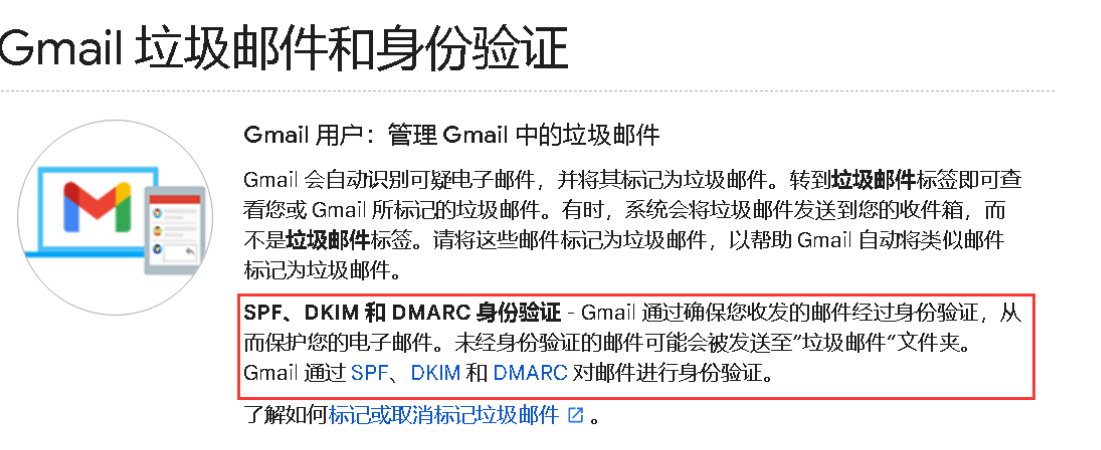
SPF(发件人身份认证)
什么是SPF?
(Sender Policy Framework) 的缩写,一种以IP地址认证电子邮件发件人身份的技术,是非常高效的垃圾邮件解决方案。
接收邮件方会首先检查域名的SPF记录,来确定发件人的IP地址是否被包含在SPF记录里面,如果在,就认为是一封正确的邮件,否则会认为是一封伪造的邮件进行退回。
如何设置邮件服务器的SPF呢?
SPF是通过域名的TXT记录来进行设置的
TXT记录值为:最典型的 SPF 格式的 TXT 记录例子为 “v=spf1 a mx ~all”,表示只有这个域名的 A 记录和 MX 记录中的 IP 地址有权限使用这个域名发送邮件
参数值表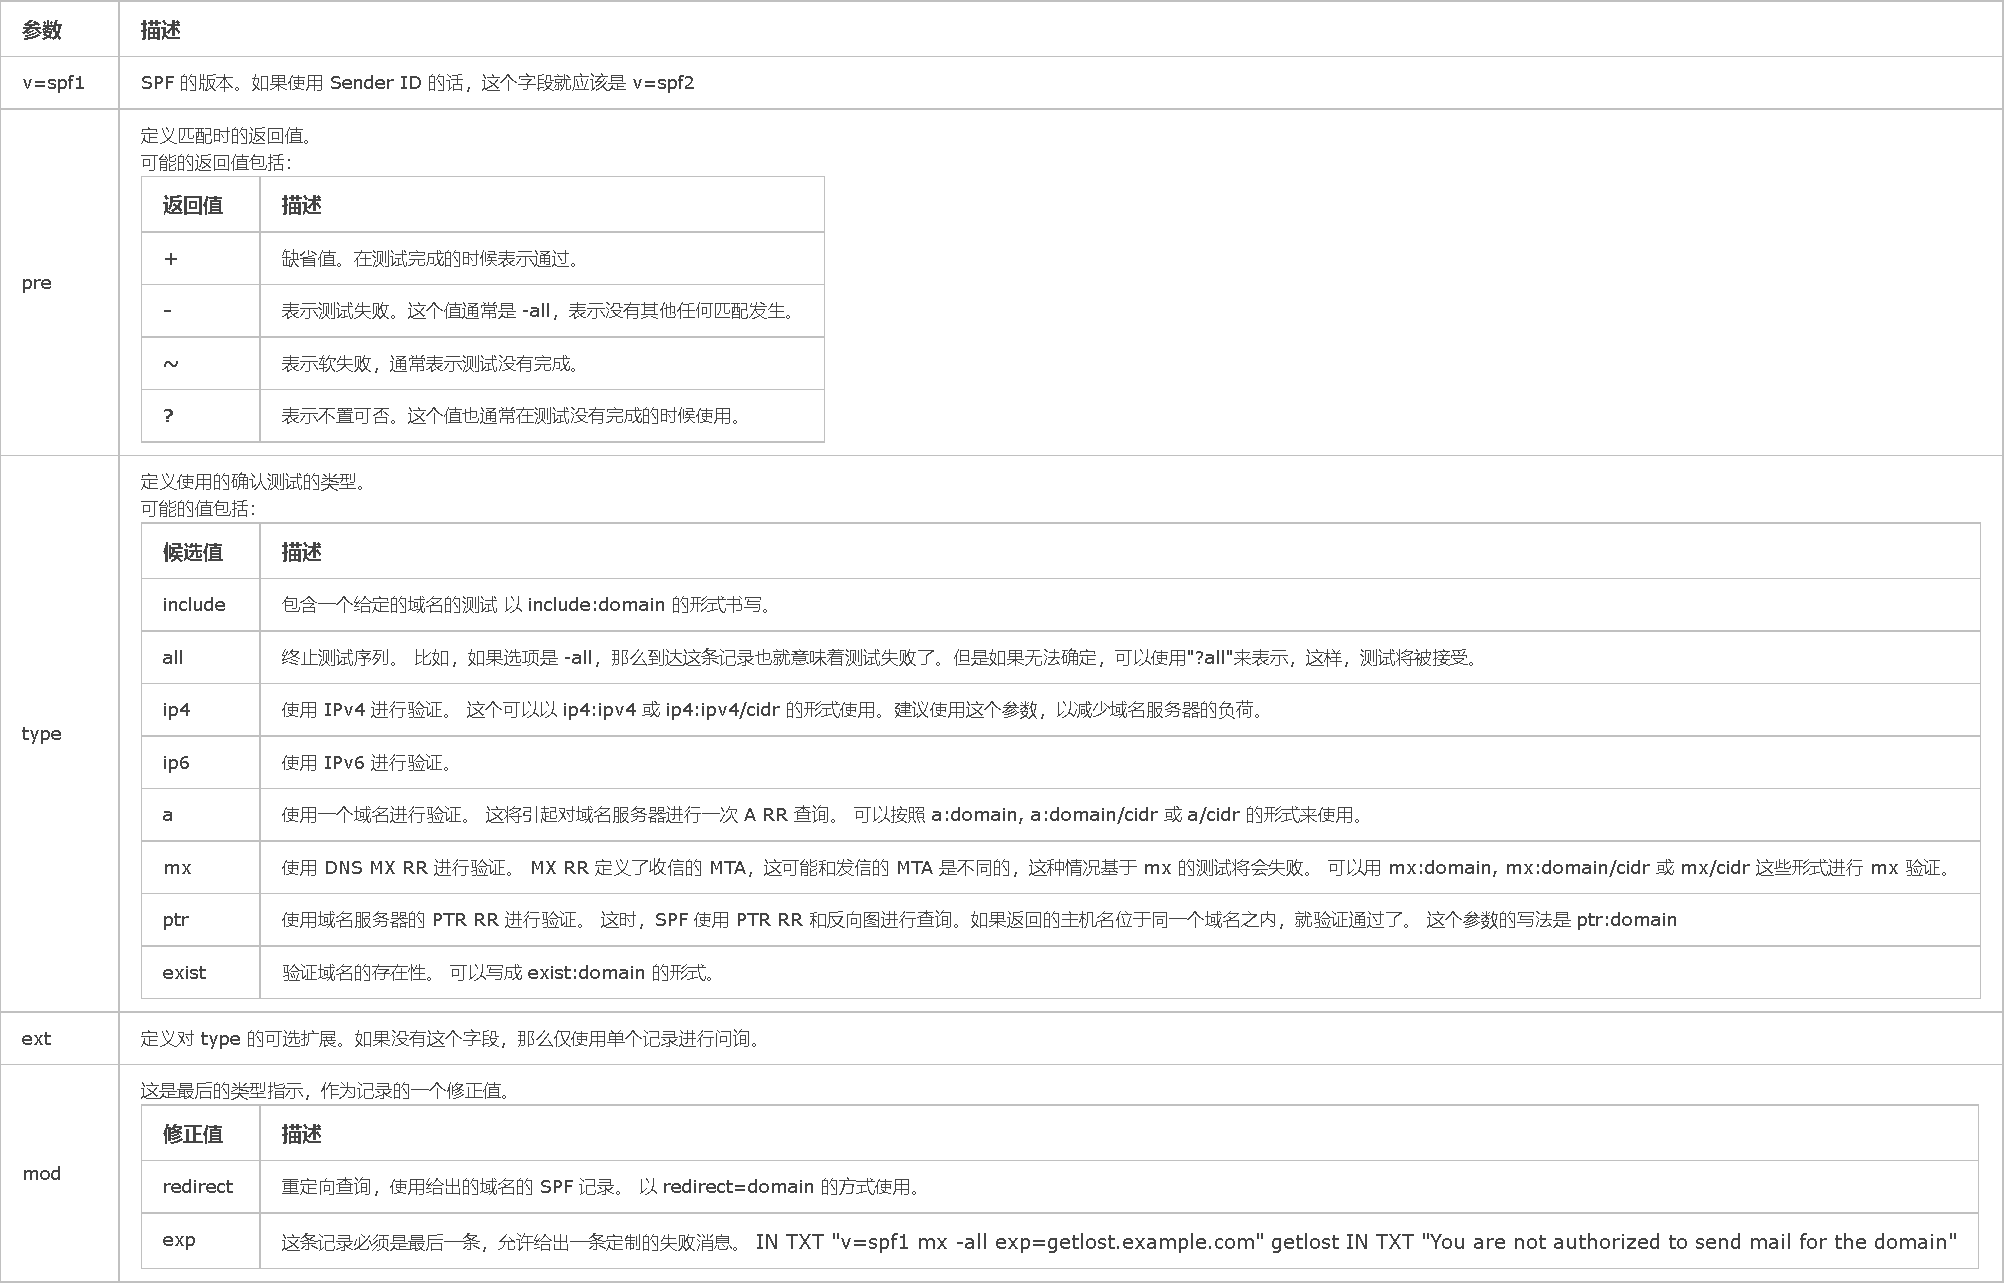
开始配置
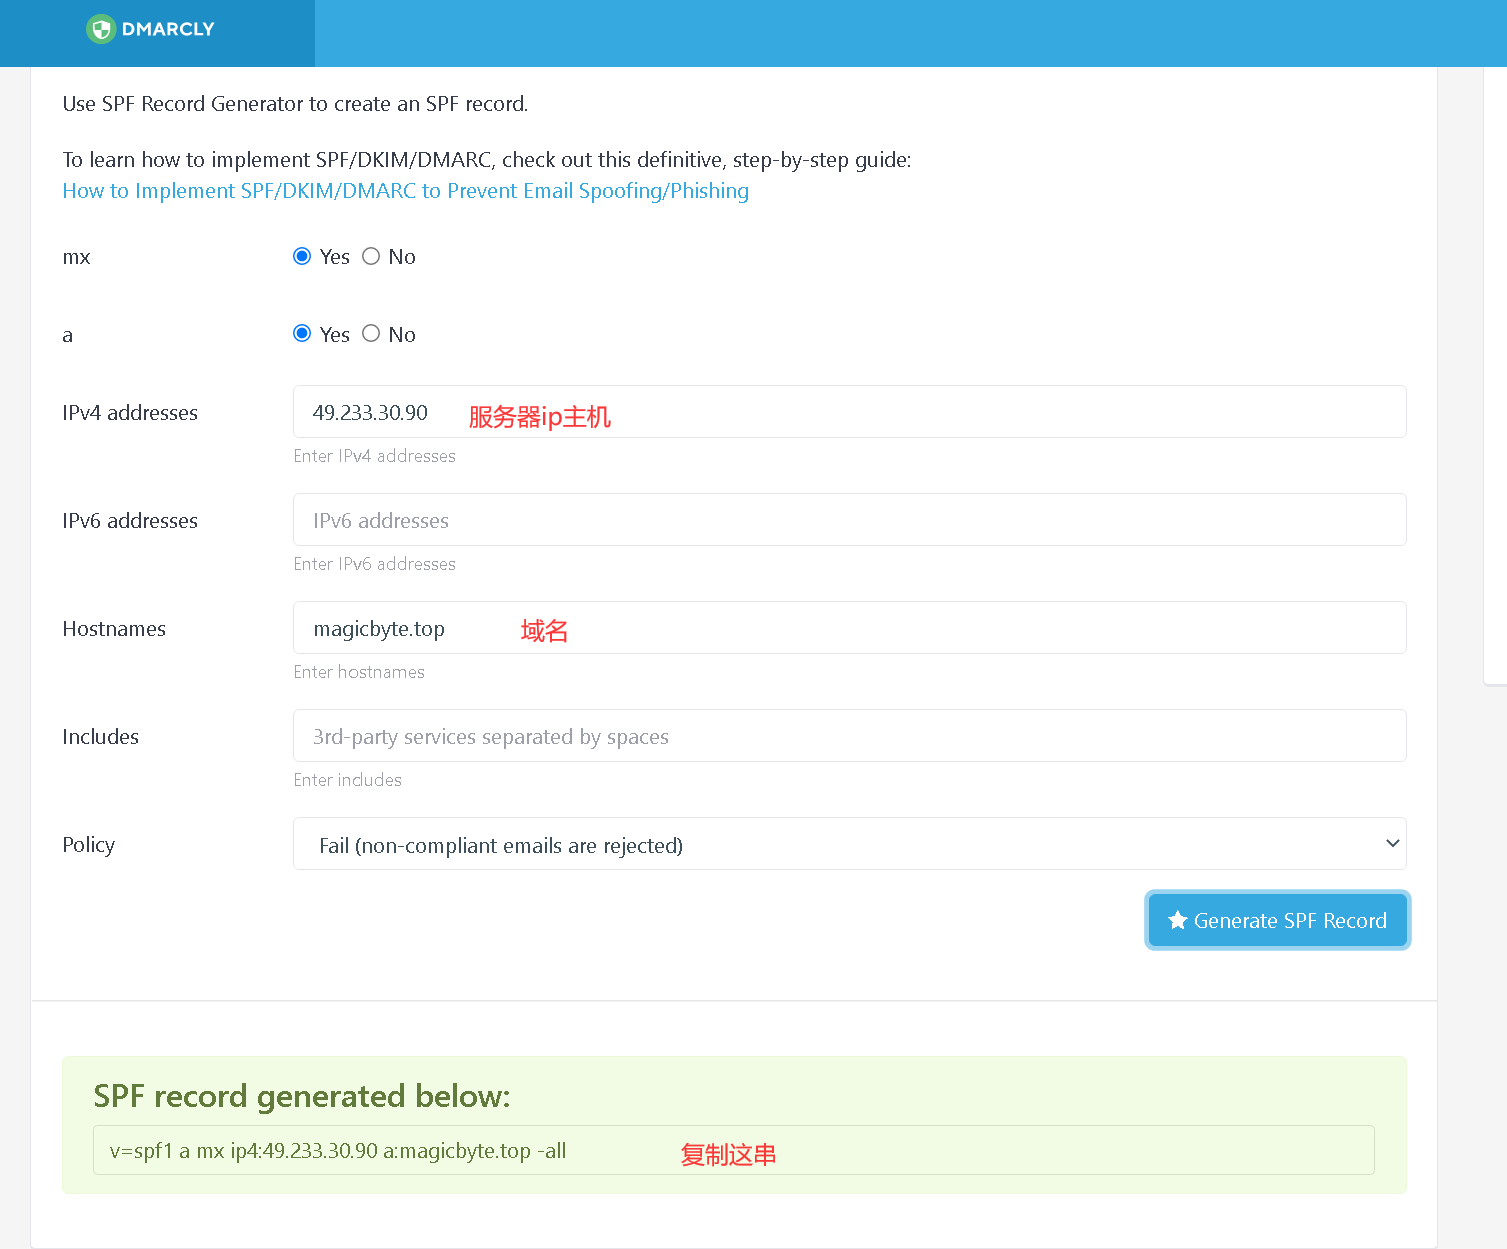
这个为通用的,a:a记录, mx:mx记录
v=spf1 a mx ~all
打开spf记录生成工具https://dmarcly.com/tools/spf-record-generator


检查记录是否有效
https://dmarcly.com/tools/spf-record-checker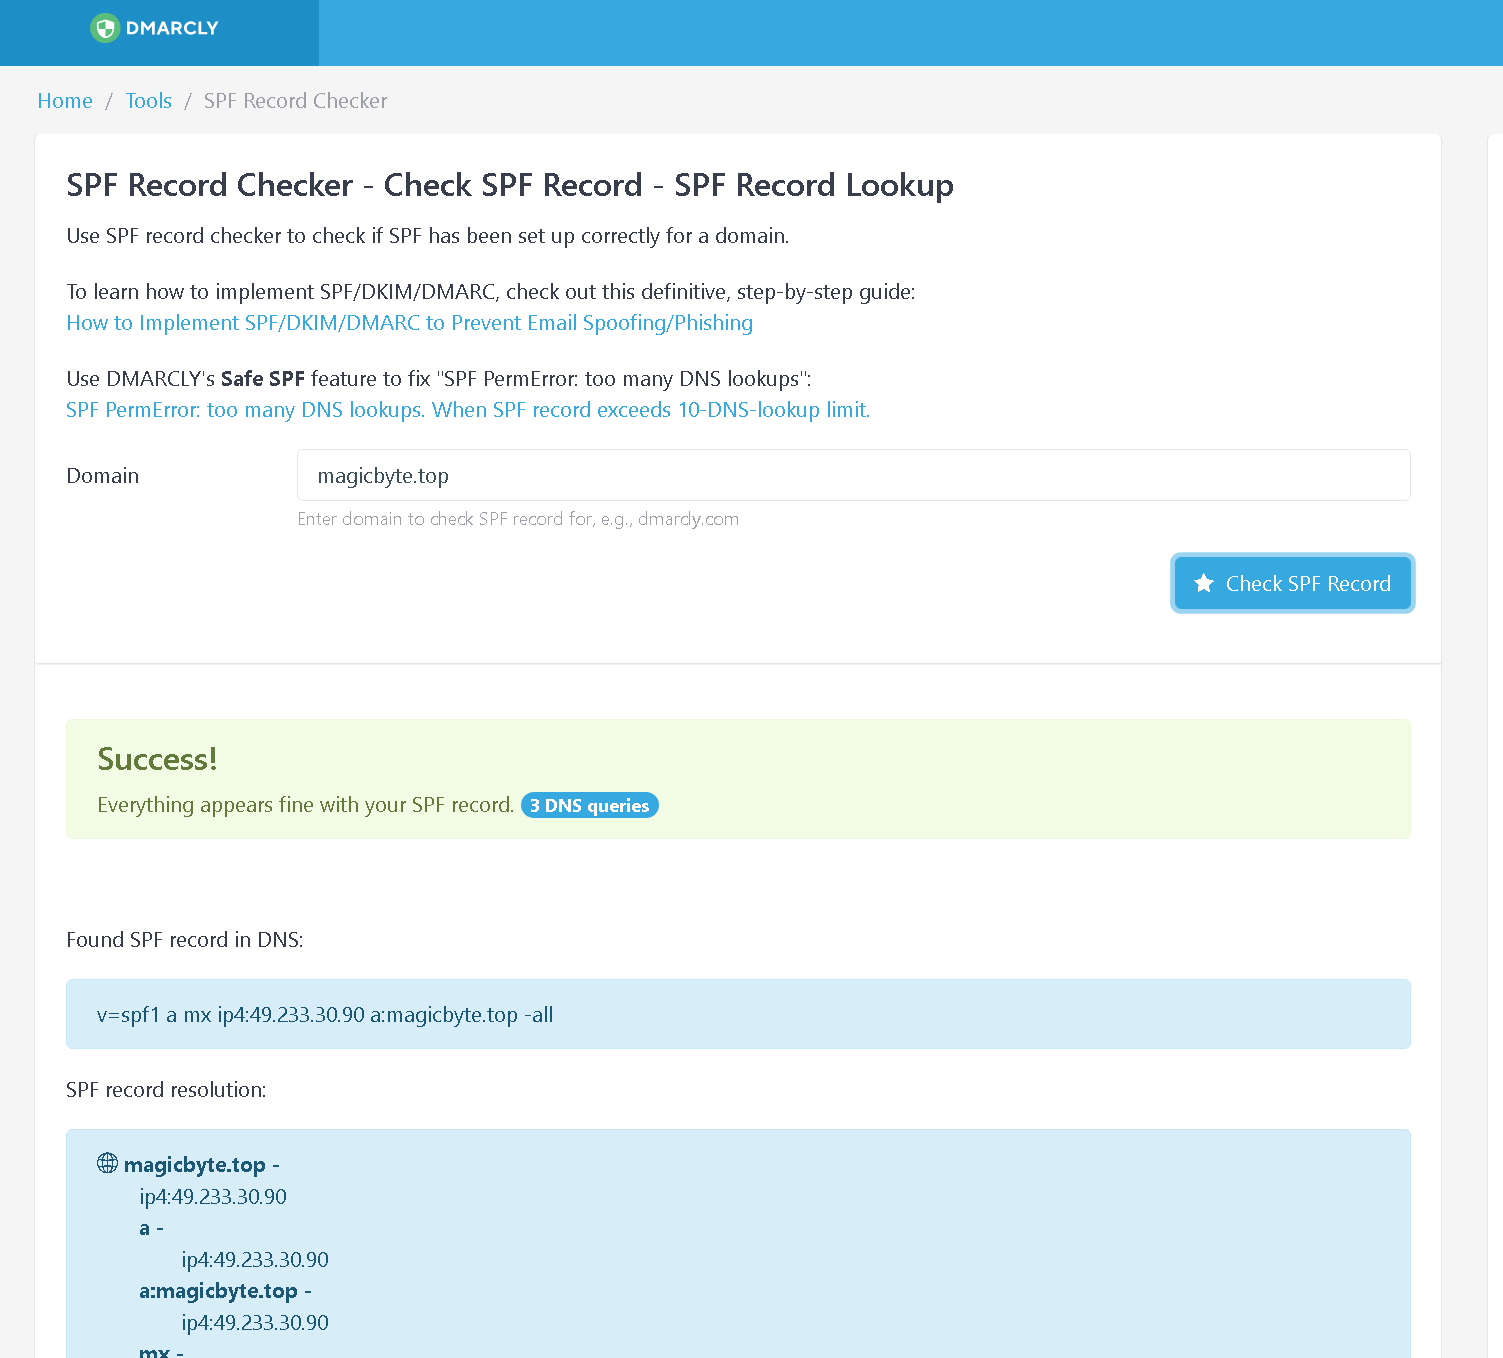
看到success就代表记录有效了
命令行检查spf指向是否生效
测试
然后再试着发送邮件,打开邮件的原始内容,找到spf,一下图谷歌邮箱为例,就代表成功啦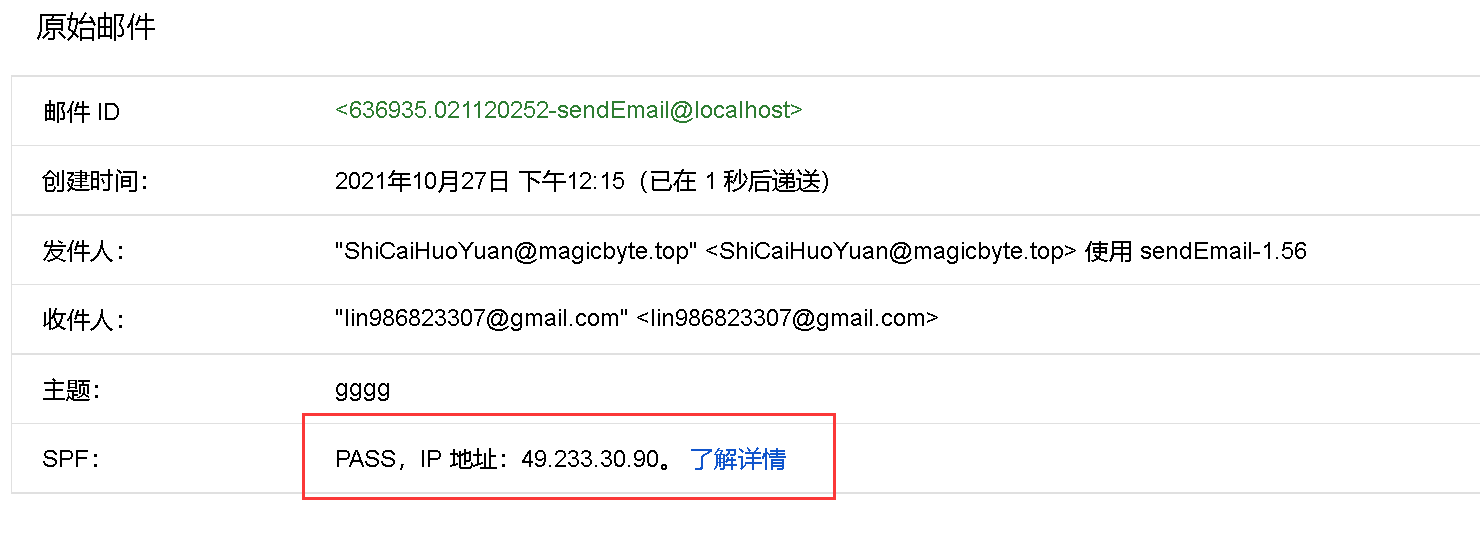
DKIM(邮件签名)
为什么使用?
邮件诈骗:
邮件诈骗是垃圾邮件制作者所用的欺骗方法,让邮件看起来像是从不属于他们的合法域/邮箱地址发出。这通过伪造邮件头文件来实现,让它看起来合法,以便收件人信任并打开邮件。
因为发件人看起来是真实的,垃圾邮件制作者按照这种方法让更多人查看邮件。但有时候,如果他们尝试从用户那里取回敏感信息,可能会引起严重的后果。欺诈邮件可通过配置 SPF 和 DKIM 来检测和避免。如果已配置 DKIM,则验证与每封邮件关联的域名身份
邮件反向散射:
垃圾邮件制作者假冒域名并使用篡改的邮箱地址发送邮件。如果收件人域拒绝邮件,它将向假冒的域发送退回邮件
DKIM 如何工作
在 DKIM 流程中,公共密钥作为域 DNS 管理器(域的注册商或 DNS 提供商)的 TXT 记录来发布。每封外发的邮件包括使用私有密钥为特殊域生成的唯一签名。收件服务器使用这个私有-公共密钥组合以验证邮件来源。如果验证失败,收件人服务器可能会基于服务器行为拒绝邮件或将它分类为垃圾/伪造邮件
DKIM 选择器
该选择器用于识别域的公共 DKIM 密钥详情。它是 DKIM 签名的一个属性,包括在邮件的 DKIM 头中。如果您需要为不同的用户提供特殊签名控制,则可为单个域使用多个选择器
DKIM配置方法
安装opendkim
apt-get install opendkim opendkim-tools
安装完成后,输入如下命令,会在当前目录下生成公钥和私钥两个文件:default.private 和 default.txt
把私钥放到想要的位置,比如 /var/db/dkim/ 后执行命令
chown -R opendkim:opendkim /var/db/dkimchmod 440 /var/db/dkim/default.private
更改/etc/opendkim.conf配置文件
Canonicalization relaxed/simpleMode svSyslogSuccess yesLogWhy yesUserID opendkim:opendkimSocket inet:127.0.0.1:8891
DKIM配置完成后,在postfix的main.cf继续配置加密
smtpd_milters= inet:localhost:8891milter_default_action = acceptmilter_protocol = 2non_smtpd_milters = inet:localhost:8891
重启postfix和opendkim
service postfix restartservice opendkim restart#查看端口是否正在运行netstat -tapn|grep 8891
https://cloud.tencent.com/developer/article/1051272
PTR反向解析(rDNS)
为什么使用?
域名反向解析(RDNS)是一种常见反垃圾邮件的功能,现在要需要检查IP反向解析(PTR)记录的邮件服务器越来越多,尤其是国外的邮件服务器(例如:AOL),很多时候被对方拒绝被退信,都是因为没有反向解析造成的。
比如用xxx@name.com这个邮箱给kasum@lwork.com发一封信,lwork邮件服务器接到这封信会查看这封信的信头文件,这封信的信头文件会显示这封信是由哪个IP地址发出来的。然后根据这个IP地址进行反向解析,如果反向解析到这个IP对应的域名是name.com就接收这封邮件,如果反向解析这个IP没有对应到name.com,那么就拒绝这封邮件。
如何配置
注意:以下配置适用于内网测试,不适用于公网,也就是在不同网域下的计算机反向解析是无效的
不同域计算机反向解析必须要向ISP(网络提供商)申请进行配置PTR,除非你搞个内网穿透,也没试过,我猜的
你不知道自己的ISP是谁?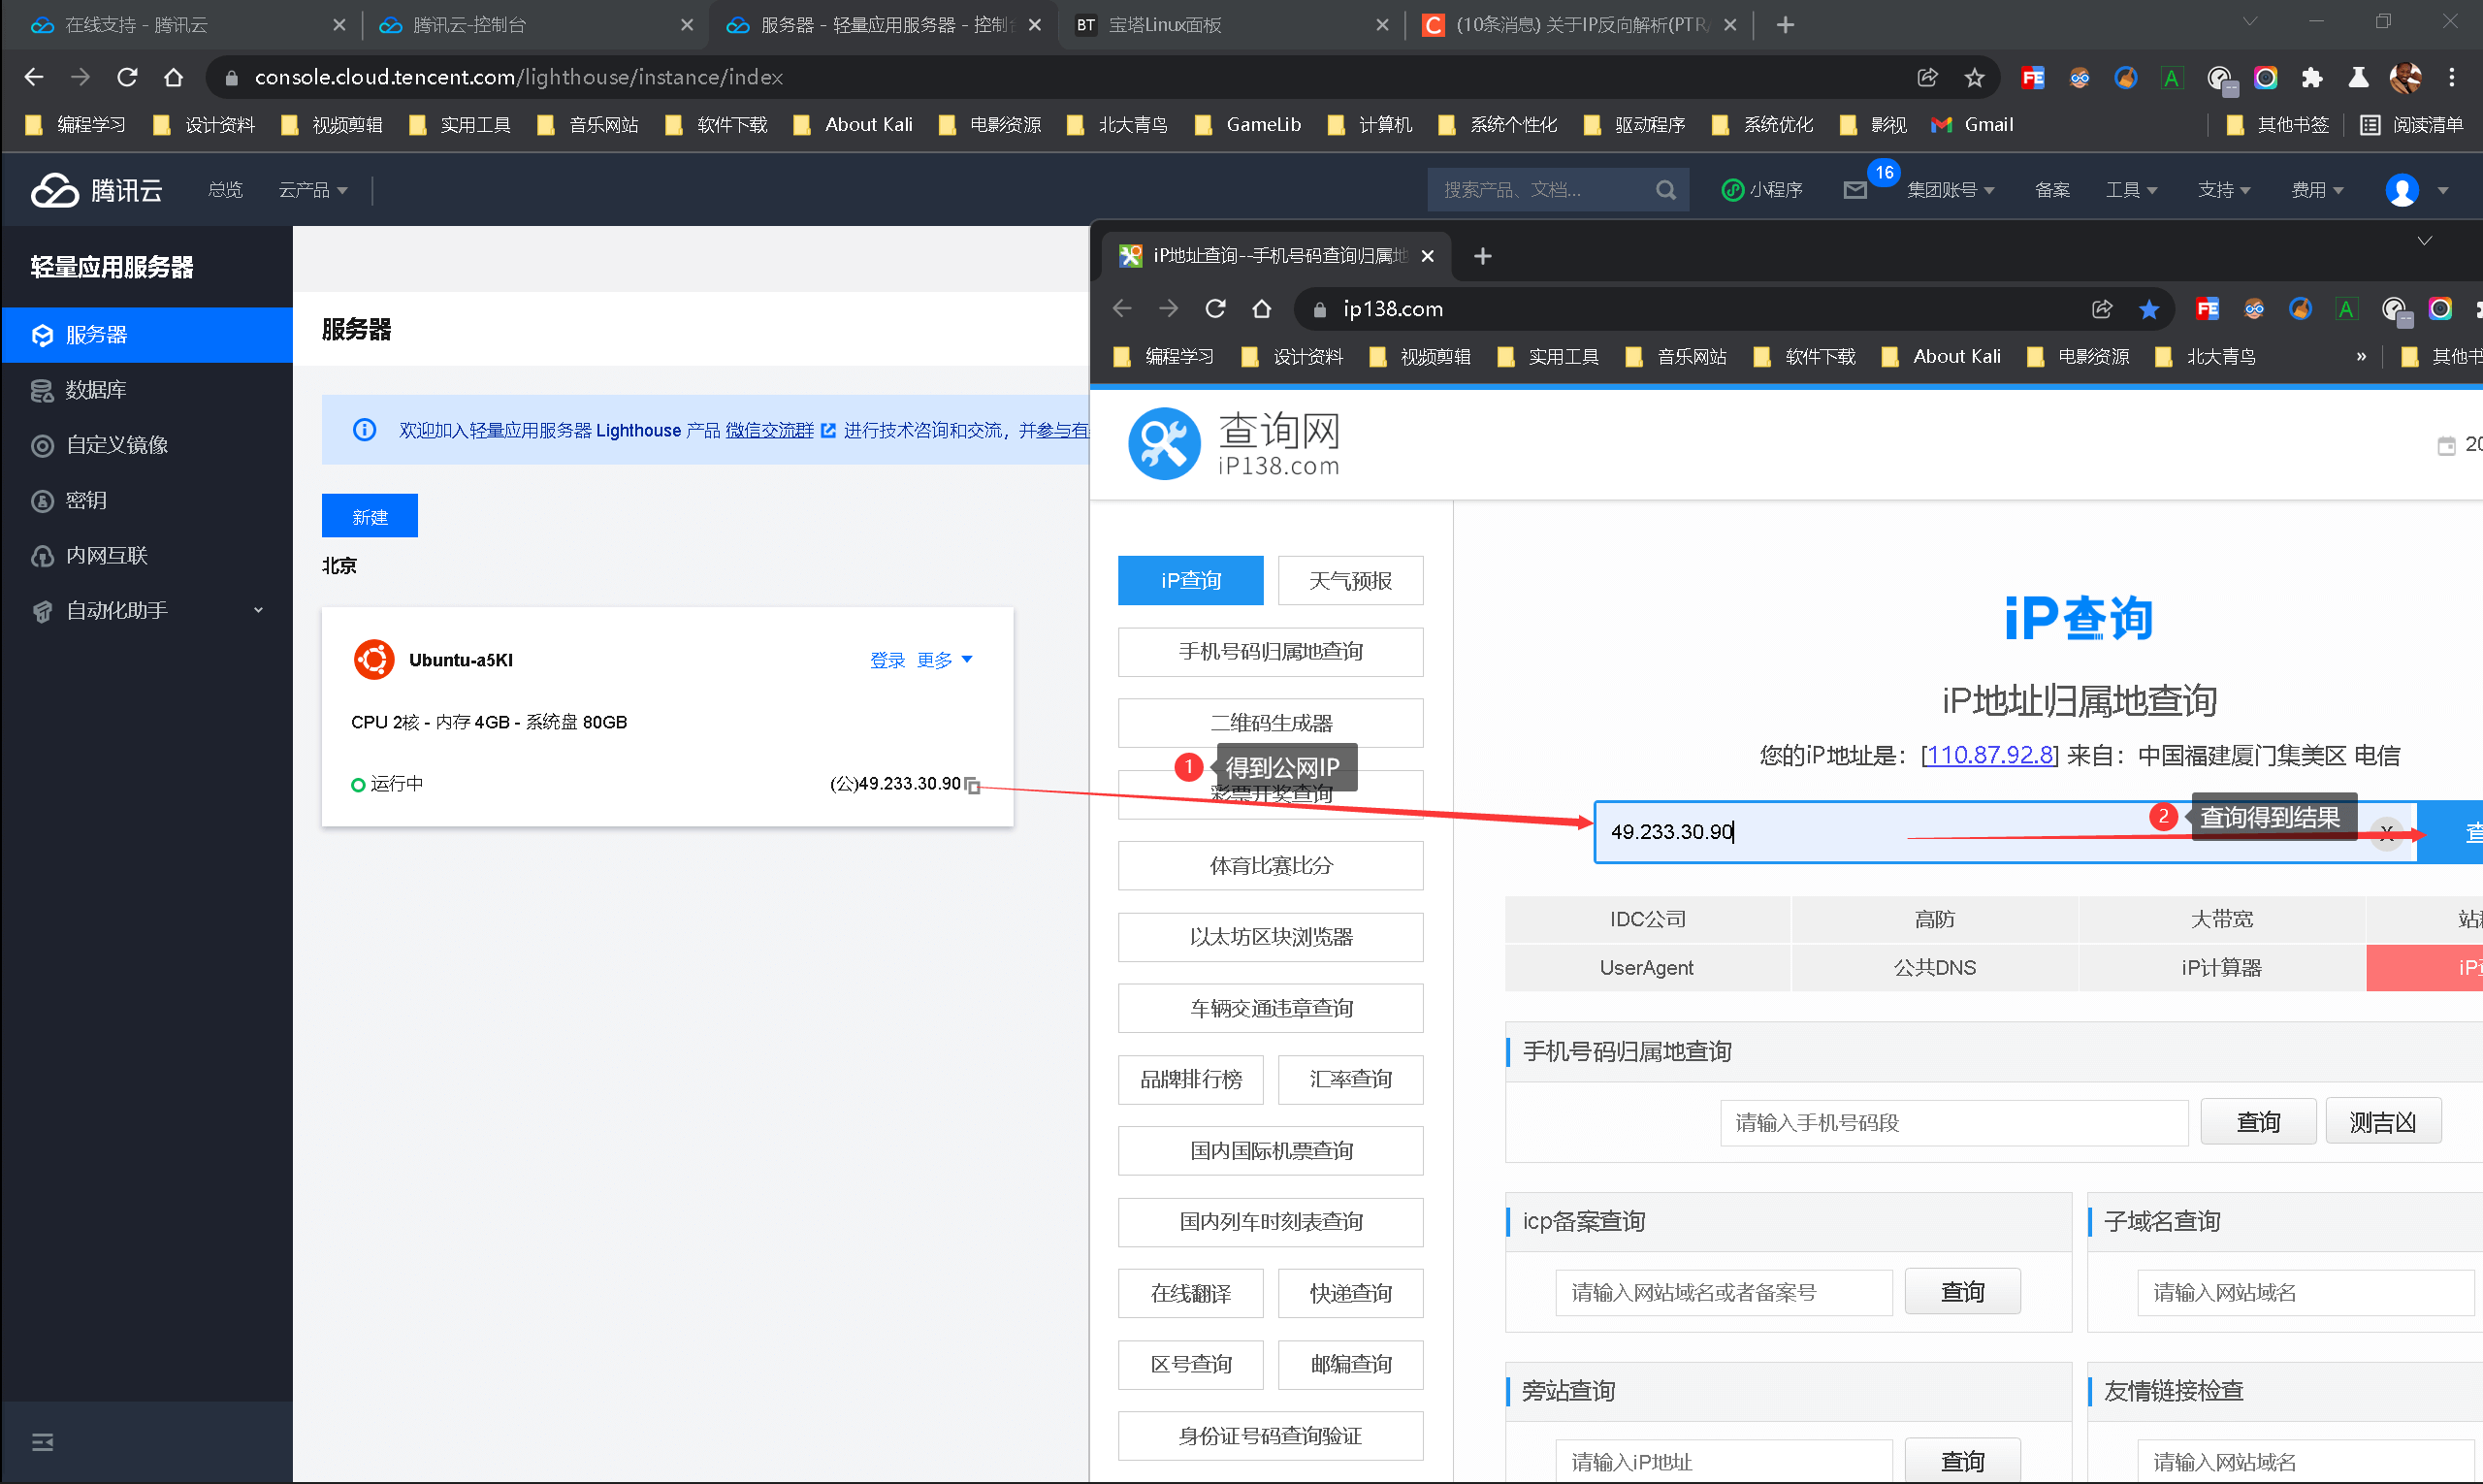
以我腾讯云服务器为例:
看到我的IP是腾讯云提供的,那我就直接去找腾讯云申请,以前免费,现在收费,经我测试目前Ucloud可用,并且秒配,不过他们强制要求域名备案,能发不过没法访问ngix或tomcat部署的网站
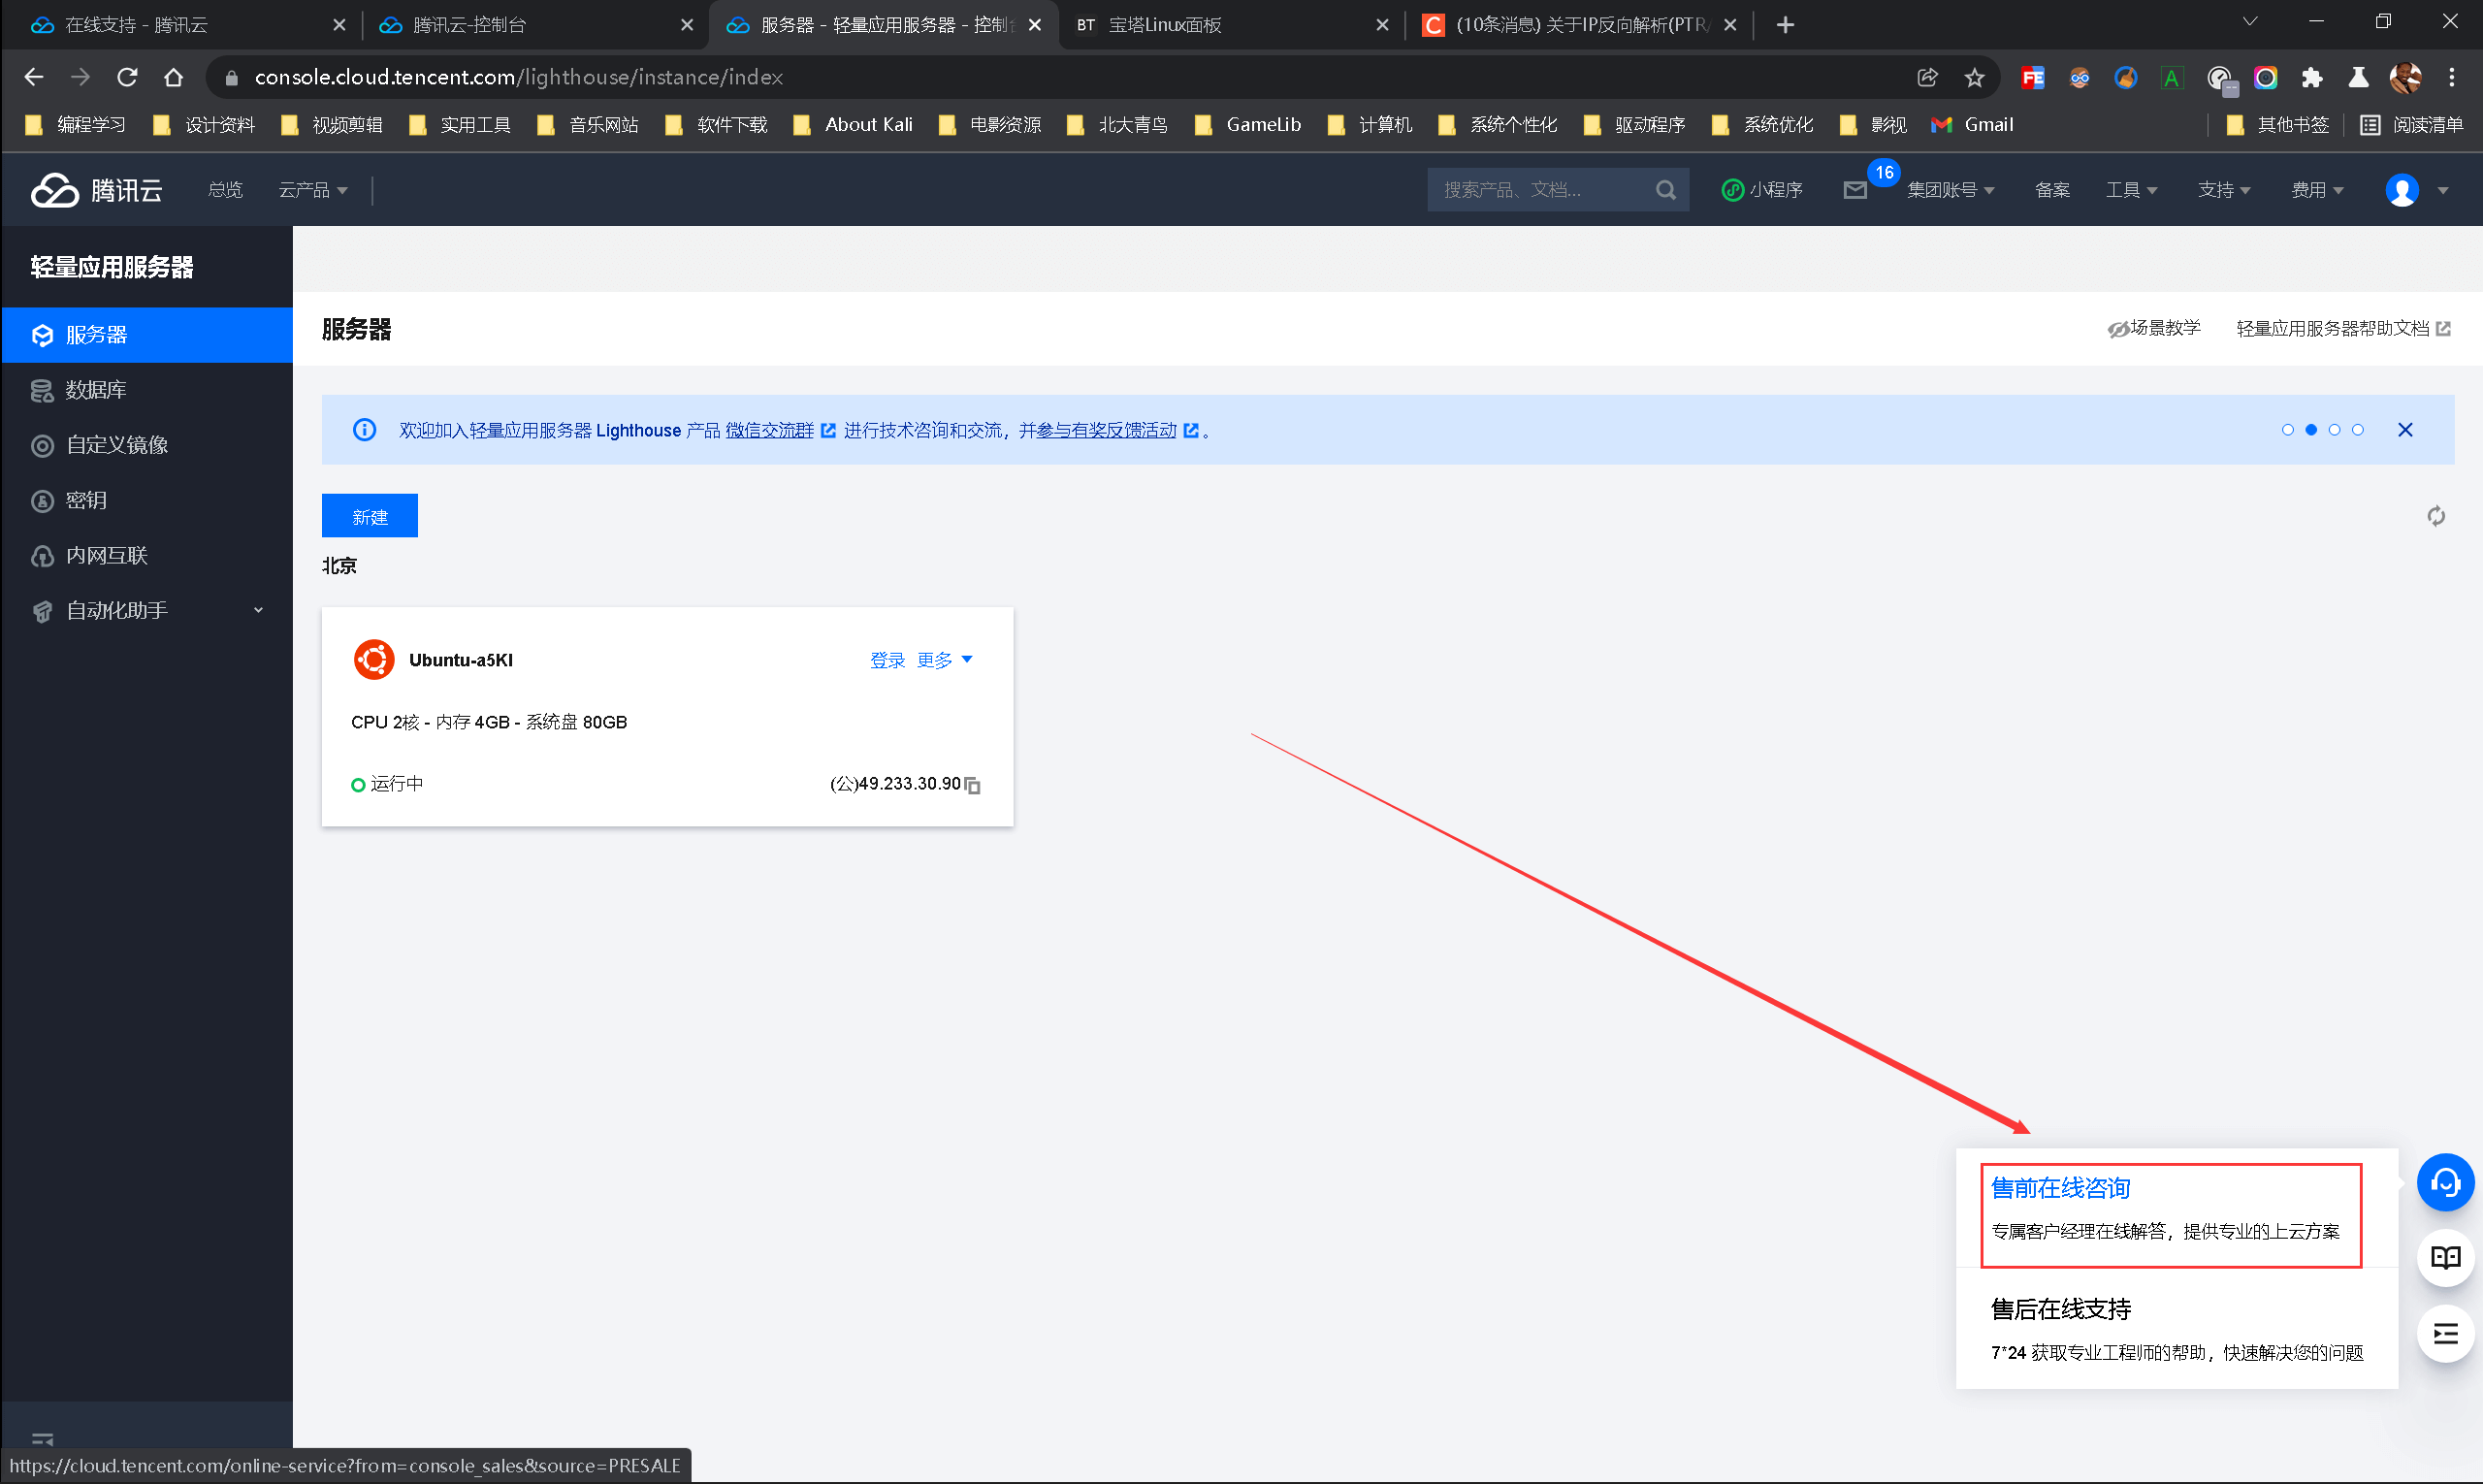
找专门的技术顾问提供服务
需要提供实例的IP和该实例绑定的域名
并且经询问腾讯云是免费配置的(已成过去式)
安装bind服务
BIND v9版本的文件目录与之前的版本大不相同,所以在配置时需要注意
apt-get install bind9
检查版本
查看DNS
bind的主要配置named.cf
语法规则
(1)每个条件语句写在{}里面,并且{}后面必须跟;也就是说 {xxx};这种形式
(2)条件语句自身也需要以;结尾,也就是{xxx;};这种形式
(3)注释可以有3种风格,c、c++、unix风格,分别对应/ / // #特殊符号注释
语法格式
功能选项 [..] {
参数:值;....};
bind可以使用的功能选项有(重体字是会用到的)
acl:定义一个ip地址列表,用来做访问控制或者其他
controls:宣告rnde utility使用的控制通道
include:包含某些个文件
key:设置密钥信息,它应用在通过TSIG进行授权和认证的配置中
logging:设置日志服务器和日志信息的发送地
options:全局配置选项和为其他语句配置默认值
server:在一个单服务器基础上设置特定的配置选项
trusted-keys:定义新人的dnssed密钥
view:定义一个视图
zone:定义一个域
配置解析
named.conf
// This is the primary configuration file for the BIND DNS server named.
// 译:这是BIND DNS服务器named关键配置文件
// Please read /usr/share/doc/bind9/README.Debian.gz for information on the
// structure of BIND configuration files in Debian, BEFORE you customize
// this configuration file.
// 译:请查看/usr/share/doc/bind9/README.Debian.gzDebian的BIND配置文件结构信息文档
//
// If you are just adding zones, please do that in /etc/bind/named.conf.local
// 译:如果你只是添加区域,请在/etc/bind/named.conf.local这里面添加
include “/etc/bind/named.conf.options”;
include “/etc/bind/named.conf.local”;
include “/etc/bind/named.conf.default-zones”;
named.conf.local
//
// Do any local configuration here
//
// Consider adding the 1918 zones here, if they are not used in your
// organization
//include “/etc/bind/zones.rfc1918”;
//下面是需要配置的
//域名配置—->正向解析
zone “magicbyte.top” IN {
type master;
file “magicbyte.top.zone” ;//域名专用配置文件
};
//内网IP 10.0.16.12—->反向解析
//注意这里的IP是反向的
//例如Ip为 10.0.16.12 那么.in-addr.arpa前面就是12.16.0.10
//你可能会问那为什么12不要了? 是因为可能不同IP会指向不同的域名,看到后面你就知道了
zone “16.0.10.in-addr.arpa” IN {
type master;
file “10.0.16.zone” ;//IP专用配置文件
};
magicbyte.top.zone
$TTL 600
@ IN SOA ns1.magicbyte.top. admin.magicbyte.top. (
2
1H
2W
3D
600 )
// IN | 记录类型 | 域名对应的IP地址
IN NS ns1
ns1 IN A 10.0.16.12
IN A 10.0.16.12
10.0.16.zone
$TTL 600
@ IN SOA ns1.magicbyte.top. admin.magicbyte.top (
2
1H
2W
3D
600 )
//ip地址(就是上面named.conf.local配置中缺的那一段,在这里做一个IP与域名的匹配,通过Ip找域名) | IN | 记录类型(PTR就是反向解析的记录类型) | 对应的域名
IN NS ns1.magicbyte.top.
12 IN PTR ns1.magicbyte.top.
12 IN PTR magicbyte.top.
//注意这个配置文件最后一行必须是换行符,Bind9的语法规则非常严格
重载配置
systemctl restart bind9
systemctl enable bind9
/etc/init.d/named restart
格式检查
named-checkconf /etc/bind/named.conf.local
named-checkzone 文件名称 /etc/bind/正向数据文件
named-checkzone 文件名称 /etc/bind/反向数据文件
指定本机DNS服务器地址
sudo nano /etc/resolv.conf
DNS=xx.xx.xx.xx
dig 测试
正向检查
dig 域名
#反向检查
dig -x xx.xx.xx.xx
nslookup测试
正向解析
nslookup 你的域名
#反向解析
nslookup -qt=ptr 你所配置的IP
正向效果
反向效果
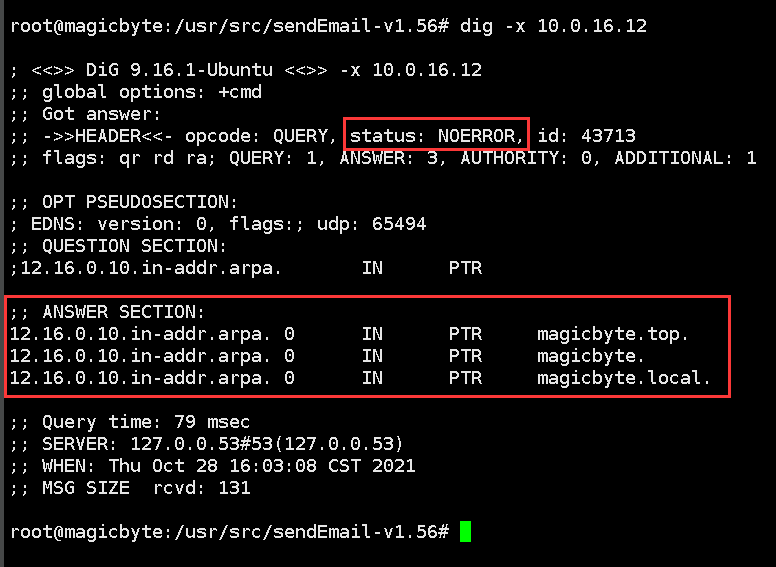
以上是内网有效,发邮件还得外网有效,以下是找ISP(IP提供商)配置完成的效果图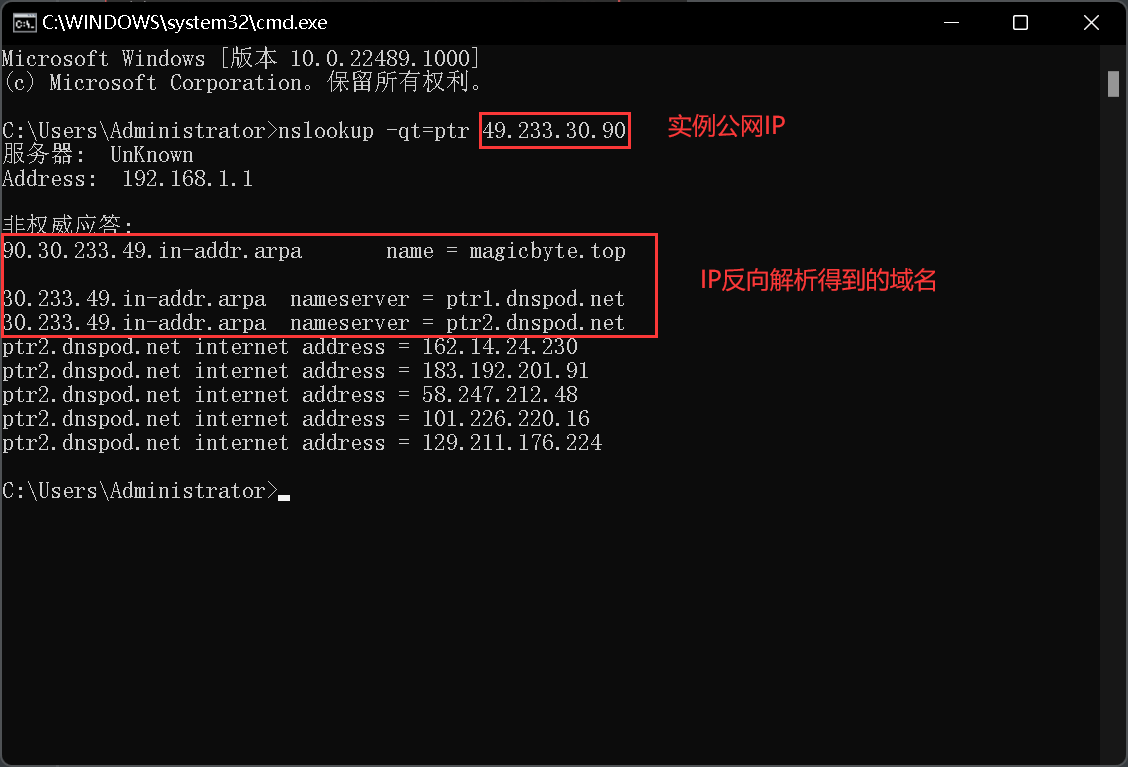
宝塔的配置
当然,配置了那么多其实在宝塔几分钟就可以搞定,不仅有发件功能还有收件功能,如果以上哪项配置不能用,那么一下是宝塔一键生成的配置
Dovecot(收件)
Dovecot configuration file
If you’re in a hurry, see http://wiki2.dovecot.org/QuickConfiguration
“doveconf -n” command gives a clean output of the changed settings. Use it
# instead of copy&pasting files when posting to the Dovecot mailing list.
‘#’ character and everything after it is treated as comments. Extra spaces
# and tabs are ignored. If you want to use either of these explicitly, put the
# value inside quotes, eg.: key = “# char and trailing whitespace “
Most (but not all) settings can be overridden by different protocols and/or
# source/destination IPs by placing the settings inside sections, for example:
# protocol imap { }, local 127.0.0.1 { }, remote 10.0.0.0/8 { }
Default values are shown for each setting, it’s not required to uncomment
# those. These are exceptions to this though: No sections (e.g. namespace {})
# or plugin settings are added by default, they’re listed only as examples.
# Paths are also just examples with the real defaults being based on configure
# options. The paths listed here are for configure —prefix=/usr
# —sysconfdir=/etc —localstatedir=/var
Protocols we want to be serving.
protocols = imap pop3 lmtp
A comma separated list of IPs or hosts where to listen in for connections.
# ““ listens in all IPv4 interfaces, “::” listens in all IPv6 interfaces.
# If you want to specify non-default ports or anything more complex,
# edit conf.d/master.conf.
#listen = , ::
Base directory where to store runtime data.
#base_dir = /var/run/dovecot/
Name of this instance. In multi-instance setup doveadm and other commands
# can use -i to select which instance is used (an alternative
# to -c ). The instance name is also added to Dovecot processes
# in ps output.
#instance_name = dovecot
# to -c
# in ps output.
#instance_name = dovecot
Greeting message for clients.
#login_greeting = Dovecot ready.
Space separated list of trusted network ranges. Connections from these
# IPs are allowed to override their IP addresses and ports (for logging and
# for authentication checks). disable_plaintext_auth is also ignored for
# these networks. Typically you’d specify your IMAP proxy servers here.
#login_trusted_networks =
Space separated list of login access check sockets (e.g. tcpwrap)
#login_access_sockets =
With proxy_maybe=yes if proxy destination matches any of these IPs, don’t do
# proxying. This isn’t necessary normally, but may be useful if the destination
# IP is e.g. a load balancer’s IP.
#auth_proxy_self =
Show more verbose process titles (in ps). Currently shows user name and
# IP address. Useful for seeing who are actually using the IMAP processes
# (eg. shared mailboxes or if same uid is used for multiple accounts).
#verbose_proctitle = no
Should all processes be killed when Dovecot master process shuts down.
# Setting this to “no” means that Dovecot can be upgraded without
# forcing existing client connections to close (although that could also be
# a problem if the upgrade is e.g. because of a security fix).
#shutdown_clients = yes
If non-zero, run mail commands via this many connections to doveadm server,
# instead of running them directly in the same process.
#doveadm_worker_count = 0
# UNIX socket or host:port used for connecting to doveadm server
#doveadm_socket_path = doveadm-server
Space separated list of environment variables that are preserved on Dovecot
# startup and passed down to all of its child processes. You can also give
# key=value pairs to always set specific settings.
#import_environment = TZ
## Dictionary server settings
Dictionary can be used to store key=value lists. This is used by several
# plugins. The dictionary can be accessed either directly or though a
# dictionary server. The following dict block maps dictionary names to URIs
# when the server is used. These can then be referenced using URIs in format
# “proxy::“.
dict {
#quota = mysql:/etc/dovecot/dovecot-dict-sql.conf.ext
#expire = sqlite:/etc/dovecot/dovecot-dict-sql.conf.ext
}
namespace inbox {
inbox = yes
mailbox Trash {
auto = subscribe # autocreate and autosubscribe the Trash mailbox
special_use = \Trash
}
mailbox Sent {
auto = subscribe # autocreate and autosubscribe the Sent mailbox
special_use = \Sent
}
mailbox Junk {
auto = subscribe # autocreate and autosubscribe the Sent mailbox
special_use = \Junk
}
mailbox Drafts {
auto = subscribe
special_use = \Drafts
}
}
Most of the actual configuration gets included below. The filenames are
# first sorted by their ASCII value and parsed in that order. The 00-prefixes
# in filenames are intended to make it easier to understand the ordering.
!include conf.d/*.conf
A config file can also tried to be included without giving an error if
# it’s not found:
!include_try local.conf
Rspamd(邮件监控)
spam的直译就是垃圾邮件
过滤建议类型
- discard:你的邮件我不能要了,但返回给发件人成功(仅仅在特殊情况下使用)
- reject:你的邮件已经被拒绝了
- rewrite subject:该内容将判定为垃圾邮件
- add header:添加特定的标题以指示垃圾邮件
- no action:允许抄送
soft reject:软拒绝,暂时延时抄送(应用在灰名单和发送速率限制)1.9版本更新了几个建议你每项建议的得分由这些配置文件来决定这些文件都是可以由你自定义权重,当然也没有必要专门去修改,改低了过后只能是自己在骗自己,别的邮件服务器还是会检查的
- quarantine:将邮件推送到隔离区(必须由 MTA 支持)
-
这里的每一项都可以自定义阈值,而这个垃圾性邮件过滤系统也就是根据这些阈值来判定每条邮件该提出哪些建议来进行更改
fuzzy_group.conf - 哈希模糊分数
- headers_group.conf - 各类标题检查
- hfilter_group.conf - 主机象征过滤
- mime_types_group.conf - mime 类型的规则
- mua_group.conf - MUA相关的规则
- neural_group.conf - 神经网络产生的分数(有点奇妙)
- phishing_group.conf - 钓鱼邮件检查
- policies_group.conf - 邮件协议检查 (DKIM, SPF, DMARC, ARC)
- rbl_group.conf - RBL生产规则
- statistics_group.conf - Bayes统计
- subject_group.conf - 内容检查
- surbl_group.conf - Url黑名单
System V init adopted top level configuration
Please don’t modify this file as your changes might be overwritten with
# the next update.
#
# You can modify ‘$LOCAL_CONFDIR/rspamd.conf.local.override’ to redefine
# parameters defined on the top level
#
# You can modify ‘$LOCAL_CONFDIR/rspamd.conf.local’ to add
# parameters defined on the top level
#
# For specific modules or configuration you can also modify
# ‘$LOCAL_CONFDIR/local.d/file.conf’ - to add your options or rewrite defaults
# ‘$LOCAL_CONFDIR/override.d/file.conf’ - to override the defaults
#
# See https://rspamd.com/doc/tutorials/writing_rules.html for details
.include “$CONFDIR/common.conf”
options {
pidfile = “$RUNDIR/rspamd.pid”;
.include “$CONFDIR/options.inc”
.include(try=true; priority=1,duplicate=merge) “$LOCAL_CONFDIR/local.d/options.inc”
.include(try=true; priority=10) “$LOCAL_CONFDIR/override.d/options.inc”
}
.include(try=true; duplicate=merge) “$CONFDIR/cgp.inc”
.include(try=true; priority=1,duplicate=merge) “$LOCAL_CONFDIR/local.d/cgp.inc”
logging {
type = “file”;
filename = “$LOGDIR/rspamd.log”;
.include “$CONFDIR/logging.inc”
.include(try=true; priority=1,duplicate=merge) “$LOCAL_CONFDIR/local.d/logging.inc”
.include(try=true; priority=10) “$LOCAL_CONFDIR/override.d/logging.inc”
}
worker “normal” {
bind_socket = “localhost:11333”;
.include “$CONFDIR/worker-normal.inc”
.include(try=true; priority=1,duplicate=merge) “$LOCAL_CONFDIR/local.d/worker-normal.inc”
.include(try=true; priority=10) “$LOCAL_CONFDIR/override.d/worker-normal.inc”
}
worker “controller” {
bind_socket = “localhost:11334”;
.include “$CONFDIR/worker-controller.inc”
.include(try=true; priority=1,duplicate=merge) “$LOCAL_CONFDIR/local.d/worker-controller.inc”
.include(try=true; priority=10) “$LOCAL_CONFDIR/override.d/worker-controller.inc”
}
worker “rspamd_proxy” {
bind_socket = “localhost:11332”;
.include “$CONFDIR/worker-proxy.inc”
.include(try=true; priority=1,duplicate=merge) “$LOCAL_CONFDIR/local.d/worker-proxy.inc”
.include(try=true; priority=10) “$LOCAL_CONFDIR/override.d/worker-proxy.inc”
}
Local fuzzy storage is disabled by default
worker “fuzzy” {
bind_socket = “localhost:11335”;
count = -1; # Disable by default
.include “$CONFDIR/worker-fuzzy.inc”
.include(try=true; priority=1,duplicate=merge) “$LOCAL_CONFDIR/local.d/worker-fuzzy.inc”
.include(try=true; priority=10) “$LOCAL_CONFDIR/override.d/worker-fuzzy.inc”
}
Postfix(发件)
See /usr/share/postfix/main.cf.dist for a commented, more complete version
Debian specific: Specifying a file name will cause the first
# line of that file to be used as the name. The Debian default
# is /etc/mailname.
#myorigin = /etc/mailname
smtpd_banner = $myhostname ESMTP $mail_name (Ubuntu)
biff = no
appending .domain is the MUA’s job.
append_dot_mydomain = no
Uncomment the next line to generate “delayed mail” warnings
#delay_warning_time = 4h
readme_directory = no
See http://www.postfix.org/COMPATIBILITY_README.html — default to 2 on
# fresh installs.
compatibility_level = 2
smtpd_relay_restrictions = permit_mynetworks permit_sasl_authenticated defer_unauth_destination
myhostname = magicbyte.top
alias_maps = hash:/etc/aliases
alias_database = hash:/etc/aliases
myorigin = /etc/mailname
mydestination =
relayhost =
mynetworks = 127.0.0.0/8 [::ffff:127.0.0.0]/104 [::1]/128
mailbox_size_limit = 0
recipient_delimiter = +
inet_interfaces = all
inet_protocols = all
virtual_mailbox_domains = sqlite:/etc/postfix/sqlite_virtual_domains_maps.cf
virtual_alias_maps= sqlite:/etc/postfix/btrule.cf
virtual_mailbox_maps = sqlite:/etc/postfix/sqlite_virtual_mailbox_maps.cf, sqlite:/etc/postfix/sqlite_virtual_alias_domain_mailbox_maps.cf
smtpd_sasl_type = dovecot
smtpd_sasl_path = private/auth
smtpd_sasl_auth_enable = yes
smtpd_recipient_restrictions = permit_sasl_authenticated, permit_mynetworks, reject_unauth_destination
smtpd_use_tls = yes
smtp_tls_security_level = may
smtpd_tls_security_level = may
virtual_transport = lmtp:unix:private/dovecot-lmtp
smtpd_milters = inet:127.0.0.1:11332
non_smtpd_milters = inet:127.0.0.1:11332
milter_mail_macros = i {mail_addr} {client_addr} {client_name} {auth_authen}
milter_protocol = 6
milter_default_action = accept
message_size_limit = 102400000
smtpd_tls_chain_files = /etc/pki/dovecot/private/dovecot.pem,/etc/pki/dovecot/certs/dovecot.pem
tls_server_sni_maps = hash:/etc/postfix/vmail_ssl.map
tomcat服务器
源自:(https://www.cnblogs.com/nicknailo/p/8571004.html)
安装
下载压缩包(tar.gz)
https://tomcat.apache.org/download-10.cgi
上传至服务器,并解压缩
tar -zxvf 压缩包
配置优化
请求压缩
打开tomcat/conf/server.xml服务器配置文件
connectionTimeout=”20000”
compression=”on”
compressionMinSize=”2048”
noCompressionUserAgents=”gozilla, traviata”
compressableMimeType=”text/html,text/xml,text/javascript,text/css,text/plain,application/javascript,image/jpg,image/png,image/gif”/>
数据库
https://www.jianshu.com/p/9a10640f3ec4
项目部署
SpringBoothttps://blog.csdn.net/boywcx/article/details/87307667
