使用 kind 创建本地 Kubernetes 集群
Kind 即 Kubernetes In Docker,顾名思义是使用 Docker 容器作为 Node 并将 Kubernetes 部署至其中的一个工具。官方文档中也把 Kind 作为一种本地集群搭建的工具进行推荐。
社区知名本地集群部署环境的比较
以下对比仅限于功能性和影响力方面的对比(截止 2020.04.15),性能方面目前缺乏比较完善的数据支撑。
| minikube 1.9.2 | kind 0.8.1 | MicroK8s 1.18 | K3s 1.17.4 | |
|---|---|---|---|---|
| 出品方 | Kubernetes 官方 | Kubernetes SIG(官方社区) | Ubuntu | Rancher |
| 推荐/认证 | 官方推荐 | 官方推荐 | 官方认证 | |
| 社区热度 | 17.9k ⭐️ | 5.2k ⭐️ | 3k ⭐️ | 12.3k ⭐️ |
| 运行环境 | 虚拟机 | 容器环境 | 虚拟机 | 裸金属 / 虚拟机 |
| 支持的硬件架构 | AMD64 | AMD64(1.0 GA 考虑支持 ARM) | AMD64 | AMD64, ARMv7, ARM64 |
| 支持的操作系统 | Linux, macOS, Windows | Linux, macOS, Windows | Linux, macOS, Windows | Linux |
| 支持的容器运行时 | Docker, CRI-O, containerd, gvisor | Docker(1.0 GA 考虑支持其它) | containerd | Docker, containerd |
| 运行需要的内存 | 2 GB | 8 GB | 4 GB | 512 MB |
| 是否需要 Root? | / | / | / | ❗️Known Issue |
| 多集群支持? | ✅ 通过切换 Profile | ✅ 即多个容器 | ❌ | ✅ 通过 K3s in Docker |
| 多节点集群支持? | ❓实验中的特性 | ✅ 创建很简单 | ✅ 连接多个 MicroK8s 节点 | ✅ 通过多个 K3s Agent 支持 |
| 主节点 HA 支持? | ❌ | ✅ 创建很简单 | ❌ | ✅ 通过 K3s Master HA 支持 |
| 应用插件支持? | ✅ 丰富的 Addons | ❌ 全靠自己装 | ✅ 丰富的 Addons | ❌ 全靠自己装 |
| 特点综述 👉👉👉 | “官方大儿子”:出道很早,功能强大,各种环境的支持比较充分;但略显“笨重”,对多节点特性支持差 | “官方社区新贵”:使用和配置都很灵活,体验 K8s 新特性的首选;但定位非生产环境,也暂未考虑应用插件 | “Ubuntu 生态的挑战者”:相对小众,但整体功能比较完整;整体比较“中庸”,需要结合实践业务场景来应用 | “小型 K8s 的代表”:小小的身材却有大大的力量,优势劣势都比较突出;目前主要的工作领域偏重边缘云 |
安装并使用 kind 创建单节点集群
⚠️ 使用 kind 的先决条件显而易见,需要先安装 Docker!同时建议在此阶段,完成
kubectl工具的安装。
kind 的安装非常的方便,各平台的安装方式可参考如下命令:👇
# On macOS / Linux$ curl -Lo ./kind https://github.com/kubernetes-sigs/kind/releases/download/v0.7.0/kind-$(uname)-amd64$ chmod +x ./kind$ mv ./kind /some-dir-in-your-PATH/kind# On Mac / Linux via Homebrew$ brew install kind
# On Windowscurl.exe -Lo kind-windows-amd64.exe https://github.com/kubernetes-sigs/kind/releases/download/v0.7.0/kind-windows-amd64Move-Item .\kind-windows-amd64.exe c:\some-dir-in-your-PATH\kind.exe# On Windows via Chocolatey (https://chocolatey.org/packages/kind)choco install kind
接下来可以使用 kind 命令开始创建你的本地集群,同样非常简单 kind create cluster ,通常我们还可以配上一些其它参数:
--name <name>:为创建的集群设置一个自定义的名称-v <level>: 开启 Debug 模式,输出调试信息,level越高细节越多--config:从配置文件读取集群配置,通常用于对集群进行自定义配置,或建立多节点集群等复杂集群
如下执行 kind create cluster --name webup -v 4 即可开始创建名为 webup 的本地单节点集群,默认会从 Docker Hub 拉取 kind 所使用的 Node 的镜像,如果拉取较慢,可以考虑通过配置 Docker 代理环境变量来加速拉取过程。
$ kind create cluster --name webup -v 4
Creating cluster "webup" ...
DEBUG: docker/images.go:70] Pulling image: kindest/node:v1.17.0@sha256:9512edae126da271b66b990b6fff768fbb7cd786c7d39e86bdf55906352fdf62 ...
 ✓ Ensuring node image (kindest/node:v1.17.0) 🖼
 ✓ Preparing nodes 📦

 ... ... ...

 ✓ Writing configuration 📜

 ... ... ...

Your Kubernetes control-plane has initialized successfully!

To start using your cluster, you need to run the following as a regular user:

  mkdir -p $HOME/.kube
  sudo cp -i /etc/kubernetes/admin.conf $HOME/.kube/config
  sudo chown $(id -u):$(id -g) $HOME/.kube/config

You should now deploy a pod network to the cluster.
Run "kubectl apply -f [podnetwork].yaml" with one of the options listed at:
  https://kubernetes.io/docs/concepts/cluster-administration/addons/

You can now join any number of control-plane nodes by copying certificate authorities
and service account keys on each node and then running the following as root:

  kubeadm join 172.17.0.2:6443 --token <value withheld> \
    --discovery-token-ca-cert-hash sha256:1cbaeafda73fb10298390ea17ec6212ff5efe85490d11d303e9a705b40431b2e \
    --control-plane

Then you can join any number of worker nodes by running the following on each as root:

kubeadm join 172.17.0.2:6443 --token <value withheld> \
    --discovery-token-ca-cert-hash sha256:1cbaeafda73fb10298390ea17ec6212ff5efe85490d11d303e9a705b40431b2e
 ✓ Starting control-plane 🕹️
 ✓ Installing CNI 🔌
 ✓ Installing StorageClass 💾
Set kubectl context to "kind-webup"
You can now use your cluster with:

kubectl cluster-info --context kind-webup

Not sure what to do next? 😅 Check out https://kind.sigs.k8s.io/docs/user/quick-start/
🎯 完成以上安装过程后,可以通过
kind get clusters来查看是否存在名为webup的本地集群
使用 kind 创建多节点集群
对于多节点集群,我们需要用到配置文件来创建,如下我们使用 kind create cluster --config webup.yaml --name webup-2w -v 1 来创建一个两个工作节点的集群:
# three node (two workers) cluster config
kind: Cluster
apiVersion: kind.x-k8s.io/v1alpha4
nodes:
  - role: control-plane
  - role: worker
  - role: worker
$ kind create cluster --config webup.yaml --name webup-2w -v 1
Creating cluster "webup-2w" ...
DEBUG: docker/images.go:61] Image: kindest/node:v1.17.0@sha256:9512edae126da271b66b990b6fff768fbb7cd786c7d39e86bdf55906352fdf62 present locally
 ✓ Ensuring node image (kindest/node:v1.17.0) 🖼
 ✓ Preparing nodes 📦 📦 📦
 ✓ Writing configuration 📜
 ✓ Starting control-plane 🕹️
 ✓ Installing CNI 🔌
 ✓ Installing StorageClass 💾
 ✓ Joining worker nodes 🚜
Set kubectl context to "kind-webup-2w"
You can now use your cluster with:

kubectl cluster-info --context kind-webup-2w

Thanks for using kind! 😊

$ kind get clusters
webup
webup-2w

$ kubectl get no
NAME                     STATUS   ROLES    AGE    VERSION
webup-2w-control-plane   Ready    master   6d8h   v1.17.0
webup-2w-worker          Ready    <none>   6d8h   v1.17.0
webup-2w-worker2         Ready    <none>   6d8h   v1.17.0
如果需要配置默认的本地端口映射,可以按如下方式使用 extraPortMappings 字段:
kind: Cluster
apiVersion: kind.x-k8s.io/v1alpha4
nodes:
- role: control-plane
  extraPortMappings:
  - containerPort: 80
    hostPort: 80
    listenAddress: "0.0.0.0" # Optional, defaults to "0.0.0.0"
    protocol: udp # Optional, defaults to tcp
对于使用 NodePort 服务或 DaemonSet 暴露主机端口的服务,以上方式将会很有用。
🍮 如何合并多个 kubeconfig 文件
- 首先,合并之前要注意这些 kubeconfig 文件的内容是否有重复(比如
clusters.name),重复则不能进行合并; - 其次,建议备份一下现有的
~/.kube/config文件,以免发生合并错误无法回退; - 再后,可以一次性合并多个文件(假设在
~/.kube目录下):KUBECONFIG=config.bak:config.new kubectl config view --flatten > config:::
使用 kubectl 部署一个 Nginx 应用
通过
kubectl create deployment快速部署一个 Nginx 应用测试 kind 集群的可用性。
$ kubectl create deployment nginx --image=nginx:1.17-alpine
deployment.apps/nginx created

$ kubectl get po
NAME                    READY   STATUS    RESTARTS   AGE
nginx-9c649478d-zmjgx   1/1     Running   0          3m16s
使用 k9s 管理 Kubernetes 集群
k9s 提供了一个基于 curses 的终端 UI,可与 Kubernetes 集群进行交互。该工具的目的是使用户更容易浏览、观察和管理 Kubernetes 集群及其上面的应用程序。
k9s 的安装及热键绑定
k9s 基于 Go 开发,可以轻松在 Linux, macOs, Windows 三大平台上运行,通常可以直接下载使用 Binary 文件,或通过以下几个主流的工具安装:
# Via Homebrew or LinuxBrew for macOS and Linux
$ brew install derailed/k9s/k9s

# Via MacPorts
$ sudo port install k9s

# Via Scoop for Windows
$ scoop install k9s
k9s 的配置项很丰富,比较常用且有用的是热键的设定,创建 $HOME/.k9s/hotkey.yml 按如下格式录入内容,即可完成 k9s 内置命令的热键绑定:
# $HOME/.k9s/hotkey.yml
hotKey:
  # Hitting Shift-1 navigates to your pod view
  shift-1:
    shortCut:    Shift-1
    description: Viewing pods
    command:     po
  # Hitting Shift-2 navigates to your deployments
  shift-2:
    shortCut:    Shift-2
    description: View deployments
    command:     dp
  # Hitting Shift-2 navigates to your services
  shift-3:
    shortCut:    Shift-3
    description: View services
    command:     svc
  # Hitting Shift-4 navigates to your statefulsets view
  shift-4:
    shortCut:    Shift-4
    description: Viewing statefulsets
    command:     sts
  # Hitting Shift-5 navigates to your daemonsets
  shift-5:
    shortCut:    Shift-5
    description: View daemonsets
    command:     ds
  # Hitting Shift-0 navigates to your nodes
  shift-0:
    shortCut:    Shift-0
    description: View nodes
    command:     no
:::info
🍮 还有一个推荐给“爱美”人士使用的定制内容是皮肤,可配置的内容很多,但配置项太过繁琐,通常推荐直接下载使用官方皮肤,保存为 $HOME/.k9s/skin.yml 即可。
:::
k9s 的常用启动命令
# List all available CLI options
$ k9s help

# To get info about K9s runtime (logs, configs, etc..)
$ k9s info

# To run K9s in a given namespace
$ k9s -n mycoolns

# Start K9s in an existing KubeConfig context
$ k9s --context coolCtx

# Start K9s in readonly mode - with all modification commands disabled
$ k9s --readonly
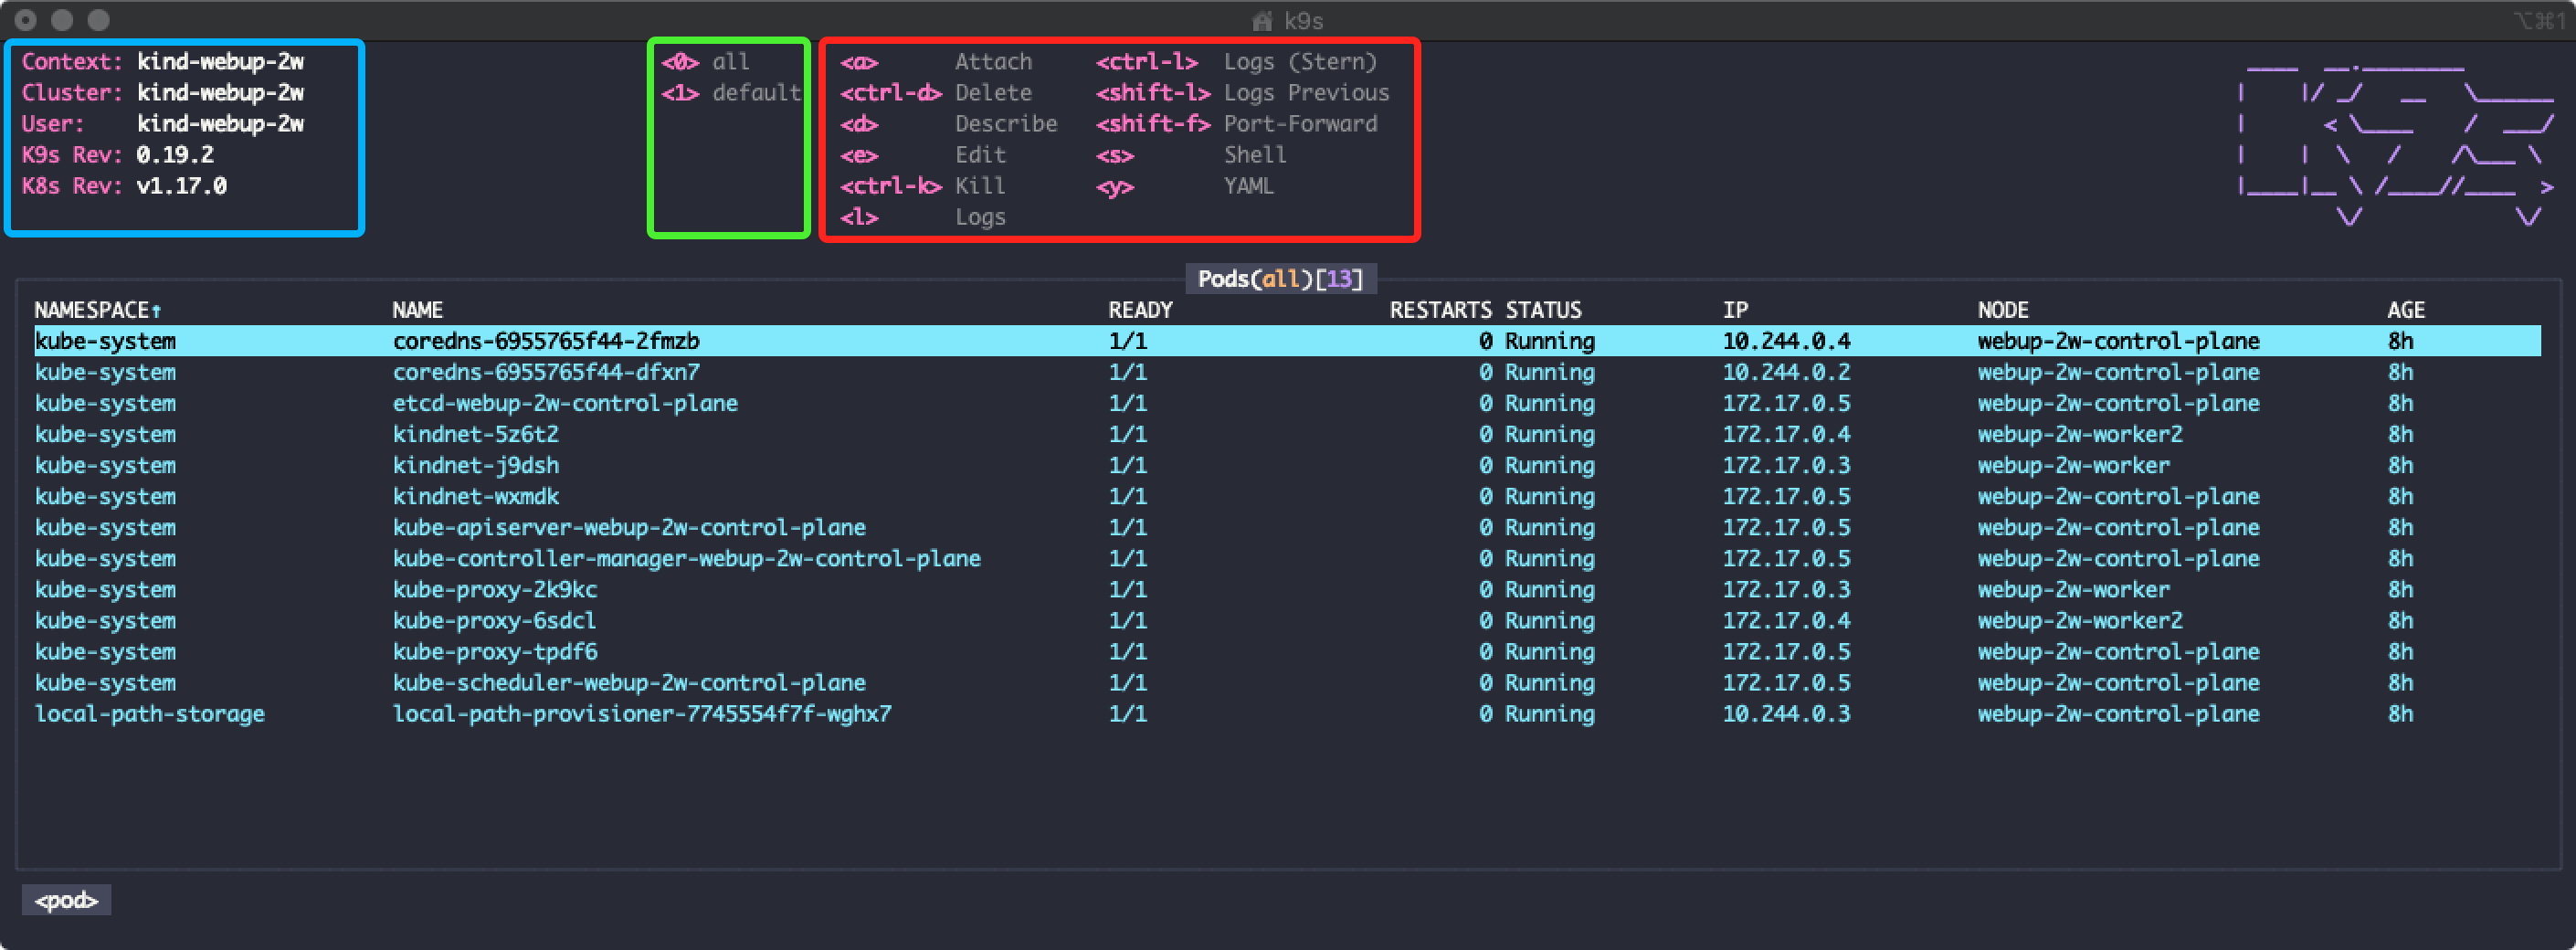
k9s 的基础界面
- 蓝色区域:当前 K8s 的上下文、当前集群、当前 k9s 及 K8s 版本等信息
- 绿色区域:数字
0, 1, 2 ... 9代表了不同的 Namespace,在界面中直接按对应数字即可进行切换显示 - 红色区域:当前视图下所有可操作的视图专有命令
k9s 的常用操作命令
以下列举一些在 k9s 启动后比较常用、通用且比较推荐能熟练使用的操作命令。
| 命令 | 执行内容 |
|---|---|
? |
显示所有可用的键盘符号和帮助 |
ctrl-a |
显示所有可用的资源别名 |
:q, ctrl-c |
退出 k9s |
:po⏎ |
用单数/复数或短名来查看 Kubernetes 资源,如 po, dp, svc, cm, sec, rb, etc. |
/filter-key⏎ |
筛选出一个资源视图,给定一个过滤器 |
/-l label-selector⏎ |
通过标签过滤资源视图 |
/-f filter-key⏎ |
模糊查找给定一个关键字的资源 |
<esc> |
退出视图/命令/过滤模式 |
c |
复制当前所选(所在)的资源的名称 |
d, y, e, l,… |
常用命令来描述、查看 YAML、编辑 YAML、查看日志等等 |
:ctx⏎ |
查看和切换到另一个 Kubernetes 集群环境 |
:ctx context-name⏎ |
查看和切换到另一个指定的 Kubernetes 集群环境 |
:ns⏎ |
查看并切换到另一个 Kubernetes 命名空间 |
ctrl-w |
切换查看当前资源的更多/更少信息 |
ctrl-d |
删除一个资源(TAB 键和 ENTER 键确认) |
ctrl-k |
删除一个资源(直接删除,不会有确认!) |
k9s 的部分高级功能
以下介绍一些没有直接出现在官方文档部分(通常在 Release Notes 中可以找到的)相对不容易留意到的“隐藏”功能。
快速变更工作负载的副本数量
通过 :dp 或 :rs 进入 Deployments 或 StatefulSets 视图界面后,可以通过 s 快捷键在所在资源上调出副本数量修改窗口,输入数量并确定即可完成修改。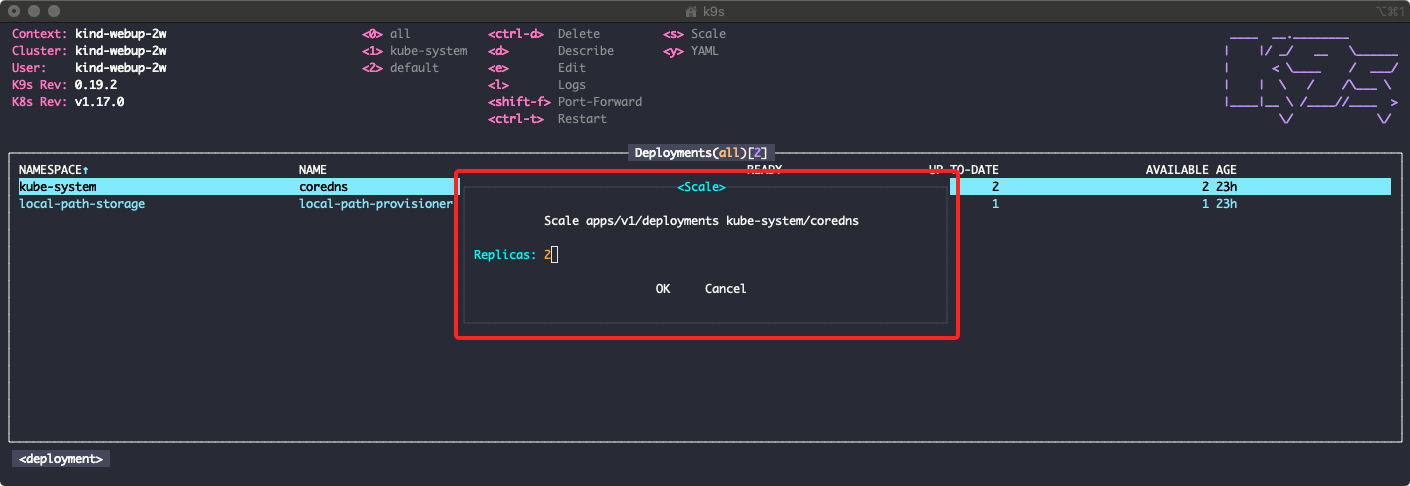
使用 Port Forward 在本地使用集群内服务
在 Pods, Deployments / StatefulSets, Services 视图界面都可以通过 shift-f 的快捷键,执行容器的本地端口映射操作。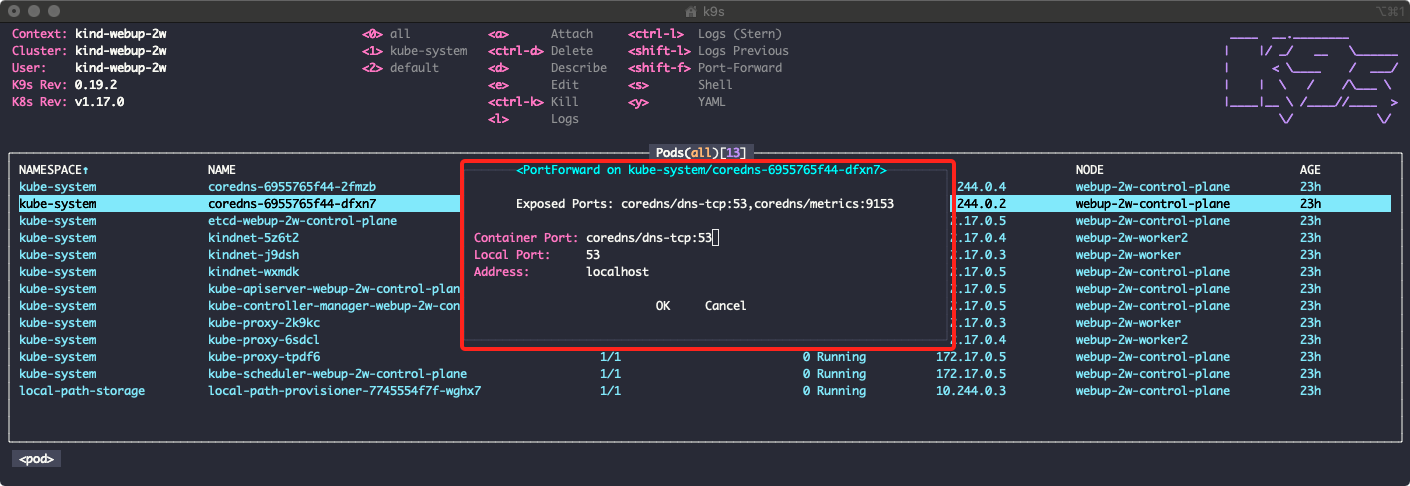
使用 Pulses 视图跟踪实施资源状态
通过 :pu 可以进入一个摘要视图,这个视图列出了集群中最常用的资源类型,和它们的当前数量及活动状态,以 5 秒为周期刷新。
使用 XRay 视图获取资源的树状关系图
通过 :x <res> [ns] 可以进入 XRay 视图,从而查看和遍历资源之间的关系和关联,并检查引用的完整性。比如我们通过 :x dp 可以进入如下的 Deployments 资源 XRay 视图,它会以 Deployments 为基础通过树状关系图罗列其所包含的 Pods 及 Pods 所绑定的其它资源。目前 XRay 支持探查:Pods, Deployments, StatefulSets, Services, DaemonSets。
🎯 需要注意的是,可以直接从 XRay 视图中操作对应的资源;并且可以用
/快捷键来对当前的根资源进行过滤。
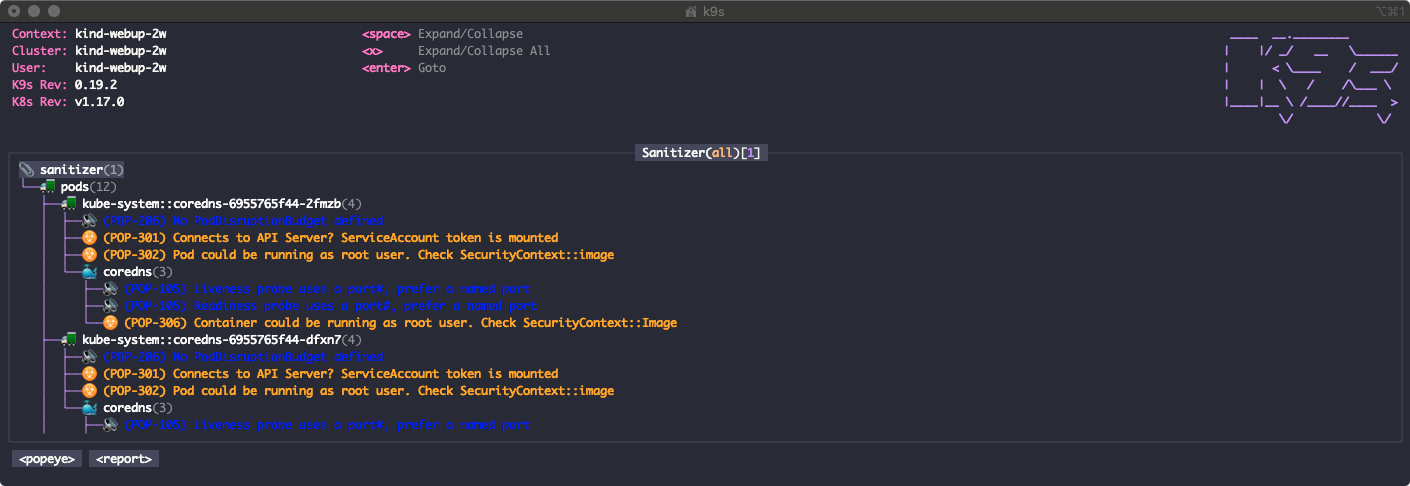
使用 Popeye 检查资源配置的合理程度
Popeye 是 k9s 作者开发的另一个 K8s 命令行工具,现已被集成进 k9s,它可以实时扫描你的集群,并报告潜在的问题,比如:引用完整性、配置错误、资源使用等。
通过 :popeye 命令可以进入 Popeye 的总览视图,然后可以通过在给定的资源条目上按 Enter 键来查看更为详细的检测报告。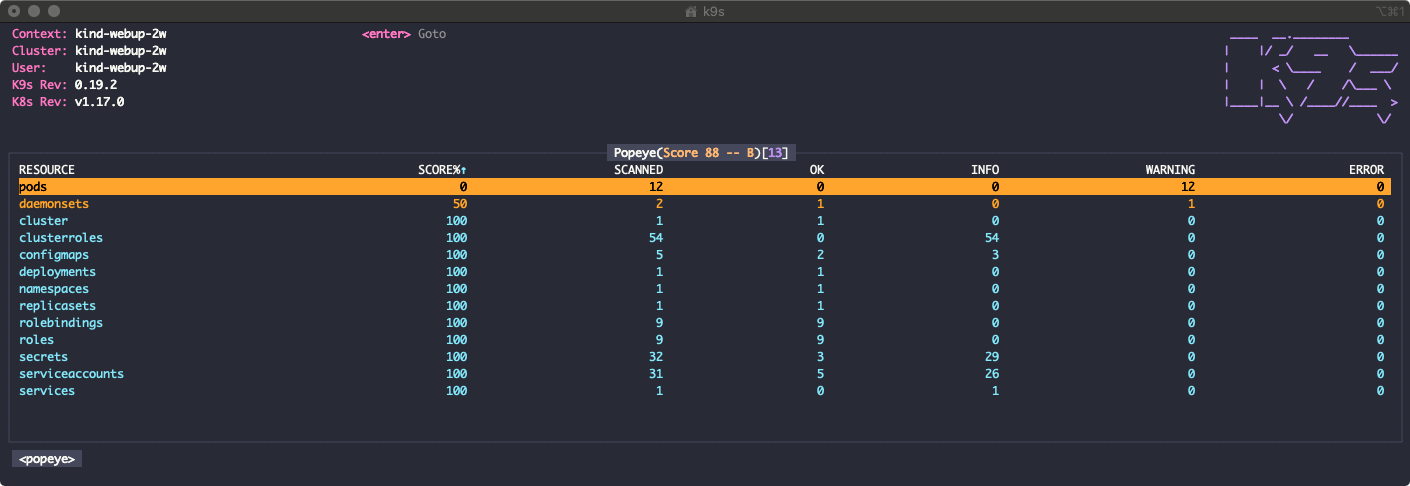
 :::info
🍮 Popeye 还支持一个配置文件,即
:::info
🍮 Popeye 还支持一个配置文件,即 spinach.yml,该文件提供了自定义扫描资源的内容,并根据自己的策略设置不同的严重程度。
👀 请阅读 Popeye 文档,了解如何自定义报告。spinach.yml 文件将从 k9s 的主目录 $HOME/.k9s/MY_CLUSTER_CONTEXT_NAME_spinach.yml 中读取。
:::
使用 Stern 更直接的查询服务日志
Stern 是一款社区知名的 K8s 集群服务日志查询工具,虽然 k9s 已然集成了部分 Stern 的功能,但操作不太直接也无法连接管道操作(
|),以下提供两个额外的使用方式。
使用 k9s 插件支持多 Pod 的日志查询
k9s 的插件机制提供了一个自定义的引入外部工具的操作模式,k9s 只能查询单个 Pod 的日志,我们可以利用插件创建一个可以查询当前命名空间下多个 Pod 的快捷命令。
# $HOME/.k9s/plugin.yml
plugin:
  stern:
    shortCut: Ctrl-L
    description: "Logs (Stern)"
    scopes:
      - pods
    command: /usr/local/bin/stern # NOTE! Look for the command at this location.
    background: false
    args:
     - --tail
     - 100
     - $FILTER             # NOTE! Pulls the filter out of the pod view.
     - -n
     - $NAMESPACE        # Use current namespace
     - --context
     - $CONTEXT     # Use current k8s context
直接使用 stern 在命令行查询日志
使用
stern命令,我们可以在本地动态查看 Pod 的日志信息。stern 可以让你根据 Kubernetes 中的 Pod 和容器生成以不同颜色编码的输出。
$ stern -h
Tail multiple pods and containers from Kubernetes

Usage:
  stern pod-query [flags]

Flags:
      --all-namespaces             If present, tail across all namespaces. A specific namespace is ignored even if specified with --namespace.
      --color string               Color output. Can be 'always', 'never', or 'auto' (default "auto")
      --completion string          Outputs stern command-line completion code for the specified shell. Can be 'bash' or 'zsh'
  -c, --container string           Container name when multiple containers in pod (default ".*")
      --container-state string     If present, tail containers with status in running, waiting or terminated. Default to running. (default "running")
      --context string             Kubernetes context to use. Default to current context configured in kubeconfig.
  -e, --exclude strings            Regex of log lines to exclude
  -E, --exclude-container string   Exclude a Container name
  -h, --help                       help for stern
      --kubeconfig string          Path to kubeconfig file to use
  -n, --namespace string           Kubernetes namespace to use. Default to namespace configured in Kubernetes context
  -o, --output string              Specify predefined template. Currently support: [default, raw, json] (default "default")
  -l, --selector string            Selector (label query) to filter on. If present, default to ".*" for the pod-query.
  -s, --since duration             Return logs newer than a relative duration like 5s, 2m, or 3h. Defaults to 48h.
      --tail int                   The number of lines from the end of the logs to show. Defaults to -1, showing all logs. (default -1)
      --template string            Template to use for log lines, leave empty to use --output flag
  -t, --timestamps                 Print timestamps
  -v, --version                    Print the version and exit
stern 命令的使用方法很简单,以下列举一些常见、常用的操作作为参考:
# Tail all pods within a current namespace:
$ stern .

# Tail all pods that matches a given regular expression:
$ stern pod_query

# Tail matched pods from all namespaces:
$ stern pod_query --all-namespaces

# Tail matched pods from 15 minutes ago and ignore 'probe' messages:
$ stern pod_query -e probe -s 15m

# Tail matched pods with a specific label:
$ stern pod_query -l release=canary

# Pipe the log message to jq
$ stern pod_query -o json | jq .

若有收获,就点个赞吧
0 人点赞
