public AnnotationConfigApplicationContext(Class<?>... componentClasses) {this();register(componentClasses);// 3.刷新整个容器refresh();}
一. refresh()方法整体概览
构造方法中, 前面两步已经做了很多事情了, 但这些事情都是准备工作. 比起refresh()而言, 还是小巫见大巫. 在refresh()方法中,包含着各后置处理的作用 / 调用时机; Bean的诞生过程; 循环依赖如何解决以及Spring的其他组件使用等. 接下来迎接风暴!
// refresh()本身是一个聚合方法, 具体的功能都委托给了各个子方法.public void refresh() throws BeansException, IllegalStateException {synchronized (this.startupShutdownMonitor) {// 1.在刷新容器之前,做一些基础的处理. 不难prepareRefresh();// 2. 获取刷新后的beanFactory.注意:这里并不是要把当前的beanFactory全部刷新,只是刷新部分数据.不然之前的准备工作岂不是白做了. 不难ConfigurableListableBeanFactory beanFactory = obtainFreshBeanFactory();// 3. 准备BeanFactory. 重要!!!prepareBeanFactory(beanFactory);try {// 4. 空方法 Spring后版本可能会用postProcessBeanFactory(beanFactory);// 5. 调用后置处理器 重要!!!invokeBeanFactoryPostProcessors(beanFactory);// 6. 注册后置处理的Bean到容器当中 重要!!!registerBeanPostProcessors(beanFactory);// 7. 初始化MessageSource并将其bean注入到容器中initMessageSource();// 8. 初始化事件多播器并将其bean注入到容器中initApplicationEventMulticaster();// 9. 在特定上下文子类中初始化其他特殊bean. 当前是空方法, Spring后续版本可能会用onRefresh();// 10. 注册监听器到容器中registerListeners();// 11. 实例化所有剩余的bean(非延迟)到容器中 重要!!!finishBeanFactoryInitialization(beanFactory);// 12. 最后, 发布容器刷新完成事件finishRefresh();}catch (BeansException ex) {// 异常情况下, 销毁容器中所有的beandestroyBeans();cancelRefresh(ex);throw ex;}finally {// 清除一些不必要的缓存resetCommonCaches();}}}
二、prepareRefresh()详解
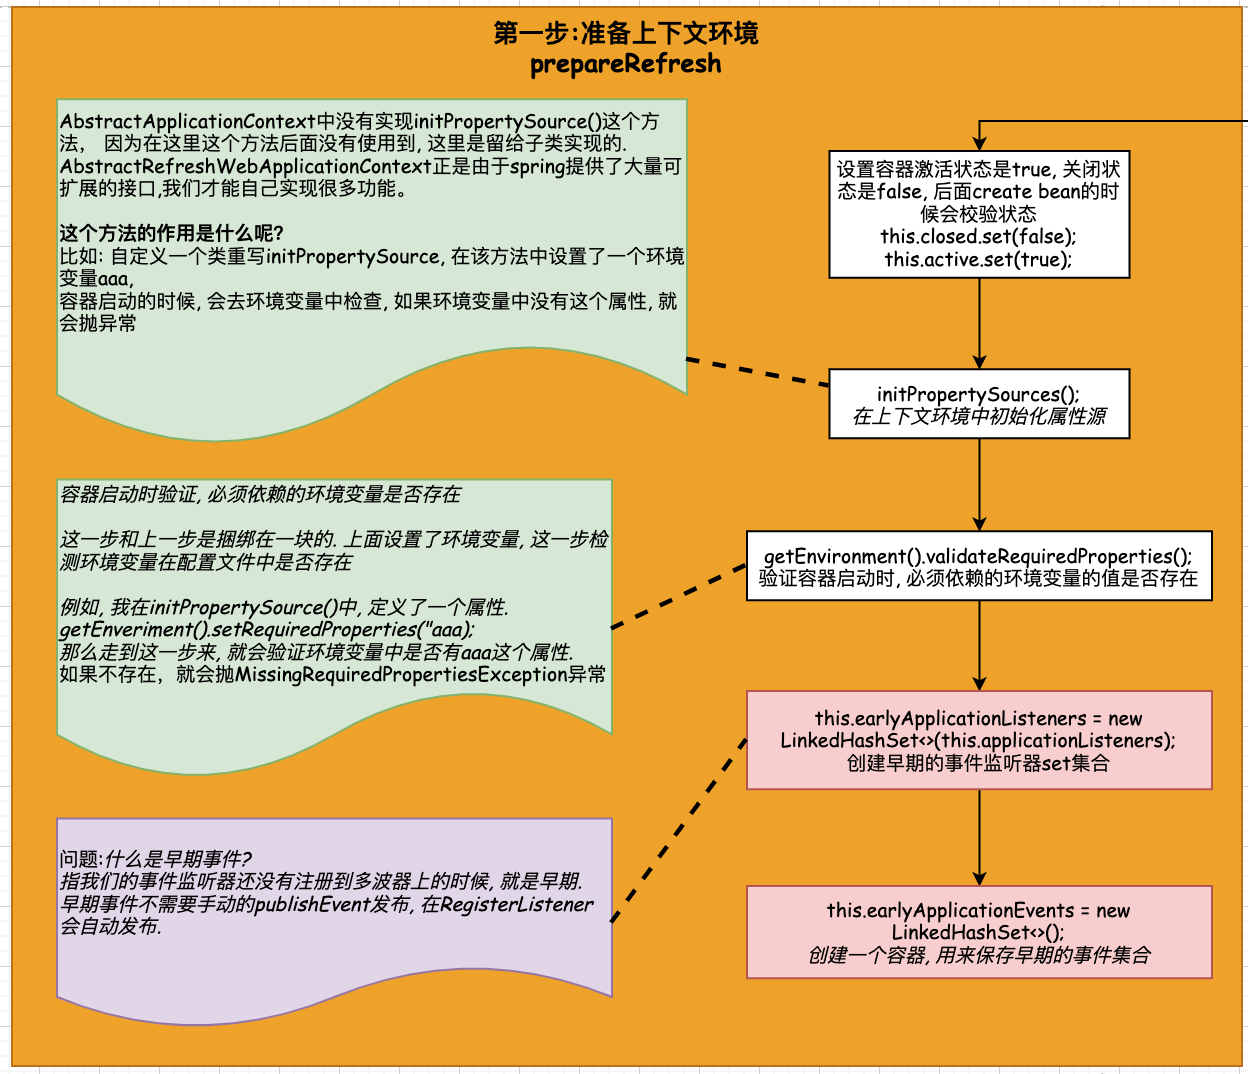
protected void prepareRefresh() {// 这一句很明显的获取了系统当前时间,其实他的作用是来记录当前的启动时间的this.startupDate = System.currentTimeMillis();// 这两个状态的设置,前者关闭程序设置为false,后者运行标识设置为truethis.closed.set(false);this.active.set(true);// 初始化资源必要的资源. 目前是空方法. Spring后续版本可能会启用.initPropertySources();// 校验系统环境/JVM环境当中的必要参数getEnvironment().validateRequiredProperties();// 判断刷新前的运用程序监听集合是否为空,为空初始化applicationListeners监听,不为空,则清空监听器if (this.earlyApplicationListeners == null) {// 这里会保存pre-refresh状态下的listeners,即使此后再调用刷新,这些listeners会包含在所有的// listeners集合中。这么做的目的应该是用户在调用刷新前手动注册了一些liteners,而这些liteners// 并不是bean无法自动发现,这里只会设置一次值this.earlyApplicationListeners = new LinkedHashSet<>(this.applicationListeners);}else {// 再次 fresh,把之前添加的监听器添加到 applicationListenersthis.applicationListeners.clear();this.applicationListeners.addAll(this.earlyApplicationListeners);}// 允许收集早期的ApplicationEvent,一旦多播器可用,便会发布. 实际上这里也是一个empty setthis.earlyApplicationEvents = new LinkedHashSet<>();}
- 这段代码前面的是记录当前的启动时间以及设置运行标识为true状态。
- 然后执行
initPropertySources()方法,该方法Spring源码是没有实现的,在Spring的源码中一般没有实现的方法大部分就是Spring预留出来给用户进行高级扩展的能力,用户可以根据自身的需要重写initPropertySources()方法,并在方法中进行个性化的属性处理及设置。 - 紧接着是执行对属性进行验证的方法
getEnvironment().validateRequiredProperties(),其验证的逻辑是交给AbstractPropertyResolver# validateRequiredProperties()方法完成的,该方法主要是校验的是this.requiredProperties属性。这个属性初始化的时候是空的,所有看起来就像是什么都没有校验一样。但是如果用户扩展实现了initPropertySources()方法,并且设置了系统属性,那么在初始化的时候就this.requiredProperties属性就不为空,就需要执行校验逻辑。
假如现在有这样一个需求,工程在运行过程中用到的某个设置(例如 VAR )是从系统环境变量中取得的,而如果用户没有在系统环境变量中配置这个参数,那么工程可能不会工作。这一要求可能会有各种各样的解决办法,当然,在 Spring 中可以这样做,你可以直接修改 Spring 的源码,例如修改 ClassPathXmlApplicationContext。当然,最好的办法还是对源码进行扩展,我们可以自定义类:
public class MyClassPathXmlApplicationContext extends ClassPathXmlApplicationContext {public MyClassPathXmlApplicationContext(String... configLocations) throws BeansException {super(configLocations);}@Overrideprotected void initPropertySources() {// 添加验证要求getEnvironment().setRequiredProperties("VAR");}}
我们自定一义了继承自 ClassPathXmlApplicationContext 的 MyClassPathXmlApplicationContext , 并重写了initPropertySources方法,在方法中添加了我们的个性化需求,那么在验证的时候也就是程序走到 getEnvironment().validateRequiredProperties()代码的时候,如果系统并没有检测到对应 VAR 的环境变量,那么将抛出异常。当然我们还需要在使用的时候替换掉原有的ClassPathXmlApplicationContext:
public static void main(String[] args) {ApplicationContext context = new MyClassPathXmlApplicationContext("spring/lookup-test.xml");GetBeanTest getBeanTest = (GetBeanTest) context.getBean("getBeanTest");getBeanTest.showMe();}
https://www.cnblogs.com/warehouse/p/9384735.html 这是一个优质的博主,可以看看他的源码解析的内容。
三、关于this.earlyApplicationListeners的思考
// 判断刷新前的运用程序监听集合是否为空,为空初始化applicationListeners监听,不为空,则清空监听器if (this.earlyApplicationListeners == null) {// 这里会保存pre-refresh状态下的listeners,即使此后再调用刷新,这些listeners会包含在所有的// listeners集合中。这么做的目的应该是用户在调用刷新前手动注册了一些liteners,而这些liteners// 并不是bean无法自动发现,这里只会设置一次值this.earlyApplicationListeners = new LinkedHashSet<>(this.applicationListeners);}else {// 再次 fresh,把之前添加的监听器添加到 applicationListenersthis.applicationListeners.clear();this.applicationListeners.addAll(this.earlyApplicationListeners);}
第一次在看这个代码进行调试的时候,看到的都是this.earlyApplicationListeners都是为null的。感觉既然都是null,那Spring为啥需要判断是否为null。而且还有后面else的逻辑,什么情况下this.earlyApplicationListeners 不等于 null呢?
- 可以通过
addApplicationListener(...)向ApplicationContext添加监听器,此时添加的监听器保存在applicationListeners属性中 - 假设在刷新过程中或者刷新后调用了
addApplicationListener(...),那么再次刷新时,applicationListeners就包含了这些监听器。这里通过earlyApplicationListeners解决了此问题。 - 在刷新之前,添加的所有监听器保存在
applicationListeners,而earlyApplicationListeners为null,当第一次refresh的时候将applicationListeners保在earlyApplicationListeners中,如果重新刷新,那么用earlyApplicationListeners覆盖applicationListerners。 - 这样就确保了第一次刷新之前通过
addApplicationListener(...)添加了哪些监听器,无论之后添加了多少监听器,再次refresh都不起作用public static void main(String[] args) {AnnotationConfigApplicationContext context = new AnnotationConfigApplicationContext();// pre-refresh状态下的listeners监听器。此监听器保存在applicationListeners属性中context.addApplicationListener(new DemoMyListener());// 注册配置类context.register(AppConfig.class);// 刷新上下文context.refresh();// 刷新上下文context.refresh();}

https://bbs.huaweicloud.com/blogs/281015

