sping两大核心:IOC(控制反转)、AOP(面向切面)
IOC:创建对象的过程由spring负责,用于解耦(xml方式管理Bean)
IOC底层原理:**xml解析+工厂模式+反射;**<br /> DI:依赖注入,注入属性,是IOC的具体实现,必须在**创建对象的基础**上进行
spring有两种bean:
1.普通bean,在配置文件的class属性中定义的的类型就是返回类型<br /> 2.工厂bean,在配置文件中定义的类型可以和返回类型不一样(就是可以生成bean的bean)
spring的bean默认是单实例对象(bean通过getbean得到的一直是同一个对象),可以通过bean标签的属性scope属性设置为多实例。
1.singleton,默认,单实例,在**加载spring配置文件**时就会创建对象
<bean id="mybean" class="com.factoryBean.MyBean" scope="singleton"/>
2.prototype,多实例,在**调用getBean()**时才会创建多实例对象
<bean id="mybean" class="com.factoryBean.MyBean" scope="prototype"/>
Bean生命周期
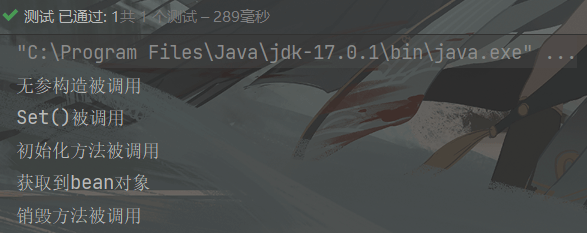
1.通过构造器创建Bean实例
2.为Bean的属性设值和对其他Bean的引用(set)
init-method=”initMethod”:指定初始化方法
destroy-method=”destroyMethod”:指定销毁方法
<bean id="orders" class="com.beanLife.Orders" init-method="initMethod" destroy-method="destroyMethod"><property name="name" value="手机"/></bean>
3.调用Bean中初始化方法(需要配置)
//自定义初始化方法public void initMethod(){System.out.println("初始化方法被调用");}
4.获取到Bean对象
ApplicationContext applicationContext=new ClassPathXmlApplicationContext("BeanLife.xml");Orders orders = applicationContext.getBean("orders", Orders.class);System.out.println("获取到bean对象");
5.当容器关闭调用Bean的销毁方法(需要配置)
//自定义销毁方法public void destroyMethod(){System.out.println("销毁方法被调用");}
//手动调用销毁方法((ClassPathXmlApplicationContext)applicationContext).close();
结果:
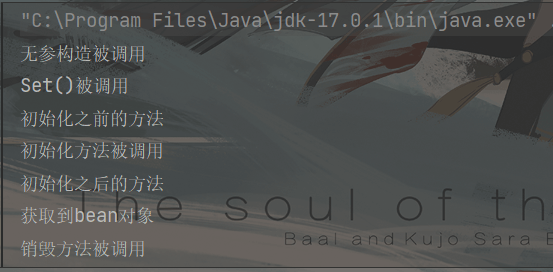
加上后置处理器(BeanPostProcessor)一共有7步操作,在原第3步初始化的前后各增加一步,即:
1.通过构造器创建Bean实例
2.为Bean的属性设值和对其他Bean的引用(set)
3.把Bean传递bean前置处理器postProcessBeforeInitialization()
4.调用Bean中初始化方法(需要配置)
5.把Bean传递bean后置处理器postProcessAfterInitialization()
6.获取到Bean对象
7.当容器关闭调用Bean的销毁方法(需要配置)
其中,会为当前配置文件中所有Bean都添加后置处理器
public class MyBeanPost implements BeanPostProcessor {@Overridepublic Object postProcessBeforeInitialization(Object bean, String beanName) throws BeansException {System.out.println("初始化之前的方法");return BeanPostProcessor.super.postProcessBeforeInitialization(bean, beanName);}@Overridepublic Object postProcessAfterInitialization(Object bean, String beanName) throws BeansException {System.out.println("初始化之后的方法");return BeanPostProcessor.super.postProcessAfterInitialization(bean, beanName);}}
<!--配置后置处理器--><bean id="mybeanpost" class="com.beanLife.MyBeanPost"/>
注解方式管理Bean
1.针对创建对象提供注解
@Component
@Service :service层
@Controller:web层
@Repository:dao层
以上四个注解功能一样,都用于创建Bean对象,只是使用的层次不同,但是也可以跨层混用
2.创建Bean
2.1引入依赖
2.2开启组件扫描,告诉Spring哪些类使用注解
创建名称空间
xmlns:context=”http://www.springframework.org/schema/context”
http://www.springframework.org/schema/context http://www.springframework.org/schema/context/spring-context.xsd
<beans xmlns="http://www.springframework.org/schema/beans"xmlns:xsi="http://www.w3.org/2001/XMLSchema-instance"xmlns:context="http://www.springframework.org/schema/context"xsi:schemaLocation="http://www.springframework.org/schema/beans http://www.springframework.org/schema/beans/spring-beans.xsdhttp://www.springframework.org/schema/context http://www.springframework.org/schema/context/spring-context.xsd"></beans>
开启组件扫描
<!-- 开启组件扫描1.想扫描多个包可以用逗号隔开或者选择上层目录--><context:component-scan base-package="com.spring5.dao,com.spring5.service"/>
其他方式
<context:component-scan base-package="com.spring5.dao,com.spring5.service" use-default-filters="false"><!-- 表示不使用默认过滤器,只扫描带Component注解的类--><context:include-filter type="annotation" expression="org.springframework.stereotype.Component"/></context:component-scan>
<context:component-scan base-package="com.spring5.dao,com.spring5.service"><!--表示不扫描带Component注解的类--><context:exclude-filter type="annotation" expression="org.springframework.stereotype.Component"/></context:component-scan>
编写类,为类加注解
/*** 在注解里写id名字可以省略不写,默认是类名首字母小写*/@Component(value = "userService") //和xml配置类似public class UserService {public void add(){System.out.println("service add");}
/*** 测试注解形式创建bean*/@Testpublic void test1(){ApplicationContext applicationContext=new ClassPathXmlApplicationContext("bean1.xml");UserService userService = applicationContext.getBean("userService", UserService.class);userService.add();}
3.属性注入
@Autowired:根据属性类型自动注入
@Qualifier:根据属性名自动注入,和@Autowired一起使用
@Resource:既可以根据属性类型自动注入,也可以根据属性名自动注入,@Resource注解是javax.annotacion包下的,属于java的扩展包,在标准jdk中没有
@Value:注入普通类型
1.创建service和dao类,并加上注解创建bean
@Repository(value = "userDaoImpl1")public class UserDaoImpl implements UserDao {@Overridepublic void add() {System.out.println("userDao add");}}
@Service(value = "userService") //和xml配置类似public class UserService {//添加属性注解@Autowired根据类型注入,不需要写set方法@Autowiredprivate UserDao userDao;public void add(){System.out.println("service add");userDao.add();}}
2.为service定义dao属性,在属性上加入注解
//添加属性注解@Autowired根据类型注入,不需要写set方法//@Resource(name="userDaoImpl1"),@Resource注解是javax.annotacion包下的,属于java的扩展包,在标准jdk中没有@Autowired//根据名称注入,当一个接口有多个实现类时,确定不了是哪个类,根据名称就可以指定,value等于那个bean的id@Qualifier(value = "userDaoImpl1")private UserDao userDao;
4.纯注解开发
1.创建配置类,替代xml文件
/*** 配置类,取代xml配置文件,实现纯注解开发*/@Configuration //需要加上这个注解才能作为配置类@ComponentScan(basePackages = {"com.spring5.dao","com.spring5.service"}) //这个注解实现了组件扫描功能public class SpringConfig {}
2.编写测试方法,这里需要实例化AnnotationConfigApplicationContext类实现
/*** 测试纯注解开发*/@Testpublic void test2(){//这里需要使用AnnotationConfigApplicationContext实现ApplicationContext applicationContext=new AnnotationConfigApplicationContext(SpringConfig.class);UserService userService = applicationContext.getBean("userService", UserService.class);userService.add();}


