- viewerjs
- 基于photoswipe的vue-photo-preview
- vue-picture-preview
第一种:viewerjs使用介绍

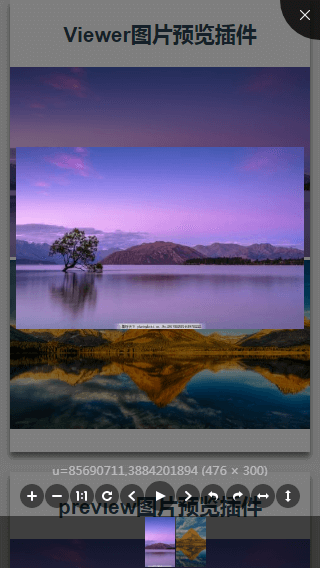
viewerjs插件截图
1、安装依赖
npm install v-viewer —save
2、main.js内引用并注册调用
//main.jsimport Viewer from 'v-viewer'import 'viewerjs/dist/viewer.css'Vue.use(Viewer);Viewer.setDefaults({Options: { "inline": true, "button": true, "navbar": true, "title": true, "toolbar": true, "tooltip": true, "movable": true, "zoomable": true, "rotatable": true, "scalable": true, "transition": true, "fullscreen": true, "keyboard": true, "url": "data-source" }});
3、代码中使用xxx.vue
<template><div class="content"><h1>Viewer图片预览插件</h1><viewer :images="imgs"><img v-for="src in imgs" :src="src.url" :key="src.title"></viewer></div></template><script>export default {data () {return {imgs: [{url: 'https://ss3.bdstatic.com/70cFv8Sh_Q1YnxGkpoWK1HF6hhy/it/u=85690711,3884201894&fm=27&gp=0.jpg',title: '图片1'},{url: 'https://ss0.bdstatic.com/70cFvHSh_Q1YnxGkpoWK1HF6hhy/it/u=3564877025,796183547&fm=27&gp=0.jpg',title: '图片2'}]}},}</script>

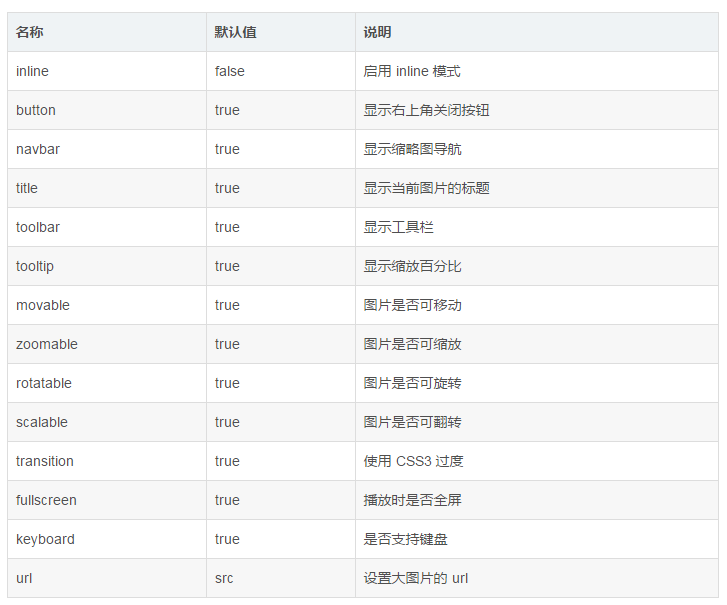
viewerjs使用配置参数
第二种:vue-photo-preview使用介绍

vue-photo-preview插件截图
1、先安装依赖npm install vue-photo-preview --save
2、main.js内引用并注册调用
//main.jsimport preview from 'vue-photo-preview'import 'vue-photo-preview/dist/skin.css'Vue.use(preview)
3、代码中使用xxx.vue
<template><div class="content"><section><h1>preview图片预览插件</h1><img v-for="src in imgs" :src="src.url" :key="src.title" :preview="src.preview" :preview-text="src.title"></section></div></template><script>export default {data () {return {imgs: [{url: 'https://ss3.bdstatic.com/70cFv8Sh_Q1YnxGkpoWK1HF6hhy/it/u=85690711,3884201894&fm=27&gp=0.jpg',title: '图片1',preview: '1'},{url: 'https://ss0.bdstatic.com/70cFvHSh_Q1YnxGkpoWK1HF6hhy/it/u=3564877025,796183547&fm=27&gp=0.jpg',title: '图片2',preview: '1'}]}},}</script>
option配置查看 http://photoswipe.com/documentation/options.html
第三种:vue-picture-preview使用介绍

vue-picture-preview插件截图
1、先安装依赖npm install vue-picture-preview --save
2、main.js内引用并注册调用
//main.jsiimport vuePicturePreview from 'vue-picture-preview'Vue.use(vuePicturePreview)
3、在根组件添加 lg-preview 组件的位置
<!-- APP.vue --><div id="app"><router-view></router-view><lg-preview></lg-preview></div>
4、代码中使用xxx.vue
<template><div class="content"><h1>vuePicturePreview图片预览插件</h1><img v-for="(img,index) in imgs"v-preview="img.url":src="img.url":alt="img.title":key="index"preview-title-enable="true"preview-nav-enable="true"></div></template><script>export default {data () {return {imgs: [{url: 'https://ss3.bdstatic.com/70cFv8Sh_Q1YnxGkpoWK1HF6hhy/it/u=85690711,3884201894&fm=27&gp=0.jpg',title: '图片1'},{url: 'https://ss0.bdstatic.com/70cFvHSh_Q1YnxGkpoWK1HF6hhy/it/u=3564877025,796183547&fm=27&gp=0.jpg',title: '图片2'}]}},}</script>
总结
除了第三种vue-picture-preview插件只有预览和切换上下张功能,另外两种都有放大和缩小(包括手势)以及其他功能

