本周我们继续来阅读 Go 语言中 sort 包的源码,这次我们把注意力放在 quickSort(快速排序) 与 heapSort(堆排序)上,看看两者实现的原理与区别,下面让我们先从 quickSort(快速排序)开始。
QuickSort
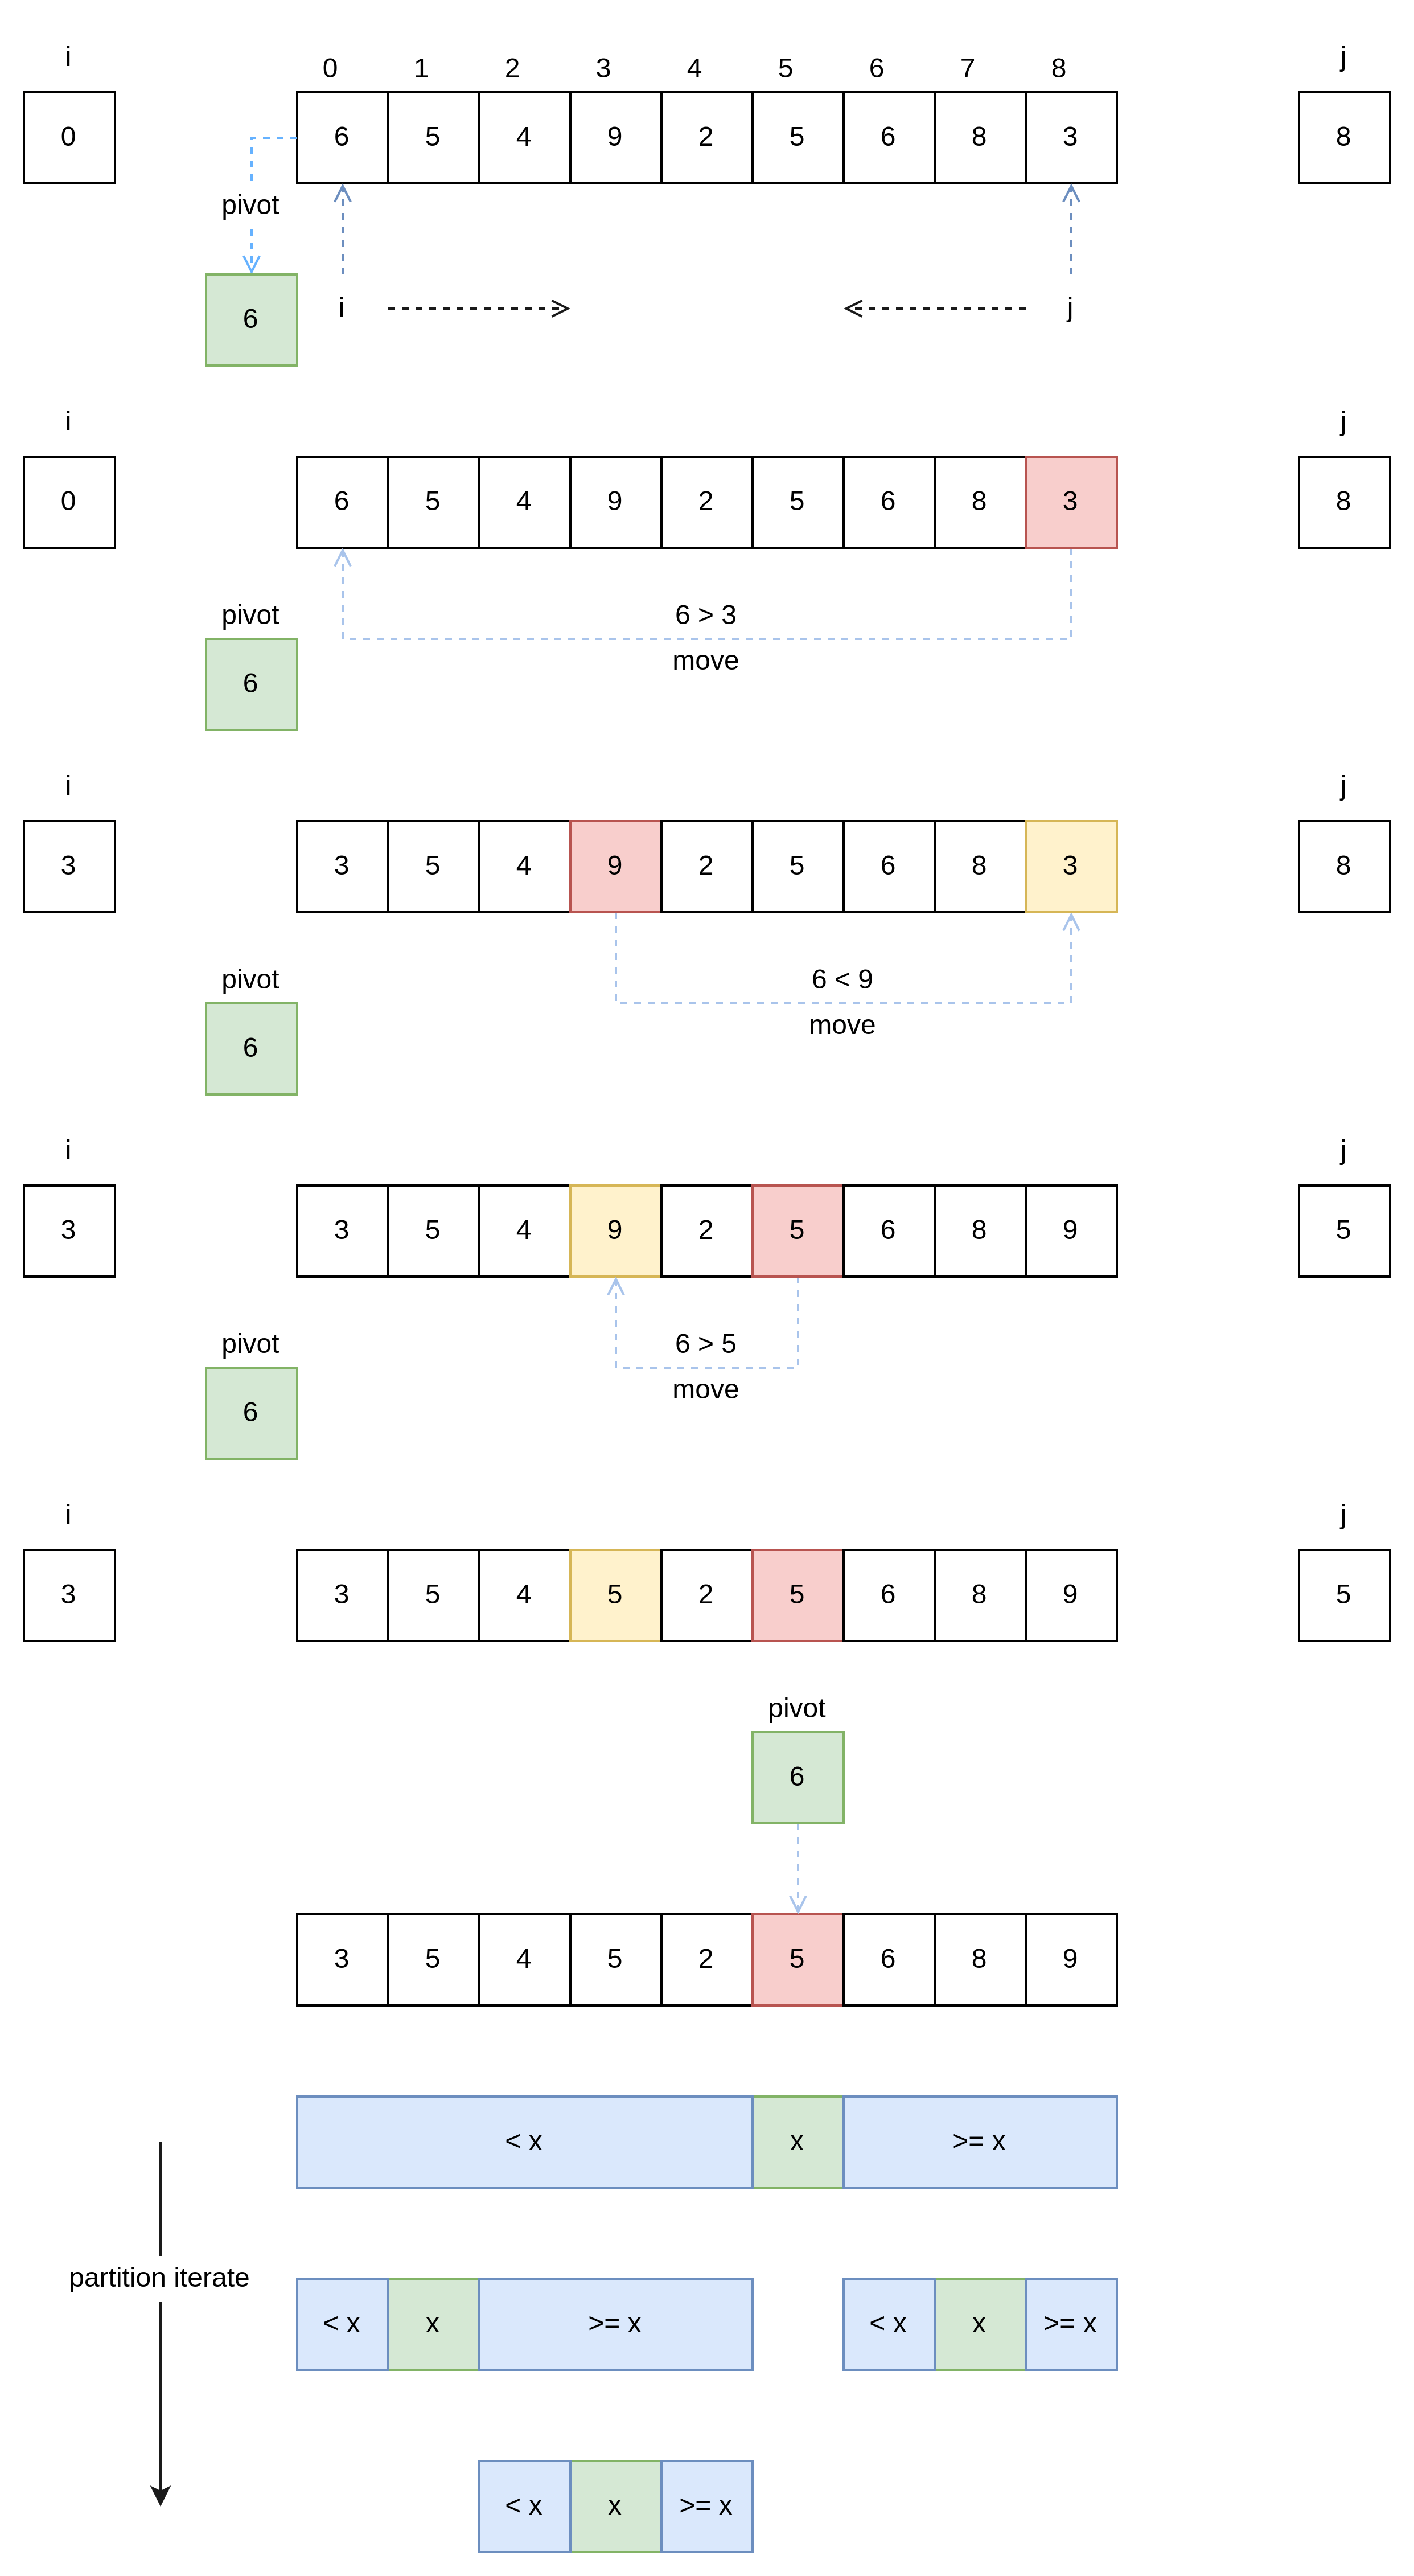
为了更好的理解 Go 源码中的 quickSort 逻辑,我们先来了解一下正常或者说是一般的 quickSort 逻辑。quickSort 又称 partition-exchange sort(分区交换排序),如图 1 所示,quickSort 的核心思想是在数据中选出一个基准值 pivot,然后使用分治法,把数据分为大小两个区,达到局部有序,然后递归分区,直到整体有序。

接下来看源码中的实现,以下源码中 L9 ~ L19 为快速排序逻辑部分,maxDepth 方法作为切换到 heapSort 的条件,传入数据长度 n,依据快速排序的分治逻辑计算最大迭代深度,接着来到 L9 有一个 doPivot 方法,看名字这个方法的功能应该是从数据中选出一个 pivot 基准值,而且代码其它部分并无分区逻辑,所以推测 doPivot 方法全部的作用为选取基准值,然后根据基准值对数据进行分区,最后返回 pivot 用于下一次迭代,但是 doPivot 返回了两个值, mlo 与 mhi,看样子是一个最小值和一个最大值,并不知道具体作用,继续往下看,L13 像是两个“长度”的比较,L14 ~ L18 总是对较小的进行排序,接下来我们带着疑问继续看 doPivot 方法。
// ...func quickSort(data Interface, a, b, maxDepth int) {for b-a > 12 { // Use ShellSort for slices <= 12 elementsif maxDepth == 0 {heapSort(data, a, b)return}maxDepth--mlo, mhi := doPivot(data, a, b)// Avoiding recursion on the larger subproblem guarantees// a stack depth of at most lg(b-a).if mlo-a < b-mhi {quickSort(data, a, mlo, maxDepth)a = mhi // i.e., quickSort(data, mhi, b)} else {quickSort(data, mhi, b, maxDepth)b = mlo // i.e., quickSort(data, a, mlo)}}if b-a > 1 {// Do ShellSort pass with gap 6// It could be written in this simplified form cause b-a <= 12for i := a + 6; i < b; i++ {if data.Less(i, i-6) {data.Swap(i, i-6)}}insertionSort(data, a, b)}}//...// maxDepth returns a threshold at which quicksort should switch// to heapsort. It returns 2*ceil(lg(n+1)).func maxDepth(n int) int {var depth intfor i := n; i > 0; i >>= 1 {depth++}return depth * 2}
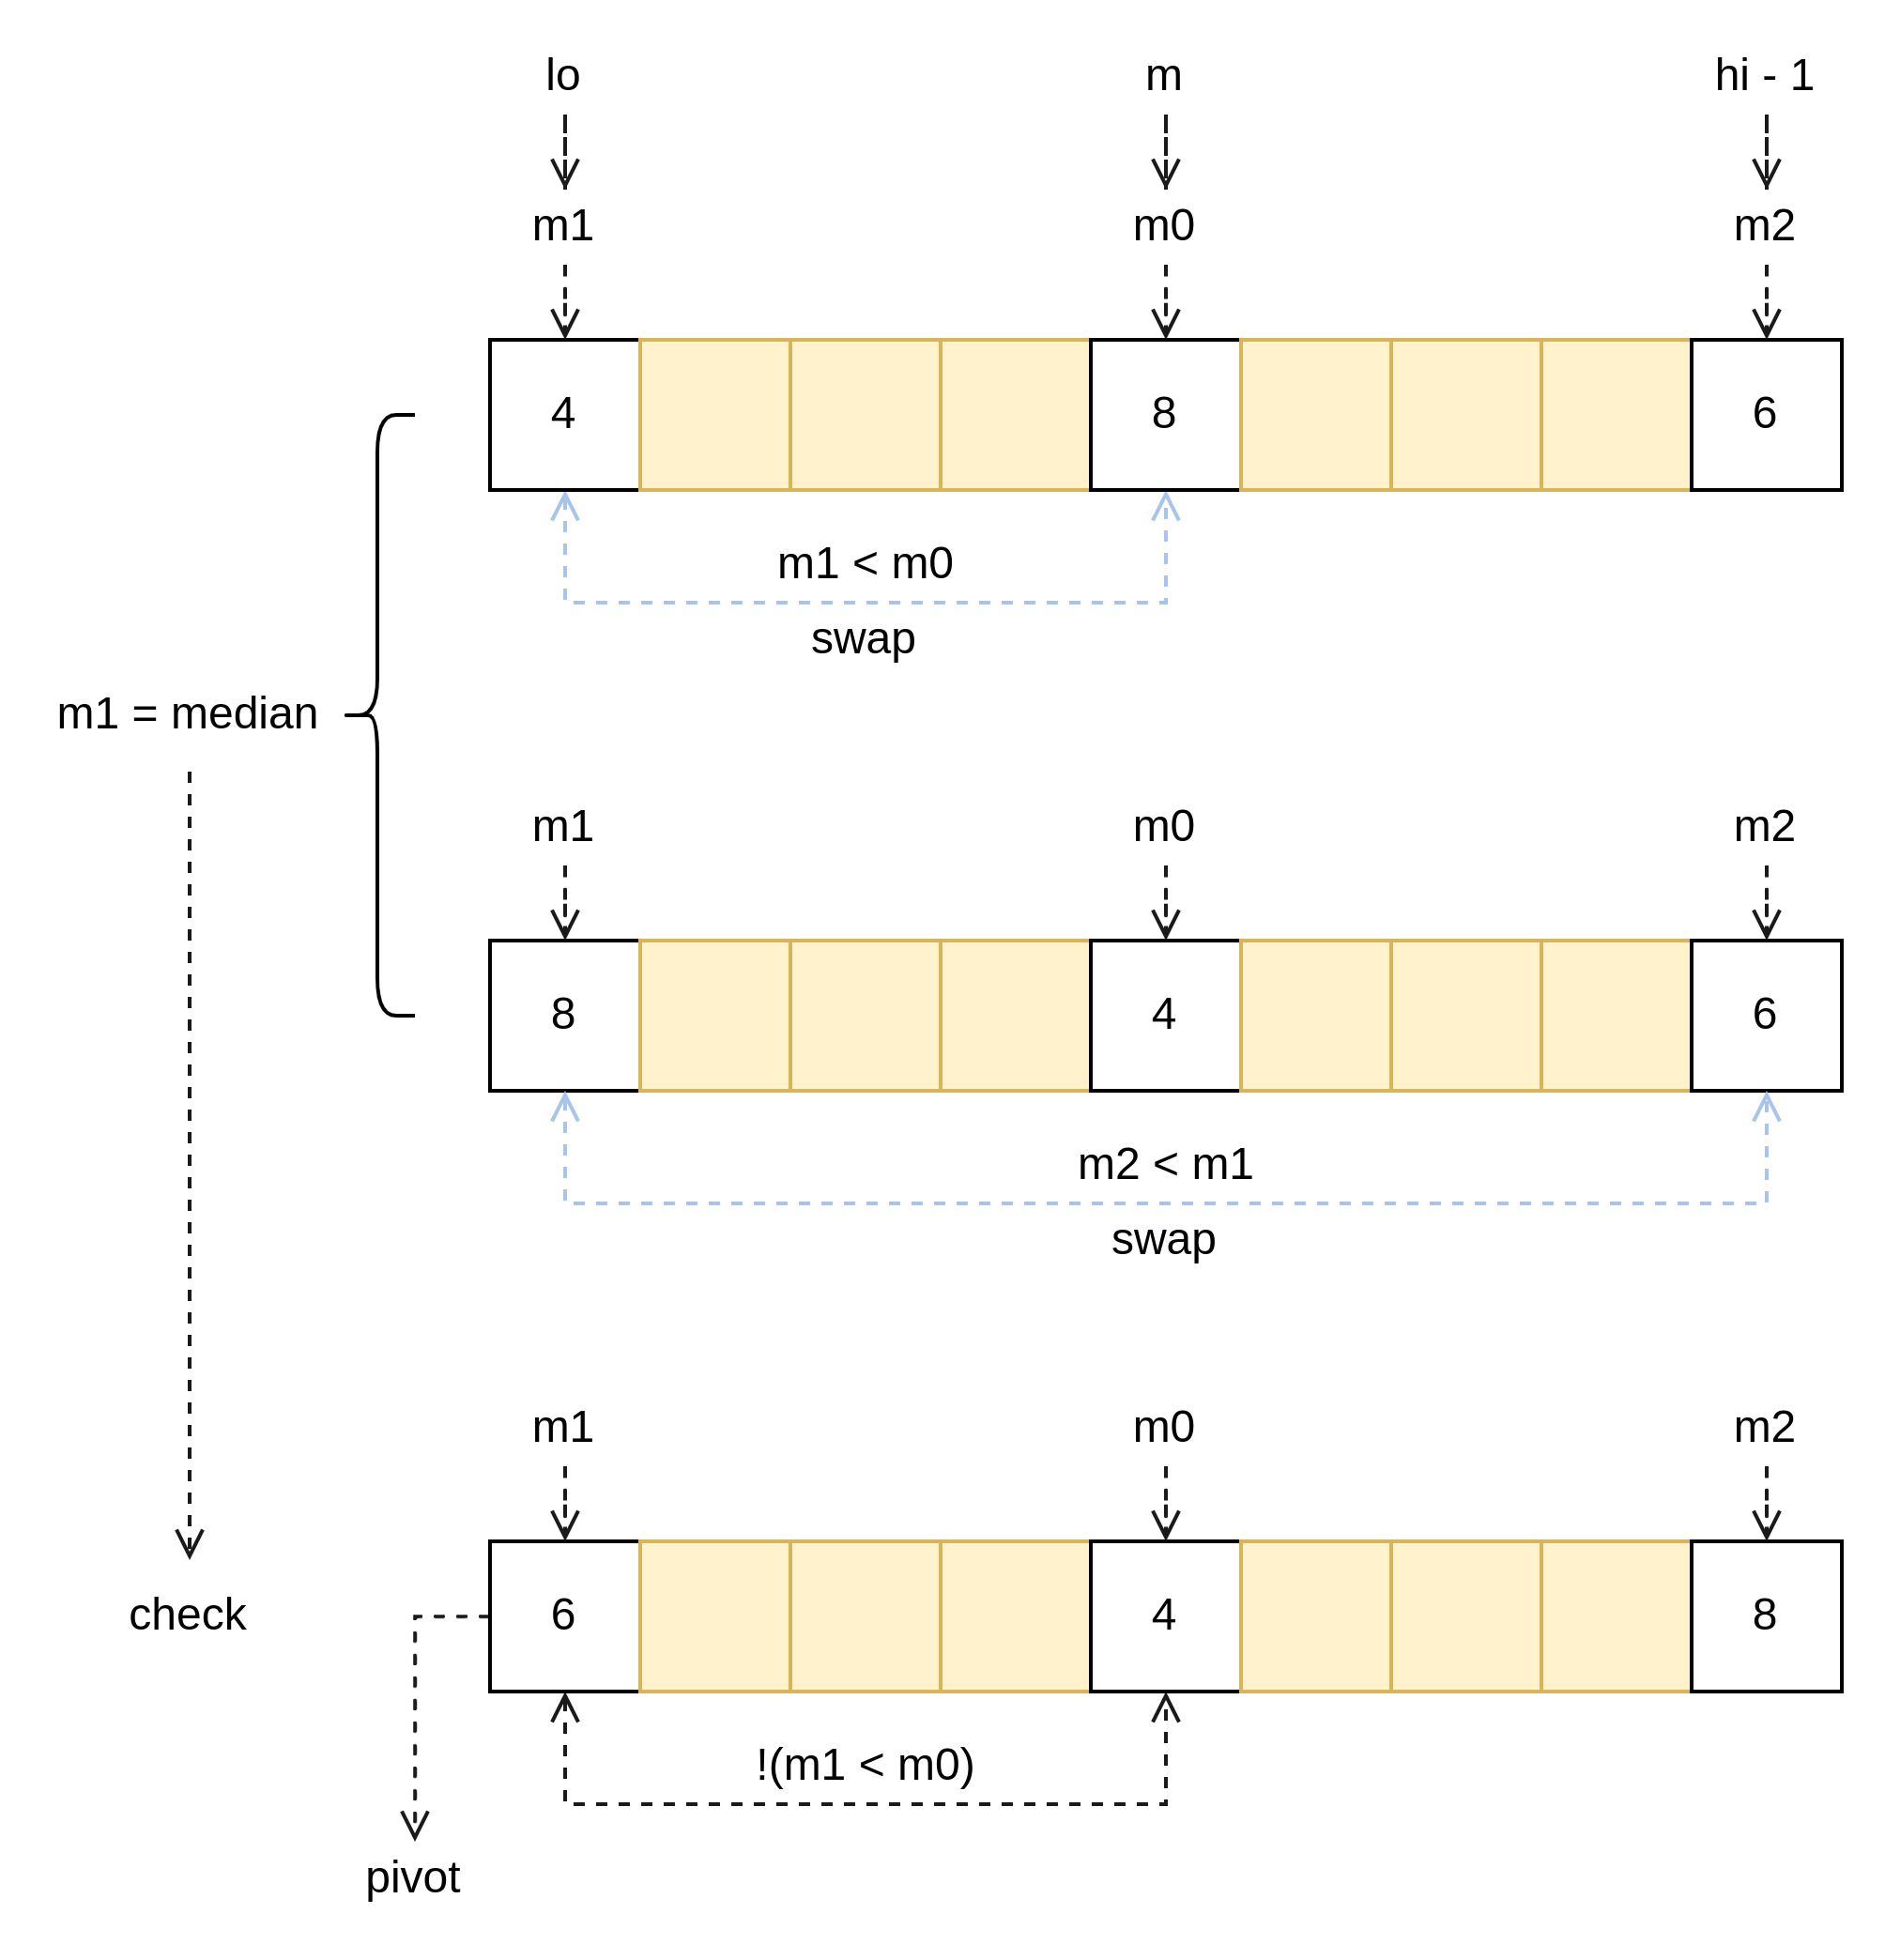
以下为 doPivot 方法中使用的 medianOfThree 方法的源码,L1 注释清楚的解释了这个方法的作用,即把 m0、m1、m2 这三个索引位置的的元素中的中位数放入索引 m1(lo)中,并且如图 2 所示,在任何情况下保持 data[m0] <= data[m1] <= data[m2] 的关系。
// medianOfThree moves the median of the three values data[m0], data[m1], data[m2] into data[m1].func medianOfThree(data Interface, m1, m0, m2 int) {// sort 3 elementsif data.Less(m1, m0) {data.Swap(m1, m0)}// data[m0] <= data[m1]if data.Less(m2, m1) {data.Swap(m2, m1)// data[m0] <= data[m2] && data[m1] < data[m2]if data.Less(m1, m0) {data.Swap(m1, m0)}}// now data[m0] <= data[m1] <= data[m2]}

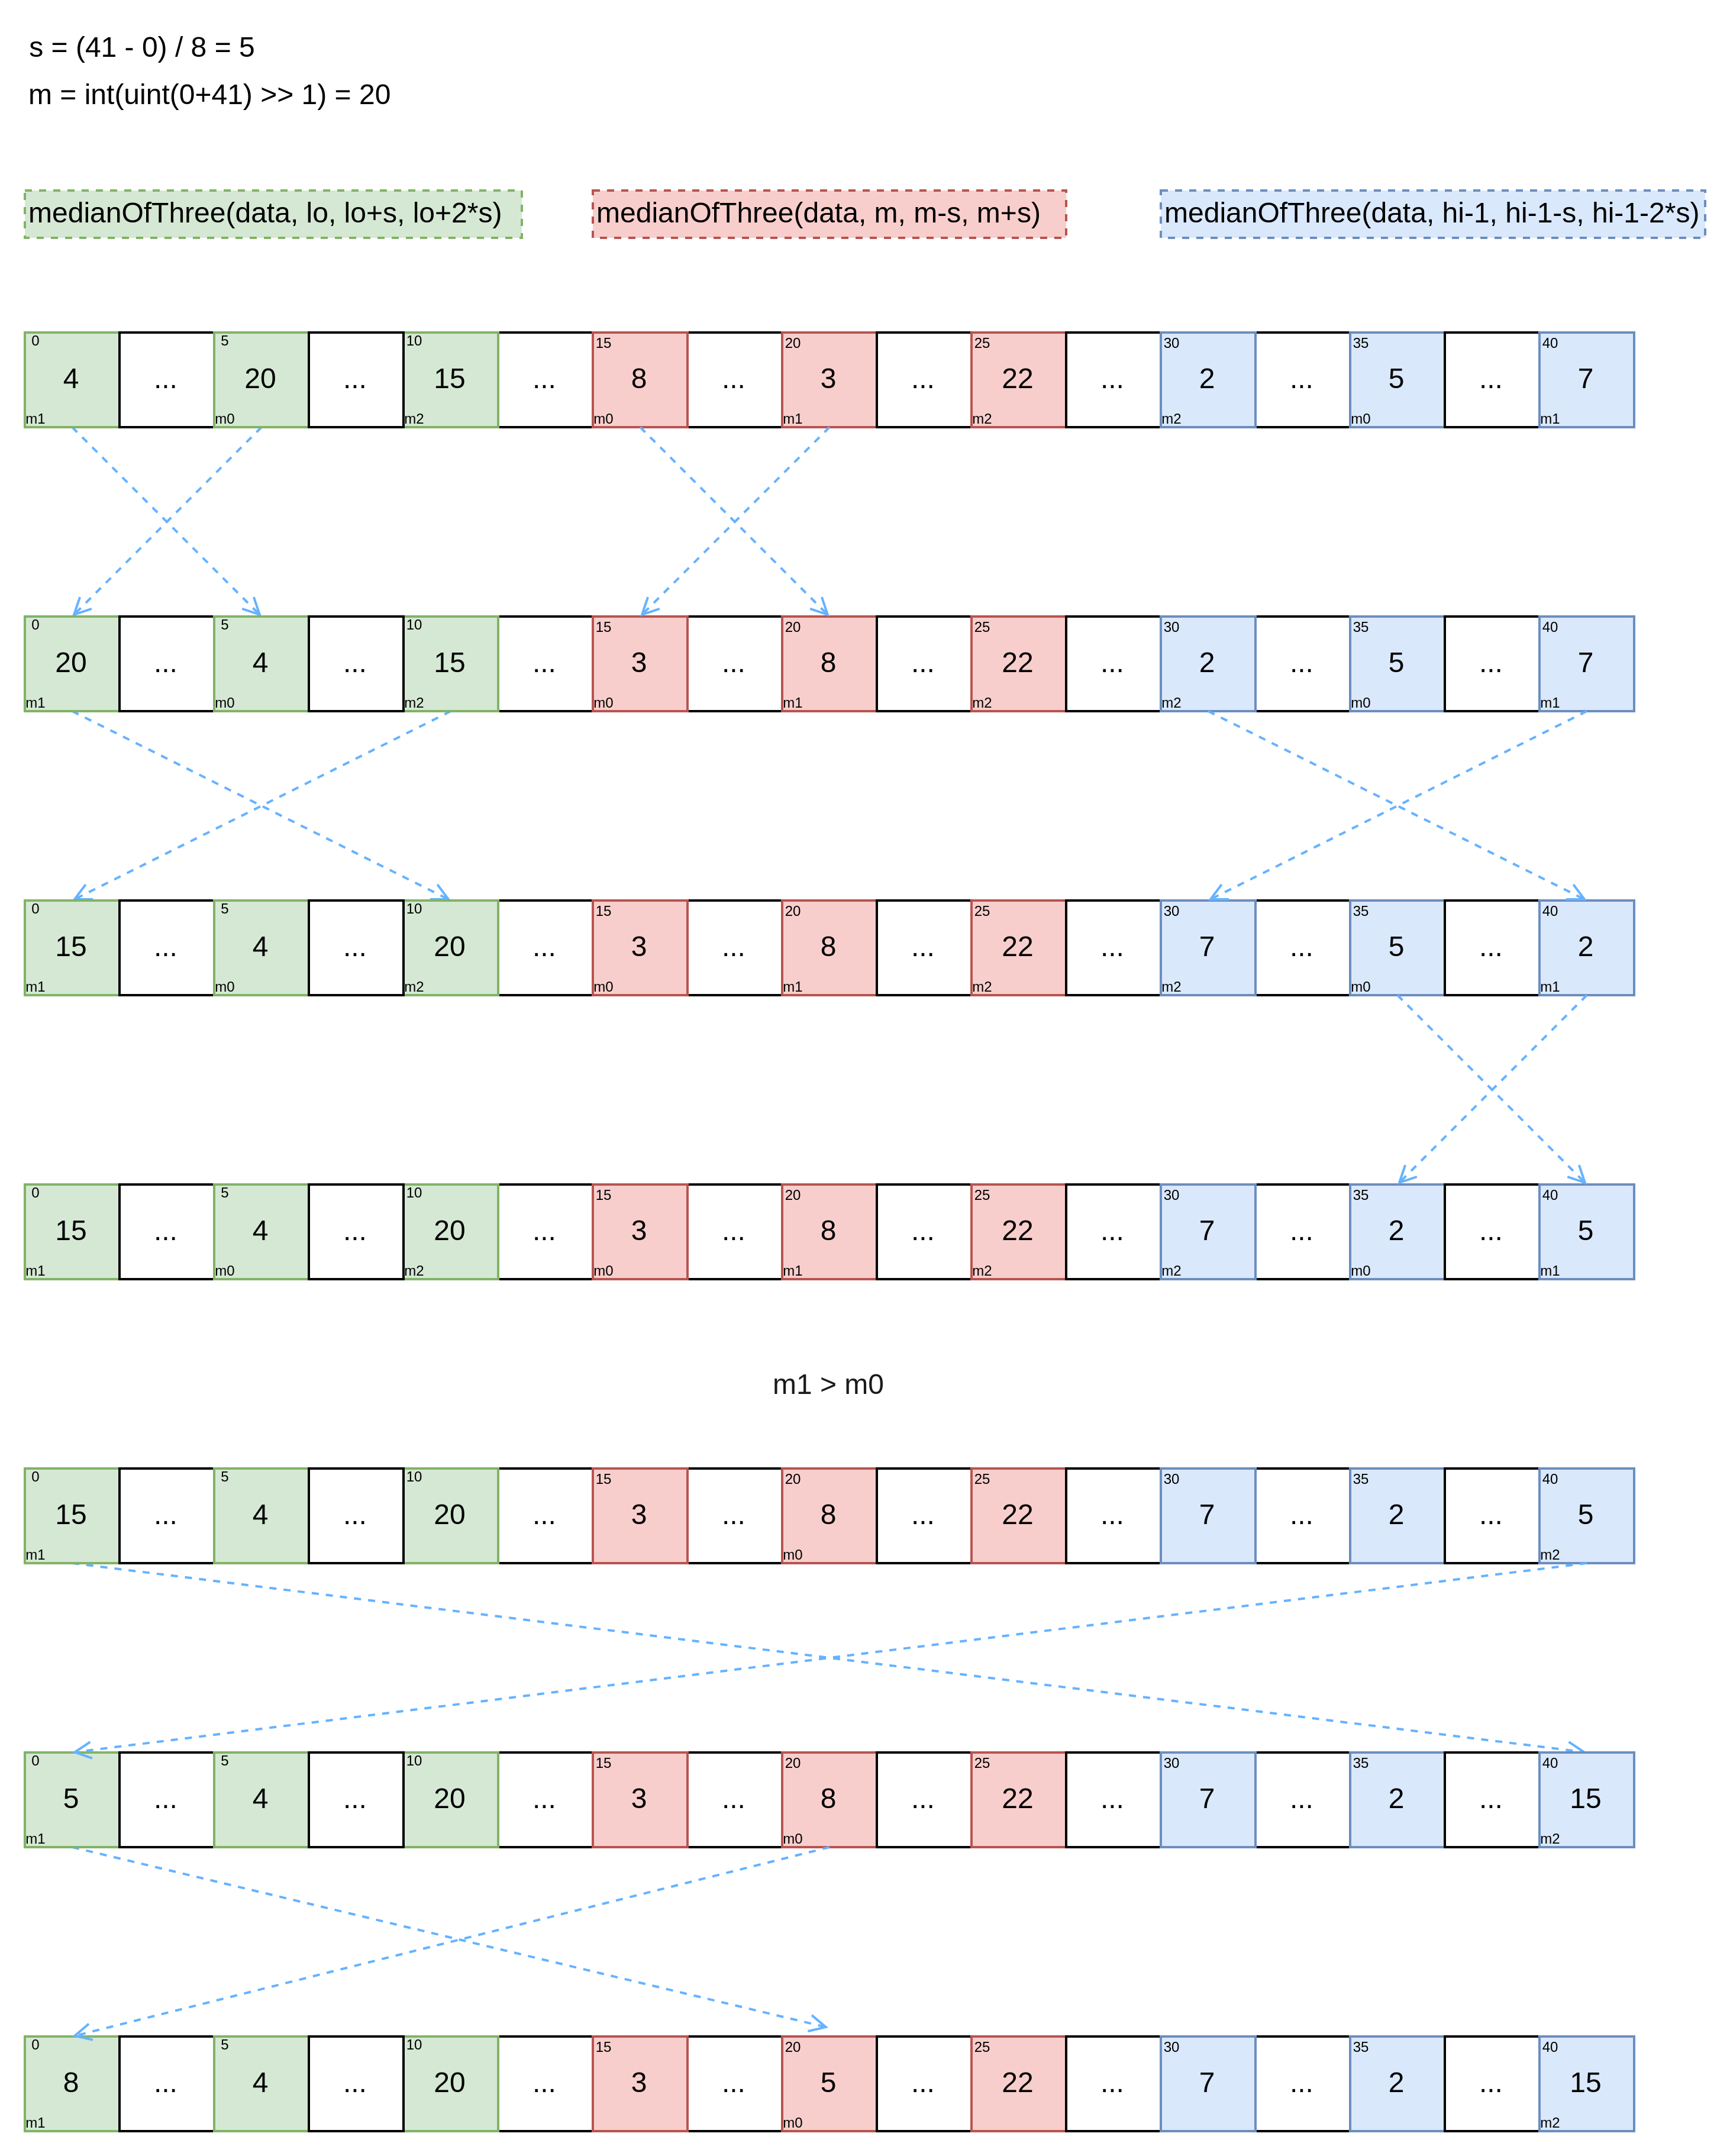
我们再看 doPivot 方法本身,L2 取排序区间的中间索引,使用 uint 类型转换来防止 lo + hi 溢出,这在 Go 是一种常用的手法, L3 如果元素数量大于40 则在 L6 ~ L8 执行三次 medianOfThree,否则只执行一次 medianOfThree,这么做依然是为了保 证后续找到的 pivot 更接近中位数,我们使元素数量为 41 看一下四次 medianOfThree 的情况,由于每次执行更改的位置互不冲突,我们合成一张图来看一下。

回到 doPivot 的 L19, lo 为最后一次 medianOfThree 选出的 pivot,L20 中由于 lo 为 pivot 所以 a 取 lo + 1,紧接着 L22 ~ L37 为分区逻辑,我们一行一行来看。
L22 ~ L23 因为小于 pivot 的值要放在左侧,所以 a 跳过所有小于 pivot 的元素从第一个大于等于 pivot 的元素下标开始,L24 使 b 等于 a ,在接下来的分区过程中使用。L26 ~ L27,找到第一个大于等于 pivot 的下标,L28 ~ L29 找到第一个小于等于 pivot 的值,因为在之前的 medianOfThree 中已经确保 pivot < hi - 1,所以这里从 c - 1 下标开始寻找,L30 ~ L32 中 b >= c 说明已经查找完毕,跳出循环,L34 交换之前找到的两个下标中的元素。
L40 ~ L82 为某种优化逻辑,从注释来看是某种保护措施,我们暂时忽略。L84 把 pivot 放到中间位置,然后在 L85 返回 b -1 与 c 两个下标,其中 b - 1 是我们 pivot 的位置,c 为 pivot 后一位。
func doPivot(data Interface, lo, hi int) (midlo, midhi int) {m := int(uint(lo+hi) >> 1) // Written like this to avoid integer overflow.if hi-lo > 40 {// Tukey's ``Ninther,'' median of three medians of three.s := (hi - lo) / 8medianOfThree(data, lo, lo+s, lo+2*s)medianOfThree(data, m, m-s, m+s)medianOfThree(data, hi-1, hi-1-s, hi-1-2*s)}medianOfThree(data, lo, m, hi-1)// Invariants are:// data[lo] = pivot (set up by ChoosePivot)// data[lo < i < a] < pivot// data[a <= i < b] <= pivot// data[b <= i < c] unexamined// data[c <= i < hi-1] > pivot// data[hi-1] >= pivotpivot := loa, c := lo+1, hi-1for ; a < c && data.Less(a, pivot); a++ {}b := afor {for ; b < c && !data.Less(pivot, b); b++ { // data[b] <= pivot}for ; b < c && data.Less(pivot, c-1); c-- { // data[c-1] > pivot}if b >= c {break}// data[b] > pivot; data[c-1] <= pivotdata.Swap(b, c-1)b++c--}// If hi-c<3 then there are duplicates (by property of median of nine).// Let's be a bit more conservative, and set border to 5.protect := hi-c < 5if !protect && hi-c < (hi-lo)/4 {// Lets test some points for equality to pivotdups := 0if !data.Less(pivot, hi-1) { // data[hi-1] = pivotdata.Swap(c, hi-1)c++dups++}if !data.Less(b-1, pivot) { // data[b-1] = pivotb--dups++}// m-lo = (hi-lo)/2 > 6// b-lo > (hi-lo)*3/4-1 > 8// ==> m < b ==> data[m] <= pivotif !data.Less(m, pivot) { // data[m] = pivotdata.Swap(m, b-1)b--dups++}// if at least 2 points are equal to pivot, assume skewed distributionprotect = dups > 1}if protect {// Protect against a lot of duplicates// Add invariant:// data[a <= i < b] unexamined// data[b <= i < c] = pivotfor {for ; a < b && !data.Less(b-1, pivot); b-- { // data[b] == pivot}for ; a < b && data.Less(a, pivot); a++ { // data[a] < pivot}if a >= b {break}// data[a] == pivot; data[b-1] < pivotdata.Swap(a, b-1)a++b--}}// Swap pivot into middledata.Swap(pivot, b-1)return b - 1, c}
现在我们回过头来再看 quickSort 的 L13 ~ L19, 这时便能理解 L10 中 mlo 与 mhi 的含义是为了比较 lo 到 median 和 median + 1 到 hi - 1 两个区间的长度,然后选择更小的区间进行下一次迭代,直到 maxDepth 为 0 之后执行 heapSort 或者某次传入的区间元素数量小于等于 12 之后进行 shellSort 和 insertSort。和图 1 的 quickSort 不同,L13 ~ L19 的逻辑是 if else,也就是说只会对较小区间进行迭代另一部分则不会进行分区迭代,接下来我们看 heapSort。
// ...func quickSort(data Interface, a, b, maxDepth int) {for b-a > 12 { // Use ShellSort for slices <= 12 elementsif maxDepth == 0 {heapSort(data, a, b)return}maxDepth--mlo, mhi := doPivot(data, a, b)// Avoiding recursion on the larger subproblem guarantees// a stack depth of at most lg(b-a).if mlo-a < b-mhi {quickSort(data, a, mlo, maxDepth)a = mhi // i.e., quickSort(data, mhi, b)} else {quickSort(data, mhi, b, maxDepth)b = mlo // i.e., quickSort(data, a, mlo)}}if b-a > 1 {// Do ShellSort pass with gap 6// It could be written in this simplified form cause b-a <= 12for i := a + 6; i < b; i++ {if data.Less(i, i-6) {data.Swap(i, i-6)}}insertionSort(data, a, b)}}//...
Heap
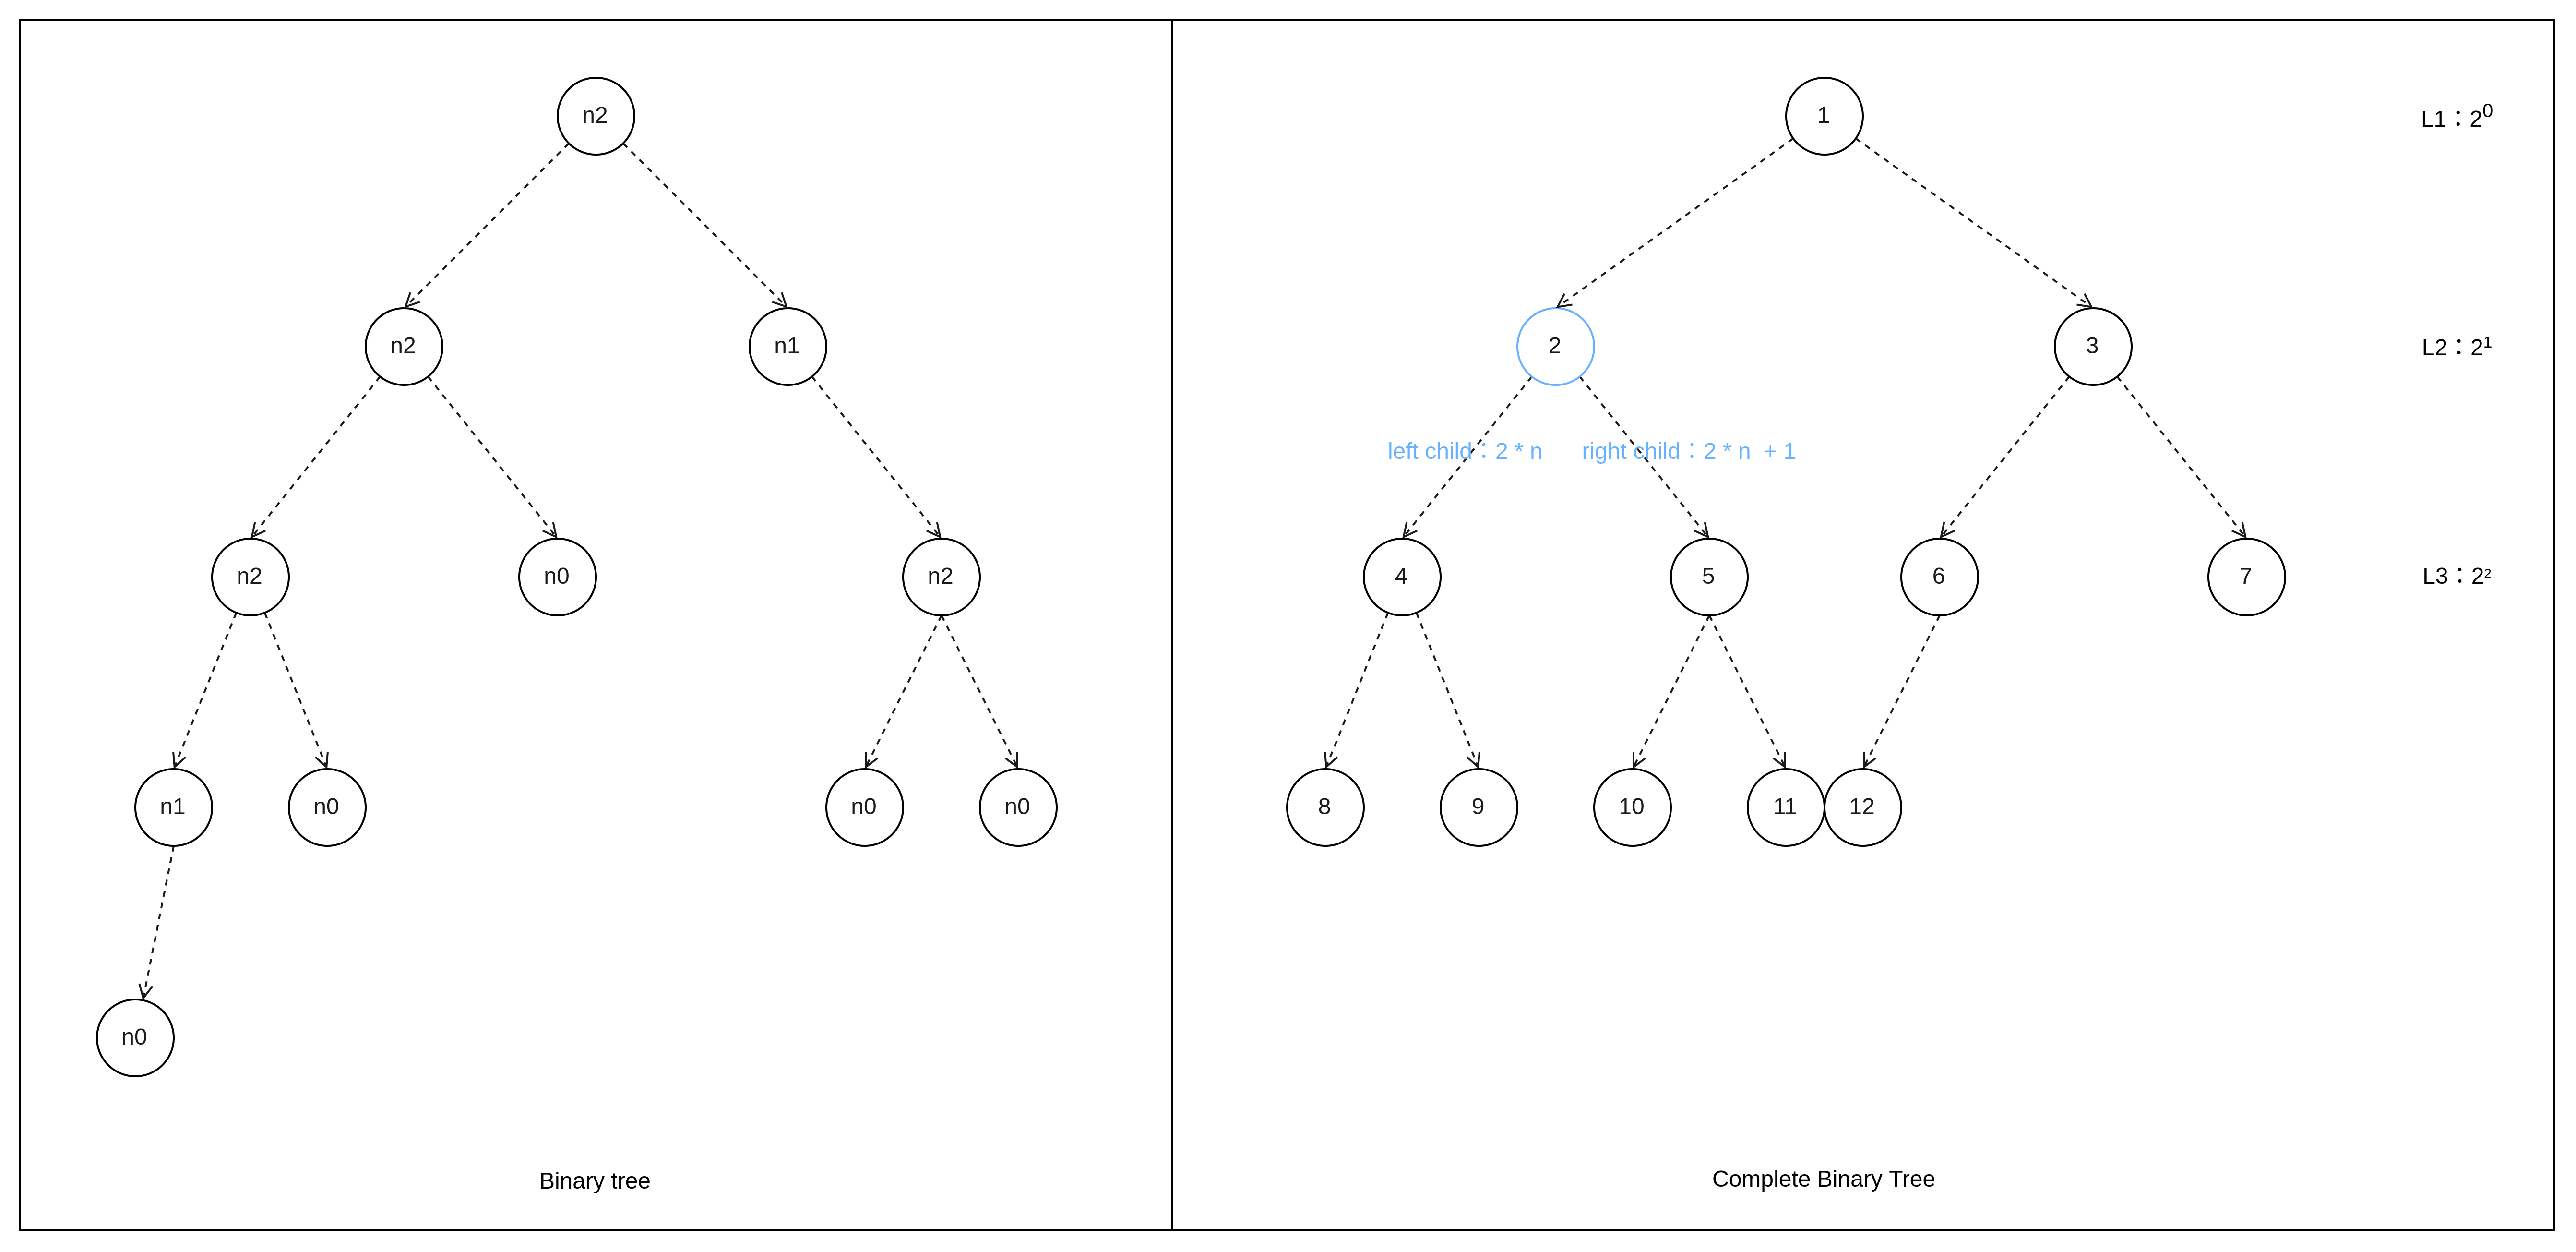
想要理解 heapSort 就必须先简单了解一下二叉树以及完全二叉树和二叉堆,我们先来看二叉树,图 4 左为 binary Tree 普通二叉树,是每个节点最多拥有两个子节点的节点树,并且节点有左右之分,不能随意颠倒顺序。
图 4 右为 complete binary tree(完全二叉树),也就是说如果一个二叉树除最后一层以外,其它层都是满的,并且最后一层要么是满的,要么节点只在右边顺序分布,那么它就是完全二叉树。 complete binary tree 根节点对应的编号为 1时,每个节点的左右子节点,分别为 n 2 和 n 2 + 1,并且父节点为 n / 2,并且每层节点数量最大为 2l - 1 个,整颗 complete binary tree 最少有 2l - 1 个节点,最大有 2l - 1 个节点。
而二叉堆则是一种满足 complete binary tree 或者近似 complete binary tree 的特殊的堆,如果它的每个节点都大于其子节点,那么叫做最大堆,反之叫做最小堆。
关于二叉树我们暂时先了解这么多,之后的其它文章会详细讲解堆和二叉树,现在我们先把注意力放在 heapSort 上。

以下为 heapSort 方法源码,L23 中 lo 初始值等于 0,所以我们可以猜测这里的二叉树模型的根节点编号从 0 开始,而 siftDown 函数中 L6 与 L10 也证实了这一点。
来到 L27,把 (hi - 1) / 2 中的 hi - 1 替换成 n 就是 complete binary tree 中查找父节点的方法(n / 2),所以 (hi - 1) / 2 代表的是最后一个节点的父节点下标,之后使用 siftDown 创建一个最大堆,然后在 L32 ~ L33 进行排序,排序的方法是把根节点与第 i 个节点交换位置,然后用 i 之前的所有节点重新构造一个最大堆,把最大值放在根节点,重复之前的动作,最后得到升序排序的数据。接下来我们看一下 siftDown 如何实现最大堆。
func heapSort(data Interface, a, b int) {first := alo := 0hi := b - a// Build heap with greatest element at top.for i := (hi - 1) / 2; i >= 0; i-- {siftDown(data, i, hi, first)}// Pop elements, largest first, into end of data.for i := hi - 1; i >= 0; i-- {data.Swap(first, first+i)siftDown(data, lo, i, first)}}
SiftDown 方法在比较节点大小之前会先判断 child 是否 大于 hi 来检测是否越界,之后如图 5 所示,在 L10 比较 child 与 child + 1,让 chile 等于较大的一方,并且在 L13 判断 root 节点是否大于较大的子节点,如果 root 节点大,则认为已经满足最大堆,直接 return,否则交换 root 节点与 child 节点的值。因为产生了交换操作,所以交换之后的 child 及后 child 节点可能不满足最大堆,所以让 root 等于 child 然后再次对剩余节点进行堆的构建。
// siftDown implements the heap property on data[lo:hi].// first is an offset into the array where the root of the heap lies.func siftDown(data Interface, lo, hi, first int) {root := lofor {child := 2*root + 1if child >= hi {break}if child+1 < hi && data.Less(first+child, first+child+1) {child++}if !data.Less(first+root, first+child) {return}data.Swap(first+root, first+child)root = child}}
以上就是 sort 包中的 “quickSort”方法的逻辑,不懂的朋友建议多画图去理解,许多复杂的结构其实只要把图画出来就能一目了然,同时也能加深印象,本周的内容就到这里,下周我们继续来看 sort 包中的稳定排序部分。

