客户端
代码地址
如果你拉了nacos的源码(本人是拿的2.0.3的版本)的话,客户端发起服务注册代码地址如下:
com.alibaba.nacos.client.naming.remote.http.NamingHttpClientProxy#registerService
注册代码剖析
@Overridepublic void registerService(String serviceName, String groupName, Instance instance) throws NacosException {NAMING_LOGGER.info("[REGISTER-SERVICE] {} registering service {} with instance: {}", namespaceId, serviceName,instance);String groupedServiceName = NamingUtils.getGroupedName(serviceName, groupName);if (instance.isEphemeral()) {BeatInfo beatInfo = beatReactor.buildBeatInfo(groupedServiceName, instance);beatReactor.addBeatInfo(groupedServiceName, beatInfo);}final Map<String, String> params = new HashMap<String, String>(32);params.put(CommonParams.NAMESPACE_ID, namespaceId);params.put(CommonParams.SERVICE_NAME, groupedServiceName);params.put(CommonParams.GROUP_NAME, groupName);params.put(CommonParams.CLUSTER_NAME, instance.getClusterName());params.put(IP_PARAM, instance.getIp());params.put(PORT_PARAM, String.valueOf(instance.getPort()));params.put(WEIGHT_PARAM, String.valueOf(instance.getWeight()));// 2.0.3的客户端代码里面这里写的不规范有点,因为上面是已经定义过了的params.put("enable", String.valueOf(instance.isEnabled()));params.put(HEALTHY_PARAM, String.valueOf(instance.isHealthy()));params.put(EPHEMERAL_PARAM, String.valueOf(instance.isEphemeral()));params.put(META_PARAM, JacksonUtils.toJson(instance.getMetadata()));reqApi(UtilAndComs.nacosUrlInstance, params, HttpMethod.POST);}
- groupedServiceName = groupName + Constants.SERVICE_INFO_SPLITER + serviceName
**instance.isEphemeral()**判断当前实例是临时实例还是持久实例,其默认值是private boolean ephemeral = true;即临时实例,如果是临时实例的话,就会添加其心跳信息public BeatInfo buildBeatInfo(String groupedServiceName, Instance instance) {BeatInfo beatInfo = new BeatInfo();beatInfo.setServiceName(groupedServiceName);beatInfo.setIp(instance.getIp());beatInfo.setPort(instance.getPort());beatInfo.setCluster(instance.getClusterName());beatInfo.setWeight(instance.getWeight());beatInfo.setMetadata(instance.getMetadata());beatInfo.setScheduled(false);beatInfo.setPeriod(instance.getInstanceHeartBeatInterval());return beatInfo;}
我们可以看到这里设置的该实例的心跳信息,
**period**就是比较关心的心跳间隔时间,其默认的时间是_**DEFAULT_HEART_BEAT_INTERVAL **_**= TimeUnit.**_**SECONDS**_**.toMillis**_**(**_**5**_**)**_,即默认5s为其心跳间隔时间,心跳信息是保存在客户端的BeatReactor里面,当然,心跳的代码就不在这里梳理了,后续会出心跳的代码分析- 再看看上面的代码片段,放入了实例的一些相关信息,如服务名,IP,端口,权重等,这些也是对于一个服务注册中心来说会比较重要的
- 请求地址
**UtilAndComs.**_**nacosUrlInstance**_为**/nacos/v1/ns/instance**,即向nacos的服务端发送一个POST请求
服务端
代码地址
com.alibaba.nacos.naming.controllers#register
服务端代码剖析
register
/*** Register new instance.* 服务注册--->client 端 post请求 nacos/v1/ns/instance* client : {@link com.alibaba.nacos.client.naming.remote.http.NamingHttpClientProxy#registerService}* @param request http request* @return 'ok' if success* @throws Exception any error during register*/@CanDistro@PostMapping@Secured(parser = NamingResourceParser.class, action = ActionTypes.WRITE)public String register(HttpServletRequest request) throws Exception {final String namespaceId = WebUtils.optional(request, CommonParams.NAMESPACE_ID, Constants.DEFAULT_NAMESPACE_ID);final String serviceName = WebUtils.required(request, CommonParams.SERVICE_NAME);NamingUtils.checkServiceNameFormat(serviceName);final Instance instance = HttpRequestInstanceBuilder.newBuilder().setDefaultInstanceEphemeral(switchDomain.isDefaultInstanceEphemeral()).setRequest(request).build();// InstanceOperatorClientImplgetInstanceOperator().registerInstance(namespaceId, serviceName, instance);return "ok";}
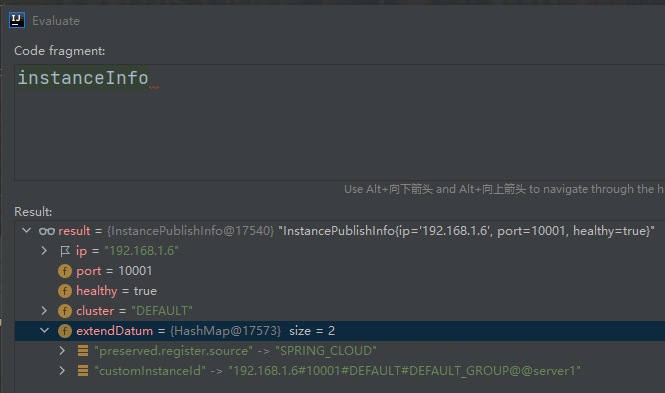
这里打印一下instance的toString,能更加直观的看看实例信息: Instance{instanceId=’192.168.1.10#10001#DEFAULT#DEFAULT_GROUP@@server1’,ip=’192.168.1.10’,port=10001,weight=1.0,healthy=true,enabled=true,ephemeral=true,clusterName=’DEFAULT’,serviceName=’DEFAULT_GROUP@@server1’,metadata={preserved.register.source=SPRING_CLOUD}}
懒得排版了,就这样看吧TAT
上面大部分代码都是格式化了一下服务相关的信息,主要的注册是走的InstanceOperatorClientImpl的registerInstance方法,跟踪源码后,服务注册的核心代码:
**EphemeralClientOperationServiceImpl#registerInstance**接下来贴一下代码:/*** This method creates {@code IpPortBasedClient} if it don't exist.*/@Overridepublic void registerInstance(String namespaceId, String serviceName, Instance instance) {boolean ephemeral = instance.isEphemeral();String clientId = IpPortBasedClient.getClientId(instance.toInetAddr(), ephemeral);createIpPortClientIfAbsent(clientId);Service service = getService(namespaceId, serviceName, ephemeral);clientOperationService.registerInstance(service, instance, clientId);}@Overridepublic void registerInstance(Service service, Instance instance, String clientId) {Service singleton = ServiceManager.getInstance().getSingleton(service);Client client = clientManager.getClient(clientId);if (!clientIsLegal(client, clientId)) {return;}InstancePublishInfo instanceInfo = getPublishInfo(instance);client.addServiceInstance(singleton, instanceInfo);client.setLastUpdatedTime();// 发布事件// 客户端注册事件NotifyCenter.publishEvent(new ClientOperationEvent.ClientRegisterServiceEvent(singleton, clientId));// 实例元数据事件NotifyCenter.publishEvent(new MetadataEvent.InstanceMetadataEvent(singleton, instanceInfo.getMetadataId(), false));}
上面的第一个
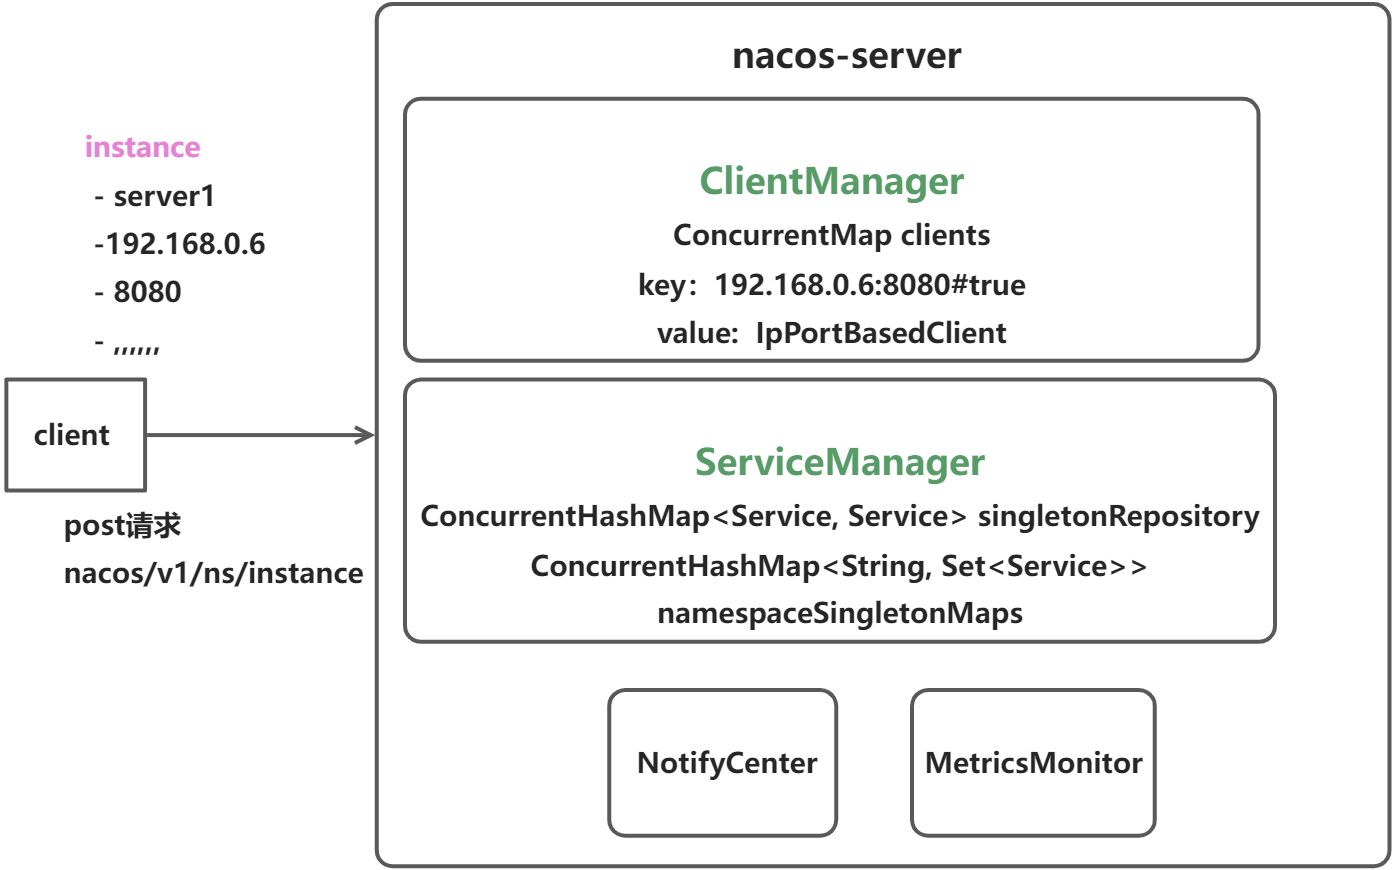
**registerInstance**方法,实际上是创建了一个client(如果这个client是第一次注册上来,则创建,如果不是则不做处理,如 192.168.0.6:8080#true,这里的true指短暂的客户端,第一次注册的话,则会生成一个新的client),**createIpPortClientIfAbsent(clientId)**,以及心跳相关信息,这个会在后续文章中详解,也就是在这里,向下文中的ClientManager的clients这个map中放入的客户端的信息等在这里,有几个可能会感兴趣的东西,ServiceManager,Client,InstancePublishInfo,NotifyCenter 所以,实列注册的时候实际做的事情都在这几个里面了
ServiceManager
public class ServiceManager {private static final ServiceManager INSTANCE = new ServiceManager();private final ConcurrentHashMap<Service, Service> singletonRepository;private final ConcurrentHashMap<String, Set<Service>> namespaceSingletonMaps;//...}
首先很明确的点就是,ServiceManager是单例的,这点在上面的
**getInstance()**表现的很明确- 两个ConcurrentHashMap,分别保存单例的服务,和命名空间下的服务集合

- 贴下debug的图片,客户端我写了两个服务,server1和server2,在singletonRepository中保存了这两个服务的信息,所以size为2,同时namespaceSingletonMaps保存了这两个服务,server1和server2,他们均在public的这个命名空间下,即public->(server1,server2),所以,说明了singletonRepository仅保存服务这个维度,namespaceSingletonMaps保存的是该命名空间下的所有的服务
- 注意
**Service{namespace='public', group='DEFAULT_GROUP', name='server1', ephemeral=true, revision=0}**这里的Service里面是的属性是没有端口,ip等属性的,意味着这里的Service是指服务(server.name指定的那个值),就算有几个server1,这里的Service都是泛指的server1
Client
意思就是客户端,接下来看看getClient做了啥 这里对Client的描述有点乱,后面的文章会对Client这块做详细的描述
- 可以看到 clientId是IP:端口+是否是短暂 的形式的字符串
- 当然这里提一嘴,本人debug过程中,虽然只启动了一个服务,但是会存在192.168.1.6:6xxxx的clientId进来,~~暂时我理解是客户端一些其他端口在做心跳等工作,先暂时这么理解~ ~~后来看的时候发现这个 好像是1.x的客户端有个线程在调用/list接口拿服务列表,这个时候也会被当做一个客户端
getClientManagerById(clientId)实际做的事情是,根据后缀,即判断当前服务是短暂还是持久的,来获取相应的ClientManager 客户端管理器,短暂的ClientManager所对应的就是EphemeralIpPortClientManager,如下:
@Component("ephemeralIpPortClientManager")public class EphemeralIpPortClientManager implements ClientManager {private final ConcurrentMap<String, IpPortBasedClient> clients = new ConcurrentHashMap<>();}
上面已经描述了client是在什么时候注册进clients这个map的,就不多做阐述了。这里定义了一个ConcurrentMap,key就是我们的服务的IP:端口+true,value保存的是客户端的IP,端口等信息,里面还有一些关于客户端心跳的一些任务,暂时就不往里面深挖了~ 不过可以扒一点这块的源码,感兴趣的话可以看看,不然就跳过到下一截 ```java @Component(“ephemeralIpPortClientManager”) public class EphemeralIpPortClientManager implements ClientManager {
private final ConcurrentMap@Override public boolean clientConnected(final Client client) {
clients.computeIfAbsent(client.getClientId(), s -> {Loggers.SRV_LOG.info("Client connection {} connect", client.getClientId());IpPortBasedClient ipPortBasedClient = (IpPortBasedClient) client;ipPortBasedClient.init();return ipPortBasedClient;});return true;
}
/**
- Init client.
*/
public void init() {
if (ephemeral) {
} else {beatCheckTask = new ClientBeatCheckTaskV2(this);HealthCheckReactor.scheduleCheck(beatCheckTask);
} } }healthCheckTaskV2 = new HealthCheckTaskV2(this);HealthCheckReactor.scheduleCheck(healthCheckTaskV2);
/**
- Schedule client beat check task with a delay. *
@param task client beat check task */ public class HealthCheckReactor { private static Map
public static void scheduleCheck(BeatCheckTask task) {
Runnable wrapperTask =task instanceof NacosHealthCheckTask ? new HealthCheckTaskInterceptWrapper((NacosHealthCheckTask) task): task;futureMap.computeIfAbsent(task.taskKey(),k -> GlobalExecutor.scheduleNamingHealth(wrapperTask, 5000, 5000, TimeUnit.MILLISECONDS));
} }
/**
- Instance beat checker for expired instance.
*/
public class ExpiredInstanceChecker implements InstanceBeatChecker {
@Override
public void doCheck(Client client, Service service, HealthCheckInstancePublishInfo instance) {
} } ```boolean expireInstance = ApplicationUtils.getBean(GlobalConfig.class).isExpireInstance();if (expireInstance && isExpireInstance(service, instance)) {deleteIp(client, service, instance);}
**clientConnected**这个方法是向**clients**这个存储客户端的map中添加client的,同时我们能够看到初始化client的同时,执行了其内部的**init()**方法,当客户端是短暂的时候,向**HealthCheckReactor.scheduleCheck(beatCheckTask)**传入了一个**ClientBeatCheckTaskV2**,我的理解是向健康检查的反应堆传入了一个客户端心跳检查的任务,跟踪源码后,可以看到**ExpiredInstanceChecker**就是实际的节拍检测的落地,isExpireInstance的实际值等于**System.**_**currentTimeMillis() **_**- instance.getLastHeartBeatTime**_**() **_**> deleteTimeout**即当前时间减去实例的最后一次心跳时间是否大于超时时间,当然,关于心跳的这部分源码,后续有机会会单独邻出来扒拉
InstancePublishInfo
贴下获取InstancePublishInfo的代码,瞅两眼就差不多了
/*** get publish info.*/default InstancePublishInfo getPublishInfo(Instance instance) {InstancePublishInfo result = new InstancePublishInfo(instance.getIp(), instance.getPort());if (null != instance.getMetadata() && !instance.getMetadata().isEmpty()) {result.getExtendDatum().putAll(instance.getMetadata());}if (StringUtils.isNotEmpty(instance.getInstanceId())) {result.getExtendDatum().put(Constants.CUSTOM_INSTANCE_ID, instance.getInstanceId());}if (Constants.DEFAULT_INSTANCE_WEIGHT != instance.getWeight()) {result.getExtendDatum().put(Constants.PUBLISH_INSTANCE_WEIGHT, instance.getWeight());}if (!instance.isEnabled()) {result.getExtendDatum().put(Constants.PUBLISH_INSTANCE_ENABLE, instance.isEnabled());}String clusterName = StringUtils.isBlank(instance.getClusterName()) ? UtilsAndCommons.DEFAULT_CLUSTER_NAME: instance.getClusterName();result.setHealthy(instance.isHealthy());result.setCluster(clusterName);return result;}
- 其实里面没啥,
_**Instance POJO of client published for Nacos v2.**_,准确的说,这个保存了实例的信息,对于2.0+的版本而言 - 拿到InstancePublishInfo信息后,client会根据这些信息做些处理,代码如下
```java
// 这里贴下上面的代码,即获取到InstancePublishInfo的地方
public void registerInstance(Service service, Instance instance, String clientId) {
}//...InstancePublishInfo instanceInfo = getPublishInfo(instance);client.addServiceInstance(singleton, instanceInfo);//...
public abstract class AbstractClient implements Client { @Override public boolean addServiceInstance(Service service, InstancePublishInfo instancePublishInfo) { if (null == publishers.put(service, instancePublishInfo)) { MetricsMonitor.incrementInstanceCount(); } NotifyCenter.publishEvent(new ClientEvent.ClientChangedEvent(this)); Loggers.SRV_LOG.info(“Client change for service {}, {}”, service, getClientId()); return true; } }
- `**MetricsMonitor.incrementInstanceCount()**`,MetricsMonitor,源码文档给出的解释是_**指标监视器**,它是一个单例的,全局的,里面有很多_**AtomicInteger,AtomicLong定义的变量,其中就有**`**private final AtomicInteger ipCount = new AtomicInteger**_**()**_**;**`说明此时会告诉_**指标监视器**_**,客户端的ip数+1了!**- 同时,发布了一个`**ClientEvent.ClientChangedEvent**`即客户端变化事件这就是拿到**InstancePublishInfo**后做的相关操作<br /><a name="zSNiL"></a>#### NotifyCenter```javaNotifyCenter.publishEvent(new ClientOperationEvent.ClientRegisterServiceEvent(singleton, clientId));NotifyCenter.publishEvent(new MetadataEvent.InstanceMetadataEvent(singleton, instanceInfo.getMetadataId(), false));
- 通过事件发布中心,发布了两个事件,
**ClientRegisterServiceEvent**以及**InstanceMetadataEvent**,关于NotifyCenter的具体细节可以参考之前的文章,这里不过多阐述了,如果你看了上章节的事件通知,那么就能够串起来这个过程了,这里不做太多的阐述,简单的来说:这里通过一个单例NotifyCenter,向这个事件所对应的发布者添加消息,接着该发布者(线程)会不断的将消息广播给订阅了这个事件的订阅者们,由此,就能够让其订阅者去处理这个事件所需要做的相关操作。
流程总结~
至此,客户端注册的流程已经完结,接下来再从宏观的角度过一下流程
- 客户端通过post请求,请求服务端的nacos,地址是
**nacos/v1/ns/instance**,包装了当前服务的一些实例信息,如IP,端口,服务名等 - Nacos服务端通过ClientManager保存客户端维度的信息,ServiceManager保存服务维度的信息,这里的客户端维度,你可以理解为是微服务集群中的一个服务,如订单微服务中的其中一个服务(可以理解成机器,或者pod),而服务维度呢,就是泛指你的这一组微服务,如订单服务,这么一说,即可联想到,服务对于客户端而言,是1对多的关系,每个客户端也会维持其心跳相关的信息,这个会在后续心跳相关源码梳理
- NotifyCenter和MetricsMonitor均为单例,MetricsMonitor是Nacos的性能指标监控器,保存nacos的全局监控信息,NotifyCenter是事件通知,会将事件通过发布者通知其订阅者,交给他们处理

若有收获,就点个赞吧
0 人点赞
