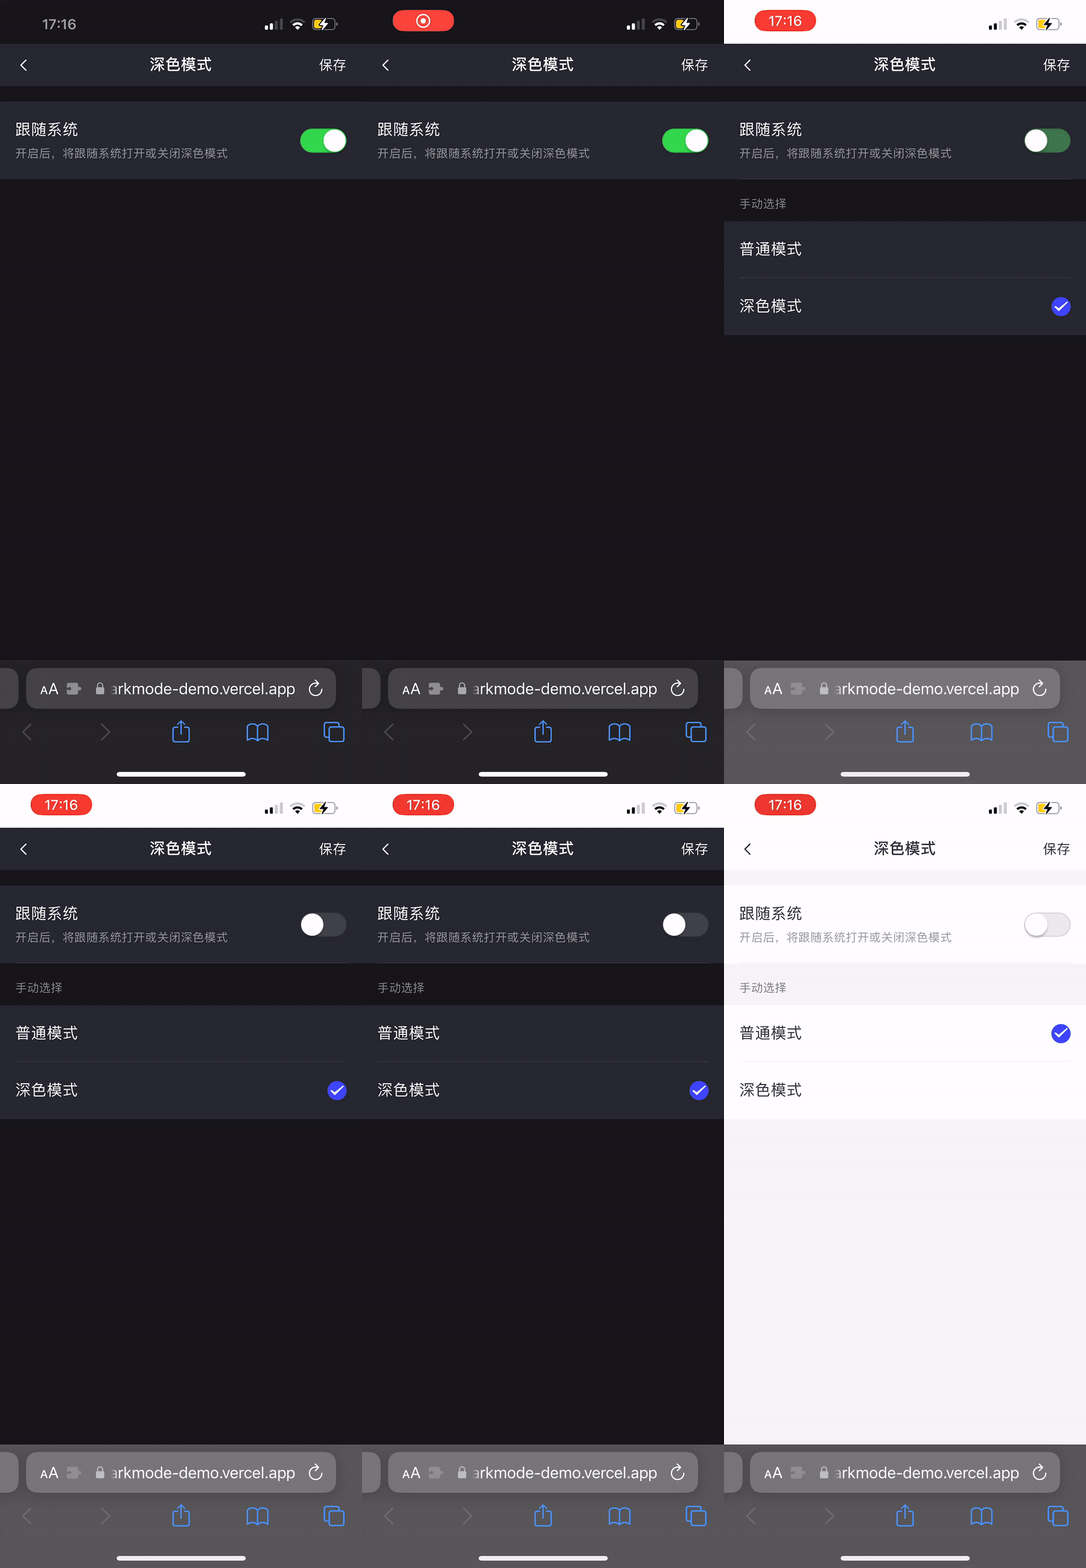
目前随着暗黑模式在各个系统的支持和推广下已经非常常见,浏览器相对应 API 也有较普遍的兼容性,并且通过 CSS Variables 现在可以方便的实现暗黑模式/白天模式样式切换,样式代码也利于维护不需要编写多份样式只需定义不同主题下的样式变量。
目前常见的实现暗黑模式的通用方案大概有以下几种,参考 CSS Tricks 文章
- Using a Body Class (样式中每个 class 都写单独的样式,切换 class)
- Using Separate Stylesheets (为每个主题维护不同样式文件)
Using Custom Properties(使用 CSS Variables,通过给 html 标签切换 data 属性,本文所采用的方案)
项目演示

演示地址 - 移动站点建议在手机模式下预览
技术
React - 本文的框架选择,
Vue也可以采用类似的方案,组件库选择和组件编写方式可能存在区别- Vite - 项目初始化及开发部署
- React Vant - 组件库选择,其他组件库样式切换方案可能有区别需参考组件库文档
- Less - 样式编写和维护
初始化项目
使用Vite初始化和开发部署项目,之前曾写过一篇Vite和React项目搭建的文章可做参考,项目搭建也非本文重点,所以这里不再详细描述项目搭建环节。该项目为手机端项目,预览调试需在手机模式。
具体配置可以参考项目源码该 Commit# 创建项目npm create vite@latest react-darkmode-demo -- --template react-ts# 创建文件目录结构cd src && mkdir -p assets assets/icons assets/images components constants pages pages/home styles utils# 引入相关依赖npm i react-vantnpm i -D less postcss-px-to-viewportcd styles && touch css-variable.less global.less index.less react-vant.less variables.less common.less# 工程化相关配置 (具体配置见 https://juejin.cn/post/7121685782980952101#heading-13)npm i -D eslint eslint-config-react-app eslint-config-prettier prettier lint-staged rollup-plugin-visualizer @types/node@16 cross-envnpx husky-init && npm installtouch .eslintrc .eslintignore .prettierrc .prettierignore
核心逻辑
样式文件中定义好一些默认主题颜色的样式变量, 然后再定义通过Javascript切换为暗黑模式时的主题颜色的样式变量。实际使用时只需在对应样式使用该样式变量即可,不需要写重复样式。 ```less :root { —text-color: #222; —bkg-color: #fff; —anchor-color: #0033cc; }
:root[data-theme=dark] { —text-color: #eee; —bkg-color: #121212; —anchor-color: #809fff; }
body { color: var(—text-color); background: var(—bkg-color); } a { color: var(—anchor-color); }
```html<button id="theme-button">切换主题</button>
以下是通过 Javascript 给 html 标签加上 data-theme 属性来切换不同主题的示例代码。
const btn = document.getElementById('theme-button')const theme = localStorage.getItem('theme')btn.addEventListener('click', () => {html.setAttribute('data-theme', theme === 'light' ? 'dark' : 'light');})
也可通过媒体查询来定义不同主题样式,这样主题可以跟随系统选择自动切换而非手动切换主题可以更加灵活。
@media (prefers-color-scheme: dark) {/* Dark theme styles go here */}@media (prefers-color-scheme: light) {/* Light theme styles go here */}
const prefersDarkScheme = window.matchMedia("(prefers-color-scheme: dark)");
编写样式
这是所有样式变量的总入口,将一些样式变量定义在 :root 选择器下,暗黑模式该样式变量显示不同颜色时直接在 :root[data-theme='dark'] 选择器下覆盖该样式变量,这样可以统一方便管理维护,也避免了额外的样式编写和查找工作。
具体的颜色和属性值需要实际开发时参考自己项目和 UI 设计开发,这里给出一个示例项目的参考。css-variables.less
:root {--app-color-white: #fff;// 颜色规范--app-primary-color: #3f7fff;--app-primary-end-color: #2d38f6;--app-text-color: #31353c;--app-text-second-color: #7e7c82;--app-text-sub-color: #8a8a99;--app-text-sub-second-color: #bebecc;--app-text-link-color: var(--app-primary-color);--app-text-link-second-color: #6b6b6b;--app-divider-color: #eaeaea;--app-background-color: #f5f5f5;--app-page-background-color: var(--app-color-white);--app-navbar-background-color: #ffffff;--app-navbar-text-color: var(--app-text-color);--app-tabbar-background-color: var(--app-color-white);--app-tabbar-text-color: #a8a8a8;--app-tabbar-text-active-color: var(--app-primary-color);--app-tabbar-text-active-gradient-color: linear-gradient(90deg,#3f7fff 0%,#2c36f5 100%);--app-success-color: #32d74b;--app-danger-color: @danger;// Tab--app-tab-height: 31px;--app-tab-background-color: var(--app-navbar-background-color);--app-tab-text-color: #62626b;--app-tab-text-active-color: var(--app-text-color);// Popup--app-popup-background: var(--app-navbar-background-color);// Button--app-button-sm-height: 24px;--app-button-sm-border-radius: @border-radius-md;// Tag--app-tag-background-color: #eaeaea;--app-tag-text-color: var(--app-text-second-color);// Switch--app-switch-active-color: var(--app-success-color);--app-switch-inactive-color: rgba(120, 120, 128, 0.16);}:root[data-theme='dark'] {// 颜色规范--app-primary-color: #3f7fff;--app-primary-end-color: #2d38f6;--app-text-color: #ffffff;--app-text-second-color: #86878b;--app-text-sub-color: #76727d;--app-text-sub-second-color: #bebecc;--app-text-link-color: var(--app-primary-color);--app-text-link-second-color: var(--app-text-second-color);--app-divider-color: #404141;--app-background-color: #151619;--app-page-background-color: #25272f;--app-navbar-background-color: #25272f;--app-navbar-text-color: var(--app-text-color);--app-tabbar-background-color: #23242e;--app-tabbar-text-color: #62626b;// Tab--app-tab-text-color: #979797;// Tag--app-tag-background-color: #373c4a;// Switch--app-switch-inactive-color: rgba(120, 120, 128, 0.32);}
另外,由于我们使用 Less 来辅助编写样式,所以我们可以将以上 css-variables.less 文件中定义的 CSS Variables 定义为 Less 中的变量,后续直接使用 Less 变量可以减少代码量,当然这一步是可选的。variables.less
@primary-color: var(--app-primary-color);@text-color: var(--app-text-color);@text-second-color: var(--app-text-second-color);@navbar-background-color: var(--app-navbar-background-color);@page-background-color: var(--app-page-background-color);// Color Palette@black: #000;@white: #fff;@danger: #ea4d44;@link-color: var(--app-text-link-color);@link-second-color: var(--app-text-link-second-color);
由于我们使用的组件库是React Vant,其中一些组件样式和 UI 设计会有一些差异,所以需要对组件库样式进行覆盖,好在 React Vant 提供多种主题定制方法,这里结合我们使用 CSS Variables 并且 React Vant 也支持该方式,所以可以直接用 CSS Variables 的方式修改,非常的方便便捷。其他组件库的样式覆盖需要参考其文档。react-vant.less
@import './variables.less';:root:root {// NavBar--rv-nav-bar-height: 44px;--rv-nav-bar-background-color: var(--app-navbar-background-color);--rv-nav-bar-title-text-color: var(--app-navbar-text-color);--rv-nav-bar-icon-color: var(--app-navbar-text-color);--rv-nav-bar-text-color: @text-color;// TabBar--rv-tabbar-background-color: var(--app-tabbar-background-color);--rv-tabbar-item-text-color: var(--app-tabbar-text-color);--rv-tabbar-item-active-color: var(--app-tabbar-text-active-color);--rv-tabbar-item-active-background-color: var(--app-tabbar-text-active-gradient-color);// Button--rv-button-plain-background-color: transparent;--rv-button-border-radius: @border-radius-lg;--rv-button-mini-padding: 0 @padding-xs;// Search--rv-search-background-color: transparent;--rv-search-content-background-color: @navbar-background-color;--rv-search-label-color: @text-color;--rv-search-left-icon-color: @text-color;--rv-search-action-text-color: @text-color;--rv-search-padding: 0;--rv-search-input-height: 39px;--rv-field-input-text-color: @text-color;// Cell--rv-cell-group-inset-padding: 0;--rv-cell-text-color: @text-color;--rv-cell-background-color: @navbar-background-color;--rv-cell-group-background-color: @navbar-background-color;--rv-cell-border-color: @border-color;}:root:root[data-theme='dark'] {// Cell--rv-cell-active-color: var(--app-tabbar-text-color);}
index.less 最后在该文件中引入以上文件,在 main.tsx 引入 index.less 使样式生效
@import './css-variables.less'; // 全局 css 变量@import './react-vant.less'; // 覆盖 react-vant 样式
React 组件
定义工具类及通用方法
utils.ts 在该文件中先定义主题常量和一些可复用的方法,在后续组件编写中会使用到
这里定义主题常量,用来区分白天/暗黑主题
enum Theme {LIGHT = 'light',DARK = 'dark',}const themes: Array<Theme> = Object.values(Theme);
通过 window.matchMedia 媒体查询可以获得系统设置的主题,如果需要根据用户系统设置时自动切换主题就需要使用到该媒体查询
const prefersDarkMQ = '(prefers-color-scheme: dark)';const getPreferredTheme = () =>window.matchMedia(prefersDarkMQ).matches ? Theme.DARK : Theme.LIGHT;
切换主题时需要更新 html 标签的 data-theme 属性,该操作也会在多个地方使用,所以我们也定义一个函数方便复用。最后将这些导出即可。
const updateHtmlTag = (str: string) => {const html = document.querySelector('html');html?.setAttribute('data-theme', str);};export { Theme, themes, updateHtmlTag, getPreferredTheme, prefersDarkMQ };
实现 React 组件 ThemeProvider
接着我们编写 React 组件的核心逻辑 ThemeProvider.tsx。主要实现方式是通过 React Context 这一特性,使用该特性可以在任意子组件中取出当前主题和修改主题,极大的增加了组件的通用性。
首先先倒入必要的方法,这里我们将用户保存的设置保存在 localStorage 中以便刷新后还能获取到用户设置的主题,所以额外引入 react-use 的 useLocalStorage hook
import {LOCAL_STORAGE_KEY_THEME,LOCAL_STORAGE_KEY_THEME_SYSTEM,} from '@/constants/config';import { noop } from '@/utils';import { createContext, useContext, useEffect, useState } from 'react';import { useLocalStorage } from 'react-use';import {getPreferredTheme,prefersDarkMQ,Theme,themes,updateHtmlTag,} from './utils';
创建一个新的 Context, 并通过 useContext 这一 hook 封装 useTheme hook
type ThemeContextType = {theme: Theme;setTheme: React.Dispatch<React.SetStateAction<Theme>>;isPreferSystemTheme: boolean | undefined; // 主题是否跟随系统setIsPreferSystemTheme: React.Dispatch<React.SetStateAction<boolean | undefined>>; // 设置主题是否跟随系统};// 创建 Context 并定义默认值const ThemeContext = createContext<ThemeContextType>({theme: getPreferredTheme(),setTheme: noop,isPreferSystemTheme: true,setIsPreferSystemTheme: noop,});ThemeContext.displayName = 'ThemeContext';const useTheme = () => {return useContext(ThemeContext);};
function ThemeProvider({children,specifiedTheme,}: {children: React.ReactNode;specifiedTheme?: Theme | null;}) {/*** 主题是否跟随系统,默认 true*/const [isPreferSystemTheme, setIsPreferSystemTheme] = useLocalStorage(LOCAL_STORAGE_KEY_THEME_SYSTEM,true);const [theme, setTheme] = useState<Theme>(() => {if (specifiedTheme) {if (themes.includes(specifiedTheme)) return specifiedTheme;}if (isPreferSystemTheme) {return getPreferredTheme();}const localTheme = window.localStorage.getItem(LOCAL_STORAGE_KEY_THEME) as Theme | null;if (localTheme) {return localTheme;}return getPreferredTheme();});useEffect(() => {if (!theme) {return;}window.localStorage.setItem(LOCAL_STORAGE_KEY_THEME, theme);updateHtmlTag(theme);}, [theme]);useEffect(() => {const mediaQuery = window.matchMedia(prefersDarkMQ);const handleChange = () => {// 如果主题跟随系统,监听系统变化if (isPreferSystemTheme) {const preferredTheme = mediaQuery.matches ? Theme.DARK : Theme.LIGHT;setTheme(preferredTheme);updateHtmlTag(preferredTheme);}};mediaQuery.addEventListener('change', handleChange);return () => mediaQuery.removeEventListener('change', handleChange);}, [isPreferSystemTheme]);return (<ThemeContext.Providervalue={{ theme, setTheme, isPreferSystemTheme, setIsPreferSystemTheme }}>{children}</ThemeContext.Provider>);}export { useTheme, ThemeProvider };
将 ThemeProvider 组件引入 main.tsx 使其生效
import React from 'react';import ReactDOM from 'react-dom/client';import { ThemeProvider } from './components/ThemeProvider';import App from './App';import './styles/index.less';ReactDOM.createRoot(document.getElementById('root') as HTMLElement).render(<React.StrictMode><ThemeProvider><App /></ThemeProvider></React.StrictMode>);
实现切换主题组件
由于以上组件的封装,只需要使用以上 hook 和通用方法,后续我们可以快速的实现不同的主题切换组件。以下就是一个开关切换主题的示例代码,也有更复杂的示例可以查看项目源码或者读者尝试根据项目实际需求实现
import { Cell, Switch } from 'react-vant';import { Theme, useTheme } from '@/components/ThemeProvider';function Page() {const { theme, setTheme, setIsPreferSystemTheme } = useTheme();const handleChangeTheme = () => {setIsPreferSystemTheme(false);setTheme((previousTheme: Theme) =>previousTheme === Theme.DARK ? Theme.LIGHT : Theme.DARK);};return (<Cell.Group card><Celltitle="深色模式"rightIcon={<Switchsize={24}activeColor="var(--app-switch-active-color)"inactiveColor="var(--app-switch-inactive-color)"checked={theme === Theme.DARK}onChange={handleChangeTheme}/>}/></Cell.Group>);}
备注:这个项目实现过程和部分代码参考了以下开源项目源码和实现方案:

