- 背景
- 目标
- LDAP
- https://www.openldap.org/doc/admin26/slapdconf2.html">https://www.openldap.org/doc/admin26/slapdconf2.html
- https://www.openldap.org/doc/admin26/quickstart.html">https://www.openldap.org/doc/admin26/quickstart.html
- See slapd-config(5) for details on configuration options.
- This file should NOT be world readable.
- Define global ACLs to disable default read access.
- Do not enable referrals until AFTER you have a working directory
- service AND an understanding of referrals.
- olcReferral: ldap://root.openldap.org
- Sample security restrictions
- Require integrity protection (prevent hijacking)
- Require 112-bit (3DES or better) encryption for updates
- Require 64-bit encryption for simple bind
- olcSecurity: ssf=1 update_ssf=112 simple_bind=64
- Load dynamic backend modules:
- olcModuleload: back_ldap.la
- olcModuleload: back_passwd.la
- Frontend settings
- Sample global access control policy:
- Root DSE: allow anyone to read it
- Subschema (sub)entry DSE: allow anyone to read it
- Other DSEs:
- Allow self write access
- Allow authenticated users read access
- Allow anonymous users to authenticate
- olcAccess: to dn.base=”” by * read
- olcAccess: to dn.base=”cn=Subschema” by * read
- olcAccess: to *
- by self write
- by users read
- by anonymous auth
- if no access controls are present, the default policy
- allows anyone and everyone to read anything but restricts
- updates to rootdn. (e.g., “access to by read”)
- rootdn can always read and write EVERYTHING!
- LMDB database definitions
- Cleartext passwords, especially for the rootdn, should
- be avoided. See slappasswd(8) and slapd-config(5) for details.
- Use of strong authentication encouraged.
- The database directory MUST exist prior to running slapd AND
- should only be accessible by the slapd and slap tools.
- Mode 700 recommended.
- Indices to maintain
- secret = testing123
- }
- }
- then that EAP type takes precedence over the
- default type configured here.
- A list is maintained to correlate EAP-Response
- packets with EAP-Request packets. After a
- - ldaps:// (LDAP over SSL)
- - ldapi:// (LDAP over Unix socket)
- - ldapc:// (Connectionless LDAP)
- server = ‘ldap.rrdns.example.org’
- server = ‘ldap.rrdns.example.org’
- Unless overridden in another section, the dn from which all
- searches will start from.
- You can run the ‘ldapsearch’ command line tool using the
- attribute ref.
- control:NT-Password := ‘ntPassword’
- reply:Reply-Message := ‘radiusReplyMessage’
- reply:Tunnel-Type := ‘radiusTunnelType’
- Where to start searching in the tree for users
- Filter for user objects, should be specific enough
- to identify a single user object.
- The StartTLS operation is supposed to be
- used with normal ldap connections instead of
- using ldaps (port 636) connections
- ca_file = ${certdir}/cacert.pem
- As of version 3.0, the ‘pool’ section has replaced the
- ca_cert=”/etc/raddb/certs/ca.der”
- member. This can allow for some finer-grained access
- controls.
- Core dumps are a bad thing. This should only be set to
- ‘yes’ if you’re debugging a problem with the server.
背景
实验室搭建的很多系统都提供自己的用户管理功能,比如openstack、zabbix、openvas、jumpserver,但使用这些系统的又是同一批同学,导致账户密码重复的存在于每个系统。同时又有一些系统依赖其他用户管理系统而运行,如radius。
LDAP是一种目录数据库,每条目(entry)以树状组织在数据库中,适合用于描述现实世界众多树状的组织人员架构,一般使用开源的openldap。
LAM是图形化登录管理使用LDAP的CMS系统,有免费版和pro版。
RADIUS是一种用于进行认证授权审计(3A)的协议,向北提供各类认证框架协议的服务,向南从数据库查询用户名、密码或哈希等,经过对比后,给北向返回认证成功或失败的结果,而北向的RADIUS客户端是其他服务的服务端,拿到认证结果后,根据结果对用户的请求做出不同的反应,如无线AP的是否允许设备连入。
目标
快速拉起一套LDAP+LAM+RADIUS,能够:
- LDAP提供manager用户用于管理员对人员增删改查
- LDAP设置ACL策略使除manager外的用户仅能查看自己的信息、修改自己的密码
- LDAP提供readonly用户用于一些不支持radius认证的系统,如jumpserver仅从ldap导出用户数据
- LAM提供WEB界面供普通用户与管理员图形化管理
- RADIUS支持PEAP-MSCHAPV2模式的企业无线认证(LDAP中需要存储用户密码的微软NT哈希)
LDAP
LDAP的部署教程多之又多,大部分停留在编写slapd.conf配置文件从而初始化生成树形数据结构的方式,然而官方文档已经写明2.3版本以后使用ldif进行初始化,配置文件以兼容的方式保留并后续会被淘汰。The older style slapd.conf(5) file is still supported, but its use is deprecated and support for it will be withdrawn in a future OpenLDAP release.
接下来的介绍基于对https://www.openldap.org/doc/admin26/的阅读,admin26即2.6版本的使用文档。
名词解释
DN:globally-unique Distinguished Name,一条entry的唯一标识,是从树根到树枝的路径,如uid=babs,ou=People,dc=example,dc=com,最左为树枝,最右为树根。
DC:Domain Component,域名的一部分,如dc=example,dc=com
ou:Organizational Unit,组织部门,如开发组、测试组
cn:common name,节点的人读名称
schema:ldap树中的任意节点均可存储数据,类比mysql的schema指定了数据表的模式,ldap中schema可以提供objectclass对象,它规定了节点应该具有的xxx属性。在树结构中为节点指定objectclass,即可使节点遵守对应的数据模式。
目录组织
LDAP能存储任意形状的树,那究竟使用它存储哪种形状的树呢?如何设计LDAP存储的数据结构?:
传统的组织方式以国家公司架构进行设计,如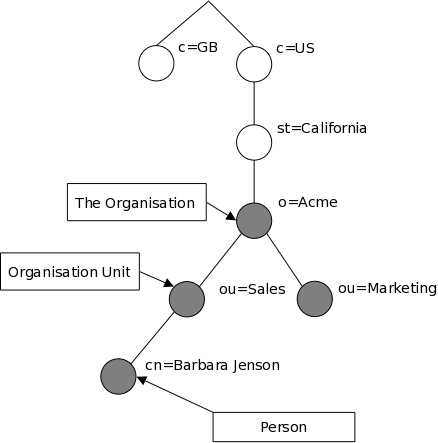
现在比较流行以公司域名进行组织,即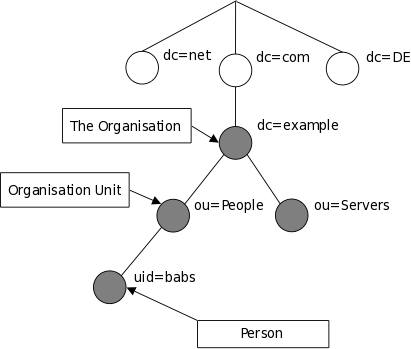
注意LDAP的树结构数据 与 节点内容数据 分开存储,树的结构与每个节点(树结构数据)需遵循的objectclass存储在配置文件目录中,常见于/etc/openldap/slapd.d/,节点的所有属性数据(节点内容数据)由存储backend配置决定,如mdb后端常存储在/var/lib/ldap。
开始搭建
安装
安装方式根据自身需要进行选择,https://www.openldap.org/doc/admin26/install.html
本文选择基于docker的方式,构建ldap镜像,Dockerfile内容为
FROM alpine:3.15RUN apk add --no-cache openldap openldap-backend-all openldap-overlay-all openldap-clientsADD schema/* /etc/openldap/schema/ENV COMMAND="slapd -d 1 -F /data"
alpine系统的3.15版本安装的是openldap的2.6版本,一劳永逸的安装了所有的ldap存储后端backend、以及overlay插件,还安装了ldap的客户端以供测试。
最后容器命令设定为从/data目录读取树状结构数据,debug级别调整为1,此时会驻留在前台避免容器进程退出。
拉起容器只需将持久化目录以及后一小节的ldif文件挂载进去即可,如docker run -d --name ldap -p 389:389 -p 636:636 -v xxx:/data -v yyy:/ldap ldap:latest
配置
配置文件根据https://www.openldap.org/doc/admin26/slapdconf2.html文档的示例配置修改而来,文件命名为init.ldif,修改内容如下:
- 14、15行的pid存储路径,修改为/var/run目录
- 34行加载存储后端模块名称,由.la后缀修改为.so后缀,因为alpine中安装ldap不存在.la文件
- 43-48行加载所需的schema,其中openldap不提供samba.ldif,需要自己去寻找(我从其他ldap镜像复制过来)
- 88行以后是修改集中的区域:
- olcSuffix:树状结构的根,即dc=sechnic,dc=com
- olcRootDN:mdb数据库的root用户,不受ACL限制,拥有所有权限
- olcDbDirectory:节点内容数据存储目录,指定与树结构数据相同的目录,从而只需挂载一个目录进入容器即可持久化
- 105-106行指定ACL规则,语法大致为
to 一些实体 by 一些entry 可读可写 by 另一些entry可读 by ...,文档位于https://www.openldap.org/doc/admin26/access-control.html。目标中的123主要功能均由ACL实现。
- 注意:一个LDAP服务端能同时管理多个backend,每个backend存储一个domain或者说olcSuffix
```
https://www.openldap.org/doc/admin26/slapdconf2.html
https://www.openldap.org/doc/admin26/quickstart.html
#See slapd-config(5) for details on configuration options.
This file should NOT be world readable.
# dn: cn=config objectClass: olcGlobal cn: config # #Define global ACLs to disable default read access.
# olcArgsFile: /var/run/slapd.args olcPidFile: /var/run/slapd.pid #Do not enable referrals until AFTER you have a working directory
service AND an understanding of referrals.
olcReferral: ldap://root.openldap.org
#Sample security restrictions
Require integrity protection (prevent hijacking)
Require 112-bit (3DES or better) encryption for updates
Require 64-bit encryption for simple bind
olcSecurity: ssf=1 update_ssf=112 simple_bind=64
#
Load dynamic backend modules:
# dn: cn=module,cn=config objectClass: olcModuleList cn: module olcModulepath: /usr/lib/openldap olcModuleload: back_mdb.so
olcModuleload: back_ldap.la
olcModuleload: back_passwd.la
dn: cn=schema,cn=config objectClass: olcSchemaConfig cn: schema
include: file:///etc/openldap/schema/core.ldif include: file:///etc/openldap/schema/cosine.ldif include: file:///etc/openldap/schema/inetorgperson.ldif include: file:///etc/openldap/schema/openldap.ldif include: file:///etc/openldap/schema/nis.ldif include: file:///etc/openldap/schema/samba.ldif
Frontend settings
# dn: olcDatabase=frontend,cn=config objectClass: olcDatabaseConfig objectClass: olcFrontendConfig olcDatabase: frontend #
Sample global access control policy:
Root DSE: allow anyone to read it
Subschema (sub)entry DSE: allow anyone to read it
Other DSEs:
Allow self write access
Allow authenticated users read access
Allow anonymous users to authenticate
#
olcAccess: to dn.base=”” by * read
olcAccess: to dn.base=”cn=Subschema” by * read
olcAccess: to *
by self write
by users read
by anonymous auth
#
if no access controls are present, the default policy
allows anyone and everyone to read anything but restricts
updates to rootdn. (e.g., “access to by read”)
#
rootdn can always read and write EVERYTHING!
#
LMDB database definitions
#
# dn: olcDatabase=monitor,cn=config objectClass: olcDatabaseConfig olcDatabase: monitor olcRootDN: cn=config olcMonitoring: FALSE
dn: olcDatabase=mdb,cn=config objectClass: olcDatabaseConfig objectClass: olcMdbConfig olcDatabase: mdb olcDbMaxSize: 1073741824 olcSuffix: dc=sechnic,dc=com olcRootDN: cn=admin,ou=users,dc=sechnic,dc=com
Cleartext passwords, especially for the rootdn, should
be avoided. See slappasswd(8) and slapd-config(5) for details.
Use of strong authentication encouraged.
olcRootPW: admin123
The database directory MUST exist prior to running slapd AND
should only be accessible by the slapd and slap tools.
Mode 700 recommended.
olcDbDirectory: /data/
Indices to maintain
olcDbIndex: objectClass eq olcAccess: to attrs=userPassword,sambaHomeDrive,sambaAcctFlags,displayName,shadowLastChange,sambaNTPassword,sambaPwdLastSet by self write by dn.base=”cn=manager,ou=users,dc=sechnic,dc=com” write by anonymous auth by none olcAccess: to by self read by dn.base=”cn=manager,ou=users,dc=sechnic,dc=com” write by dn=”cn=readonly,ou=users,dc=sechnic,dc=com” read by * search
<a name="dSiuK"></a>### 运行首先根据上一小节中编写的配置文件离线生成树结构数据,注意替换容器命令为`sleep 100d`避免容器找不到配置文件而挂掉,进入容器后执行:<br />`slapadd -n 0 -F /data -l /ldap/init.ldif`<br />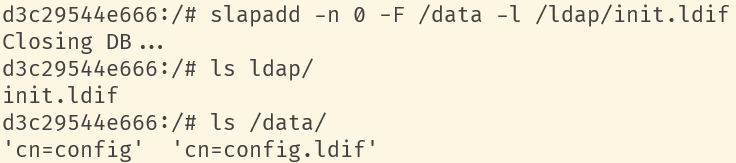<br />若有报错,调整init.ldif后需要清空/data/目录后重新执行slapadd。<br />最后取消对命令的修改,重新拉起容器,进入容器进行测试校验:<br />`ldapsearch -x -b '' -s base '(objectclass=*)' namingContexts`<br />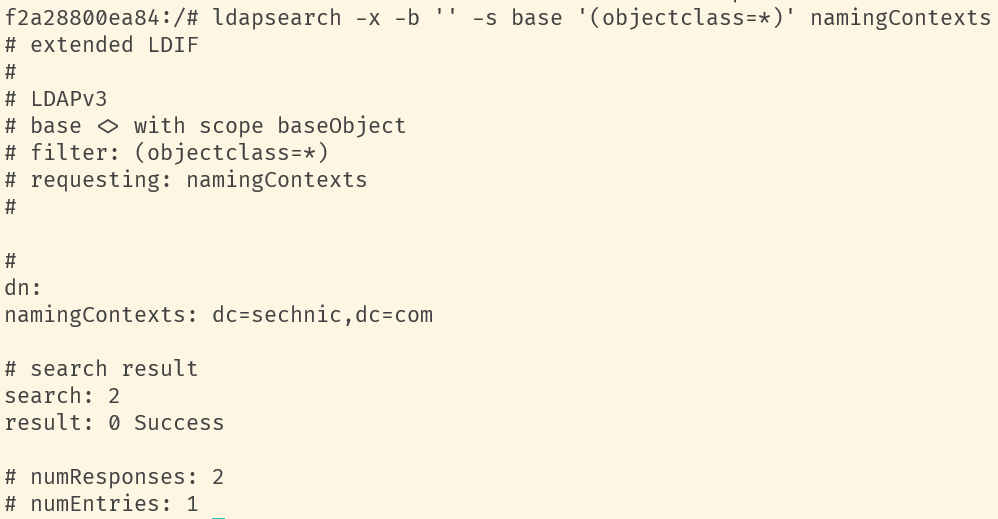<br />至此完成树结构的创建,后续users、groups等树枝,以及节点内容的创建,均通过LAM在图形化界面中完成。<a name="fwssl"></a># LAM<a name="HcBZg"></a>## 开始搭建<a name="lfwjr"></a>### 安装同样使用容器化部署,直接使用官网提供的镜像:ldapaccountmanager/lam:7.7<a name="Jvkq0"></a>### 运行`docker run -d --name lam -p 82:80 ldapaccountmanager/lam:7.7`<a name="tGT5b"></a>### 配置打开lam的web端:<br />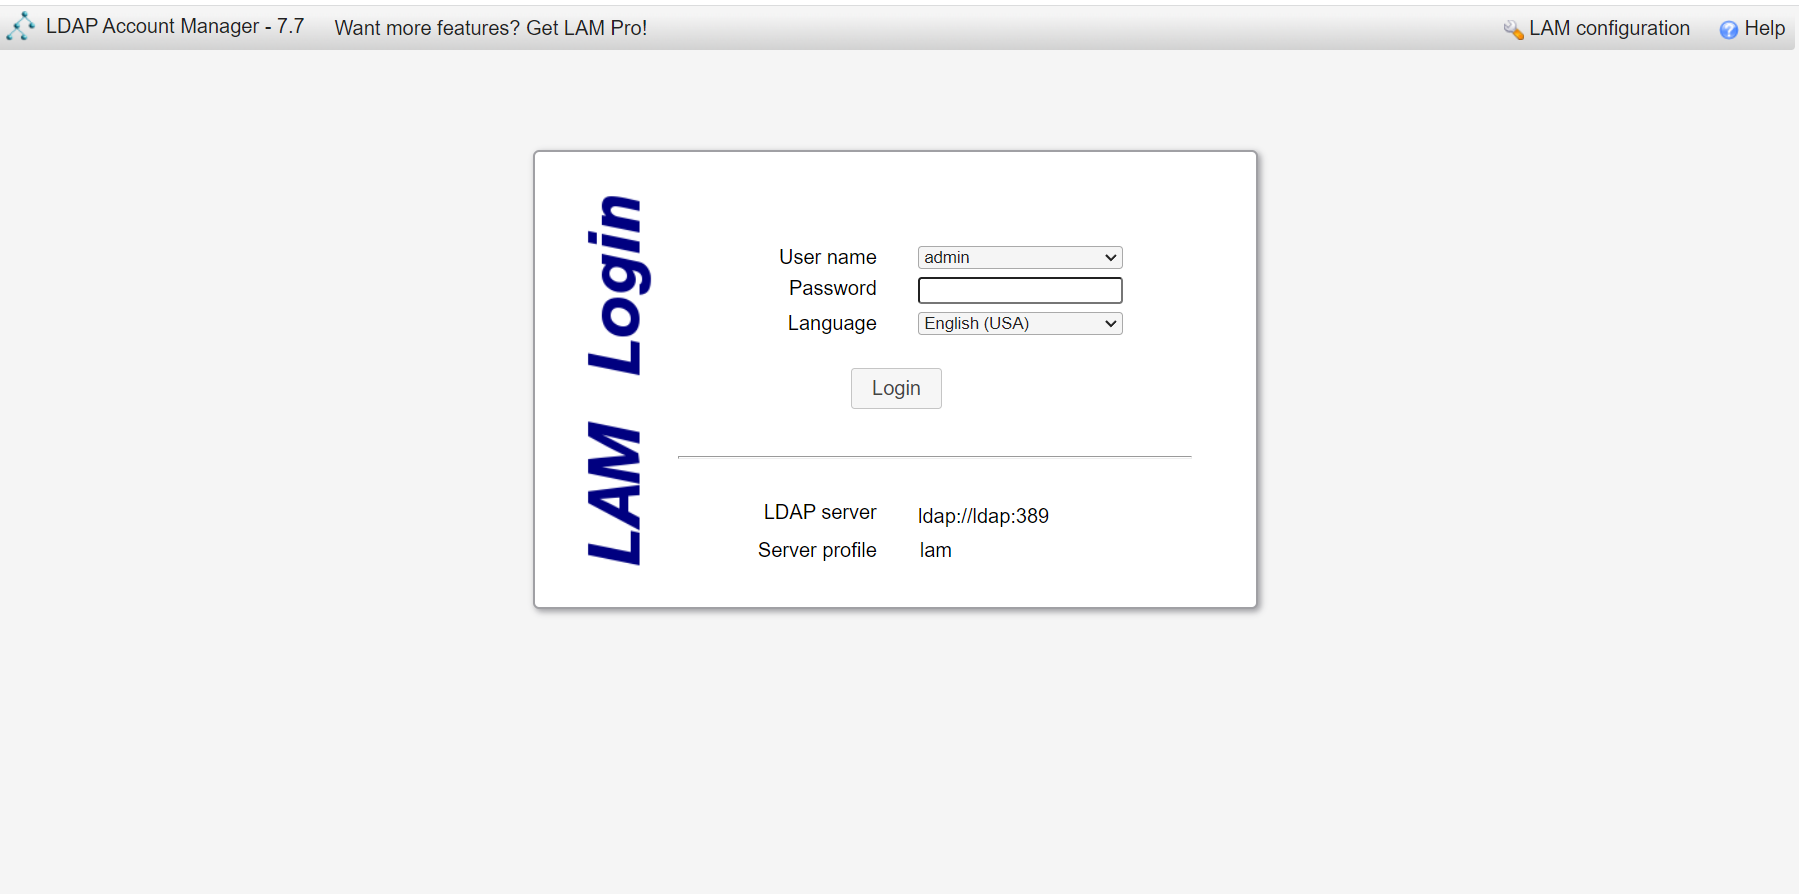<br />LAM的一个profile对应一个LDAP的backend数据库,都对应着一个域,即sechnic.com,首先进行profile配置,点击右上角LAM configuration<br /><br />点击Edit server profiles<br />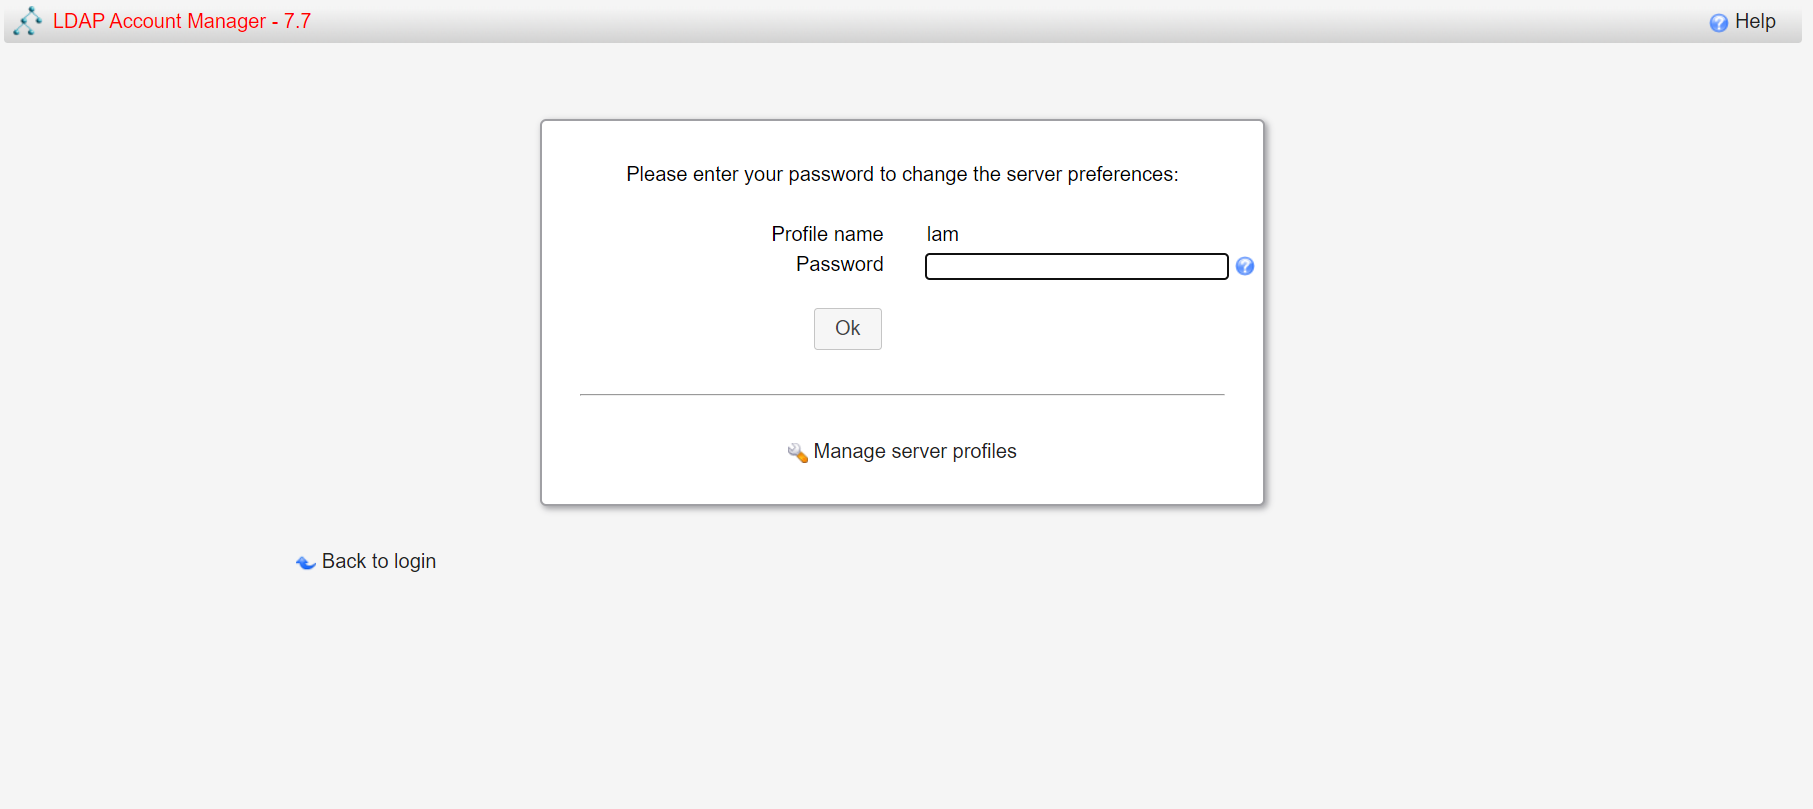<br />这个名为lam的profile的默认密码为lam,登录进去<br />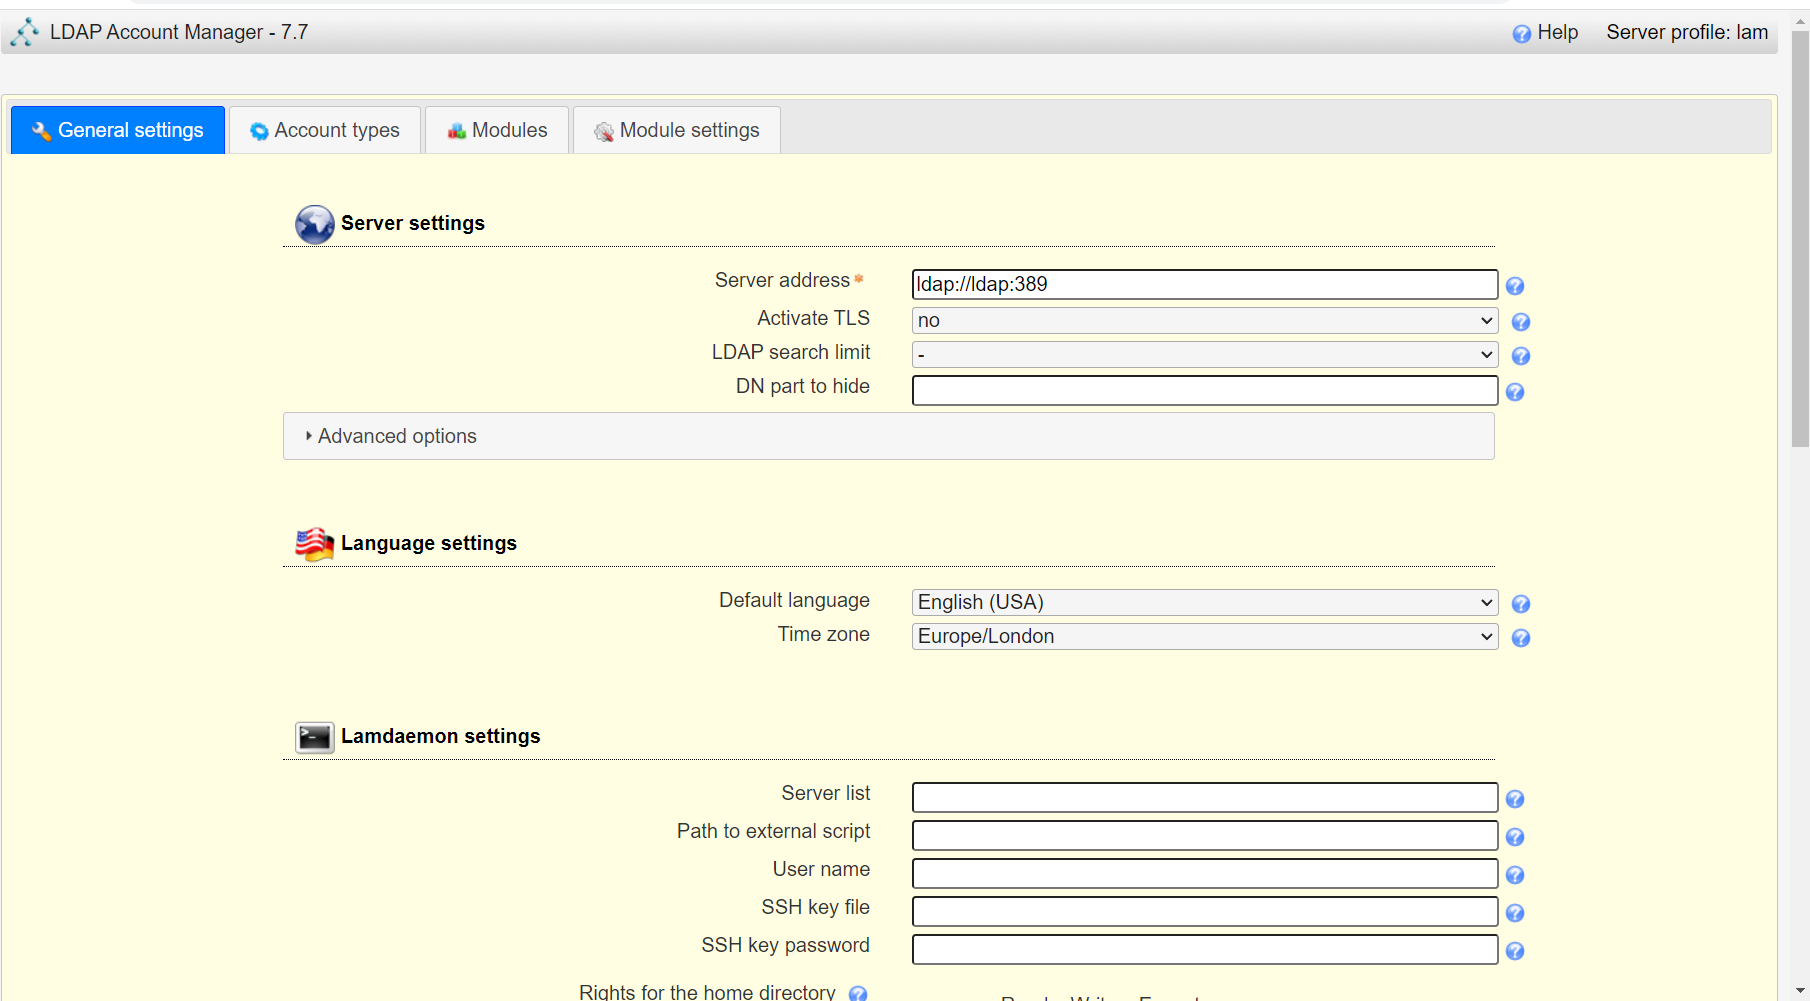<br />首先进行通用配置1. server address填ldap的容器IP或域名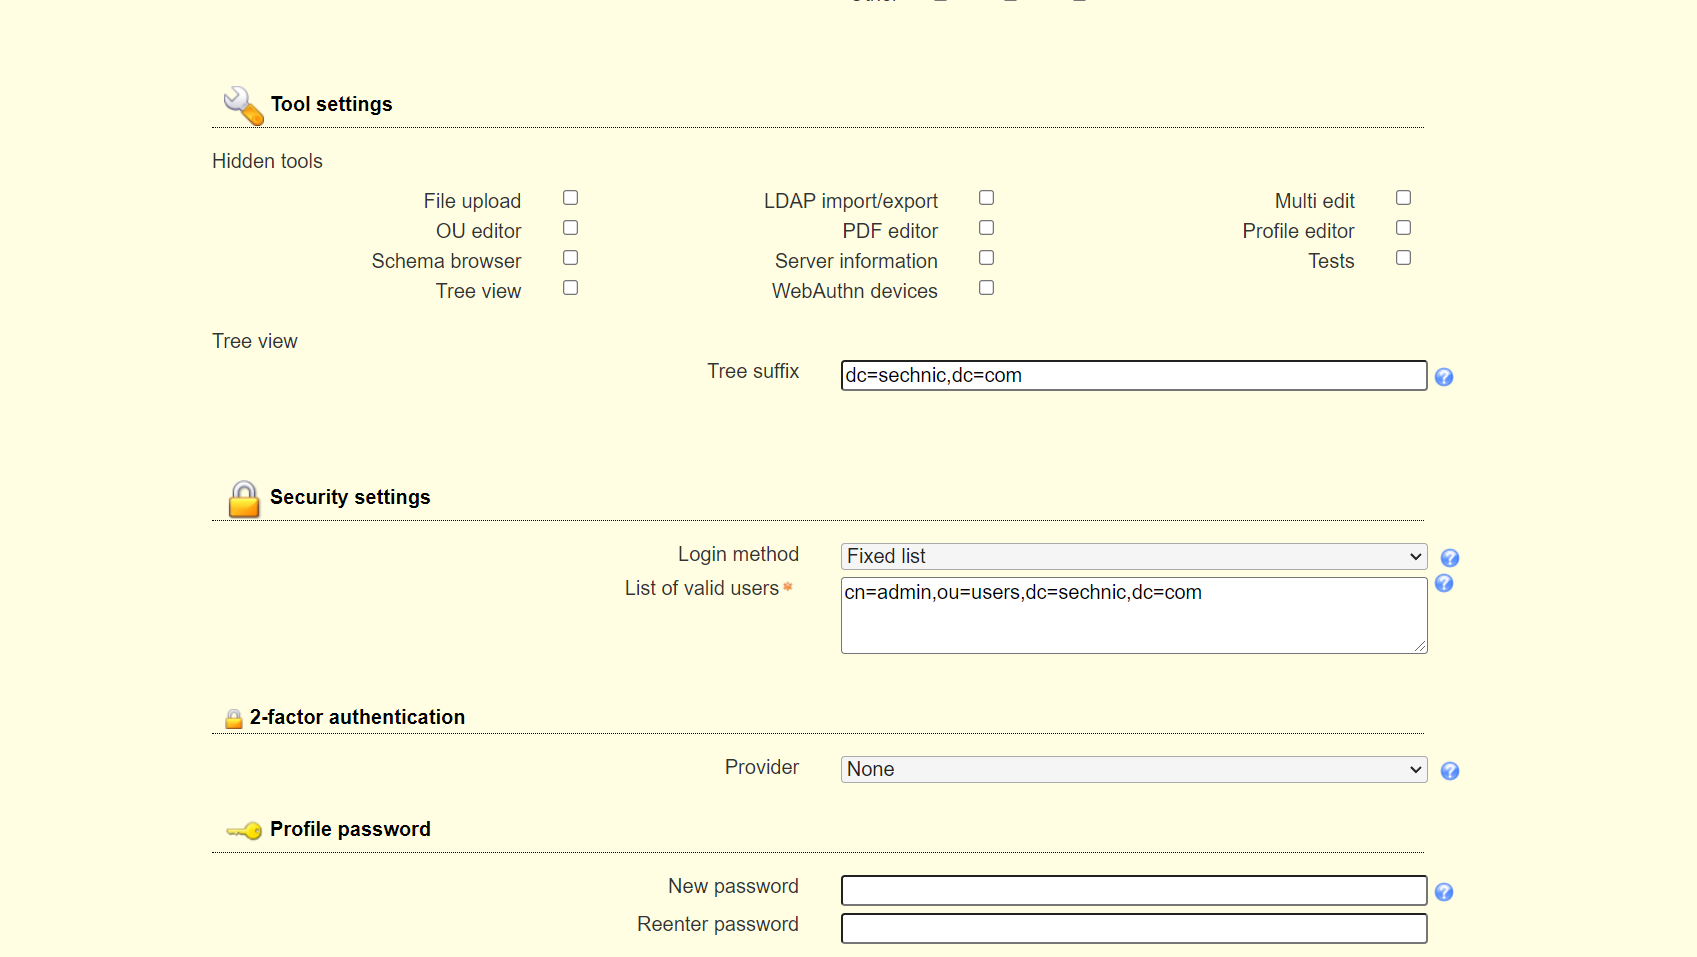2. Tree suffix填写域前缀2. Login method指定了登录LAM系统的用户从哪里来,此时我们还没创建任何用户,因此静态的指定如果登录,就使用数据库root用户登录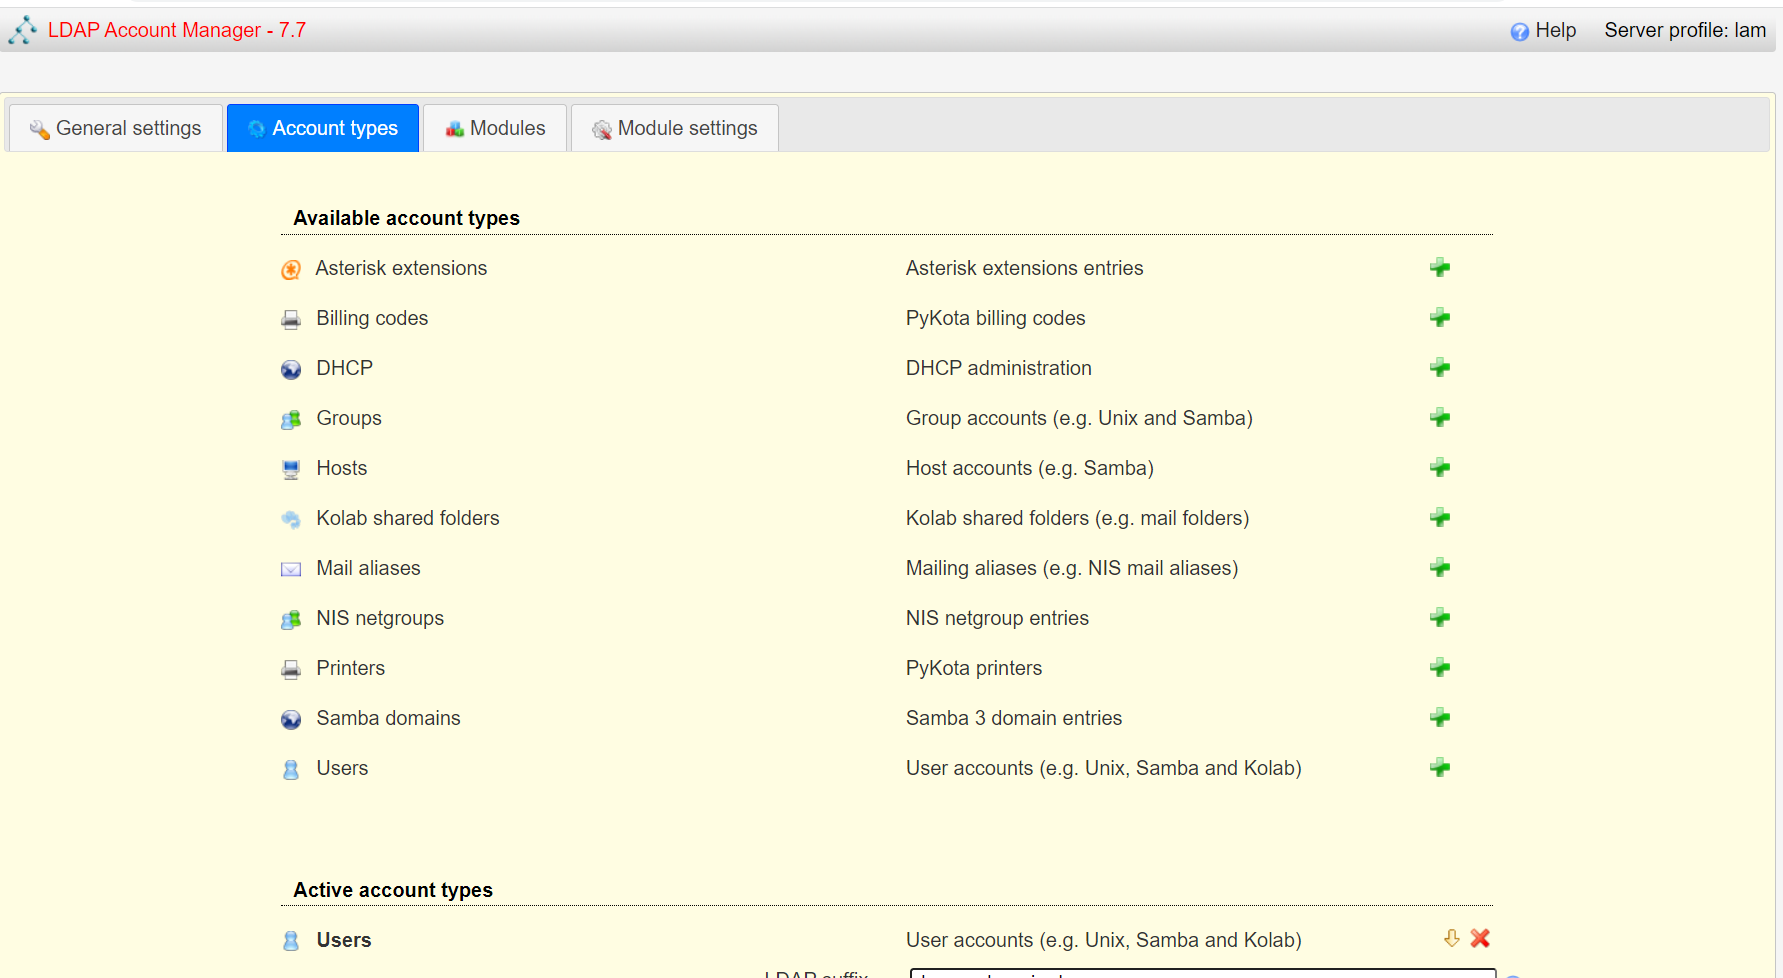<br />接下来进行account types配置,这里配置的是在域前缀dc=xxx,dc=com的树干上,需要有哪些树枝:<br />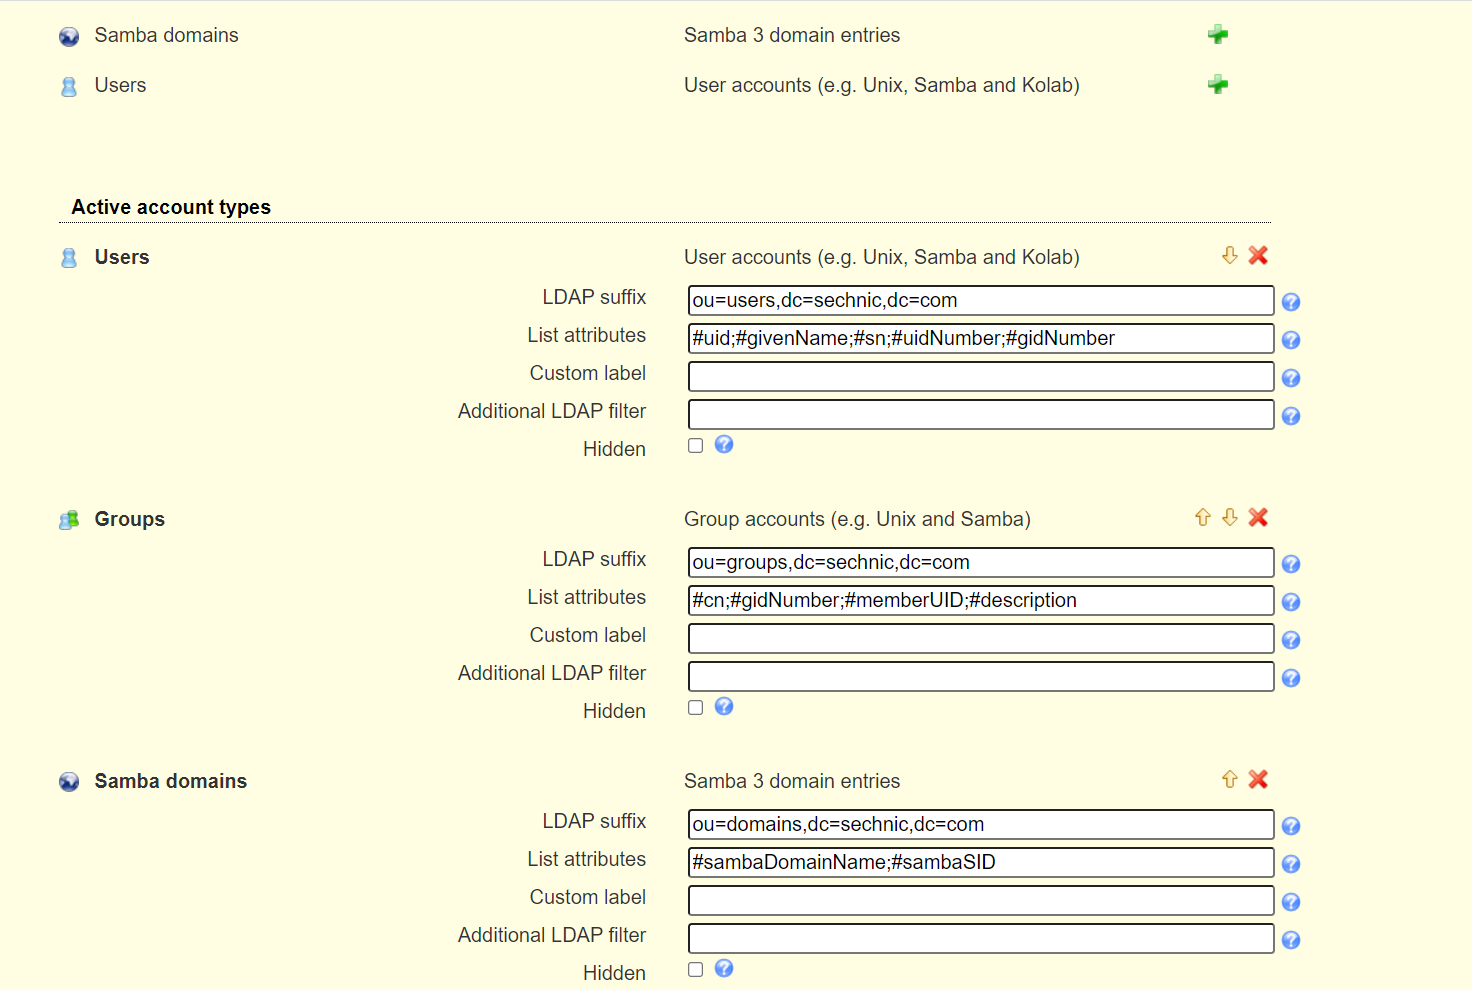<br />默认只有users和groups,点击samba domains后面的绿色加号添加smb域的树枝,并为每个树枝填写他们各自的前缀,如ou=users,dc=sechnci,dc=com。接下来进行modules配置:<br />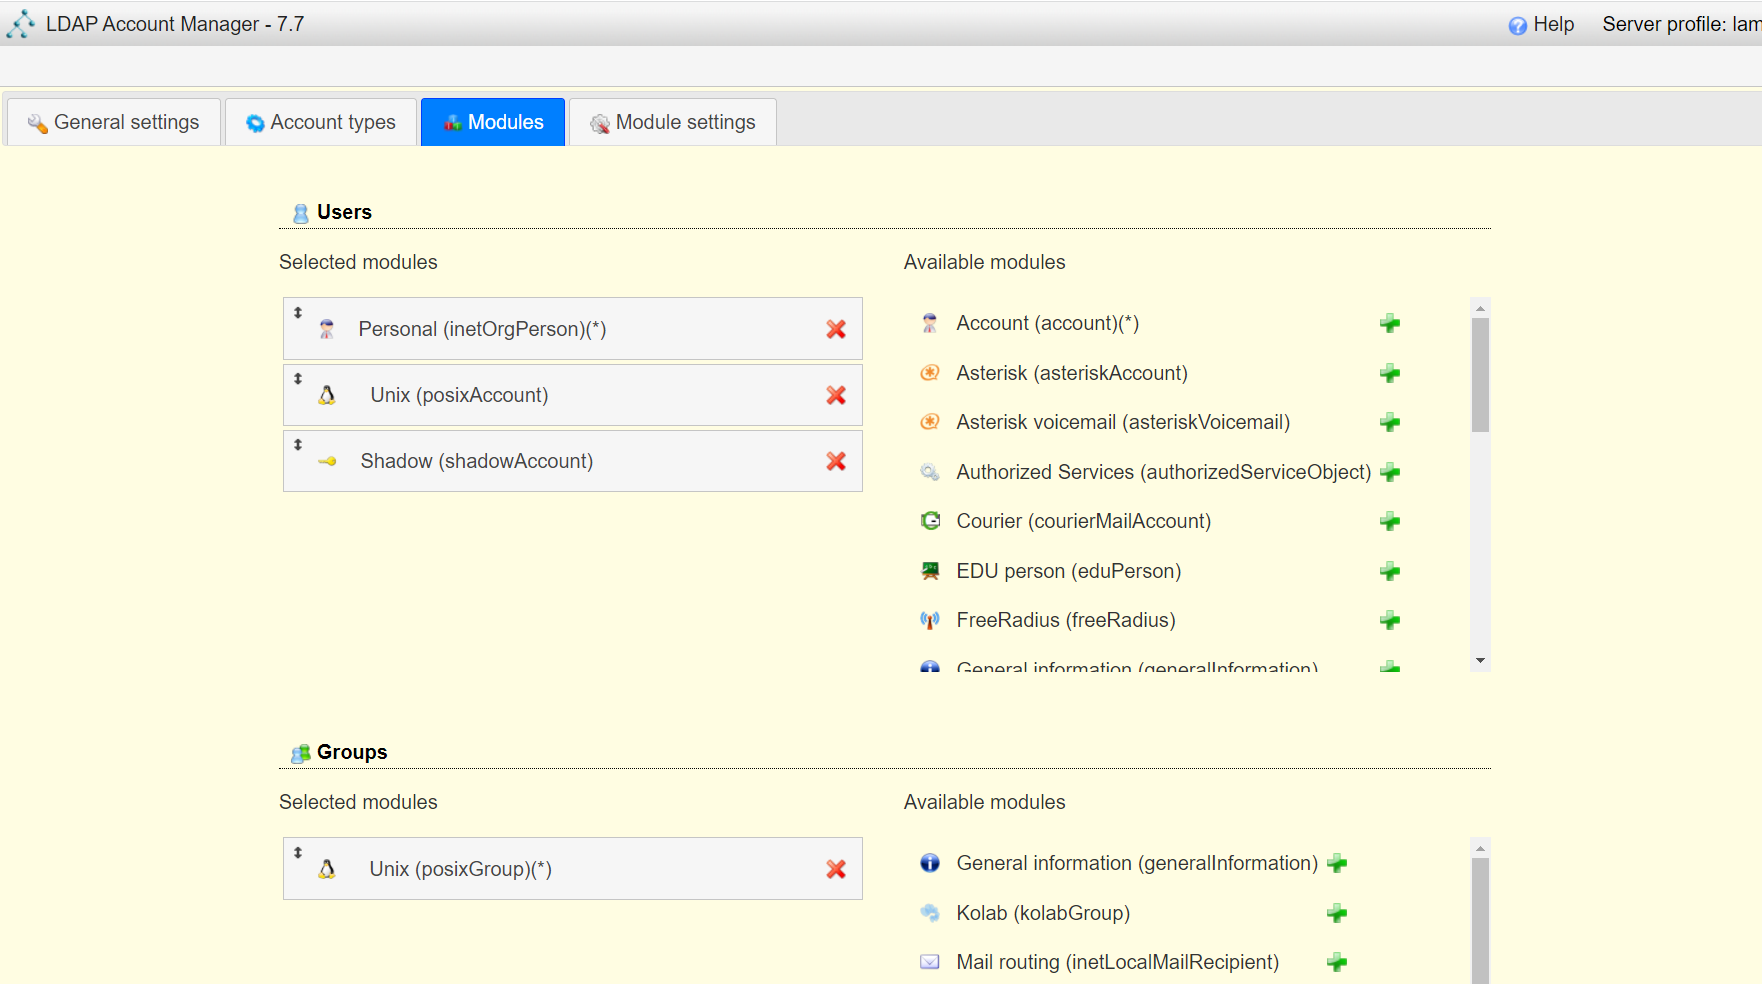<br />modules这里配置了,每个树枝上的小树枝需要遵守的模式(objectclass(由schema文件定义)),如users需要遵守PosixAcount这个模式,创建一个新的user时,就必须根据这个模式指定类型的属性。<br />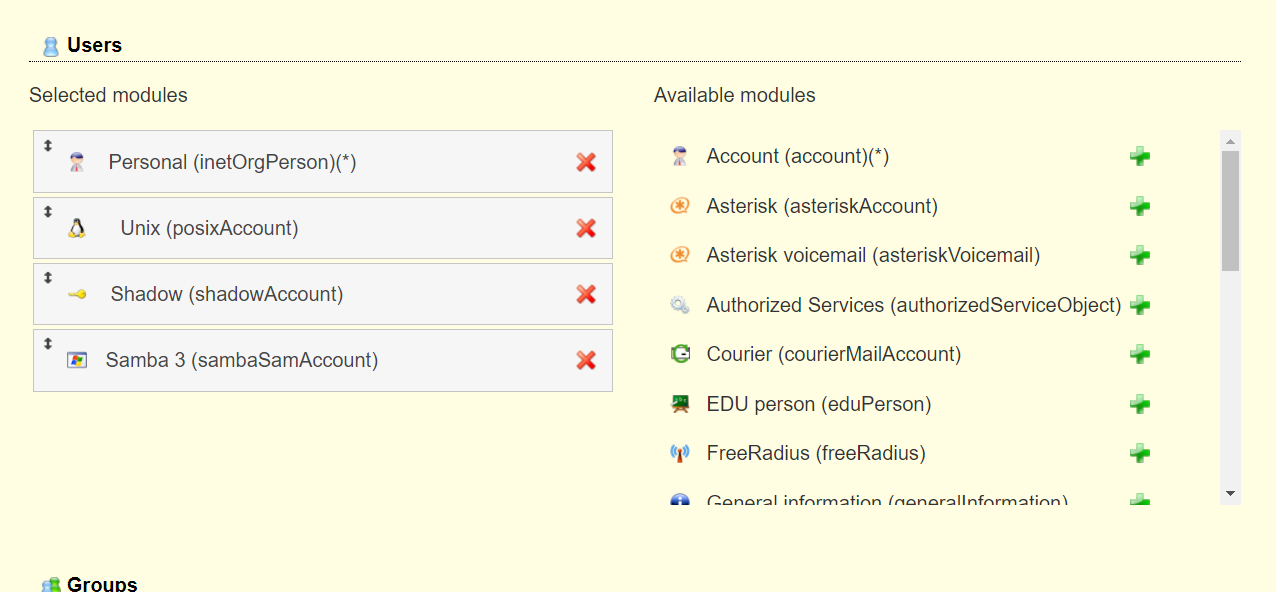<br />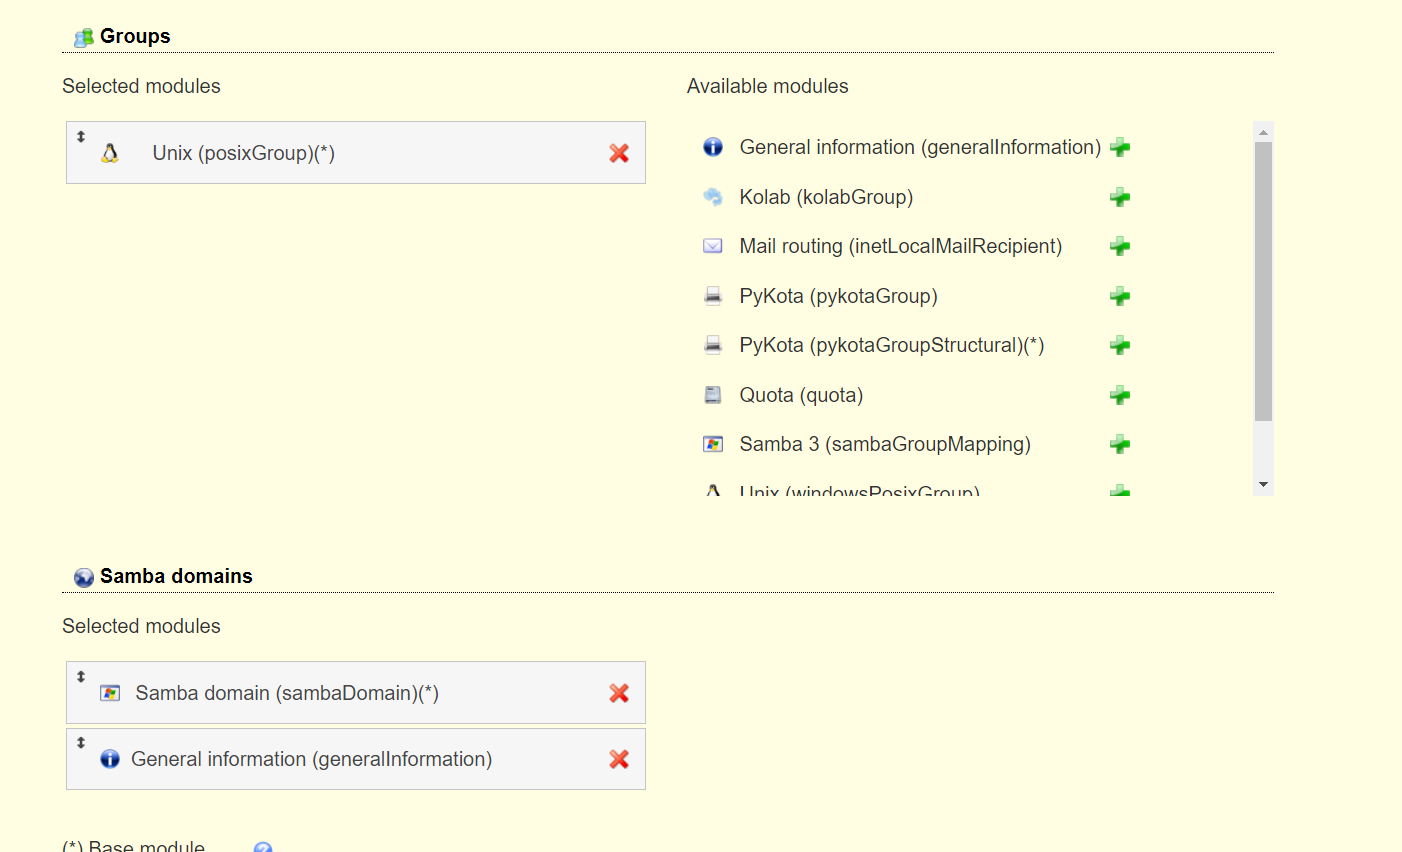<br />我们这里将Samba3从右侧加到users的左侧,即为用户设置密码时,除了明文的密码,还计算NT哈希存储到属性中(sambaSAMAcount模式规定的),以供后续的radius认证时使用。<br />此外还将两个module都添加到Samba domains。<br />最后Module Setting暂时无需设置,点击最下面的save保存,跳转回登录界面:<br />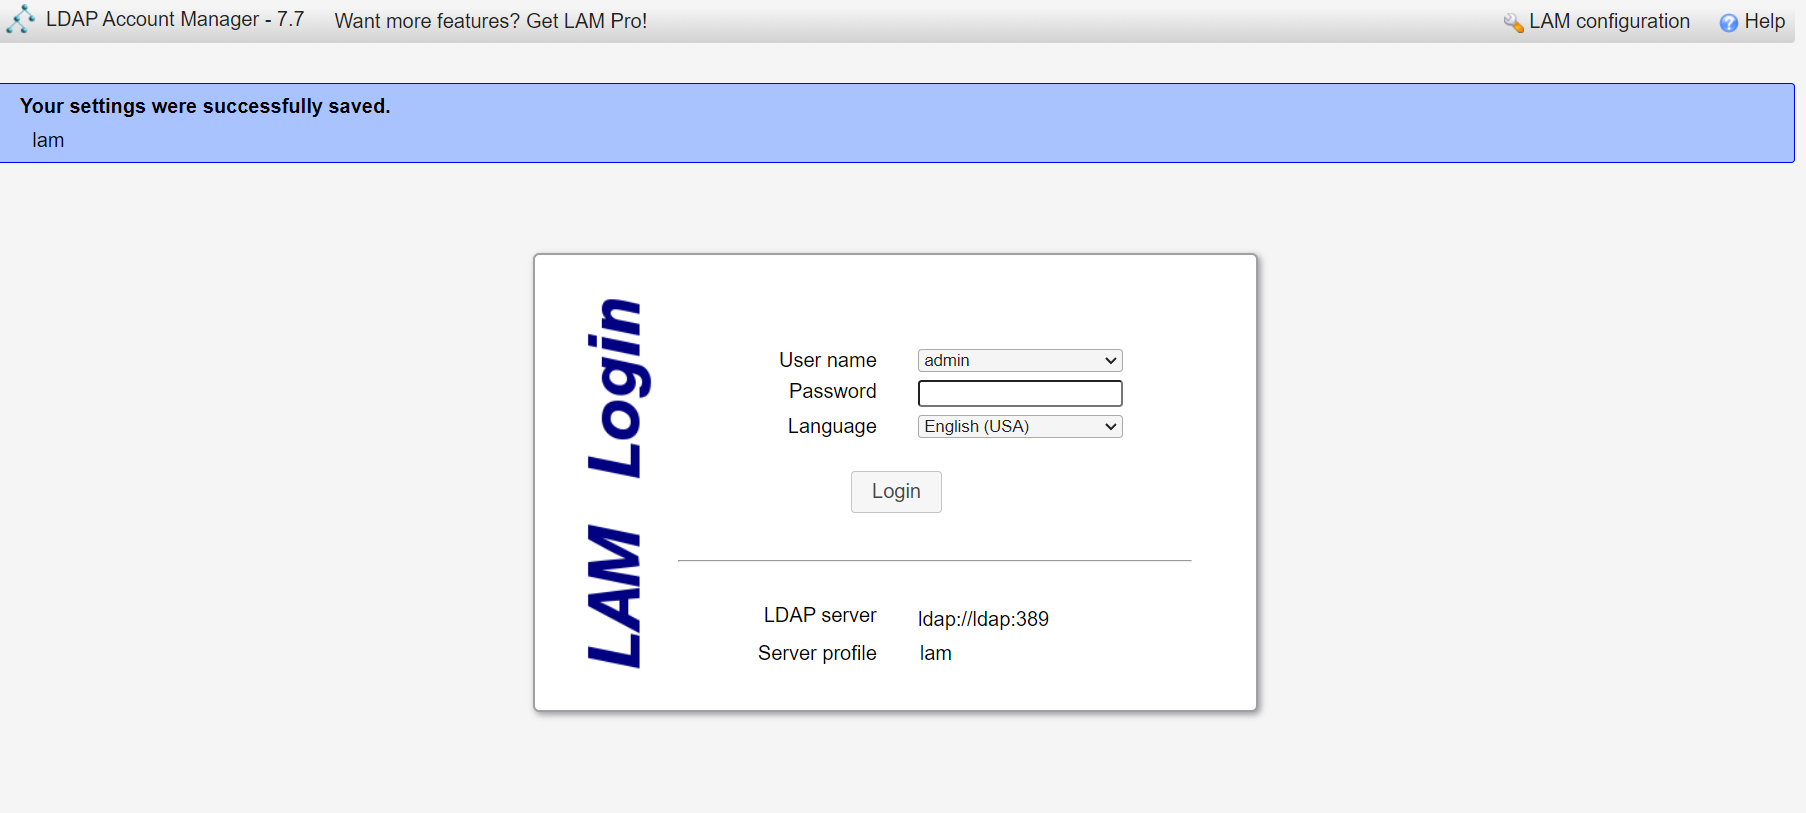<br />以init.ldif中的root密码登录<br />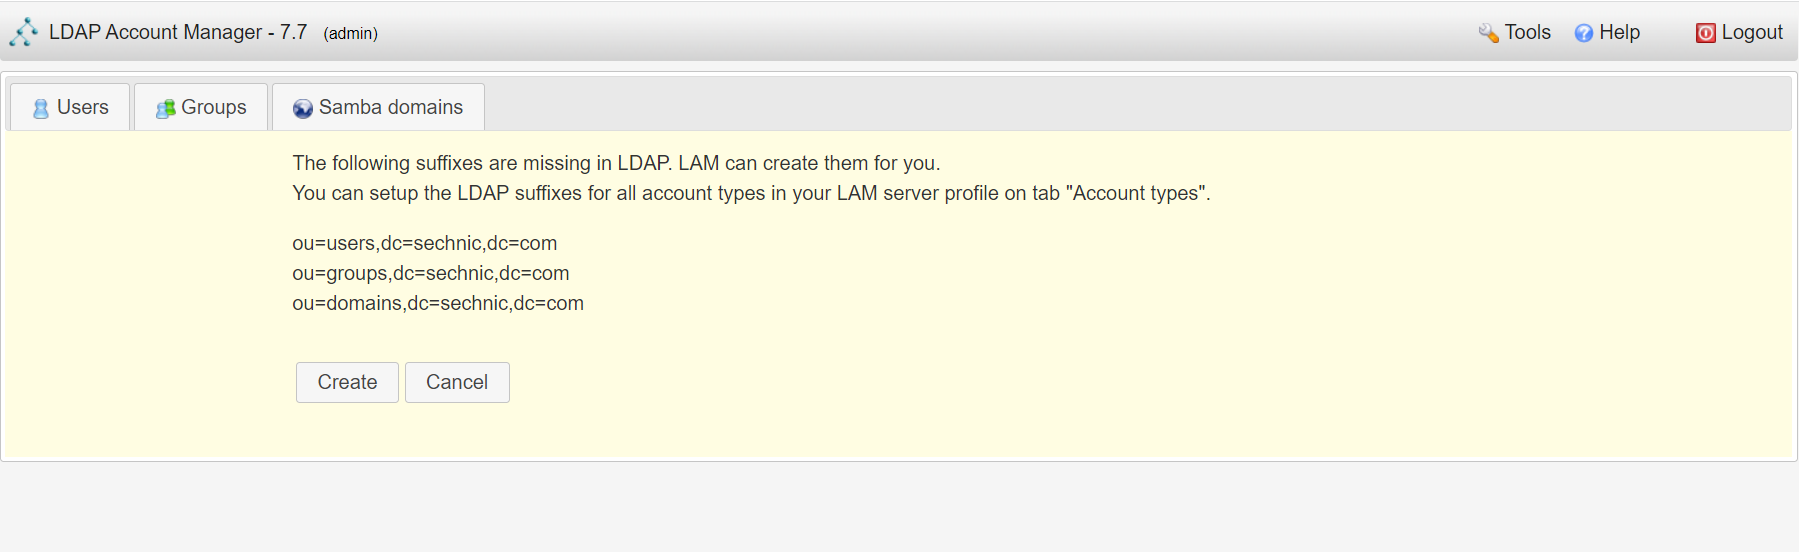<br />LAM检测到三个树枝users、groups、domains还没有创建,询问是否创建,点击create。<br />在创建一个用户前,需要先创建group和samba domain:<br />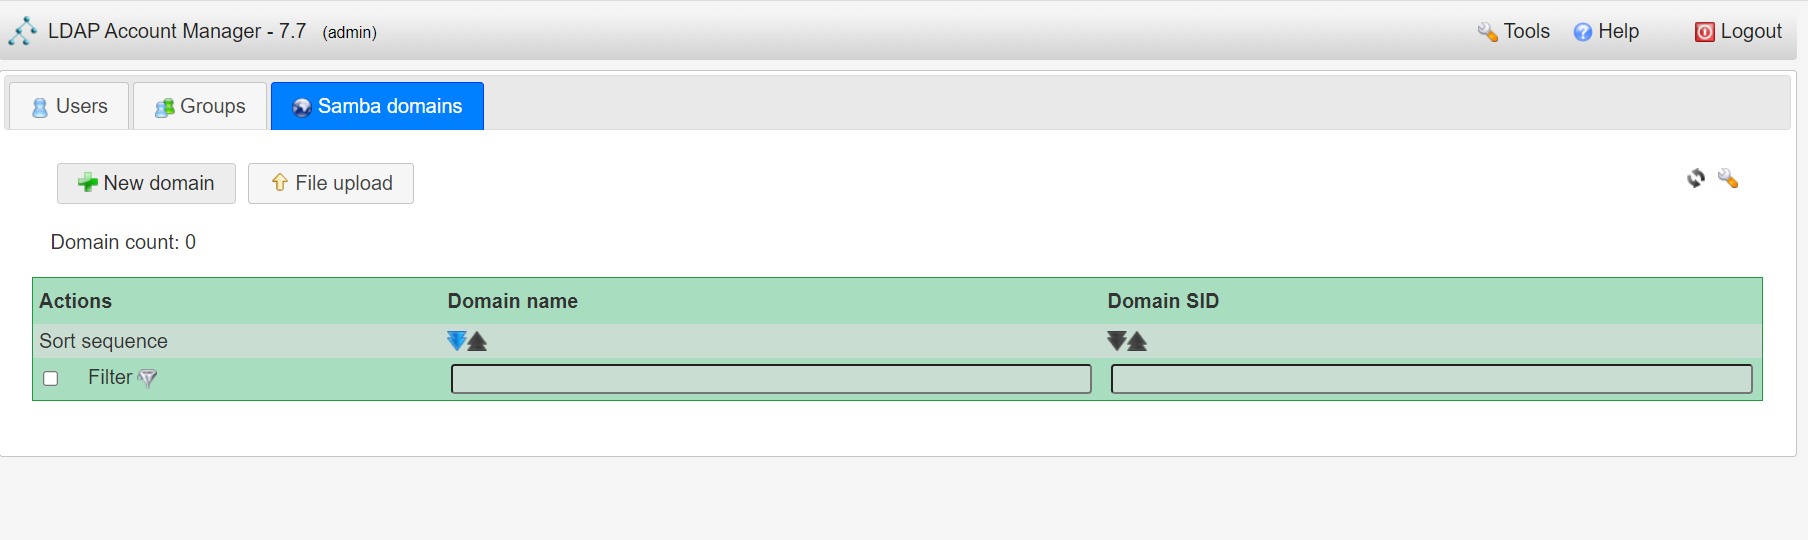<br />点击new domain<br />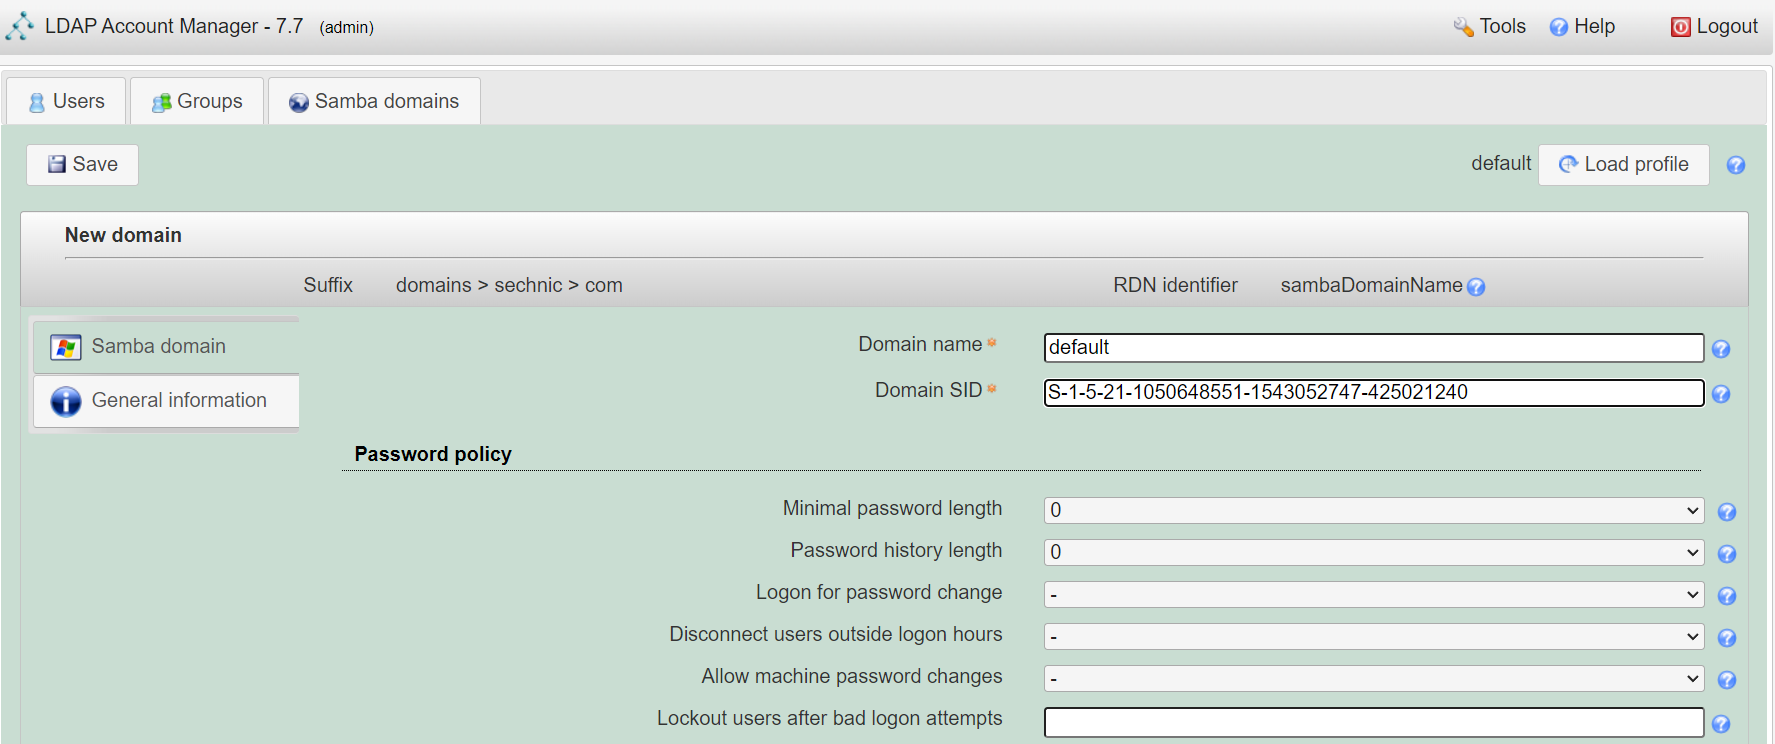<br />名称随意,SID填写S-1-5-21-1050648551-1543052747-425021240,点击Save保存<br /><br />同理创建新的group,名称任意,点击save保存<br />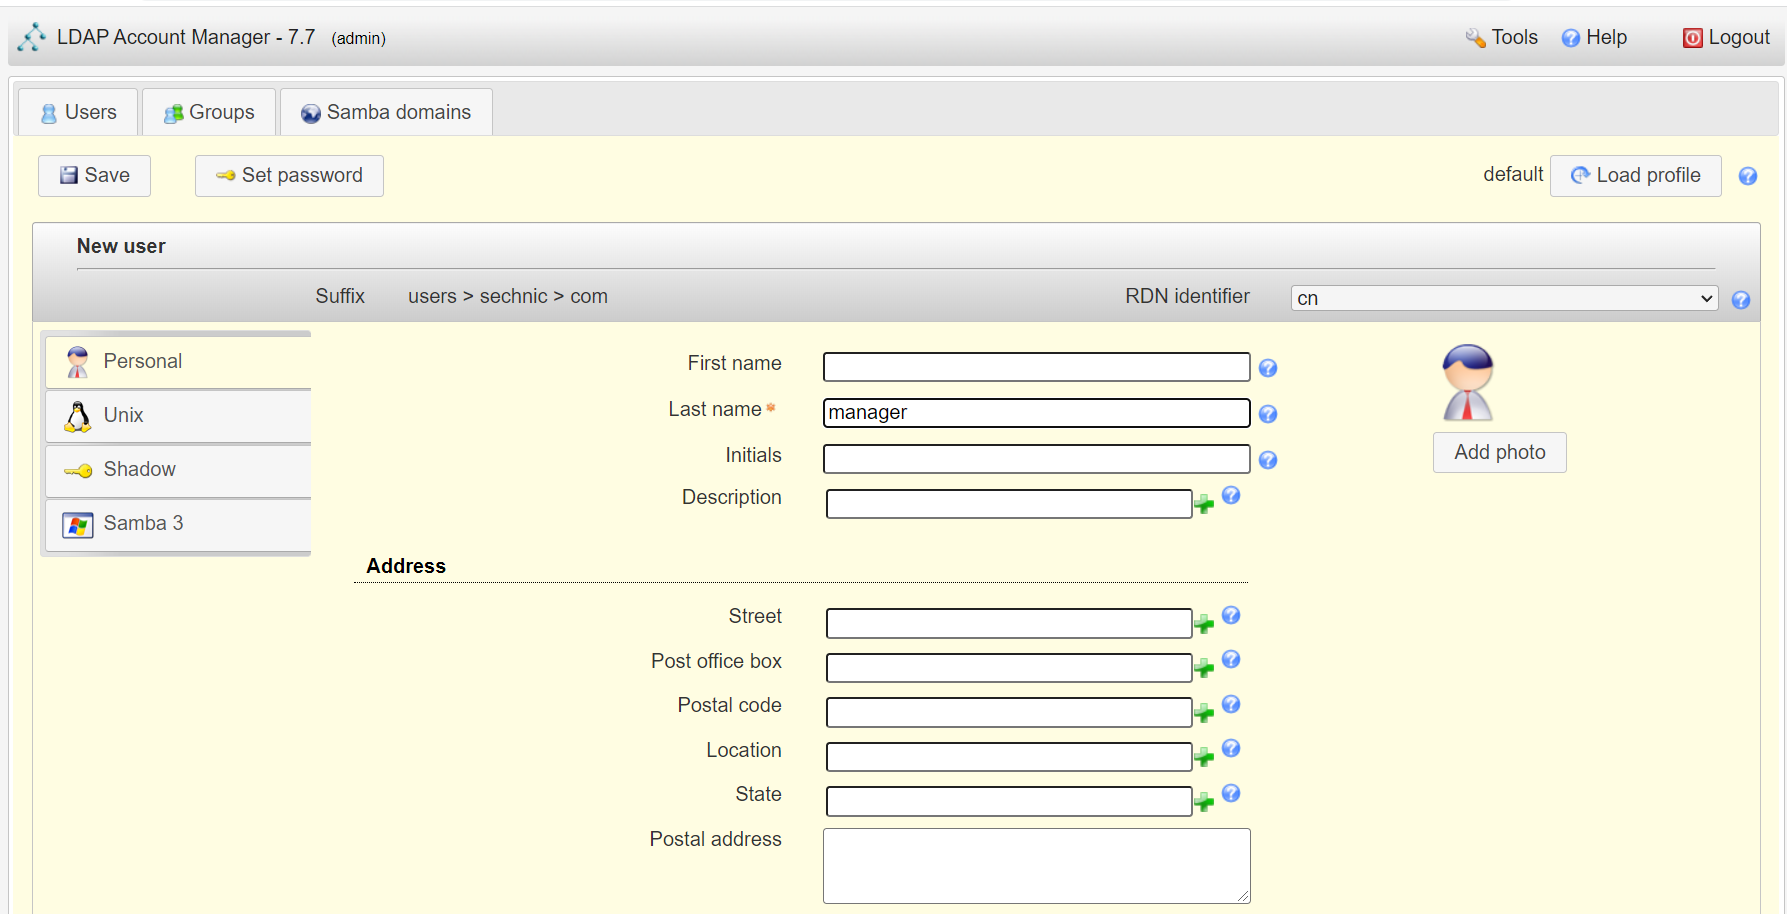<br />开始创建用户,首先是manager,根据ACL规则他拥有权利管理其他用户,点击unix,点击后无需配置<br />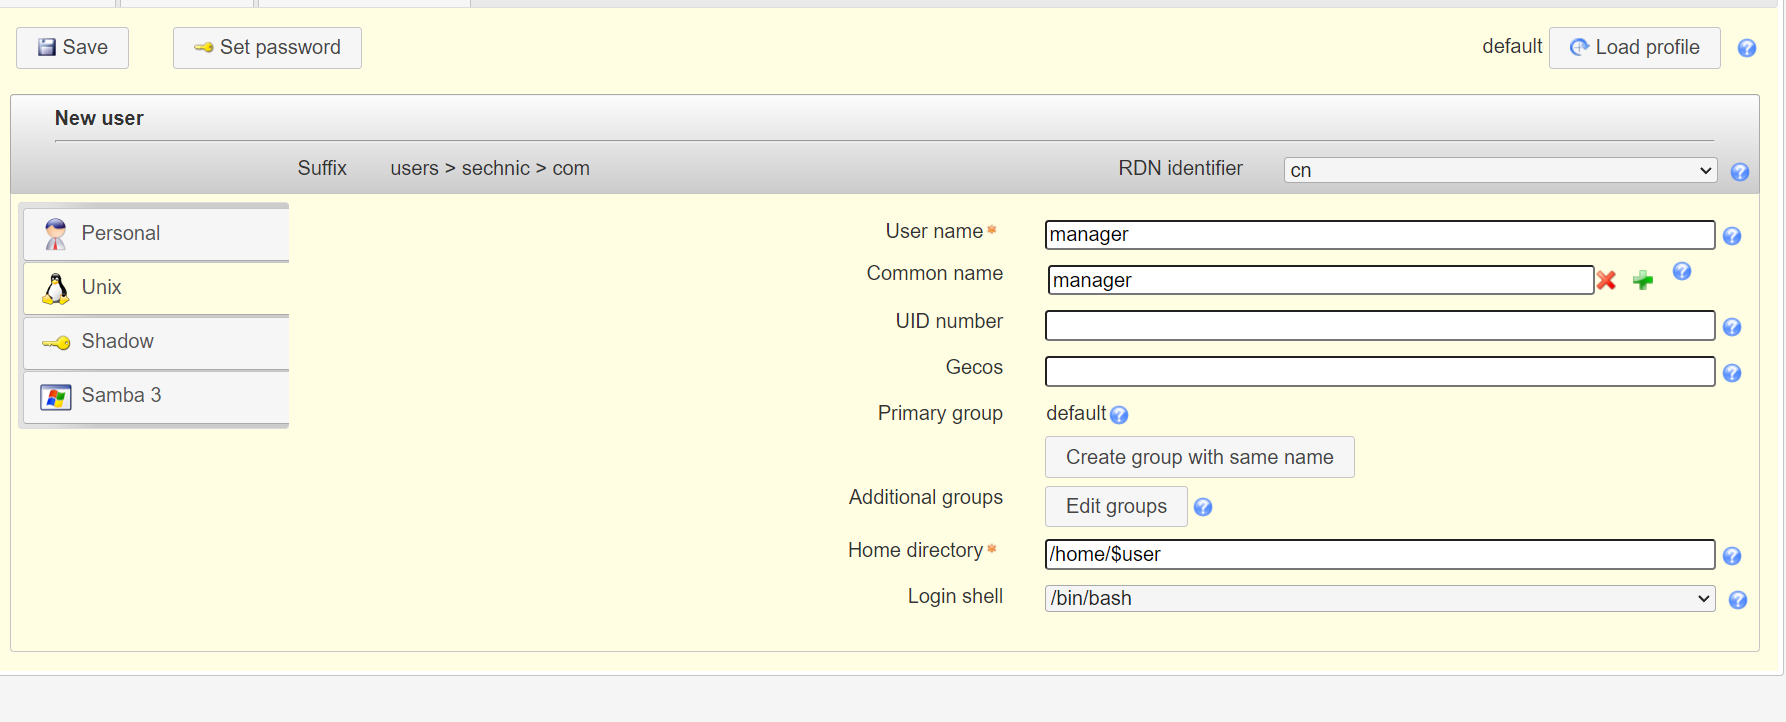<br />点击samba3,点击Add Extension后无需配置<br />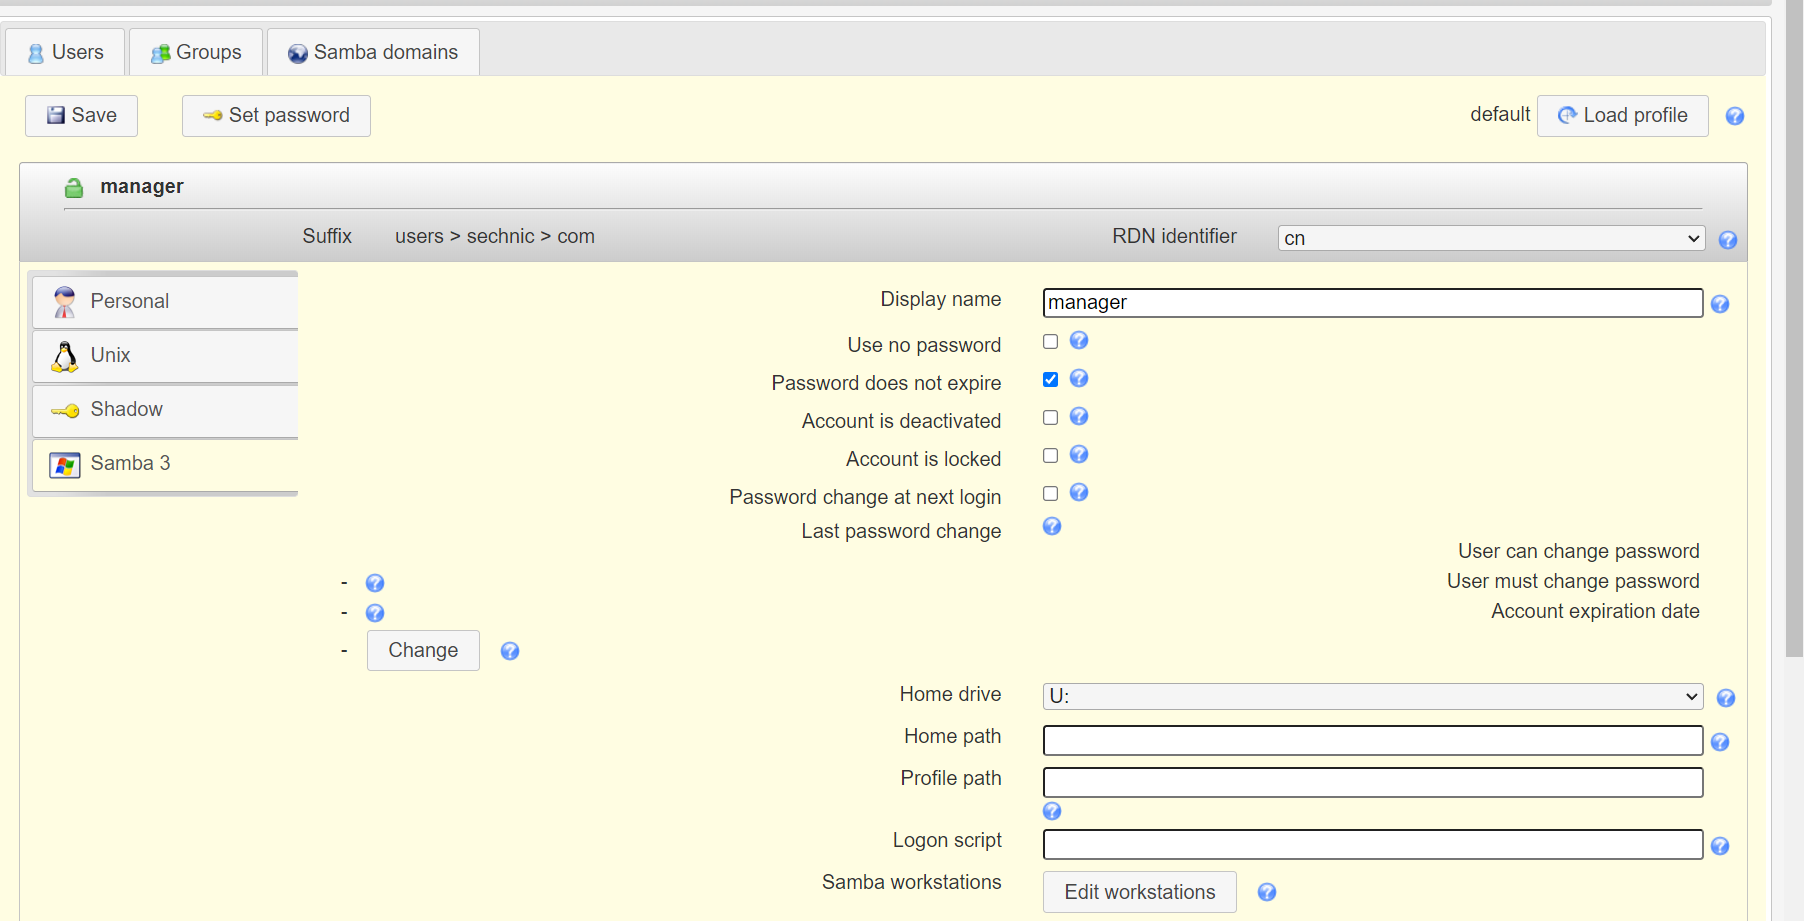<br />点击set password设置密码,设置后保存<br />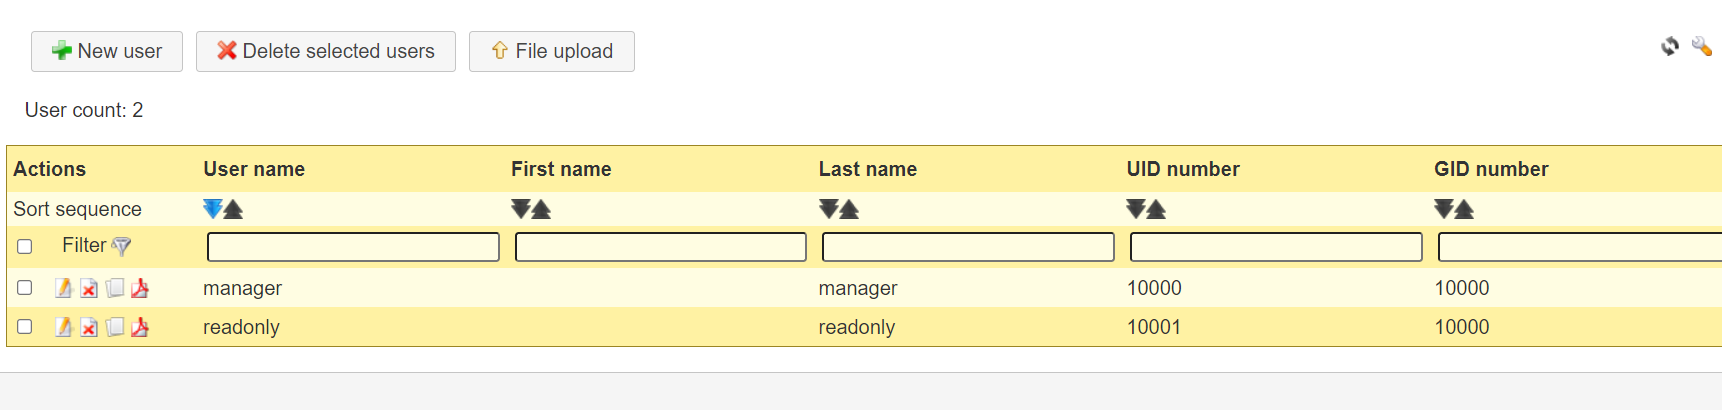<br />同理创建readonly用户。接下来我们设置LAM以ou=users中的用户登录,而不是永远以root用户登录:<br />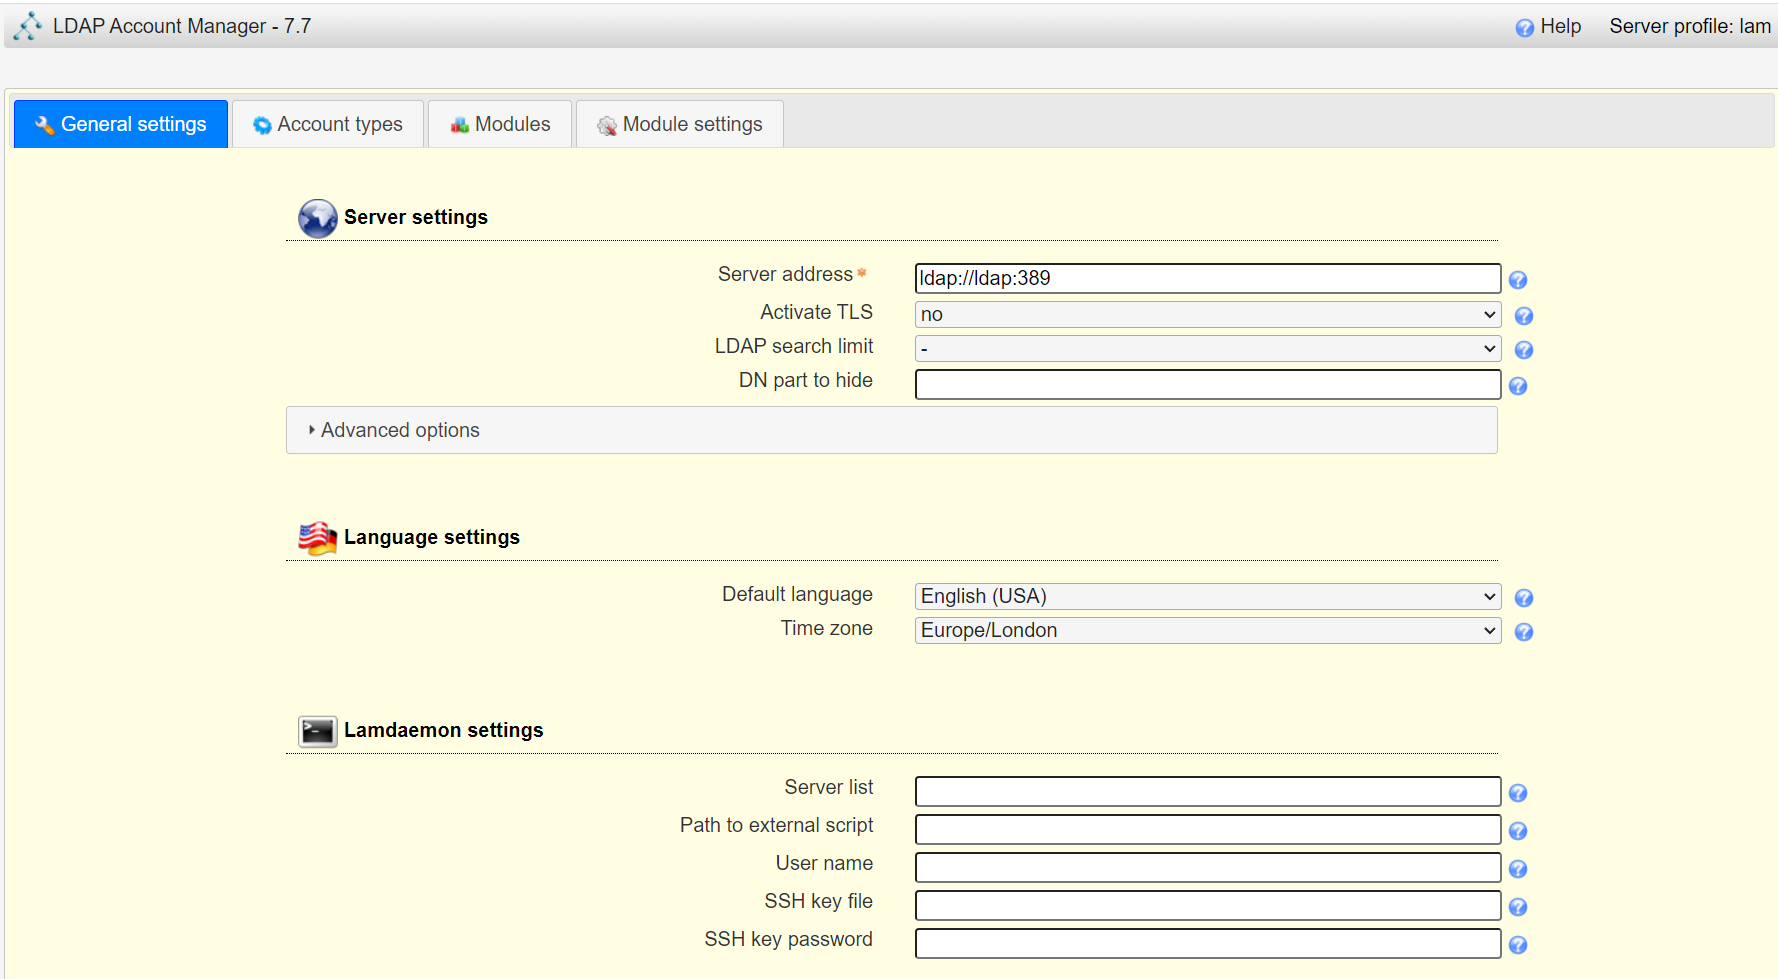<br />回到lam profile的配置页面<br />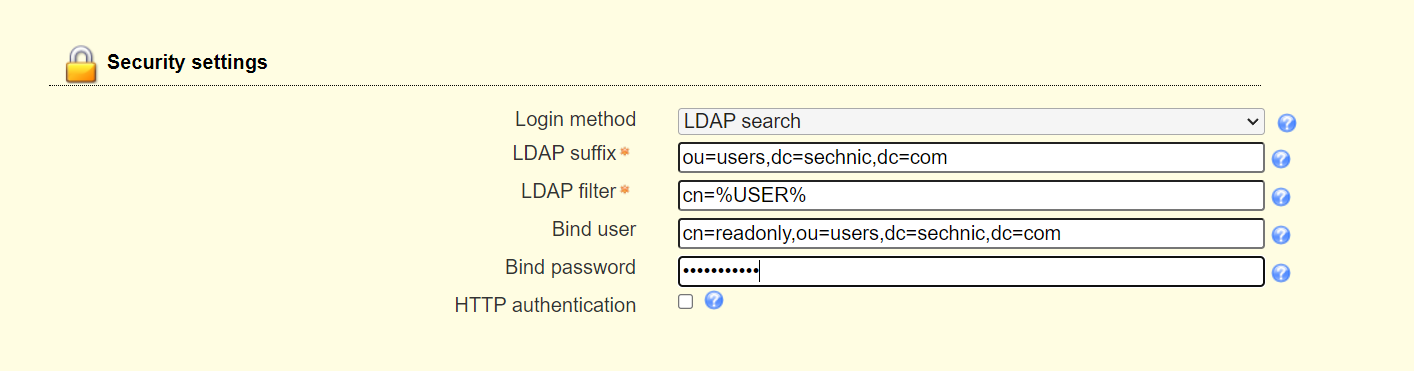<br />login method改为search,这样LAM在登录界面会在ou=users中搜索(cn=username)用户提供的用户名,而在搜索时LAM需要先以拥有搜索权限的用户登录至LDAP,我们为他配置readonly用户,根据ACL规则有读取和搜索权限。<br />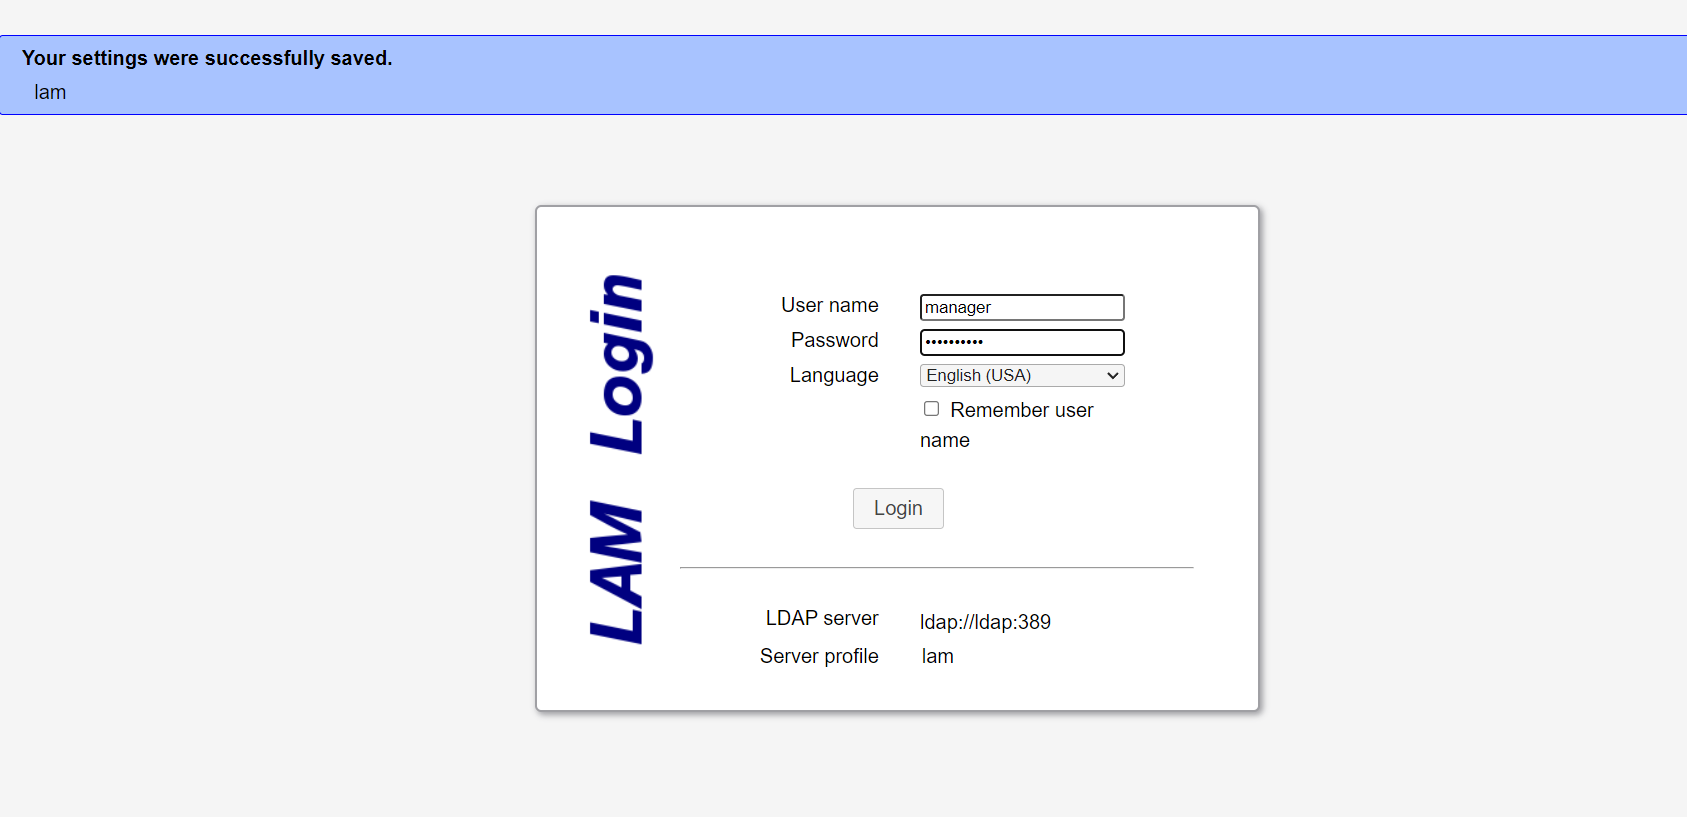<br />保存后,以刚刚添加的manager登录<br />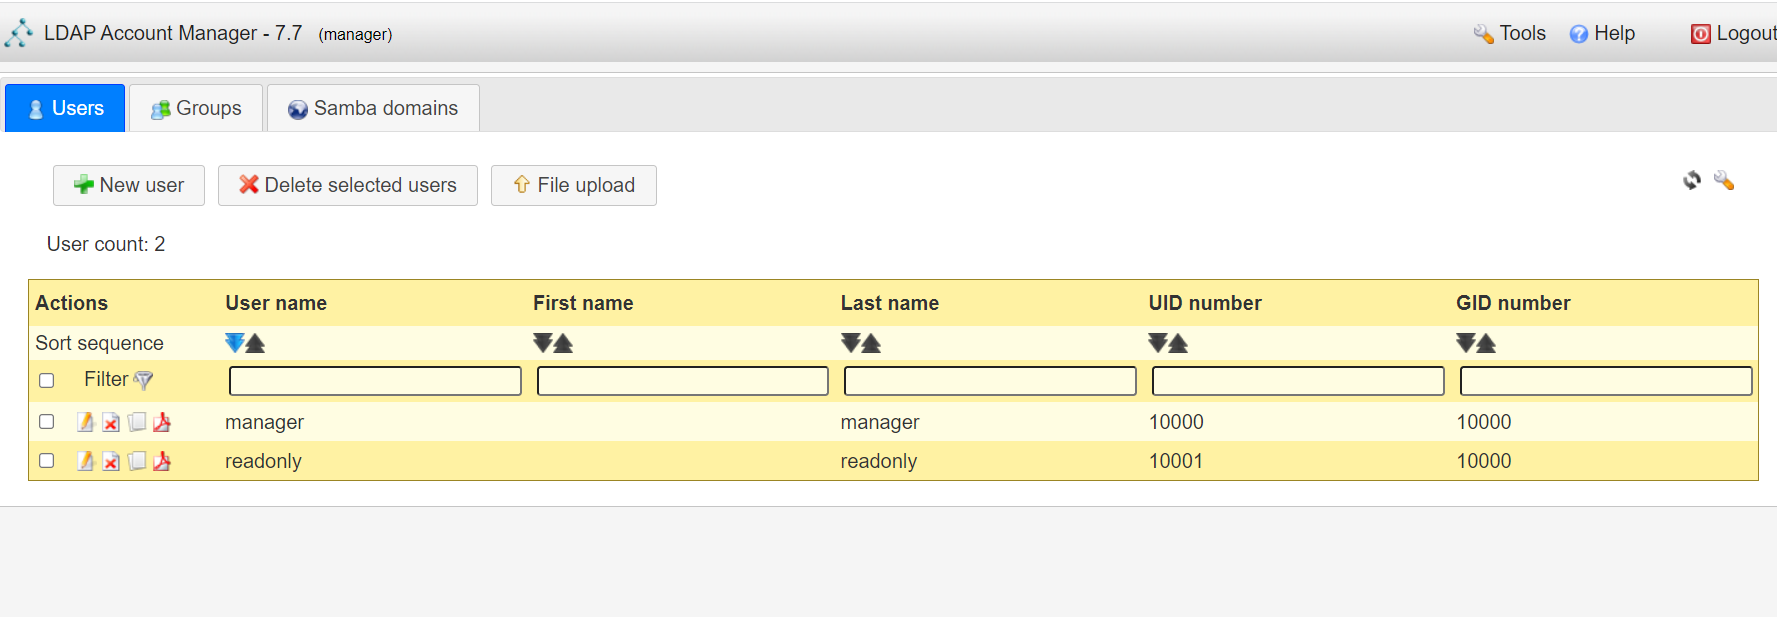<br />能看到所有的用户列表,添加新的普通用户,添加方式相同:<br />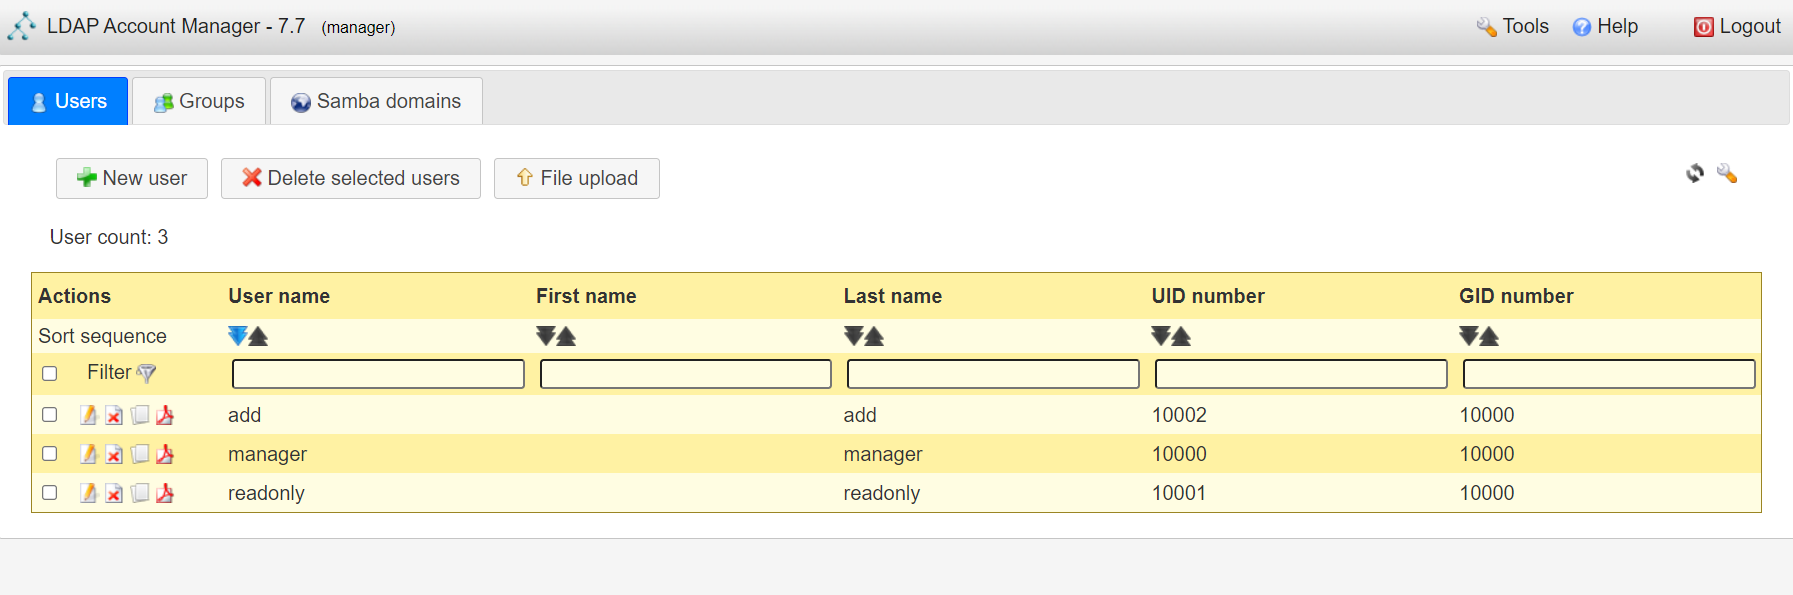<br />logout后,以普通用户登录,只能看到本用户的信息,同时能够自行重置密码。<br />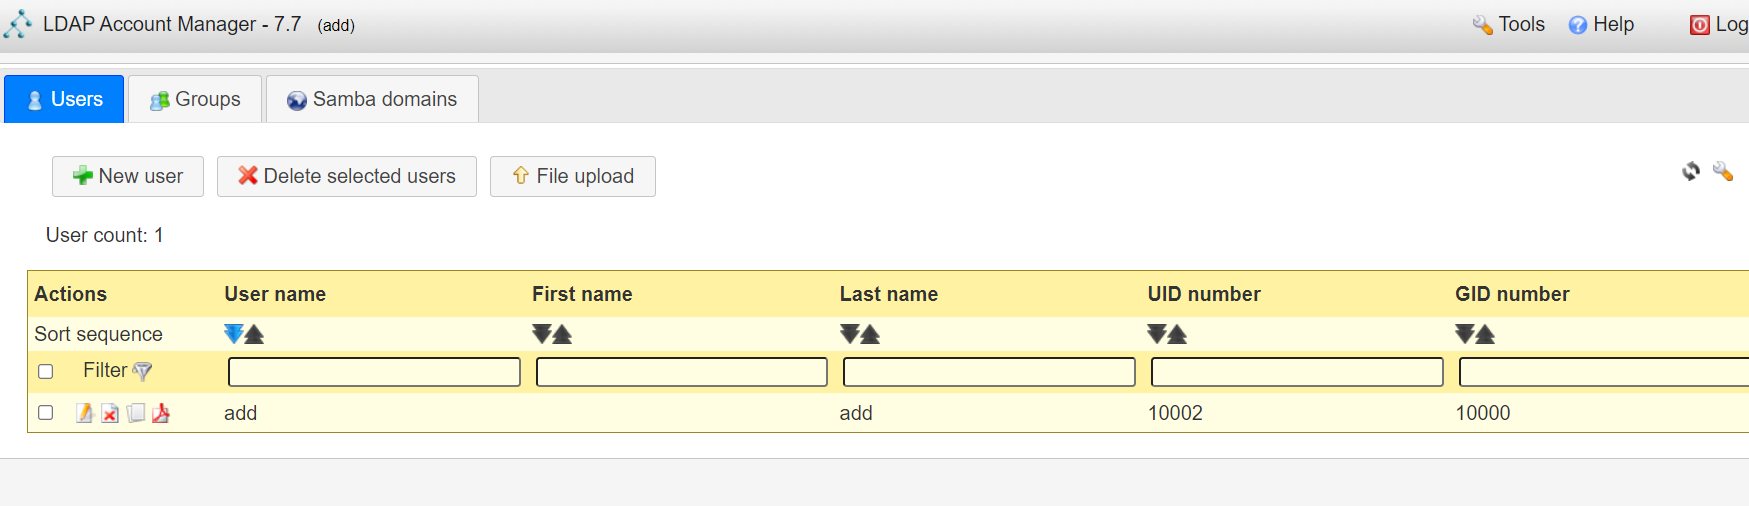<br />至此,LAM的配置完成,可以使用manager用户进行普通用户的管理,普通用户也能登录到LAM进行密码的修改。<a name="zcmsL"></a># RADIUS<a name="bvoM5"></a>### 配置搭建运行部分省略,同样可以使用公开的raidus镜像拉起容器,<br />配置部分注意需要修改ldap、eap的module配置,以及运行用户的配置
diff —git a/radius/clients.conf b/radius/clients.conf index 9dbc3e9..4cefcfc 100644 —- a/radius/clients.conf +++ b/radius/clients.conf @@ -266,3 +266,10 @@ client localhost_ipv6 {
secret = testing123
}
}
+ +client any {
- ipaddr = 0.0.0.0/0
- secret = 5699923
- require_message_authenticator = no
+
+}
diff —git a/radius/mods-available/eap b/radius/mods-available/eap
index 249d37f..6148b52 100644
—- a/radius/mods-available/eap
+++ b/radius/mods-available/eap
@@ -24,7 +24,7 @@ eap {
then that EAP type takes precedence over the
default type configured here.
#
- default_eap_type = md5
default_eap_type = peap
A list is maintained to correlate EAP-Response
packets with EAP-Request packets. After a
diff —git a/radius/mods-available/ldap b/radius/mods-available/ldap index 7ab829f..9ec5d36 100644 —- a/radius/mods-available/ldap +++ b/radius/mods-available/ldap @@ -16,7 +16,7 @@ ldap {
- ldaps:// (LDAP over SSL)
- ldapi:// (LDAP over Unix socket)
- ldapc:// (Connectionless LDAP)
- server = ‘localhost’
@@ -25,12 +25,12 @@ ldap {
# Administrator account for searching and possibly modifying.# If using SASL + KRB5 these should be commented out.
-# identity = ‘cn=admin,dc=example,dc=org’ -# password = mypass
- identity = ‘cn=root,dc=sechnic,dc=com’
password = toor
Unless overridden in another section, the dn from which all
searches will start from.
- base_dn = ‘dc=example,dc=org’
base_dn = ‘dc=sechnic,dc=com’
#
You can run the ‘ldapsearch’ command line tool using the
@@ -127,6 +127,8 @@ ldap {
attribute ref.
update {
control:Password-With-Header += 'userPassword'
- control:NT-Password := ‘sambaNTPassword’
- reply:Reply-Message := ‘sambaPwdLastSet’
control:NT-Password := ‘ntPassword’
reply:Reply-Message := ‘radiusReplyMessage’
reply:Tunnel-Type := ‘radiusTunnelType’
@@ -188,7 +190,7 @@ ldap { # user {Where to start searching in the tree for users
- base_dn = “${..base_dn}”
base_dn = “ou=users,${..base_dn}”
Filter for user objects, should be specific enough
to identify a single user object.
@@ -554,7 +556,7 @@ ldap {
The StartTLS operation is supposed to be
used with normal ldap connections instead of
using ldaps (port 636) connections
-# start_tls = yes
start_tls = no
ca_file = ${certdir}/cacert.pem
@@ -574,7 +576,7 @@ ldap {
# The default is libldap's default, which varies based# on the contents of ldap.conf.
-# require_cert = ‘demand’
require_cert = ‘never’ }
As of version 3.0, the ‘pool’ section has replaced the
diff —git a/radius/mods-enabled/ldap b/radius/mods-enabled/ldap new file mode 120000 index 0000000..a8ab497 —- /dev/null +++ b/radius/mods-enabled/ldap @@ -0,0 +1 @@ +../mods-available/ldap \ No newline at end of file diff —git a/radius/peap-mschapv2.conf b/radius/peap-mschapv2.conf new file mode 100644 index 0000000..d401738 —- /dev/null +++ b/radius/peap-mschapv2.conf @@ -0,0 +1,10 @@ +network={
- ssid=”example”
- key_mgmt=WPA-EAP
- eap=PEAP
- identity=”add”
- anonymous_identity=”anonymous”
- password=”xxx”
- phase2=”autheap=MSCHAPV2”
ca_cert=”/etc/raddb/certs/ca.der”
+} diff —git a/radius/radiusd.conf b/radius/radiusd.conf index a840006..ed32861 100644 —- a/radius/radiusd.conf +++ b/radius/radiusd.conf @@ -501,8 +501,8 @@ security {member. This can allow for some finer-grained access
controls.
#
- user = freerad
- group = freerad

若有收获,就点个赞吧
0 人点赞
