multoprocessing
multiprocessing模块就是跨平台版本的多进程模块。提供一个Process类来代表一个进程对象,下面演示了启动一个子进程并等待其结束:
from multiprocessing import Processimport os# 子进程要执行的代码def run_proc(name):print('Run child process %s (%s)...' % (name, os.getpid()))if __name__ == '__main__':print('Parent process %s.' % os.getpid())p = Process(target = run_proc, args=('test',))print('Child process will start.')p.start()p.join()print('Child process end.')# 执行结果如下:# Parent process 928.# Child process will start.# Run child process test (929)...# Process end.
创建子进程时,只需要传入一个执行函数和函数的参数,创建一个Process实例,用**start()**方法启动,这样创建进程比fork()还要简单。**join()**方法可以等待子进程结束后再继续往下运行,通常用于进程间的同步。
Pool
如果要启动大量的子进程,可以用进程池的方式批量创建子进程:
from multiprocessing import Poolimport os, time, randomdef long_time_task(name):print('Run task %s (%s)...' % (name, os.getpid()))start = time.time()time.sleep(random.random() * 3)end = time.time()print('Task %s runs %0.2f seconds.' % (name, (end - start)))if __name__ == '__main__':print('Parent process %s.' % os.getpid())p = Pool(4)for i in range(5):p.apply_async(long_time_task, args=(i,))print('Waiting for all subprocesses done...')p.close()p.join()print('All subprocesses done.')
执行结果如下:
Parent process 10108.Waiting for all subprocesses done...Run task 0 (9448)...Run task 1 (9784)...Run task 2 (10640)...Run task 3 (11804)...Task 1 runs 0.36 seconds.Run task 4 (9784)...Task 0 runs 1.92 seconds.Task 3 runs 2.44 seconds.Task 2 runs 2.64 seconds.Task 4 runs 2.40 seconds.All subprocesses done.
对**Pool**对象调用**join()**方法会等待所有子进程执行完毕,调用**join()**之前必须先调用**close()**,调用**close()**之后就不能继续添加新的**Process**了。
注意输出的结果,task0、1、2、3是立即执行的,而task4要等待前面某个task完成后才执行,这是因为Pool的默认大小在我的电脑上是4,因此最多同时执行4个进程。这是Pool有意设置的限制,并不是操作系统的限制。如果改成p = Pool(5)就可以同时跑5个进程。
因为Pool的默认大小是CPU的核数,如果拥有8核CPU,要至少提交9个子进程才能看到上面的等待效果。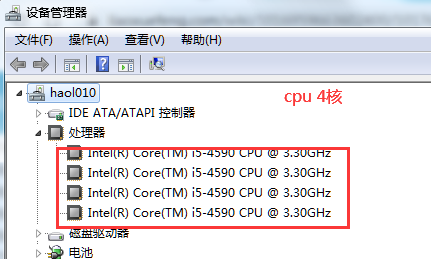
子进程
subprocess模块可以非常方便的启动一个子进程,然后控制其输入和输出。
import subprocessprint('$ nslookup www.python.org')r = subprocess.call(['nslookup', 'www.python.org'])print('Exit code:', r)
…超纲了,看原文吧
进程间通信
Python的multiprocessing模块包装了底层的机制,提供了Queue、Pipes等多种方式来交换数据。
我们以Queue为例,在父进程中创建两个子进程,一个往Queue里写数据,一个从Queue里读数据:
from multiprocessing import Process, Queueimport os, time, random# 写数据进程执行的代码def write(q):print('Process to write: %s' % os.getpid())for value in ['A', 'B', 'C']:q.put(value) # 写入: Queue().put(value)time.sleep(random.random())# 读数据进程执行的代码:def read(q):print('Process to read: %s' % os.getpid())while True:value = q.get(True) # 读取: Queue().get()print('Get %s from queue.' % value)if __name__=='__main__':# 父进程创建Queue,并传给各个子进程:q = Queue()pw = Process(target=write, args=(q,))pr = Process(target=read, args=(q,))# 启动子进程pw,写入pw.start()# 启动子进程pr,读取pr.start()# 等待pw结束:pw.join()# pr进程里是死循环,无法等待其结束,只能强行终止:pr.terminate() # terminate()
运行结果:
Process to write: 50563Put A to queue...Process to read: 50564Get A from queue.Put B to queue...Get B from queue.Put C to queue...Get C from queue.
多线程
启动一个线程就是把一个函数传入并创建Thread实例,然后调用start()开始执行:
import time, threading# 新线程执行的代码:def loop():print('thread %s is running...' % threading.current_thread().name)n = 0while n < 5:n = n + 1print('thread %s >>> %s' % (thread.current_thread().name, n))time.sleep(1)print('thread %s ended.' % threading.current_thread().name)print('thread %s is running...' % threading.current_thread().name)t = threading.Thread(target=loop, name='LoopThread')t.start()t.join()print('Thread %s ended.' % threading.current_thread().name)
thread MainThread is running...thread LoopThread is running...thread LoopThread >>> 1thread LoopThread >>> 2thread LoopThread >>> 3thread LoopThread >>> 4thread LoopThread >>> 5thread LoopThread ended.thread MainThread ended.
Lock
多线程和多进程最大的不同在于,多进程中,同一个变量,各自有一份拷贝存在于每个进程中,互不影响,而多线程中,所有变量都由所有线程共享,所以,任何一个变量都可以被任何一个线程修改,因此,线程之间共享数据最大的危险在于多个线程同时改一个变量,把内容给改乱了。
要确保balance计算正确,就要给change_it()上一把锁,当某个线程开始执行change_it()时,我们说,该线程因为获得了锁,因此其他线程不能同时执行change_it(),只能等待,直到锁被释放后,获得该锁以后才能改。由于锁只有一个,无论多少线程,同一时刻最多只有一个线程持有该锁,所以,不会造成修改的冲突。创建一个锁就是通过threading.Lock()来实现:
import time, threadinglock= threading.Lock()# 假定这是你的银行存款:balance = 0def change_it(n):# 先存后取,结果应该是为0global balance # global balancebalance = banlance + nbalance = balance - ndef run_thread(n):for i in range(20000):# 先获取锁:lock.acquire() # 如果没有锁,执行change_it时,线程可能中断导致多个线程把同一对象的内容改乱了。try:change_it(n)finally:# 改完了之后要释放锁lock.release() # 改完了之后要释放锁t1 = threading.Thread(target=run_thread, args=(5,))t2 = threading.Thread(target=run_thread, args=(8,))t1.start()t2.start()t1.join()t2.join()print(balance)
要小心死锁的发生。
多核CPU
Python解释器由于设计时有GIL全局锁,导致了多线程无法利用多核。所以在Python中,可以使用多线程,但不要指望能有效利用多核。
不过,Python虽然不能利用多线程实现多核任务,但可以通过多进程实现多核任务。多个Python进程有各自独立的GIL锁,互不影响。
import multiprocessing print(multiprocessing.cpu_count()) # 获取cpu是几核的
ThreadLocal
一个ThreadLocal变量虽然是全局变量,但每个线程都只能读写自己线程的独立副本,互不干扰。ThreadLocal解决了参数在一个线程中各个函数之间互相传递的问题。
improt threading# 创建全局ThreadLocal对象:local_school = threading.local()def process_student():# 获取当前线程关联的students:std = local_school.studentprint('Hello, %s (in %s)' % (std, threading.current_thread().name))def process_thread(name):# 绑定ThreadLocal的student:local_school.student = nameprocess_student()t1 = threading.Thread(target= process_thread, args=('Alice',), name='Thread-A')t2 = threading.Thread(target= process_thread, args=('Bob',), name='Thread-B')t1.start()t2.start()t1.join()t2.join()
执行结果:
Hello, Alice (in Thread-A)Hello, Bob (in Thread-B)
全局变量local_school就是一个ThreadLocal对象,每个Thread对它都可以读写student属性,但互相不影响。可以把local_school看成全局变量,但每个属性如local_school.student都是线程的局部变量,可以任意读写而不互相干扰,也不用管理锁的问题,ThreadLocal内部会处理。ThreadLocal最常用的地方就是为每个线程绑定一个数据库连接,HTTP请求,用户身份信息等,这样一个线程的所有调用到的处理函数都可以非常方便的访问这些资源。
分布式进程
Python的multiprocessing模块不但支持多进程,其中managers子模块还支持把多进程分布到多台机器上。一个服务进程可以作为调度者,将任务分布到其他多个进程中,依靠网络通信。
举个例子:如果我们已经有一个通过Queue通信的多进程程序在同一台机器上运行,现在,由于处理任务的进程任务繁重,希望把发送任务的进程和处理任务的进程分布到两台机器上。怎么用分布式进程实现?
原有的Queue可以继续使用,但是通过managers模块把Queue通过网络暴露出去,就可以让其他机器的进程访问Queue了。
我们先看服务进程,服务进程负责启动Queue,把Queue注册到网络上,然后往Queue里面写入任务:
# task_master.pyimport random, time, queuefrom multiprocessing.managers import BaseManager# 发送任务的队列:task_queue = queue.Queue()# 接收结果的队列:result_queue = queue.Queue()# 从BaseManager继承的QueueManager:class QueueManager(BaseManager):pass# 把两个Queue都注册到网络上, callable参数关联了Queue对象:QueueManager.register('get_task_queue', callable=lambda: task_queue)QueueManager.register('get_result_queue', callable=lambda: result_queue)# 绑定端口5000, 设置验证码'abc':manager = QueueManager(address=('', 5000), authkey=b'abc')# 启动Queue:manager.start()# 获得通过网络访问的Queue对象:task = manager.get_task_queue()result = manager.get_result_queue()# 放几个任务进去:for i in range(10):n = random.randint(0, 10000)print('Put task %d...' % n)task.put(n)# 从result队列读取结果:print('Try get results...')for i in range(10):r = result.get(timeout=10)print('Result: %s' % r)# 关闭:manager.shutdown()print('master exit.')
请注意,当我们在一台机器上写多进程程序时,创建的Queue可以直接拿来用,但是,在分布式多进程环境下,添加任务到Queue不可以直接对原始的task_queue进行操作,那样就绕过了QueueManager的封装,必须通过manager.get_task_queue()获得的Queue接口添加。
然后,在另一台机器上启动任务进程(本机上启动也可以):
# task_worker.pyimport time, sys, queuefrom multiprocessing.managers import BaseManager# 创建类似的QueueManager:class QueueManager(BaseManager):pass# 由于这个QueueManager只从网络上获取Queue,所以注册时只提供名字:QueueManager.register('get_task_queue')QueueManager.register('get_result_queue')# 连接到服务器,也就是运行task_master.py的机器:server_addr = '127.0.0.1'print('Connect to server %s...' % server_addr)# 端口和验证码注意保持与task_master.py设置的完全一致:m = QueueManager(address=(server_addr, 5000), authkey=b'abc')# 从网络连接:m.connect()# 获取Queue的对象:task = m.get_task_queue()result = m.get_result_queue()# 从task队列取任务,并把结果写入result队列:for i in range(10):try:n = task.get(timeout=1)print('run task %d * %d...' % (n, n))r = '%d * %d = %d' % (n, n, n*n)time.sleep(1)result.put(r)except Queue.Empty:print('task queue is empty.')# 处理结束:print('worker exit.')
任务进程要通过网络连接到服务进程,所以要指定服务进程的IP。
现在,可以试试分布式进程的工作效果了。先启动task_master.py服务进程。task_master.py进程发送完任务后,开始等待result队列的结果。现在启动task_worker.py进程:task_worker.py进程结束,在task_master.py进程中会继续打印出结果:
Result: 3411 * 3411 = 11634921Result: 1605 * 1605 = 2576025Result: 1398 * 1398 = 1954404Result: 4729 * 4729 = 22363441Result: 5300 * 5300 = 28090000Result: 7471 * 7471 = 55815841Result: 68 * 68 = 4624Result: 4219 * 4219 = 17799961Result: 339 * 339 = 114921Result: 7866 * 7866 = 61873956
这个简单的Master/Worker模型有什么用?其实这就是一个简单但真正的分布式计算,把代码稍加改造,启动多个worker,就可以把任务分布到几台甚至几十台机器上,比如把计算n*n的代码换成发送邮件,就实现了邮件队列的异步发送。
Queue对象存储在哪?注意到task_worker.py中根本没有创建Queue的代码,所以,Queue对象存储在task_master.py进程中: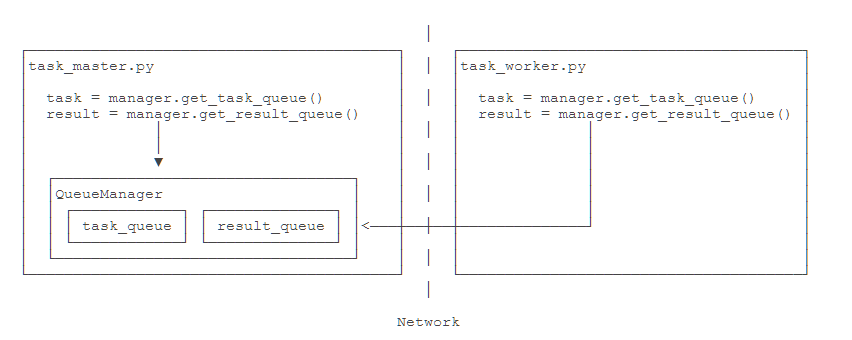
而Queue之所以能通过网络访问,就是通过QueueManager实现的。由于QueueManager管理的不止一个Queue,所以,要给每个Queue的网络调用接口起个名字,比如get_task_queue。
authkey有什么用?这是为了保证两台机器正常通信,不被其他机器恶意干扰。如果task_worker.py的authkey和task_master.py的authkey不一致,肯定连接不上。
注意Queue的作用是用来传递任务和接收结果,每个任务的描述数据量要尽量小。比如发送一个处理日志文件的任务,就不要发送几百兆的日志文件本身,而是发送日志文件存放的完整路径,由Worker进程再去共享的磁盘上读取文件。

若有收获,就点个赞吧
0 人点赞
