show: stepversion: 1.0
enable_checker: true
浅谈SpringFramework IoC实现原理
提示:在前面的学习中,我们知道了Spring IoC容器的基本概念和基本应用
知道了Spring IoC容器的基本理论知识后,就可以尝试学习一下Spring源码,不过Spring源码比较复杂,所以本文不打算长篇大论,通过一些例子,一点点学习
提示:以下是本篇文章正文内容,下面案例可供参考
Spring IoC容器体系
Spring容器体系结构简述
在上一章的学习中,我们已经比较详细地介绍了Spring IoC容器和简单应用,本文接着学习,可以参考Spring官网对IoC容器做了比较详细介绍,其中就指出了IoC容器在Spring框架中的实现核心是通过ApplicationContext,也可以说ApplicationContext是Spring IoC容器的表现:
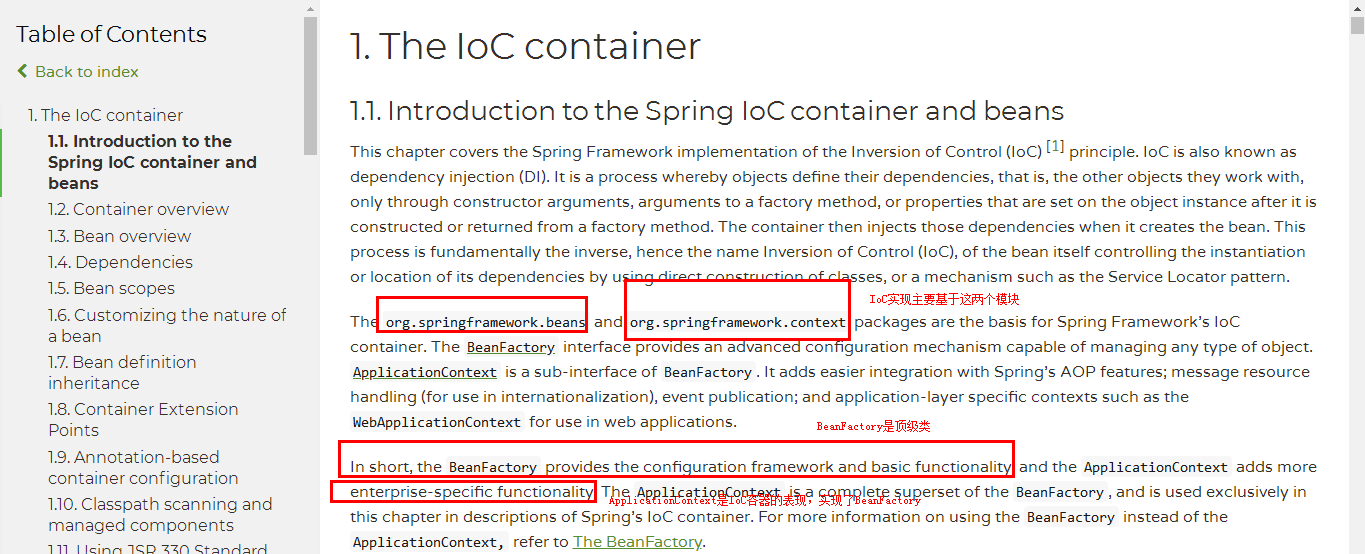
- 主要工程:org.springframework.beans、org.springframework.context
BeanFactory是顶级接口,ApplicationContext是高级接口,可以说是IoC的体现
BeanFactory和Application的关系
Alt+7查看BeanFactory的所有方法如图,从名称来看BeanFactory可以看出Beandefinition生成的工厂类
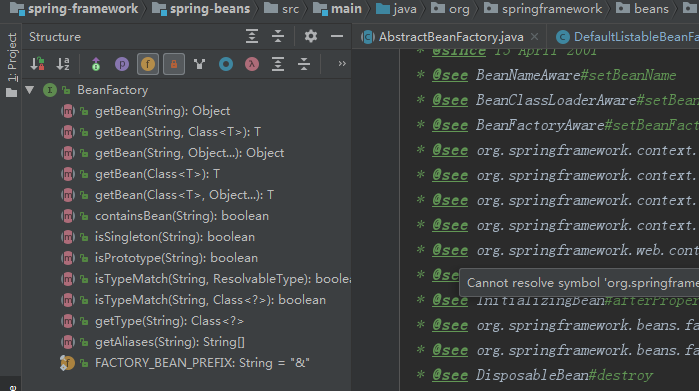
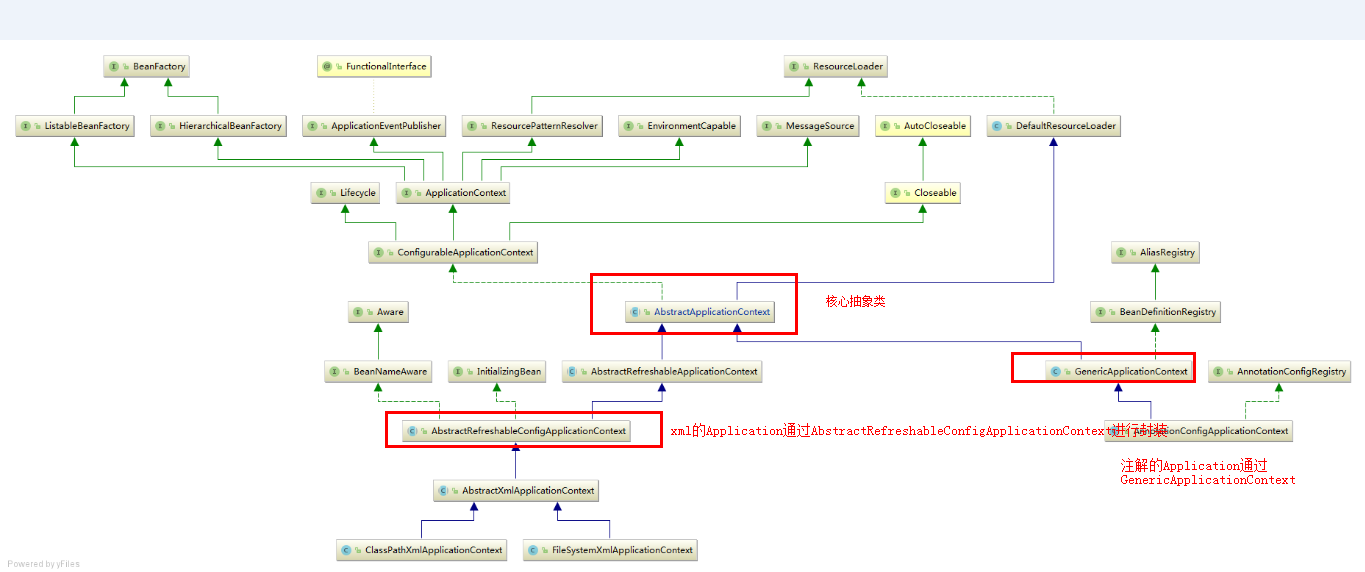
然后BeanFactory和Application的关系是怎么样的?可以用uml类图表示:从图可以看出BeanFactory是顶级接口类,而Application不仅实现了BeanFactory,而且还实现了MessageSource、EnvironmentCapable等等接口
总而言之,BeanFactory是顶级接口,ApplicationContext是高级接口,可以说是spring容器的表现ApplicationContext uml类图
ApplicationContext主要有如下的实现类,当然5.0.x版本不止这几个,不过主要使用的还是这3个:
ClassPathXmlApplicationContext:从类根路径加载元数据
- FileSystemXmlApplicationContext:从磁盘路径加载元数据
- AnnotationConfigApplicationContext:通过注解配置类加载元数据
在idea中看一下实现的类图,从图,我们可以清晰地看出类具体的关系:

从图:我们挑出重点的类,AbstractApplicationContext,GenericApplicationContext,AbstractRefreshableConfigApplicationContext
Bean初始化主流程
ok,本文通过例子调试的方法,看看Bean是怎么通过IoC容器实例的
开发软件和实验环境准备
- SpringFramework版本
- Springframework5.0.x
- 开发环境
- JAR管理:gradle 4.9/ Maven3.+
- 开发IDE:IntelliJ IDEA 2018.2.5
- JDK:jdk1.8.0_31
- Git Server:Git fro window 2.8.3
- Git Client:SmartGit18.1.5(可选)
maven项目,需要加上pom配置:
<properties><springframework.version>5.0.9.RELEASE</springframework.version></properties><dependencies><dependency><groupId>org.springframework</groupId><artifactId>spring-context</artifactId><version>${springframework.version}</version></dependency></dependencies>
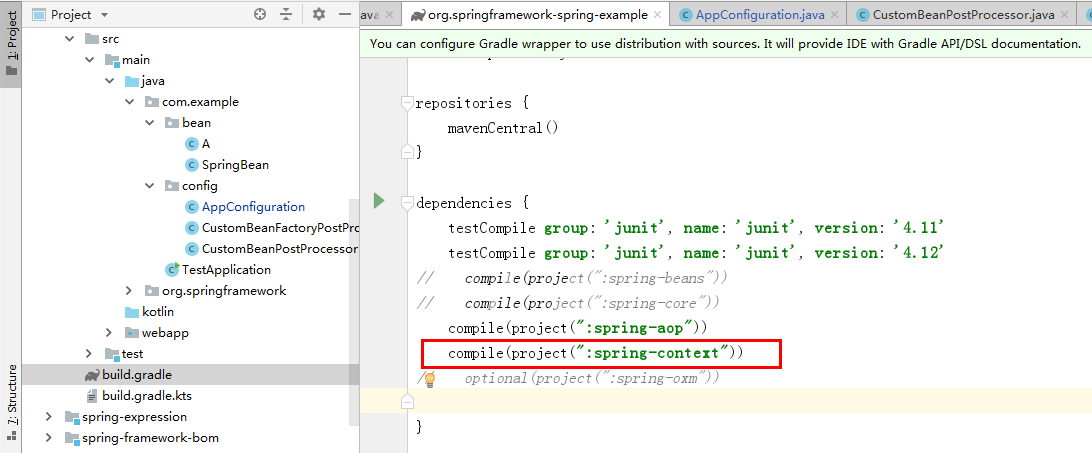
如果是gradle环境,可以直接在Spring框架project里新增一个module,具体可以参考教程:加上对应的配置
BeanDefinition初始化过程
新建一个测试的Bean类:
package com.example.bean;import org.springframework.beans.factory.InitializingBean;public class SpringBean implements InitializingBean {public SpringBean(){System.out.println("SpringBean构造函数");}@Overridepublic void afterPropertiesSet() throws Exception {System.out.println("SpringBean afterPropertiesSet");}}
配置类:注册Bean
import com.example.bean.SpringBean;import org.springframework.context.annotation.Bean;import org.springframework.context.annotation.Configuration;@Configurationpublic class AppConfiguration {@Beanpublic SpringBean springBean() {return new SpringBean();}}
测试类:本文先通过AnnotationConfigApplicationContext 进行学习
import com.example.bean.SpringBean;import com.example.config.AppConfiguration;import org.springframework.context.annotation.AnnotationConfigApplicationContext;public class TestApplication {public static void main(String[] args) {AnnotationConfigApplicationContext context = new AnnotationConfigApplicationContext();context.register(AppConfiguration.class);context.refresh();SpringBean bean = context.getBean(SpringBean.class);System.out.println(bean);}}
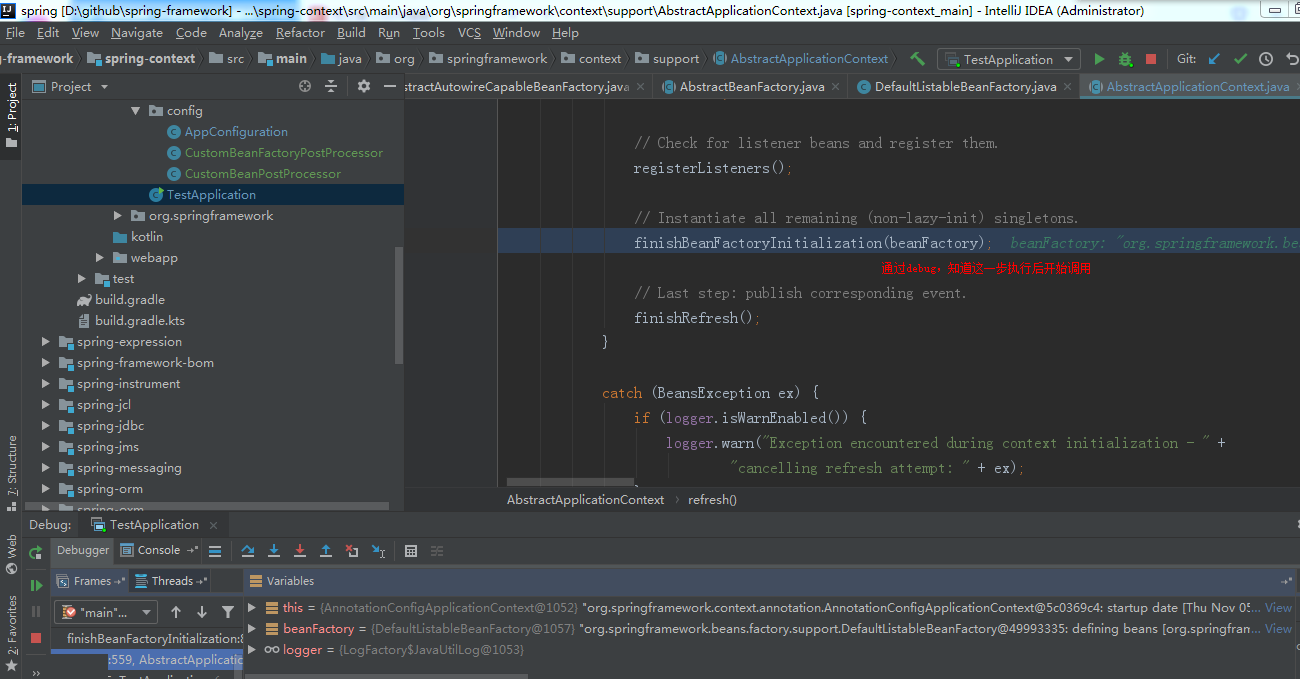
默认情况,也就是非懒加载的情况,经过调试,finishBeanFactoryInitialization(beanFactory);方法被调用后,调用了bean的构造函数,说明bean被实例了
通过@Lazy注解将bean设置为懒加载,在前面的学习,可以知道,所谓的懒加载就是在调用第一次调用bean时候才实例,不是在IoC容器启动就实例bean
@Bean@Lazypublic SpringBean springBean() {return new SpringBean();}
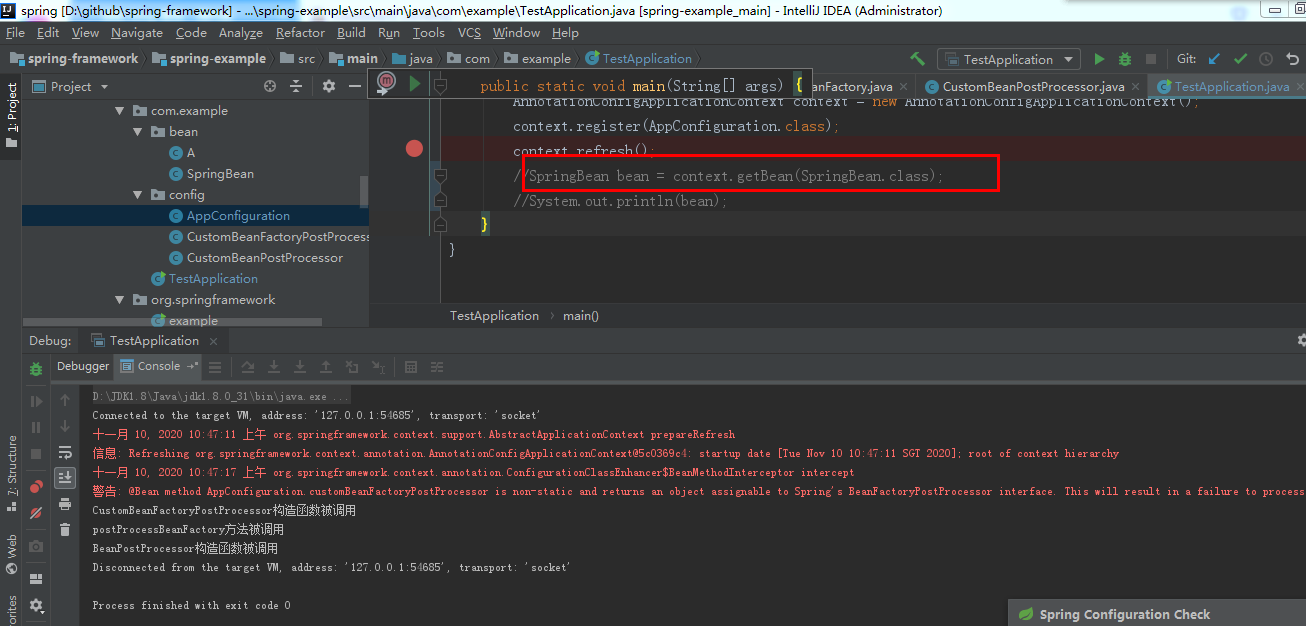
通过调试,懒加载的bean,在IoC容器启动之后,是不会被实例的,在代码SpringBean bean = context.getBean(SpringBean.class);调用时候,才会被实例
IoC容器初始化主过程
通过调试,我们找到AbstractApplicationContext的核心方法refresh,这个方法可以说是IoC容器启动的一条主线方法,找到这个方法,我们就可以对IoC启动的过程有一个比较清晰的路线{@link org.springframework.context.support.AbstractApplicationContext#refresh}
@Overridepublic void refresh() throws BeansException, IllegalStateException {// 注意:加了同步锁,保证容器的调用不冲突synchronized (this.startupShutdownMonitor) {// Prepare this context for refreshing.// 第一步:刷新Spring IoC容器前的预处理// 记录容器的启动时间,标记启动状态,处理配置文件占位符等等prepareRefresh();// Tell the subclass to refresh the internal bean factory.// 第二步:获取BeanFactory,默认实现是DefaultListableBeanFactory// 这一步比较重要,执行完成之后,xml配置会被解析成一个个BeanDefinition并注册到BeanFactory// 但是BeanDefinition还没实例完成,只是配置信息被提取处理ConfigurableListableBeanFactory beanFactory = obtainFreshBeanFactory();// Prepare the bean factory for use in this context.// 第三步:BeanFactory的准备工作// 对BeanFactory进行一些配置,设置BeanFactory的类加载器等等prepareBeanFactory(beanFactory);try {// Allows post-processing of the bean factory in context subclasses.// 第四步:BeanFactory准备工作完成之后的后置处理// 添加一些BeanFactoryPostProcessor 实现类,典型模板方法(设计模式:模板模式),给子类实现postProcessBeanFactory(beanFactory);// Invoke factory processors registered as beans in the context.// 第五步:实例并调用(invoke)BeanFactoryPostProcessors接口的postProcessBeanFactory方法(BeanFactory后置处理器)invokeBeanFactoryPostProcessors(beanFactory);// Register bean processors that intercept bean creation.// 第六步:注册BeanPostProcessors实现类(Bean后置处理器)// BeanPostProcessors接口两个方法:postProcessBeforeInitialization 和 postProcessAfterInitialization// postProcessBeforeInitialization 和 postProcessAfterInitialization分别在Bean创建的前后执行registerBeanPostProcessors(beanFactory);// Initialize message source for this context.// 第七步:初始化MessageSource组件,用于实现国际化i18n功能,消息处理,消息绑定initMessageSource();// Initialize event multicaster for this context.// 第八步:初始化事件派发器initApplicationEventMulticaster();// Initialize other special beans in specific context subclasses.// 第九步:典型的模板方法(设计模式:模板模式),具体实现给子类实现,在IoC容器刷新时候添加自己的逻辑代码onRefresh();// Check for listener beans and register them.// 第十步:注册监听器,ApplicationListener接口的监听器registerListeners();// Instantiate all remaining (non-lazy-init) singletons.// 第十一步:非懒加载(lazy-init=false,默认)的单例bean初始化实例完成finishBeanFactoryInitialization(beanFactory);// Last step: publish corresponding event.// 第十二步:完成ApplicationContext的刷新,调用LifecycleProcessor的onRefresh方法finishRefresh();}catch (BeansException ex) {if (logger.isWarnEnabled()) {logger.warn("Exception encountered during context initialization - " +"cancelling refresh attempt: " + ex);}// Destroy already created singletons to avoid dangling resources.// 回收bean资源destroyBeans();// Reset 'active' flag.cancelRefresh(ex);// Propagate exception to caller.// 异常往上抛,具体实现类才能捕获到异常信息throw ex;}finally {// Reset common introspection caches in Spring's core, since we// might not ever need metadata for singleton beans anymore...// 刷新缓存resetCommonCaches();}}}
画思维导图表示核心过程: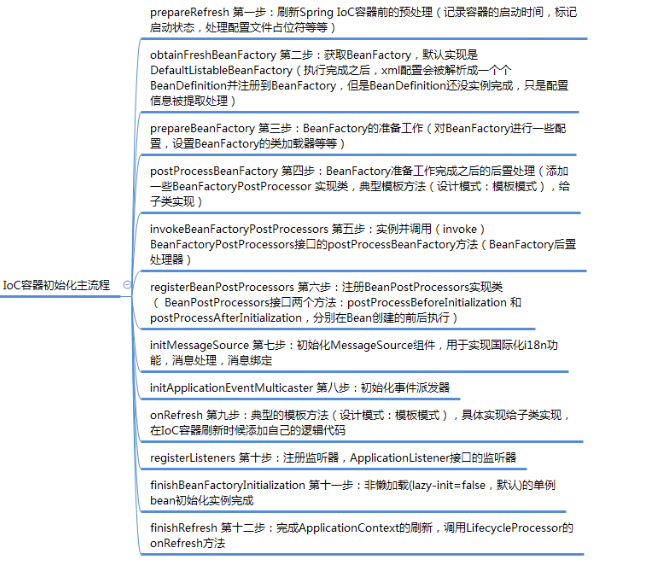
浅谈prepareRefresh预加载过程
本文先简要跟下代码:
protected void prepareRefresh() {// Switch to active.// 记录启动时间,active属性设置为true,closed属性设置为falsethis.startupDate = System.currentTimeMillis();this.closed.set(false);this.active.set(true);if (logger.isInfoEnabled()) {logger.info("Refreshing " + this);}// Initialize any placeholder property sources in the context environment.// 处理配置文件中的占位符initPropertySources();// Validate that all properties marked as required are resolvable:// see ConfigurablePropertyResolver#setRequiredProperties// 校验配置文件getEnvironment().validateRequiredProperties();// Store pre-refresh ApplicationListeners...if (this.earlyApplicationListeners == null) {this.earlyApplicationListeners = new LinkedHashSet<>(this.applicationListeners);}else {// Reset local application listeners to pre-refresh state.this.applicationListeners.clear();this.applicationListeners.addAll(this.earlyApplicationListeners);}// Allow for the collection of early ApplicationEvents,// to be published once the multicaster is available...this.earlyApplicationEvents = new LinkedHashSet<>();}
浅谈BeanFactory构建过程
{@link org.springframework.context.support.AbstractApplicationContext#refresh}obtainFreshBeanFactory方法:
/*** Tell the subclass to refresh the internal bean factory.* @return the fresh BeanFactory instance* @see #refreshBeanFactory()* @see #getBeanFactory()*/protected ConfigurableListableBeanFactory obtainFreshBeanFactory() {// 创建BeanFactoryrefreshBeanFactory();// 返回refreshBeanFactory方法创建好的BeanFactoryConfigurableListableBeanFactory beanFactory = getBeanFactory();if (logger.isDebugEnabled()) {logger.debug("Bean factory for " + getDisplayName() + ": " + beanFactory);}return beanFactory;}
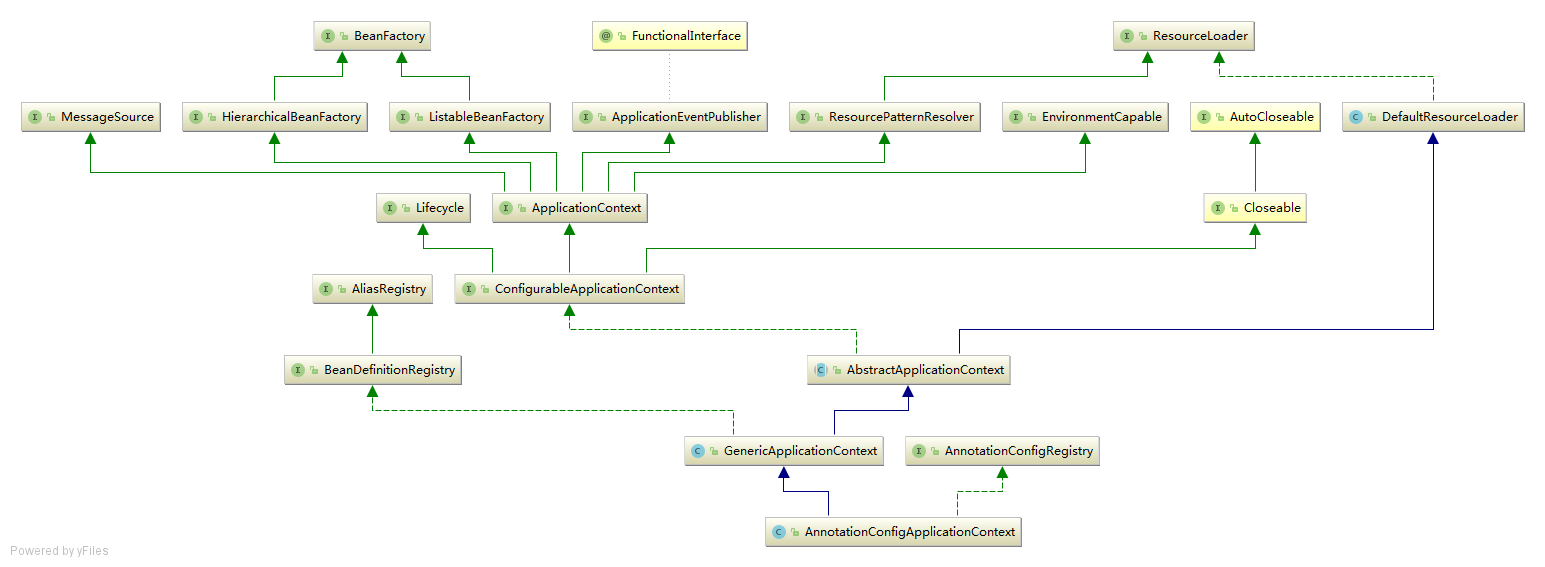
通过调试,默认的BeanFactory是DefaultListableBeanFactory,为什么是DefaultListableBeanFactory?可以找一下AnnotationConfigApplicationContext的uml类图,从图可以看出AnnotationConfigApplicationContext继承于GenericApplicationContext
Ctrl+Alt+B找到{@link org.springframework.context.support.GenericApplicationContext#getBeanFactory}
private final DefaultListableBeanFactory beanFactory;/*** Return the single internal BeanFactory held by this context* (as ConfigurableListableBeanFactory).*/@Overridepublic final ConfigurableListableBeanFactory getBeanFactory() {return this.beanFactory;}
所以,默认的BeanFactory就是DefaultListableBeanFactory
接着往上继续跟refreshBeanFactory方法,Ctrl+Alt+B找到org.springframework.context.support.GenericApplicationContext#refreshBeanFactory,根据注释,找到registerBeanDefinition
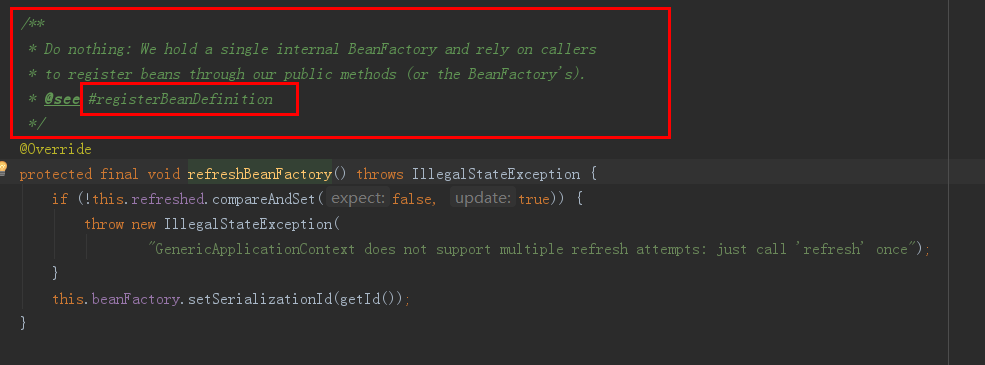
{@link org.springframework.context.support.GenericApplicationContext#registerBeanDefinition}
@Overridepublic void registerBeanDefinition(String beanName, BeanDefinition beanDefinition)throws BeanDefinitionStoreException {// 将BeanDefinition注册到BeanFactorythis.beanFactory.registerBeanDefinition(beanName, beanDefinition);}
{@link org.springframework.beans.factory.support.DefaultListableBeanFactory#registerBeanDefinition},这里的逻辑比较复杂,需要跟一下代码:
@Overridepublic void registerBeanDefinition(String beanName, BeanDefinition beanDefinition)throws BeanDefinitionStoreException {Assert.hasText(beanName, "Bean name must not be empty");Assert.notNull(beanDefinition, "BeanDefinition must not be null");// 校验BeanDefinition必须是AbstractBeanDefinition的子类if (beanDefinition instanceof AbstractBeanDefinition) {try {((AbstractBeanDefinition) beanDefinition).validate();}catch (BeanDefinitionValidationException ex) {throw new BeanDefinitionStoreException(beanDefinition.getResourceDescription(), beanName,"Validation of bean definition failed", ex);}}// 单例Bean信息保存在beanDefinitionMap里BeanDefinition existingDefinition = this.beanDefinitionMap.get(beanName);if (existingDefinition != null) {// 是否允许BeanDefinition覆盖// 意思是:举个例子两个bean的id和name是相同的,在同个配置文件里这种情况是会抛异常的,在不同配置文件会进行覆盖if (!isAllowBeanDefinitionOverriding()) {// 不允许覆盖,抛出异常throw new BeanDefinitionStoreException(beanDefinition.getResourceDescription(), beanName,"Cannot register bean definition [" + beanDefinition + "] for bean '" + beanName +"': There is already [" + existingDefinition + "] bound.");}else if (existingDefinition.getRole() < beanDefinition.getRole()) {// e.g. was ROLE_APPLICATION, now overriding with ROLE_SUPPORT or ROLE_INFRASTRUCTURE// 用框架定义的bean覆盖用户定义的bean,日志打印一些警告日志if (logger.isWarnEnabled()) {logger.warn("Overriding user-defined bean definition for bean '" + beanName +"' with a framework-generated bean definition: replacing [" +existingDefinition + "] with [" + beanDefinition + "]");}}else if (!beanDefinition.equals(existingDefinition)) {// 用新的bean覆盖旧的bean,同样会打印日志提示if (logger.isInfoEnabled()) {logger.info("Overriding bean definition for bean '" + beanName +"' with a different definition: replacing [" + existingDefinition +"] with [" + beanDefinition + "]");}}else {if (logger.isDebugEnabled()) {logger.debug("Overriding bean definition for bean '" + beanName +"' with an equivalent definition: replacing [" + existingDefinition +"] with [" + beanDefinition + "]");}}// 将beanDefinition保存到beanDefinitionMapthis.beanDefinitionMap.put(beanName, beanDefinition);}else {// 判断是否已经有其他的 Bean 开始初始化了,要加上同步锁,避免冲突if (hasBeanCreationStarted()) {// Cannot modify startup-time collection elements anymore (for stable iteration)// 加上同步锁,避免多个bean加载到beanDefinitionMap冲突(用于稳定迭代)synchronized (this.beanDefinitionMap) {this.beanDefinitionMap.put(beanName, beanDefinition);List<String> updatedDefinitions = new ArrayList<>(this.beanDefinitionNames.size() + 1);updatedDefinitions.addAll(this.beanDefinitionNames);updatedDefinitions.add(beanName);this.beanDefinitionNames = updatedDefinitions;if (this.manualSingletonNames.contains(beanName)) {Set<String> updatedSingletons = new LinkedHashSet<>(this.manualSingletonNames);updatedSingletons.remove(beanName);this.manualSingletonNames = updatedSingletons;}}}else {// Still in startup registration phase// 其它情况: 这种是理想的情况// beanDefinitionMap保存beanDefinition,注册beanDefinitionNames,manualSingletonNamesthis.beanDefinitionMap.put(beanName, beanDefinition);this.beanDefinitionNames.add(beanName);this.manualSingletonNames.remove(beanName);}this.frozenBeanDefinitionNames = null;}if (existingDefinition != null || containsSingleton(beanName)) {resetBeanDefinition(beanName);}else if (isConfigurationFrozen()) {clearByTypeCache();}}
BeanFactoryPostProcessor调用过程
为了验证BeanFactoryPostProcessor的调用过程,我们想知道BeanFactoryPostProcessor什么时候被实例,时候时候才被调用,我们可以通过写个例子进行验证:
package com.example.config;import org.springframework.beans.BeansException;import org.springframework.beans.factory.config.BeanFactoryPostProcessor;import org.springframework.beans.factory.config.BeanPostProcessor;import org.springframework.beans.factory.config.ConfigurableListableBeanFactory;import org.springframework.stereotype.Component;/***<pre>* CustomBeanFactoryPostProcessor* </pre>**<pre>* @author mazq* 修改记录* 修改后版本: 修改人: 修改日期: 2020/11/05 15:21 修改内容:* </pre>*///@Componentpublic class CustomBeanFactoryPostProcessor implements BeanFactoryPostProcessor{public CustomBeanFactoryPostProcessor(){System.out.println("CustomBeanFactoryPostProcessor构造函数被调用");}/*** Modify the application context's internal bean factory after its standard* initialization. All bean definitions will have been loaded, but no beans* will have been instantiated yet. This allows for overriding or adding* properties even to eager-initializing beans.** @param beanFactory the bean factory used by the application context* @throws BeansException in case of errors*/@Overridepublic void postProcessBeanFactory(ConfigurableListableBeanFactory beanFactory) throws BeansException {System.out.println("postProcessBeanFactory方法被调用");}}
AppConfiguration 配置类:
package com.example.config;import org.springframework.context.annotation.Bean;import org.springframework.context.annotation.Configuration;/***<pre>* AppConfiguration* </pre>**<pre>* @author mazq* 修改记录* 修改后版本: 修改人: 修改日期: 2020/11/05 10:26 修改内容:* </pre>*/@Configurationpublic class AppConfiguration {@Beanpublic CustomBeanFactoryPostProcessor customBeanFactoryPostProcessor(){return new CustomBeanFactoryPostProcessor();}}
public static void main(String[] args) {AnnotationConfigApplicationContext context = new AnnotationConfigApplicationContext();context.register(AppConfiguration.class);context.refresh();SpringBean bean = context.getBean(SpringBean.class);System.out.println(bean);}
然后在构造函数和postProcessBeanFactory方法处打断点,debug运行,通过debug,在invokeBeanFactoryPostProcessors时候,构造函数和postProcessBeanFactory都被调用了,说明了BeanFactoryPostProcessor的初始化和调用都是在invokeBeanFactoryPostProcessors执行时候触发
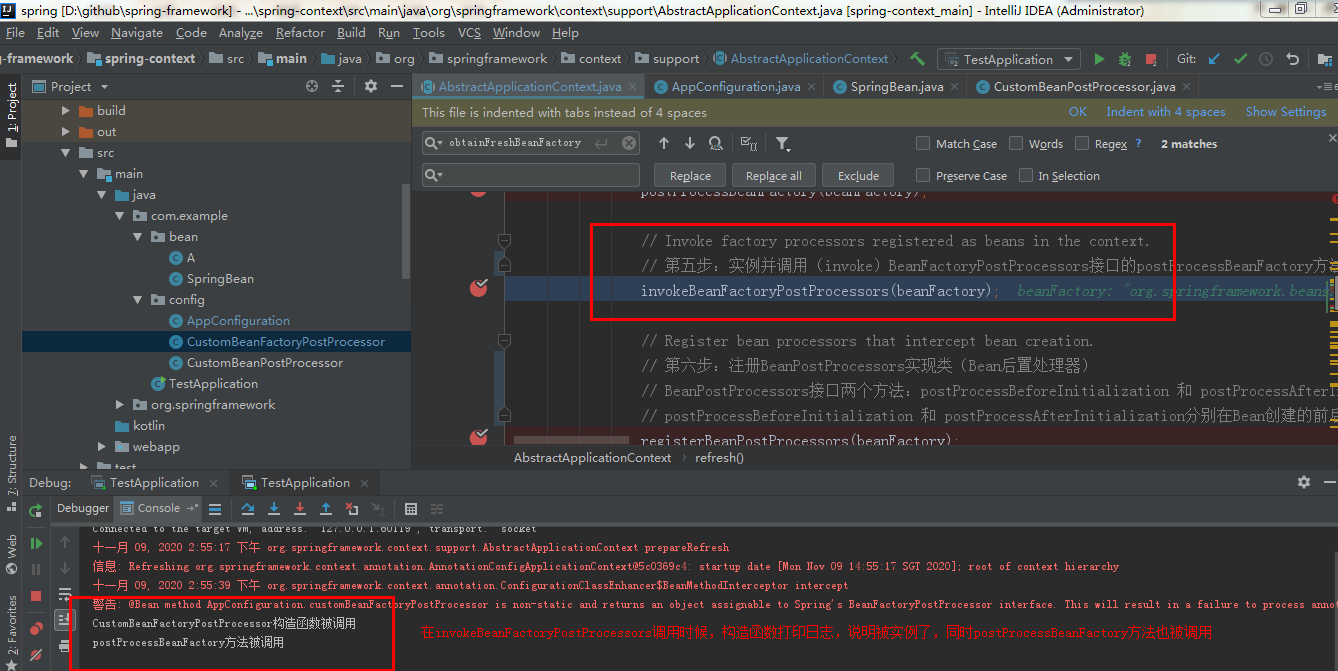
BeanPostProcessor 调用过程
接着,验证BeanPostProcessor 什么时候被实例,时候时候才被调用,我们也可以通过例子调试验证:
package com.example.config;import org.springframework.beans.BeansException;import org.springframework.beans.factory.config.BeanPostProcessor;/***<pre>* CustomBeanPostProcessor* </pre>**<pre>* @author mazq* 修改记录* 修改后版本: 修改人: 修改日期: 2020/11/05 10:55 修改内容:* </pre>*/public class CustomBeanPostProcessor implements BeanPostProcessor {public CustomBeanPostProcessor() {System.out.println("BeanPostProcessor构造函数被调用");}@Overridepublic Object postProcessBeforeInitialization(Object bean, String beanName) throws BeansException {if ("springBean".equals(beanName)) {System.out.println("postProcessBeforeInitialization方法被调用,对应的beanName是springBean");}return bean;}@Overridepublic Object postProcessAfterInitialization(Object bean, String beanName) throws BeansException {if ("springBean".equals(beanName)) {System.out.println("postProcessAfterInitialization,对应的beanName是springBean");}return bean;}}
配置类,将bean加载到ioc容器:
package com.example.config;import org.springframework.context.annotation.Bean;import org.springframework.context.annotation.Configuration;/***<pre>* AppConfiguration* </pre>**<pre>* @author mazq* 修改记录* 修改后版本: 修改人: 修改日期: 2020/11/05 10:26 修改内容:* </pre>*/@Configurationpublic class AppConfiguration {@Beanpublic CustomBeanPostProcessor customBeanPostProcessor(){return new CustomBeanPostProcessor();}}
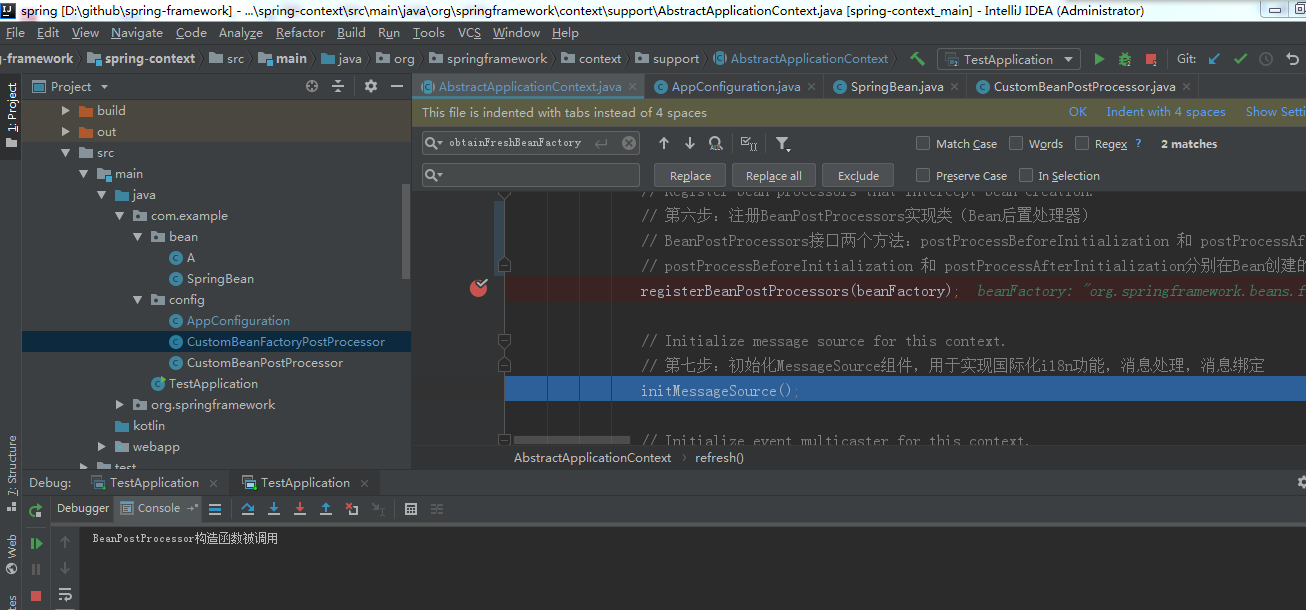
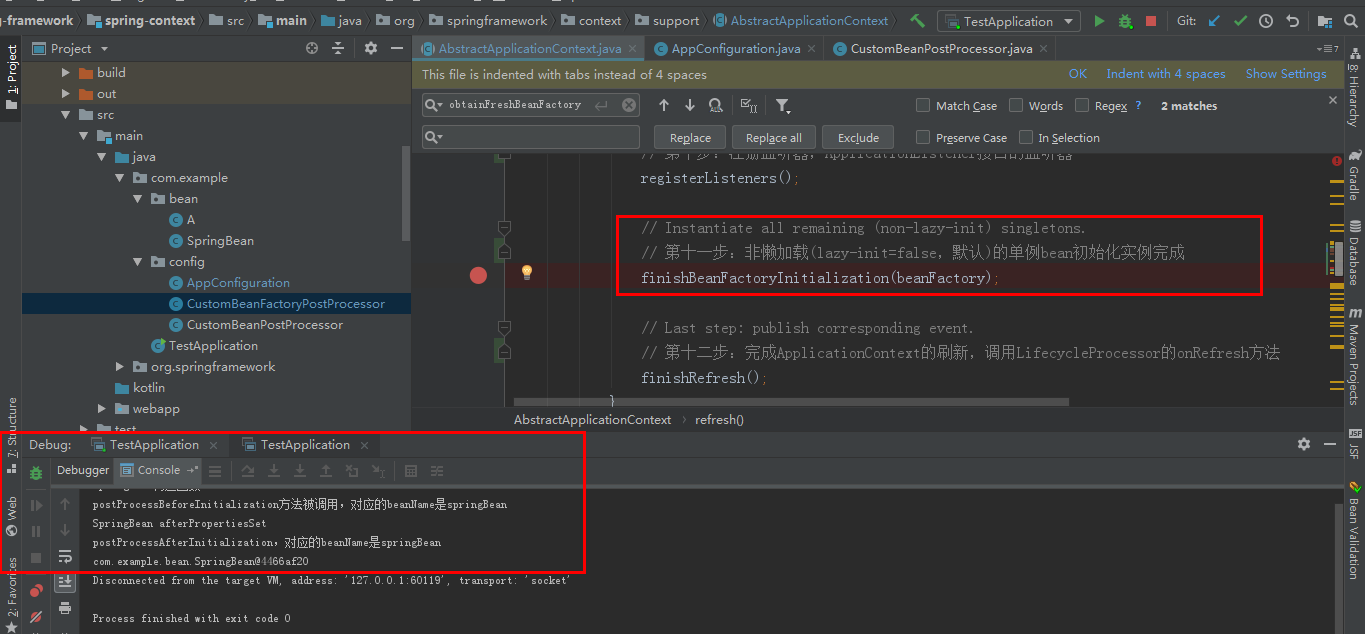
经过调试,BeanPostProcessor初始化实例是在#refresh.registerBeanPostProcessors时候触发的,调用是在#refresh.finishBeanFactoryInitialization时候被触发的
ok,基于前面的实验,可以归纳比对一下BeanFactoryPostProcessor和BeanPostProcessor,这两个比较重要的接口:
| 接口关键点 | 方法 | | —- | —- |
| BeanFactoryPostProcessor初始化 | #refresh.invokeBeanFactoryPostProcessors(beanFactory) |
| BeanFactoryPostProcessor调用 | #refresh.invokeBeanFactoryPostProcessors(beanFactory) |
| BeanPostProcessor 初始化 | #refresh.registerBeanPostProcessors(beanFactory) |
| BeanPostProcessor 调用 | #refresh.finishBeanFactoryInitialization(beanFactory) |
CustomBeanFactoryPostProcessor构造函数被调用
postProcessBeanFactory方法被调用
BeanPostProcessor构造函数被调用
SpringBean构造函数
postProcessBeforeInitialization方法被调用,对应的beanName是springBean
SpringBean afterPropertiesSet
postProcessAfterInitialization,对应的beanName是springBean
com.example.bean.SpringBean30ee2816

