1、LVM磁盘扩展
第一步:卸载umount
安全起见
umount /data3
第二步:增加pv
[root@my-client ~]# fdisk -l

Disk /dev/sdc: 2147 MB, 2147483648 bytes, 4194304 sectors
Units = sectors of 1 * 512 = 512 bytes
Sector size (logical/physical): 512 bytes / 512 bytes
I/O size (minimum/optimal): 512 bytes / 512 bytes


Disk /dev/sdb: 3221 MB, 3221225472 bytes, 6291456 sectors
Units = sectors of 1 * 512 = 512 bytes
Sector size (logical/physical): 512 bytes / 512 bytes
I/O size (minimum/optimal): 512 bytes / 512 bytes
Disk label type: dos
Disk identifier: 0x6cf7e06c

   Device Boot      Start         End      Blocks   Id  System
/dev/sdb1            2048      411647      204800   8e  Linux LVM
/dev/sdb2          411648     6291455     2939904    5  Extended
/dev/sdb5          413696     1232895      409600   8e  Linux LVM
/dev/sdb6         1234944     6291455     2528256   8e  Linux LVM

Disk /dev/sda: 21.5 GB, 21474836480 bytes, 41943040 sectors
Units = sectors of 1 * 512 = 512 bytes
Sector size (logical/physical): 512 bytes / 512 bytes
I/O size (minimum/optimal): 512 bytes / 512 bytes
Disk label type: dos
Disk identifier: 0x000df097

   Device Boot      Start         End      Blocks   Id  System
/dev/sda1   *        2048     2099199     1048576   83  Linux
/dev/sda2         2099200    41943039    19921920   8e  Linux LVM

Disk /dev/mapper/centos-root: 18.2 GB, 18249416704 bytes, 35643392 sectors
Units = sectors of 1 * 512 = 512 bytes
Sector size (logical/physical): 512 bytes / 512 bytes
I/O size (minimum/optimal): 512 bytes / 512 bytes


Disk /dev/mapper/centos-swap: 2147 MB, 2147483648 bytes, 4194304 sectors
Units = sectors of 1 * 512 = 512 bytes
Sector size (logical/physical): 512 bytes / 512 bytes
I/O size (minimum/optimal): 512 bytes / 512 bytes


Disk /dev/mapper/test--vg1-test--lv1: 2789 MB, 2789212160 bytes, 5447680 sectors
Units = sectors of 1 * 512 = 512 bytes
Sector size (logical/physical): 512 bytes / 512 bytes
I/O size (minimum/optimal): 512 bytes / 512 bytes

[root@my-client ~]# fdisk /dev/sdc
[root@my-client ~]# fdisk /dev/sdc
Welcome to fdisk (util-linux 2.23.2).

Changes will remain in memory only, until you decide to write them.
Be careful before using the write command.

Device does not contain a recognized partition table
Building a new DOS disklabel with disk identifier 0xb565ec68.

Command (m for help): p

Disk /dev/sdc: 2147 MB, 2147483648 bytes, 4194304 sectors
Units = sectors of 1 * 512 = 512 bytes
Sector size (logical/physical): 512 bytes / 512 bytes
I/O size (minimum/optimal): 512 bytes / 512 bytes
Disk label type: dos
Disk identifier: 0xb565ec68

   Device Boot      Start         End      Blocks   Id  System

Command (m for help): n
Partition type:
   p   primary (0 primary, 0 extended, 4 free)
   e   extended
Select (default p):
Using default response p
Partition number (1-4, default 1):
First sector (2048-4194303, default 2048):
Using default value 2048
Last sector, +sectors or +size{K,M,G} (2048-4194303, default 4194303):
Using default value 4194303
Partition 1 of type Linux and of size 2 GiB is set

Command (m for help): p

Disk /dev/sdc: 2147 MB, 2147483648 bytes, 4194304 sectors
Units = sectors of 1 * 512 = 512 bytes
Sector size (logical/physical): 512 bytes / 512 bytes
I/O size (minimum/optimal): 512 bytes / 512 bytes
Disk label type: dos
Disk identifier: 0xb565ec68

   Device Boot      Start         End      Blocks   Id  System
/dev/sdc1            2048     4194303     2096128   83  Linux

Command (m for help): t
Selected partition 1
Hex code (type L to list all codes): 8e
Changed type of partition 'Linux' to 'Linux LVM'

Command (m for help): w
The partition table has been altered!

Calling ioctl() to re-read partition table.
Syncing disks.

[root@my-client ~]# pvcreate /dev/sdc1
  Physical volume "/dev/sdc1" successfully created.
第三步:把增加的pv放到vg中
vgextend test-vg1 /dev/sdc1
第四步:增加lvm
lvextend -L 2.5G /dev/test-vg1/test-lv1
lvextend -L +100M /dev/test-vg1/test-lv1
不加+的意思是调整为多少大小
-l 指定pv数量
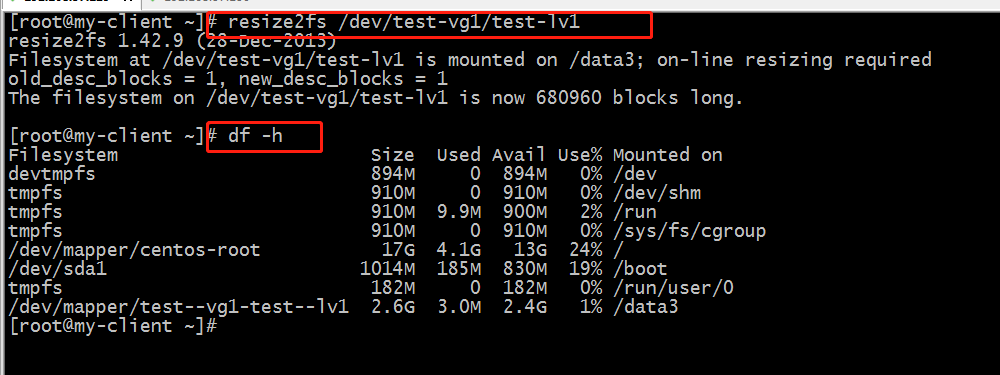
第五步 resize2fs /dev/lvm_1/lvm_disk1 增加到系统分区表中 **
**
第六步写到/etc/fstab
mount -a挂载/etc/fstab中的路径
2、删除逻辑卷与卷组
2.1 删除逻辑卷,lvremove
lvremove /dev/lvm_group/lv_disk2
2.2 删除卷组,vgremove
2.3 删除PV,pvremove
2.4 删除/etc/fstab
3、创建swap分区
3.1 磁盘分区
3.2 格式化swap&&激活分区
mkswap /dev/sdb1
swapon /dev/sdb2 (打开swap分区)
查看cat /proc/swaps
3.3永久挂载
vim /etc/fstab (在fstab中增加一条记录如下)
/dev/sdb2 swap swap defaults 0 0
第四步:挂载fstab下的分区
mount -a
删除交换分区
swapoff /dev/sdb2
删除fstab

