在测试环境下,由于需要经常修改代码,反复重启,非常浪费时间,所以我们可以借助 Spring Boot 提供的热加载插件完成热部署
流程图
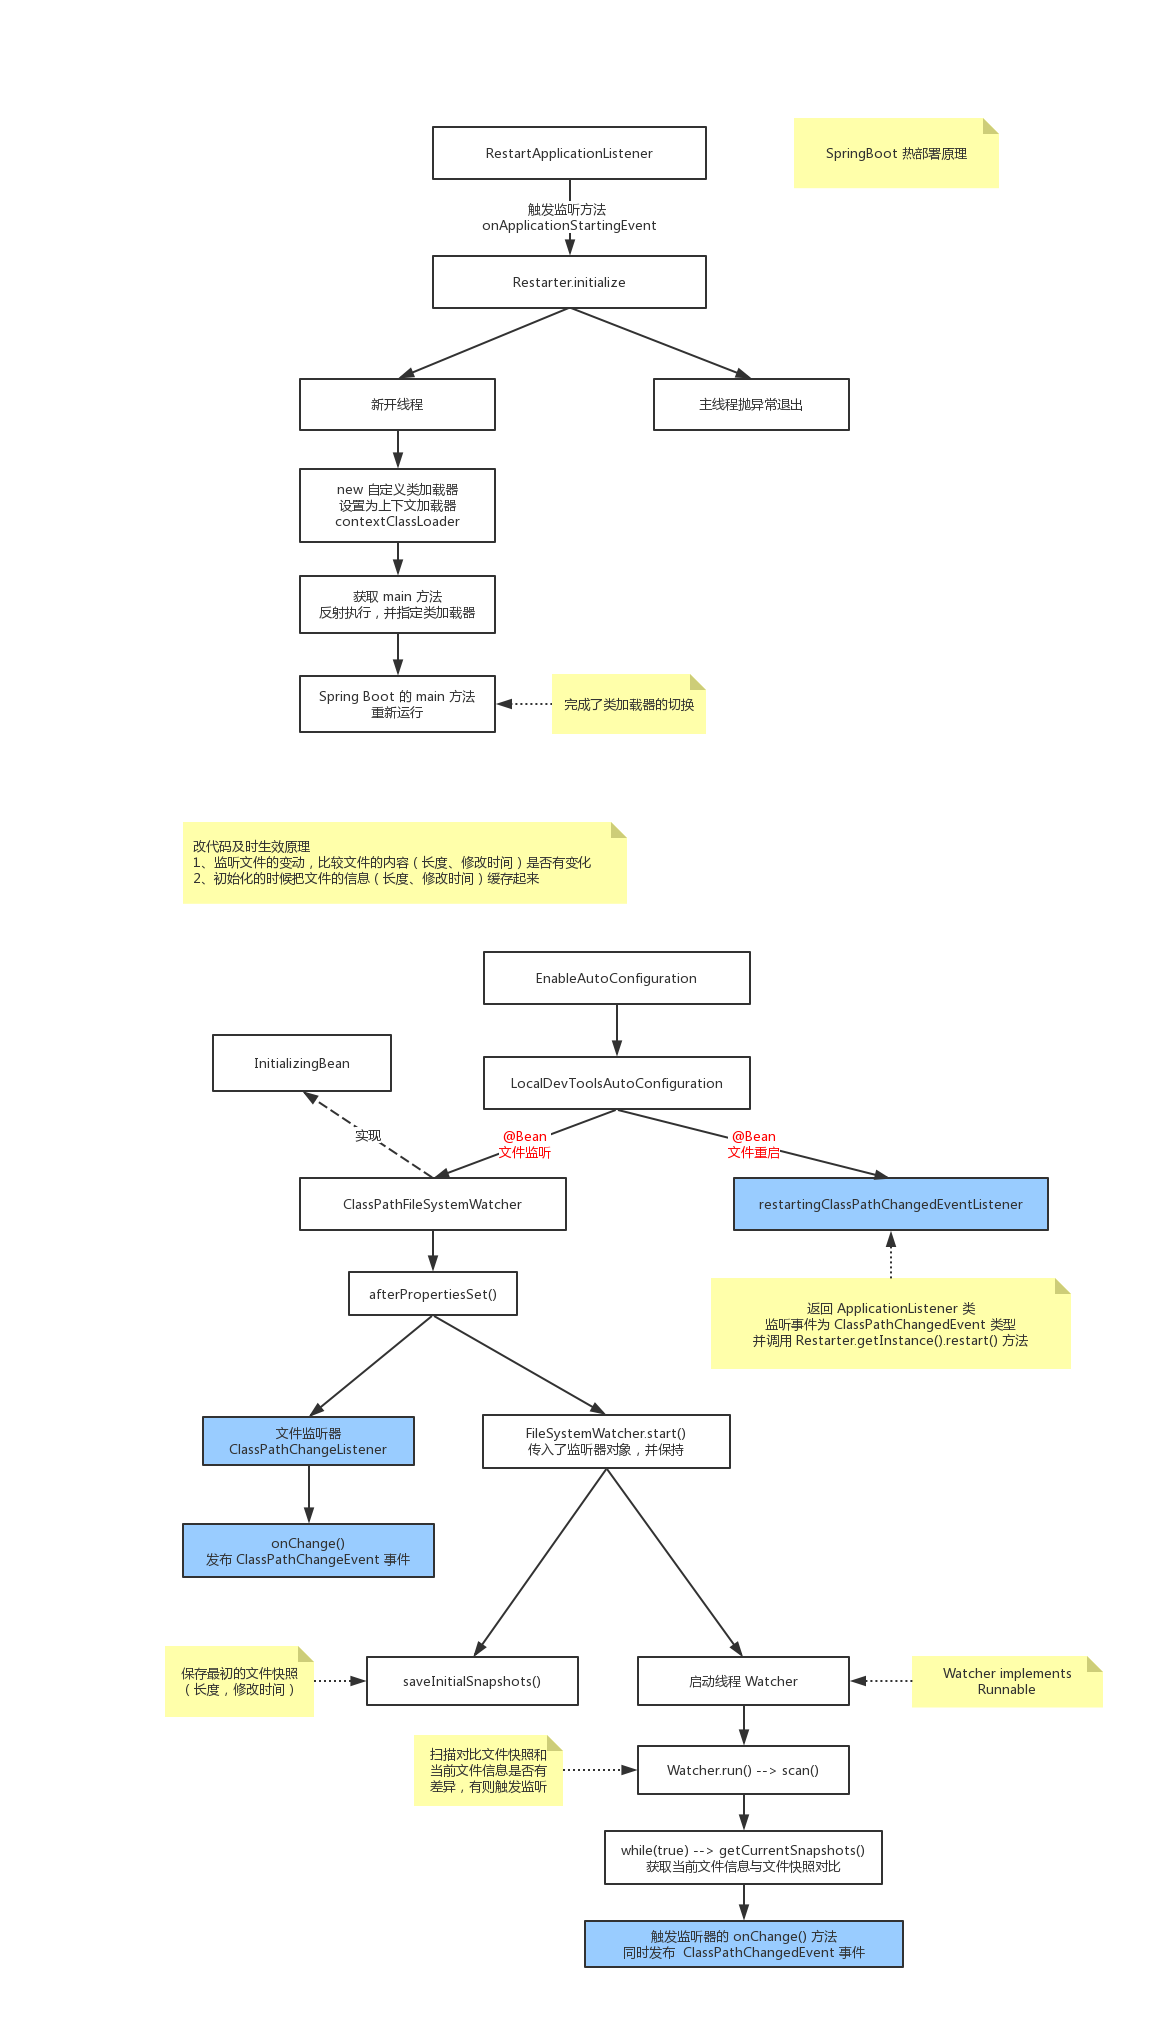
Spring Boot 热部署
<!-- https://mvnrepository.com/artifact/org.springframework.boot/spring-boot-devtools --><dependency><groupId>org.springframework.boot</groupId><artifactId>spring-boot-devtools</artifactId><version>2.3.1.RELEASE</version></dependency>
加上这个依赖以后,当我们完成代码的修改以后,可以点击重新编译,完成代码的更新
那么热部署的原理是什么呢?
其实热部署:就是修改后的 java 文件,从新编译成 class 文件,然后再通过 ClassLoader 加载到 JVM 虚拟机中去,替换 JVM 虚拟中原来的 class 对象
类加载器
JVM 默认提供了三种类加载器
- BootstrapClassLoad:启动类加载器,存在 JVM 中,加载核心 class 文件
- ExtensionClassLoad:扩展类加载器,主要加载 lib\ext 包下面的 class 文件
- ApplicationClassLoad:应用程序类加载器,加载应用程序上下文中的 class 文件
双亲委派(父类委托)机制
双亲委派的英文是:Java parent delegation,其实是早期翻译错误,正确的理解是父类委托机制,当一个类加载器去加载某一个类的时候,默认情况下不会由自己去加载,而是由其父类去加载
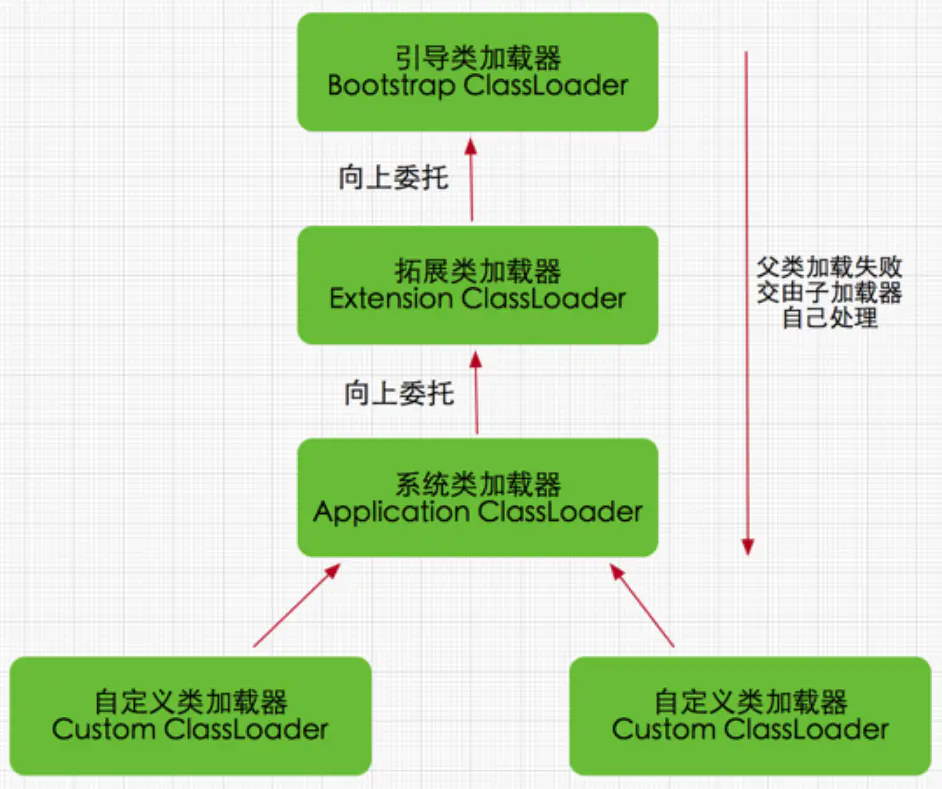
某个特定的类加载器在接到加载类的请求时,首先将加载任务委托给父类加载**器,依次递归,如果父类加载器可以完成类加载任务,就成功返回;只有父类加载器无法完成此加载任务时,才自己去加载**。
使用双亲委派模型的好处在于Java类随着它的类加载器一起具备了一种带有优先级的层次关系。例如类java.lang.String,它存在在 rt.jar 中,无论哪一个类加载器要加载这个类,最终都是委派给处于模型最顶端的Bootstrap ClassLoader 进行加载,因此 String 类在程序的各种类加载器环境中都是同一个类。
相反,如果没有双亲委派模型而是由各个类加载器自行加载的话,如果用户编写了一个 java.lang.String 的同名类并放在 ClassPath 中,那系统中将会出现多个不同的 String 类,程序将混乱。因此,如果开发者尝试编写一个与rt.jar 类库中重名的 Java 类,可以正常编译,但是永远无法被加载运行(因为都会向上委派,最终到 BootStrap ClassLoad,它可以加载到了 rt.jar 下的 String,所以你写的 String.class 并没有作用)
这里的 String.class 是指和 原 String.class 具有相同的包名和类名; 同一个 class 如果被不同的 ClassLoad 加载,那么类型也不相同;
ClassLoader 核心代码
先从缓存中读取 Class<?> c = findLoadedClass(name) 这个 class 文件,如果读取到,则直接返回这个 class 对象,如果没有,则调用父类的 ClassLoader 进行递归调用,最终到 Bootstrap ClassLoader 进行加载,如果 BootStrap ClassLoader 没有加载到
在这个过程中,每个类加载器都会尝试先从缓存中加载,加载到了就会直接返回,如果一直到 BootStrap ClassLoader 都没有加载到,则会抛出 ClassNotFoundException 异常信息
protected Class<?> loadClass(String name, boolean resolve) throws ClassNotFoundException {synchronized (getClassLoadingLock(name)) {// First, check if the class has already been loadedClass<?> c = findLoadedClass(name);if (c == null) {long t0 = System.nanoTime();try {if (parent != null) {c = parent.loadClass(name, false);} else {c = findBootstrapClassOrNull(name);}} catch (ClassNotFoundException e) {}if (c == null) {long t1 = System.nanoTime();c = findClass(name);sun.misc.PerfCounter.getParentDelegationTime().addTime(t1 - t0);sun.misc.PerfCounter.getFindClassTime().addElapsedTimeFrom(t1);sun.misc.PerfCounter.getFindClasses().increment();}}if (resolve) {resolveClass(c);}return c;}}
看了上面所说的类加载机制,就会产生一个问题
既然是 ClassLoader 是父类委托机制,那么如果我们更改了一个 java 文件,编译成 class 文件之后,通过类加载机制,依然会从缓存中读取,我们的修改后的 class 文件也是无效啊,那么应该如何做呢?
所以,我们需要打破父类委托机制,我们可以通过重写从缓存中寻找 class 对象的方法,让我们自定义的 ClassLoader,从缓存中可以获取到 class 对象,这样就可以不走父类委托机制了
**
自定义类加载器
public class MyClassLoader extends ClassLoader {// 项目根路径private String rootPath;// 存储所有需要由这个类加载器加载的类private List<String> classes;// classPaths 需要被热部署的类路径public MyClassLoader(String rootPath, String... hotClassPaths) throws Exception {this.rootPath = rootPath;this.classes = new ArrayList<>();for (String hotClassPath : hotClassPaths) {scanClassPath(new File(hotClassPath));}}/*** 扫描目录下的 class** @param file 类文件*/public void scanClassPath(File file) throws Exception {if (file.isDirectory()) {File[] files = file.listFiles();if (files != null) {for (File subFile : files) {scanClassPath(subFile);}}} else {String fileName = file.getName();String filePath = file.getPath();String suffix = fileName.substring(fileName.lastIndexOf("."));if (".class".equals(suffix)) {InputStream in = new FileInputStream(file);byte[] bytes = new byte[(int) file.length()];in.read(bytes);String className = fileNameToClassName(filePath);// 加载 class 文件,并生成 class 对象,加入到 JVM 虚拟机中去defineClass(className, bytes, 0, bytes.length);classes.add(className);}}}/*** 文件名转类名** @param filePath 文件路径*/private String fileNameToClassName(String filePath) {if (rootPath.startsWith("/")) {rootPath = rootPath.substring(1);}String classPath = filePath.replace(rootPath, "").replaceAll("\\\\", ".");return classPath.substring(1, classPath.lastIndexOf("."));}@Overridepublic Class<?> loadClass(String name) throws ClassNotFoundException {// 因为将该类已经加载到 JVM 中了,所以这里可以查询到Class<?> loadedClass = findLoadedClass(name);if (loadedClass == null) {if (!classes.contains(name)) {return getSystemClassLoader().loadClass(name);}throw new ClassNotFoundException("没有加载到类文件");}return loadedClass;}public static void main(String[] args) throws Exception {String rootPath = MyClassLoader.class.getResource("/").getPath();rootPath = new File(rootPath).getPath();while (true) {MyClassLoader myClassLoader = new MyClassLoader(rootPath, rootPath + "/com");Class<?> aClass = myClassLoader.loadClass("com.example.spring.boot.classloader.TestClass");aClass.getMethod("test").invoke(aClass.newInstance());TimeUnit.SECONDS.sleep(2);}}}public class TestClass {public void test() {ClassLoader classLoader = this.getClass().getClassLoader();System.out.println(classLoader + " => TestClass Version-1");}}
这里我们可以看到,当我们修改 Test 类中的方法后,点击编译 Class,此时,就会打印出修改后的内容

new 对象带来的问题
那么我们如果 new TestClass().test() 也会进行相应的改变么?
public static void main(String[] args) throws Exception {String rootPath = MyClassLoader.class.getResource("/").getPath();rootPath = new File(rootPath).getPath();while (true) {MyClassLoader myClassLoader = new MyClassLoader(rootPath, rootPath + "/com");Class<?> aClass = myClassLoader.loadClass("com.example.spring.boot.classloader.TestClass");aClass.getMethod("test").invoke(aClass.newInstance());new TestClass().test();TimeUnit.SECONDS.sleep(2);}}
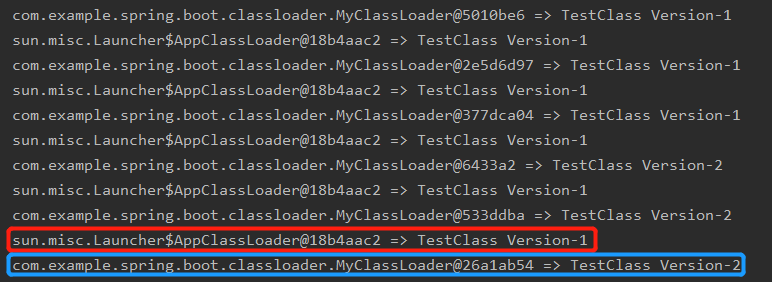
我们可以看出来,我们 new Test() 出来的 classLoader 是 AppClassLoader,内容依然是 Version-1,并没有随着改变,这也证明了,不同的类加载器加载的对象,是不同的
那么,如何才能做到输入的效果统一呢?
全盘委托机制
即是当一个 classloader 加载一个 Class 的时候,这个 Class 所依赖的和引用的其它 Class 通常也由这个classloader 负责载入
当有 new 关键字需要类加载器加载的时候,JVM 会判断当前调用 new 关键字的类加载器是什么?然后用调用 new 关键字的类加载器来加载
所以我们可以通过全盘委托机制,来修改上面的代码
待解决的几个问题
- 解决:new 对象的时候,也默认使用我们的类加载器来加载,而不是使用 AppClassLoader,这里可以使用上述的全盘委托机制来解决
- 能做到监听文件改动的目的,而不是使用死循环来实现
代码实现
Application
我们自己写一个 Application 类,然后让在 Application 中的 run 方法,创建我们的 MyClassLoader,来加载我们需要的目录下的 class 文件
public class Application {public static void run(Class<?> clazz, String... packageName) throws Exception {String rootPath = MyClassLoader.class.getResource("/").getPath();rootPath = new File(rootPath).getPath();MyClassLoader myClassLoader = new MyClassLoader(rootPath, packageName);startFileChangeListener(rootPath, packageName);// 用我们自己类加载器加载程序入口start0(myClassLoader);}public static void start() {System.out.println("启动应用程序");new TestClass().test();}public static void stop() {System.gc();System.runFinalization();System.out.println("启动应用退出");}public static void start0(MyClassLoader myClassLoader) throws Exception {Class<?> aClass = myClassLoader.loadClass("com.example.spring.boot.classloader.Application");aClass.getMethod("start").invoke(aClass.newInstance());}public static void startFileChangeListener(String rootPath, String... packageName) throws Exception {// 创建监听对象FileAlterationObserver observer = new FileAlterationObserver(rootPath);observer.addListener(new FileListener(rootPath, packageName));// 每 500 毫秒监听一次FileAlterationMonitor monitor = new FileAlterationMonitor(500);monitor.addObserver(observer);monitor.start();}}
文件变动监听
这里使用的是 Apache 的 commons-io 包,来监听文件变动,当文件发送变动的时候,我们会重新调用 Application 类的 start0 方法,进行重新加载类文件到 JVM 中去
package com.example.spring.boot.classloader;import org.apache.commons.io.monitor.FileAlterationListenerAdaptor;import java.io.File;public class FileListener extends FileAlterationListenerAdaptor {private String rootPath;private String[] hotClassPaths;public FileListener(String rootPath, String[] hotClassPaths) {this.rootPath = rootPath;this.hotClassPaths = hotClassPaths;}@Overridepublic void onFileChange(File file) {if (file.getName().contains(".class")) {try {Application.stop();MyClassLoader myClassLoader = new MyClassLoader(rootPath, hotClassPaths);Application.start0(myClassLoader);} catch (Exception e) {e.printStackTrace();}}}}

若有收获,就点个赞吧
0 人点赞
