JSON文件
JSON(JavaScript Object Notation,JS对象标记)是一种轻量级的数据交换格式。
JSON支持的数据格式:对象(字典)、数组(列表)、字符串类型(字符串必须使用双引号,不能使用单引号)、整形、浮点型、布尔型、null型。多个数据之间使用逗号分隔,json本质上就是一个字符串。
Python对象转json字符串
import jsonbooks = [{'name': "水浒传",'prices': 56},{'name': "三国演义",'prices': 79}]# dumps将Python对象转化为json字符串result = json.dumps(books, ensure_ascii=False)print(result)# dump直接将Python对象转化为json字符串写入文件中with open('books.json', 'w', encoding='utf-8') as f:json.dump(books, f, ensure_ascii=False)
如上所示,使用dumps()和dump()方法都可以完成转换,其中ensure_ascii参数默认为True,默认转换后只能存储ascii格式的,不能存储中文,我们可以将其设置为False。
json字符串转Python对象
import jsonjson_str = '[{"name": "水浒传", "prices": 56}, {"name": "三国演义", "prices": 79}]'# loads将json字符串转化为Python对象result = json.loads(json_str)print(result, type(result))# load将文件中的json字符串转化为Python对象with open('books.json', 'r', encoding='utf-8') as f:res = json.load(f)print(res, type(res))
CSV文件
CSV文件的读取
import csv# 按行读取csv文件,每一行返回一个列表with open('快代理-ip.csv', 'r', encoding='utf-8') as f:result = csv.reader(f)for i in result:print(i)# 按字典的形式读取,这种方法有索引,可以通过索引获取值with open('快代理-ip.csv', 'r', encoding='utf-8') as f:res = csv.DictReader(f)for i in res:print(i['IP'])
CSV文件的写入
import csvheaders = ['name', 'age']stu_list = [['wanger', 10],['lisi', 15],['lixiang', 20]]stu_dict = [{'name': 'wanger', 'age': 10},{'name': 'lisi', 'age': 15},{'name': 'lixiang', 'age': 20},]# writer就是一行一行的写入,指定newline=''去掉多余的换行with open('students.csv', 'w', encoding='utf-8', newline='') as f:writer = csv.writer(f)writer.writerow(headers) # 先写入表头数据writer.writerows(stu_list) # 学生信息多行写入# DictWriter按字典形式写入with open('students.csv', 'w', encoding='utf-8', newline='') as f:# 除了传入要写入的文件,还有表头信息writer = csv.DictWriter(f, headers)# 但以上表头数据仍未写入,需要调用以下方法才能正式写入表头数据writer.writeheader()writer.writerows(stu_dict)
Excel文件
安装相关库
pip install xlrd # 读pip install xlwt # 写
sheet相关操作
import xlrdworkbook = xlrd.open_workbook("学生表.xls")# 获取所有sheet名字print(workbook.sheet_names())# 根据索引获取指定的sheet对象sheet1 = workbook.sheet_by_index(0)print(sheet1.name)# 根据名字获取指定的sheel对象sheet2 = workbook.sheet_by_name('1班')print(sheet2.name)# 获取所有的sheet对象sheet_list = workbook.sheets()for i in sheet_list:print(i.name)# 获取指定sheet的行数和列数sheet3 = workbook.sheet_by_index(0)print("行数:{} 列数:{}".format(sheet3.nrows, sheet3.ncols))
Cell相关操作
这里演示的文件数据如下图: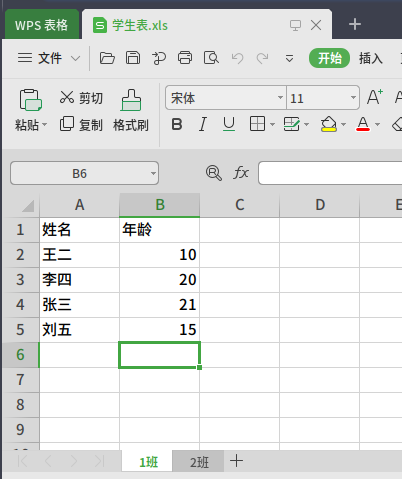
import xlrdworkbook = xlrd.open_workbook("学生表.xls")sheet = workbook.sheet_by_index(0)# 获取指定行和列的cell对象cell1 = sheet.cell(0, 0)print(cell1.value) # 输出:姓名# 获取指定行的某几列对象cell2_list = sheet.row_slice(1, 0, 3)for i in cell2_list:print(i.value) # 输出:王二 10.0# 获取指定列的某几行对象cell3_list = sheet.col_slice(0, 0, 6)for i in cell3_list:print(i.value) # 输出:姓名 王二 李四 张三 刘五 王二# 获取指定行列的值cell4 = sheet.cell_value(1, 0)print(cell4) # 输出:王二# 获取指定行某几列的值cell5 = sheet.row_values(0, 0, 3)for i in cell5:print(i) # 输出:姓名 年龄# 获取指定列某几行的值cell6 = sheet.col_values(0, 0, 6)for i in cell6:print(i) # 输出:姓名 王二 李四 张三 刘五 王二
Cell的数据类型
| 类型 | 描述 | 值 |
|---|---|---|
| xlrd.XL_CELL_EMPTY | 空白数据类型 | 0 |
| xlrd.XL_CELL_TEXT | 文本类型 | 1 |
| xlrd.XL_CELL_NUMBER | 数值类型 | 2 |
| xlrd.XL_CELL_DATE | 日期时间类型 | 3 |
| xlrd.XL_CELL_BOOLEAN | 布尔类型 | 4 |
当获取到具体的某个cell后,可以通过cell.ctype来获得这个单元格的类型
写入Excel文件
import xlwtworkbook = xlwt.Workbook()sheet = workbook.add_sheet('sheet1')# 写入表头数据headers = ['姓名', '年龄']for index, header in enumerate(headers):sheet.write(0, index, header)# 写入第一列names = ['张三', '王五']for index, name in enumerate(names):sheet.write(index+1, 0, name)# 写入年龄sheet.write(1, 1, 10)sheet.write(2, 1, 15)# 保存workbook.save("excel-write.xls")
**如果想要在原来workbook对象上添加新的cell,那么需要调用put_cell来添加。如:sheet.put_cell(row, col, Cell的数据类型, data, None)**<br /> 由于原有文件的读取使用xlrd模块,这个模块只能读,无法写入数据,因此调用put_cell()后,我们想保存的数据其实在内存上,没有保存到外存的文件中。如果想将新表的数据保存成文件,那就用xlwt模块新建一个表,将内存中的数据拷贝到新表中进行保存。
MySQL数据库
安装MySQL数据库
# 安装yay -S mysql# 初始化mysql,记住输出的root密码sudo mysqld --initialize --user=mysql --basedir=/usr --datadir=/var/lib/mysql# 启动mysql服务sudo systemctl start mysqld.service# 查看mysql状态systemctl status mysqld.service# 登录mysql服务,输入默认密码即可mysql -u root -p# 修改默认密码ALTER USER 'root'@'localhost' IDENTIFIED WITH mysql_native_password BY 'yourpassword';
Python连接到MySQL数据库
首先需要安装一个模块
pip install pymysql
简单的连接例子如下:
import pymysql# 使用pymysql.connect方法连接数据库db = pymysql.connect(host='localhost', port=3306, user='root', password='password', database='crawler')# 如果要操作具体的数据库,还需要获取db上的cursor对象cursor = db.cursor()# 使用cursor来执行sql语句,查询temp表中的所有内容cursor.execute('select * from temp')# 返回查询结果的第一行result = cursor.fetchone()print(result)
插入操作
import pymysqldb = pymysql.connect(host='localhost', port=3306, user='root', password='password', database='crawler')cursor = db.cursor()# 插入一条数据的sql语句sql = "insert into temp(id,title,context) VALUES (null,'one','第一次插入')"# 执行sql语句cursor.execute(sql)# 提交我们的操作,数据库中的数据会因为我们的操作而发生改变,就需要进行提交db.commit()# 关闭数据库db.close()# -----------------------------------------------------# -------如果我们的插入的数据需要不断变化,不论什么类型,都用%s进行占位,如下:sql = "insert into temp(id,title,context) VALUES (null,%s,%s)"cursor.execute(sql, ('变量插入', '什么数据都用%s来代替'))# ------------------------------------------------------
查询操作
import pymysqldb = pymysql.connect(host='localhost', port=3306, user='root', password='password', database='crawler')cursor = db.cursor()# 查询语句sql = "select id, title from temp where id>3"cursor.execute(sql)# 每次获取一条数据result1 = cursor.fetchone()result2 = cursor.fetchone()print(result1, result2)# 接收全部的返回结果result = cursor.fetchall()print(result)# 可以获取指定条数的数据,如果指定的大小超过结果的数量,也会返回所有的结果result = cursor.fetchmany(3)print(result)# 关闭数据库db.close()
删除操作
import pymysqldb = pymysql.connect(host='localhost', port=3306, user='root', password='password', database='crawler')cursor = db.cursor()# 删除语句sql = "delete from temp where title='xxx'"cursor.execute(sql)db.commit()# 关闭数据库db.close()
更新操作
import pymysql# 如果存在编码问题,可以在连接时通过charset来指定编码方式db = pymysql.connect(host='localhost', port=3306, user='root', password='password', database='crawler', charset='utf8')cursor = db.cursor()# 更新语句sql = "update temp set title='更新后的title' where id=1"cursor.execute(sql)db.commit()# 关闭数据库db.close()

若有收获,就点个赞吧
0 人点赞
