Scrapy基本知识
安装和文档地址
pip install scrapy# Scrapy官方文档http://doc.scrapy.org/en/latest# Scrapy中文文档http://scrapy-chs.readthedocs.io/zh_CN/latest/index.html
Scrapy框架结构
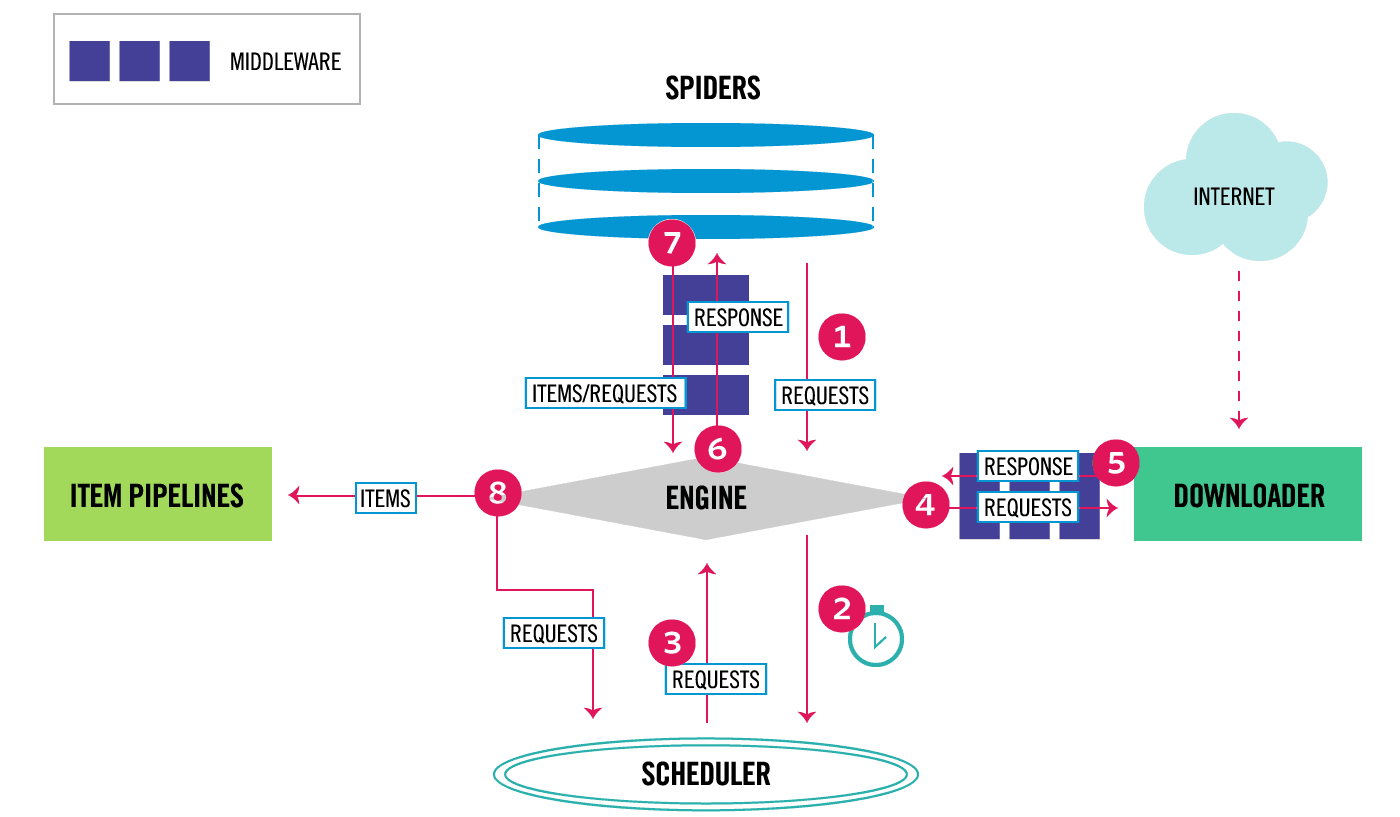
- Scrapy Engine(引擎):Scrapy框架的核心部分。负责在Spider和ItemPipeline、Downloader、Scheduler中间通讯、传递数据等。
- Spider(爬虫):发送需要爬取的链接给引擎,最后引擎把其它模块请求回来的数据再发送给爬虫,爬虫就去解析想要的数据。
- Scheduler(调度器):负责接收引擎发送过来的请求,并按一定的方式进行排列和整理,负责调度请求的顺序等。
- Downloader(下载器):负责接收引擎传过来的下载请求,然后去网络上下载对应的数据再交还给引擎。
- Item Pipeline(管道):负责将Spider传递过来的数据进行保存。
- Downloader Middlewares(下载中间件):可以扩展下载器和引擎之间的通信功能的中间件。
- Spider Middlewares(Spider中间件):可以扩展引擎和爬虫之间通信功能的中间件。
创建项目、爬虫、运行及Scrapy测试工具
# 创建项目scrapy startproject [项目名称]# 创建爬虫(需要先进入项目文件夹)scrapy genspider [爬虫名称] [爬虫作用的域名]"""以上创建的爬虫类是普通的Spider,需要自己在解析完整个网页后获取下一页的url而更简单的方法是通过CrawlSpider,这个类继承自SpiderCrawlSpider可以定义爬取规则,以后scrapy碰到满足条件的url都进行爬取,不用手动yield Request"""# 创建CrawlSpider爬虫scrapy genspider -t crawl [爬虫名字] [域名]# 运行爬虫的命令scrapy crawl [爬虫名称]# 在Scrapy中对单个网页进行测试scrapy shell [测试网页的链接]
- items.py:提前定义好需要下载的数据字段
- middlewares.py:用来存放各种中间件的文件
- pipelines.py:用来将items的模型存储到本地磁盘
- settings.py:本爬虫的一些配置信息(比如请求头、多久发送一次请求、ip代理池等)
- scrapy.cfg:项目的一些配置文件
- spider包:以后所有的爬虫都存放到这个文件夹里面
爬虫的基本过程-爬取古诗文网案例
- 修改机器人协议,添加请求头,设置pipelines的优先级 ```python ROBOTSTXT_OBEY = False
DEFAULT_REQUEST_HEADERS = { ‘Accept’: ‘text/html,application/xhtml+xml,application/xml;q=0.9,/;q=0.8’, ‘Accept-Language’: ‘en’, ‘user-agent’: ‘Mozilla/5.0 (X11; Linux x86_64) AppleWebKit/537.36 (KHTML, like Gecko) Chrome/91.0.4472.114 Safari/537.36’ }
ITEM_PIPELINES = { ‘scrapy古诗文网.pipelines.ScrapyPipeline’: 300, }
2. 在items.py中定义我们要保存的字段```pythonclass ScrapyItem(scrapy.Item):title = scrapy.Field()author = scrapy.Field()text = scrapy.Field()
在spiders中写爬虫解析代码 ```python class GswSpiderSpider(scrapy.Spider):
爬虫的名称
name = ‘gsw_spider’
只爬取这个域名下的网页
allowed_domains = [‘www.gushiwen.cn’]
爬虫开始的页面(可以指定多个)
start_urls = [‘https://www.gushiwen.cn/default_1.aspx‘]
def parse(self, response):
# 解析数据title_list = response.xpath("//div[@class='sons']/div[@class='cont']/p[1]//b/text()").getall()author_list = response.xpath("//div[@class='sons']/div[@class='cont']/p[2]")text_list = response.xpath("//div[@class='sons']/div[@class='cont']/div[@class='contson']")
for i in range(0, 10):title = title_list[i]author = ''.join(author_list[i].xpath("./a/text()").getall())text = ''.join(text_list[i].xpath(".//text()").getall()).replace('\n', '')item = ScrapyItem(title=title, author=author, text=text)yield item# 下一页的网址next_url = response.xpath("//div[@class='pagesright']/a[1]/@href").get()# 只能爬取4页,没有下一页以后直接退出if next_url is None:return Nonerequest = scrapy.Request(next_url)yield request
4. 在pipelines.py中保存数据文件```pythonclass ScrapyPipeline:def open_spider(self, spider):self.fp = open("古诗文.txt", 'w', encoding='utf-8')def process_item(self, item, spider):self.fp.write(json.dumps(dict(item), ensure_ascii=False) + '\n')return itemdef close_spider(self, spider):self.fp.close()
- 可以额外添加一个py文件来执行scrapy的爬虫运行命令
from scrapy import cmdlinecmdline.execute("scrapy crawl gsw_spider".split(" "))
CrawlSpider爬虫-猎云网案例
LinkExtractors链接提取器
使用LinkExtractors可以不用程序员自己提取想要的url,然后发送请求,这些工作都可以交给LinkExtractors,它会爬取页面中满足规则的url,实现自动爬取。
LinkExtractor(allow=r'Items/')
参数介绍:
参数介绍:
- 基本设置和定义翻页和文章规则 ```python name = ‘lyw_spider’ allowed_domains = [‘www.lieyunwang.com’] start_urls = [‘https://www.lieyunwang.com/latest/p1.html‘]
rules = ( Rule(LinkExtractor(allow=r’/latest/p\d+.html’), follow=True), Rule(LinkExtractor(allow=r’/archives/\d+’), callback=’parse_item’, follow=False) )
2. 在items中定义需要保存的字段```pythonclass ScrapyItem(scrapy.Item):title = scrapy.Field() # 文章的标题author = scrapy.Field() # 文章的作者content = scrapy.Field() # 文章的内容url = scrapy.Field() # 文章的地址
解析文章详情页,获取需要保存的数据内容
def parse_item(self, response):title = ''.join(response.xpath("//div[@class='article-main']//h1/text()").getall()).strip()author = response.xpath('//div[@class="author-info"]/a[1]/text()').get()content = ''.join(response.xpath("//div[@class='main-text']//text()").getall()).strip()url = response.urlitem = ScrapyItem(title=title, author=author, content=content, url=url)return item
保存数据
class ScrapyPipeline:def open_spider(self, spider):self.fp = open("猎云网.csv", 'w', encoding='utf-8')self.fp.write("标题,作者,链接,内容\n")def process_item(self, item, spider):info = dict(item)self.fp.write("{},{},{},{}\n".format(info["title"], info["author"], info["url"], info["content"]))return itemdef close_spider(self, spider):self.fp.close()
Scrapy框架保存文件-站酷网图片下载案例
- 基本设置和请求网址的规则定义 ```python name = ‘zcool_spider’ allowed_domains = [‘zcool.com.cn’, ‘img.zcool.cn’] start_urls = [‘https://www.zcool.com.cn/home?p=1#tab_anchor‘]
rules = {
# 翻页的规则Rule(LinkExtractor(allow=".*p=\d*#tab_anchor"), follow=True),# 每个页面中的详情页面Rule(LinkExtractor(allow=".*work/.*=\.html"), follow=False, callback="parse_detail")
}
2. 在item中定义字段,使用Scrapy自带的下载中间件,images和image_urls是必须要有的```pythonclass ImagedownloadItem(scrapy.Item):title = scrapy.Field()# 保存item上图片的链接image_urls = scrapy.Field()# 后期图片下载完成后形成image对象images = scrapy.Field()
解析详情页面,获取图片的url列表和标题
def parse_detail(self, response):title = response.xpath("//h2/text()").get().strip()image_list = response.xpath("//div[@class='work-show-box mt-40 js-work-content']//img/@src").getall()item = ImagedownloadItem(title=title, image_urls=image_list)yield item
改写ImagesPipeline中间件,另设置保存路径
这个地方我要说一下,参考网络上的写法,改写file_path方法后,只需要返回一个字符串的路径,如:”xxx/xxx.jpg”。就可以了,但我这样返回后图片怎么都保存不下来,最后我是直接将原先的父方法拿过来后,按照父方法的样式改变了图片的存储路径。
from scrapy.pipelines.images import ImagesPipelinefrom scrapy.utils.python import to_bytesfrom scrapy import Requestimport hashlibimport reclass ImageDownloadPipeline(ImagesPipeline):# 构造图像下载的请求,URL从item["image_urls"]中获取def get_media_requests(self, item, info):# 将照片的名称作为参数传递出去,用于设置图片的存储路径return [Request(x, meta={"title": item["title"]}) for x in item.get(self.images_urls_field, [])]# 设置图片存储路径及名称def file_path(self, request, response=None, info=None, *, item=None):image_guid = hashlib.sha1(to_bytes(request.url)).hexdigest()# 从request的meta中获取图片所属的标题title = request.meta["title"]title = re.sub(r"[\\/?\.<>\*]", '', title)return f'{title}/{image_guid}.jpg'
- 设置保存路径,开启中间件
下面设置的”IMAGES_STORE”是规定好的,写错的话是无效的
ITEM_PIPELINES = {'scrapy站酷网.pipelines.ImageDownloadPipeline': 300,# 'scrapy.pipelines.images.ImagesPipeline': 1}# 图片保存路径IMAGES_STORE = "./images"
补充
- 如果你使用ImagesPipeline不起作用,在终端中看到如下警告,则需要安装pillow
```python
警告
Disabled ImagesPipeline: ImagesPipeline requires installing Pillow 4.0.0 or later
解决
pip install pillow
2. 按照网络上继承后改写的写法,我暂时不知道我是哪里出了问题,暂时留个位置在这,等我知道了我再补充---<a name="gU5oi"></a># 下载器中间件使用案例<a name="f1rbP"></a>## 基本介绍下载器中间件是引擎和下载器之间通信的中间件。在这个中间件中我们可以设置代理、更换请求头等来达到反反爬虫的目的。要写下载器中间件,可以在middlewares.py中实现两个方法。一个是process_request(self, request, spider),这个方法是在请求发送之前会执行,还有一个是process_response(self, request, response, spider),这个方法是数据下载到引擎之前执行。<br />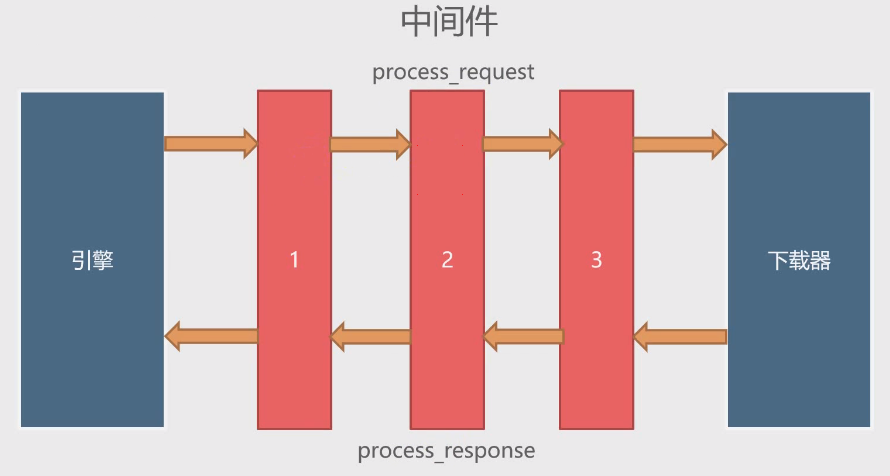| **process_request(self, request, spider)** | 这个方法是下载器在发送请求之前执行的,一般可以在这个里面设置随机IP代理等 || --- | --- || **参数** | <br />1. request:发送请求的request对象<br />1. spider:发送请求的spider对象<br /> || **返回值** | <br />1. 返回None:Scrapy将继续处理request,执行其它中间件相应的方法,直到合适的下载器处理函数被调用<br />1. 返回Response对象:Scrapy将不会调用任何其它的process_request方法,将直接返回这个response对象。已经激活的中间件的process_response()方法则会在么个response返回时被调用<br />1. 返回Request对象:不再使用之前的request对象去下载数据,而是根据现在返回的request对象返回数据<br />1. 如果这个方法出现异常,则会调用process_exception方法<br /> || **process_response(self, request, response, spider)** | 这个方法是下载器下载数据到引擎中间会执行的方法 || --- | --- || **参数** | <br />1. request:request对象<br />1. response:被处理的response对象<br />1. spider:spider对象<br /> || **返回值** | <br />1. 返回Response对象:会将这个新的response对象传给其它的中间件,最终传给爬虫<br />1. 返回Request对象:下载器链接被切断,返回的request会重新被下载器调度下载<br />1. 如果抛出一个异常,那么调用request的errback方法,如果没有指定这个方法,那么会抛出一个异常<br /> |<a name="PVCIB"></a>## 随机更改User-Agent例子1. 基本设置上面已经很多案例了,就不多说了,这里知识演示一下如何使用下载器中间件来随机更改User-Agent,所以使用的案例网站是httpbin.org,scrapy的项目创建就不介绍了,只把基本代码贴出来```python# Obey robots.txt rulesROBOTSTXT_OBEY = False# Override the default request headers:DEFAULT_REQUEST_HEADERS = {'Accept': 'text/html,application/xhtml+xml,application/xml;q=0.9,*/*;q=0.8','Accept-Language': 'en','User-Agent': 'Mozilla/5.0 (X11; Linux x86_64) AppleWebKit/537.36 (KHTML, like Gecko) Chrome/92.0.4515.107 Safari/537.36 Edg/92.0.902.55'}class HttpbinSpider(scrapy.Spider):name = 'httpbin'allowed_domains = ['httpbin.org']start_urls = ['http://httpbin.org/user-agent']def parse(self, response):print(response.text)
通过以上代码,我们运行爬虫就可以看到我们这次爬虫所使用的User-Agent
- 自写下载中间件,随机更改User-Agent
这里介绍一个python包,fake-useragent。这个包就可以随机伪造我们的user-agent,安装命令如下:
pip install fake-useragent"""安装完成后,使用这个包还有一个坑第一次使用fake_useragent的时候,需要请求网络来获取useragent的信息,放在本地以后使用的时候,都是本地直接读取了,但这个过程需要魔法上网,不然会报错解决办法你可以请求如下网址,0.0.11是版本号,可以通过命令查看后自行修改请求后将文件保存为一个.json的文件,然后使用path参数指定这个文件就可以了"""# 请求网址https://fake-useragent.herokuapp.com/browsers/0.1.11# 查看自己的版本号pip show fake-useragent# 使用path参数设置from fake_useragent import UserAgentua = UserAgent(path='xxx')
包安装完毕,接下来就是自己写下载中间件来修改User-Agent
# 爬虫多次请求,看到随机效果def parse(self, response):print(response.text)# 为了能够看到随机,所以我们发送多次请求# 同样的网址,Scrapy发现请求过以后不会再次请求# 所以我们设置一下dont_filter=True,这样就能够重复请求了yield scrapy.Request(self.start_urls[0], dont_filter=True)# 自己写下载中间件from fake_useragent import UserAgentclass UserAgentMiddlewares:def process_request(self, request, spider):ua = UserAgent(path='./User-Agent.json')request.headers["User-Agent"] = ua.random# 一些设置DOWNLOAD_DELAY = 2DOWNLOADER_MIDDLEWARES = {# 'scrapyMiddlewares.middlewares.ScrapymiddlewaresDownloaderMiddleware': 543,'scrapyMiddlewares.middlewares.UserAgentMiddlewares': 543}
随机更改IP代理例子
国内的一些代理商:
查看请求IP是否已经修改,我们可以请求 http://httpbin.org/ip 来进行测试,创建爬虫等代码这里不再列出来了。修改IP实际上也是通过中间件来完成的,所以这里给出中间件的代码,最后在setting.py文件中启用中间件就可以了 ```python
设置普通代理
class IpProxyMiddlewares:
IP代理池
PROXYS = [
{"ip": "114.99.3.146", "port": 3256},{"ip": "125.87.95.64", "port": 3256}
]
def process_request(self, request, spider):
# 随机选择代理proxy = random.choice(self.PROXYS)# 组装代理地址proxy_url = "http://" + proxy["ip"] + ":" + str(proxy["port"])request.meta['proxy'] = proxy_url
设置独享代理
class IpProxyPrivateMiddleware: def process_request(self, request, spider): proxy = “xxx.xx.x.xxx:xxxx” user_password = “username:password” request.meta[‘proxy’] = proxy
# bytesb64_user_password = base64.b64encode(user_password.encode('utf-8'))request.headers['Proxy-Authorization'] = "Basic " + b64_user_password.decode('utf-8')
```

若有收获,就点个赞吧
0 人点赞
