前言
我们先来看一道面试题:从浏览器输入URL到页面展示的过程发生了什么?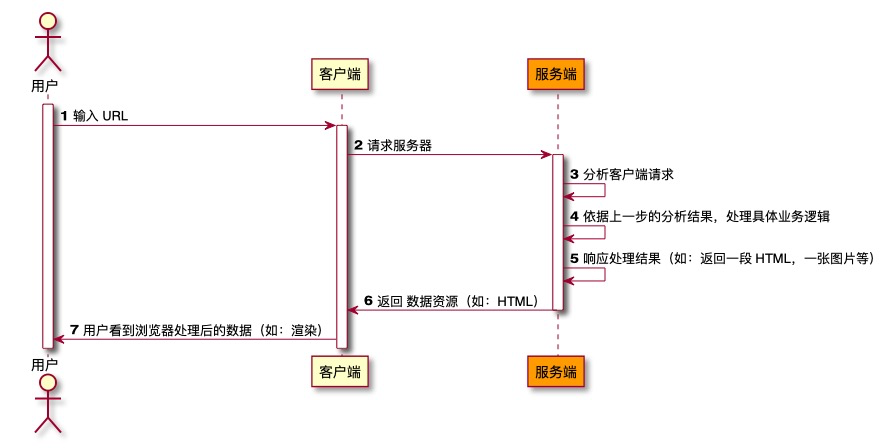
上图展示了浏览器输入URL到页面展示的一个大致过程。从图中我们不难发现,无论具体的应用功能如何变化,服务端处理任务的三个核心步骤:步骤3、步骤4、步骤5,其中 步骤3 和步骤5 的模式是固定的(因为 HTTP 协议已经规范化了),而 步骤4 是最大的变量,其复杂的业务处理逻辑都是在这一步骤处理。
如果我们每次开发一个新的应用都要把 步骤3 和步骤5 的逻辑重新实现一遍,那么就会特别麻烦。因此,我们可以封装一个框架 (或者 库),把 步骤3 和 步骤5 的逻辑进行统一处理,然后通过某种方式,把 步骤4 的处理暴露给框架的使用者。
而 Koa 做的就是这样的事情,它把 NodeJS 原生的 IncomingMessage 对象和 ServerResponse 响应对象的通用流程进行了封装,并提供了几个核心类(对象) 用于其他各种业务处理。
回顾
我们来回顾下 Koa 的使用:
const Koa = require('koa');const app = new Koa();app.use(async ctx => {ctx.body = 'Hello World';});app.listen(3000);
在上面的代码中,通过 new Koa() 实例化了一个 app 对象,然后使用 use 方法添加中间件向页面输出 Hello World 字符串,最后调用 listen 方法监听 3000 端口。
在 new Koa() 的时候 Koa 做了什么呢?它又是如何把 use 方法和 listen 方法挂载到 app 对象上的呢?
接下来,我们带着问题去探究一下它的源码。
隐藏在 package.json 里的秘密
在看源码之前,先去看看 package.json 。看看项目的入口文件,翻翻它用了哪些依赖,对项目便有里大致的概念。
"main": "lib/application.js" ,main 字段指定了程序的入口,说明 application.js 是对外暴露的最终出口。当使用遵循 CommonJS 规范的 require() 时就会加载 main 字段指定的目录下的文件。
我们来看下 lib 文件夹: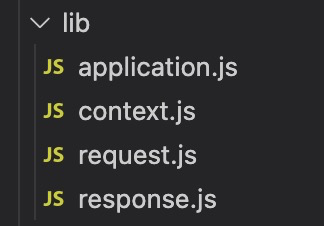
lib 文件夹下有四个文件,分别对应了 Koa 对外提供的四个核心对象:
- Application 对象
- Context 对象
- Request 对象
- Response 对象
下面,我们先来看看程序的入口文件 application.js 。
Application 对象
Application 对象是 Koa 的核心对象,通过该对象来初始化并创建 WebServer 。我们来看下 Application 对象的构造函数:
constructor(options) {super();options = options || {};this.proxy = options.proxy || false;this.subdomainOffset = options.subdomainOffset || 2;this.proxyIpHeader = options.proxyIpHeader || 'X-Forwarded-For';this.maxIpsCount = options.maxIpsCount || 0;this.env = options.env || process.env.NODE_ENV || 'development';if (options.keys) this.keys = options.keys;this.middleware = [];this.context = Object.create(context);this.request = Object.create(request);this.response = Object.create(response);// util.inspect.custom support for node 6+/* istanbul ignore else */if (util.inspect.custom) {this[util.inspect.custom] = this.inspect;}}
在 构造函数里,主要做了一些初始化的工作,并引入了在 koa 应用中包含的三大对象:
- Context 对象
- Request 对象
- Response 对象
它们都是使用 Object.create 创建的对象:
this.context = Object.create(context);this.request = Object.create(request);this.response = Object.create(response);
listen 方法
在应用中,使用 app.listen(3000) 来监听某个端口,然后在浏览器中输入 localhost:3000 就可以访问WebServer了,那么,Koa 是如何创建WebServer的呢?我们来看 listen 方法的源码:
/*** Shorthand for:**http.createServer(app.callback()).listen(...)** @param {Mixed} ...* @return {Server}* @api public*/listen(...args) {debug('listen');const server = http.createServer(this.callback());return server.listen(...args);}
从源码中可以看到,WebServer 并不是在 Application 对象创建的时候创建的,而是在调用了 Application 对象的 listen 方法的时候创建的。它通过 NodeJS 内置的 http 模块的 createServer 方法创建了一个 Server 对象,并把 this.callback() 执行后的结果作为后续请求的回调函数,最后才是调用 Server 对象的 listen 方法来监听端口。
callback()
在调用 http 模块的 createServer 方法时需要传入一个 (req, res) => { // do something } 的回调函数,代码如下:
const http = require('http');const server = http.createServer((req, res) => {res.end();});
那么 this.callback() 是不是返回 (req, res) => { // do something } 这样的一个回调函数呢?我们来看它的源码:
/*** Return a request handler callback* for node's native http server.** @return {Function}* @api public*/callback() {// 将中间件组合成中间件函数const fn = compose(this.middleware);// //koa错误处理,判断app上错误监听的数量,也就是判断是否我们的代码里有自己写监听,如果没有那么走koa的 this.onerror方法if (!this.listenerCount('error')) this.on('error', this.onerror);const handleRequest = (req, res) => {// 创建一个 Context 对象,对 req 和 res 进行包装const ctx = this.createContext(req, res);return this.handleRequest(ctx, fn);};return handleRequest;}
this.callback() 执行后返回的是 handleRequest 函数,handleRequest接收的 req 和 res 参数就是 NodeJS 中 http 模块内置的 IncomingMessage 对象和 ServerResponse 对象。
在 callback() 中,Koa 会调用 Application 对象的 createContext 方法对 req 和 res 进行包装,生成 Koa 的其中一个核心对象:Context 对象。
const ctx = this.createContext(req, res);
然后接着调用 Application 对象的 handleRequest 方法进行请求处理,并传入两个参数,其中 ctx 是调用 createContext 方法创建的 Context 对象,fn 是将中间件组合后的中间件函数。
return this.handleRequest(ctx, fn);
createContext()
接下来我们来看看在 callback() 中调用的 createContext() 函数。
/*** Initialize a new context.** @api private*/createContext(req, res) {const context = Object.create(this.context);const request = context.request = Object.create(this.request);const response = context.response = Object.create(this.response);context.app = request.app = response.app = this;context.req = request.req = response.req = req;context.res = request.res = response.res = res;request.ctx = response.ctx = context;request.response = response;response.request = request;context.originalUrl = request.originalUrl = req.url;context.state = {};return context;}
createContext 函数做的事情只有一个,那就是包装出一个全局唯一的 Context 对象。该 Context 对象上挂载了当前的 app 实例对象、req 对象和res对象。
在 Application 类中通过 Object.create() 创建出了一个 context 对象,并挂载到了Application类的实例对象上:
this.context = Object.create(context);this.request = Object.create(request);this.response = Object.create(response);
在 createContext 函数中,再次调用 Object.create() 对 Application类的实例对象上的 context 进行包装:
createContext(req, res) {const context = Object.create(this.context);const request = context.request = Object.create(this.request);const response = context.response = Object.create(this.response);// ...}
其目的就是让每次http请求都生成一个 context,并且生成的 context 都是全局唯一的,相互之间隔离。在 createContext函数中同样对 this.request、this.response 进行了再次包装,其目地和 context 是一样的。
在对 this.request 和 this.response 进行再次包装的同时,将其包装后的值分别赋值给 context.request 和 context.response,这样我们就可以在 context 上访问到 request 和 response 了。
与此同时,在createContext 函数中,Koa 也将 app实例对象、req、res 分别挂载到了 ConText 对象、request 对象、response 对象上,这样做的目的就是让 context、request、response 可以共享 app、req、res 这些属性,并且可以相互访问。
createContext(req, res) {// ...context.app = request.app = response.app = this;context.req = request.req = response.req = req;context.res = request.res = response.res = res;request.ctx = response.ctx = context;request.response = response;response.request = request;// ...}
为什么要这么做呢?
一个 ctx 即可获得所有 koa 提供的数据和方法,而 koa 会继续将这些职责进行进一步的划分,比如 request 是用来进一步封装 req 的,response 是用来进一步封装 res的,这样职责得到了分散,降低了耦合,同时共享所有资源使得整个 context 具有了高内聚的性质,内部元素互相都能够访问得到。
handleRequest()
callback() 返回的 handleRequest 函数中,除了调用 createContext 函数生成 Context 对象,还调用了 Application 对象的 handleRequest 方法对请求进行处理。我们来看下 handleRequest 的源码:
/*** Handle request in callback.** @api private*/handleRequest(ctx, fnMiddleware) {const res = ctx.res;res.statusCode = 404;const onerror = err => ctx.onerror(err);const handleResponse = () => respond(ctx);onFinished(res, onerror);return fnMiddleware(ctx).then(handleResponse).catch(onerror);}
在 handleRequest 中,通过调用 respond() 对 ctx 返回的不同情况进行处理,然后将处理后的结果作为 fnMiddleware 执行后resolve时的结果,如果 fnMiddleware 执行后的结果为 reject,则进入 onerror 的处理。
respond()
我们再来看看 respond():
/*** Response helper.*/function respond(ctx) {// allow bypassing koaif (false === ctx.respond) return;if (!ctx.writable) return;const res = ctx.res;let body = ctx.body;const code = ctx.status;// ignore bodyif (statuses.empty[code]) {// strip headersctx.body = null;return res.end();}if ('HEAD' === ctx.method) {if (!res.headersSent && !ctx.response.has('Content-Length')) {const { length } = ctx.response;if (Number.isInteger(length)) ctx.length = length;}return res.end();}// status bodyif (null == body) {if (ctx.response._explicitNullBody) {ctx.response.remove('Content-Type');ctx.response.remove('Transfer-Encoding');return res.end();}if (ctx.req.httpVersionMajor >= 2) {body = String(code);} else {body = ctx.message || String(code);}if (!res.headersSent) {ctx.type = 'text';ctx.length = Buffer.byteLength(body);}return res.end(body);}// responsesif (Buffer.isBuffer(body)) return res.end(body);if ('string' === typeof body) return res.end(body);if (body instanceof Stream) return body.pipe(res);// body: jsonbody = JSON.stringify(body);if (!res.headersSent) {ctx.length = Buffer.byteLength(body);}res.end(body);}
在 respond() 里,主要是对 ctx 返回的不同情况进行处理,如 method 为 head 时在 ctx 加上 length,body 为空时,去除 Content-Type 等字段,并返回相应的状态码,body 为 Stream 时使用 pipe 进行处理等。
onerror()
在 callback() 中,通过 on 监听 error 事件,并调用了 Application 的 onerror 方法来处理错误:
callback() {// ...if (!this.listenerCount('error')) this.on('error', this.onerror);// ...}
我们看看 Application 是怎么处理错误的:
/*** Default error handler.** @param {Error} err* @api private*/onerror(err) {// When dealing with cross-globals a normal `instanceof` check doesn't work properly.// See https://github.com/koajs/koa/issues/1466// We can probably remove it once jest fixes https://github.com/facebook/jest/issues/2549.const isNativeError =Object.prototype.toString.call(err) === '[object Error]' ||err instanceof Error;if (!isNativeError) throw new TypeError(util.format('non-error thrown: %j', err));if (404 === err.status || err.expose) return;if (this.silent) return;const msg = err.stack || err.toString();console.error(`\n${msg.replace(/^/gm, ' ')}\n`);}
可以看到,在 onerror 中,只是把 error 打印了出来。但是对于中间件内部的错误,koa 是无法捕捉的(除非转同步),我们的应用如果需要记录这个错误,可以使用 node 的 process 监听:
process.on("unhandledRejection", (err) => {console.log(err);});
中间件函数
中间件函数,就是用来处理各种业务的函数。在 Application 对象的构造函数中,提供了一个 middleware 的属性来存储中间件函数:
constructor() {// ...this.middleware = [];// ...}
然后,在 Application 对象中提供了一个 use 方法来注册中间件函数:
/*** Use the given middleware `fn`.** Old-style middleware will be converted.** @param {Function} fn* @return {Application} self* @api public*/use(fn) {if (typeof fn !== 'function') throw new TypeError('middleware must be a function!');if (isGeneratorFunction(fn)) {deprecate('Support for generators will be removed in v3. ' +'See the documentation for examples of how to convert old middleware ' +'https://github.com/koajs/koa/blob/master/docs/migration.md');fn = convert(fn);}debug('use %s', fn._name || fn.name || '-');this.middleware.push(fn);return this;}
可以看到,当我们在应用中通过 app.use(() => {}) 注册一个中间件函数时,Koa 将这个中间件函数按照使用者注册的顺序放进 Application 对象的 middleware 数组中。然后在 callback() 中调用 koa-compose 这个模块提供的 compose 函数来执行中间件:
callback() {const fn = compose(this.middleware);// ...}
compose() 函数
下面是 compose 函数的源码:
function compose (middleware) {if (!Array.isArray(middleware)) throw new TypeError('Middleware stack must be an array!')for (const fn of middleware) {if (typeof fn !== 'function') throw new TypeError('Middleware must be composed of functions!')}/*** @param {Object} context* @return {Promise}* @api public*/return function (context, next) {// last called middleware #let index = -1return dispatch(0)function dispatch (i) {if (i <= index) return Promise.reject(new Error('next() called multiple times'))index = ilet fn = middleware[i]if (i === middleware.length) fn = nextif (!fn) return Promise.resolve()try {return Promise.resolve(fn(context, dispatch.bind(null, i + 1)));} catch (err) {return Promise.reject(err)}}}}
compose 函数,它的作用就是将多个函数组合成一个函数执行。在compose函数中,其核心在于下面一段代码:
Promise.resolve(fn(context, dispatch.bind(null, i + 1)));
它会在执行当前中间件函数的时候,把下一个中间件函数作为当前中间件函数的第二个参数传入(next) ,这样就可以实现对多个中间件函数的执行流程进行控制。
我们来看一个使用了中间件的案例:
/*** File: /app.js***/const Koa = require('koa');const app = new Koa();app.use(async ctx => {console.log('1');});app.use(async ctx => {console.log('2');});app.use(async ctx => {console.log('3');});app.use(async ctx => {console.log('4');});app.listen(3000);
执行上面的代码,当我们访问这个 WebServer 的时候,后端服务器上只打印出 1 。这是因为当第一个中间件函数执行以后,后续的中间件是需要通过当前执行中间件函数的第二个参数去显式调用才能执行。
我们改造上面的代码,在每个中间件中添加 next 参数,并显式调用:
/*** File: /app.js***/const Koa = require('koa');const app = new Koa();app.use(async (ctx, next) => {console.log('1');await next();});app.use(async (ctx, next) => {console.log('2');await next();});app.use(async (ctx, next) => {console.log('3');await next();});app.use(async (ctx, next) => {console.log('4');await next();});app.listen(3000);
再次执行上面的代码,我们可以看到,按照中间件的注册顺序输出了 1、2、3、4 。
我们再来改造上面的代码,在 next() 后面添加代码:
/*** File: /app.js***/const Koa = require('koa');const app = new Koa();app.use(async (ctx, next) => {console.log('1 - start');await next();console.log('1 - end');});app.use(async (ctx, next) => {console.log('2 - start');await next();console.log('2 - end');});app.use(async (ctx, next) => {console.log('3 - start');await next();console.log('3 - end');});app.use(async (ctx, next) => {console.log('4 - start');await next();console.log('4 - end');});app.listen(3000);
执行上面的代码,输出的顺序如下:
1 - start2 - start3 - start4 - start4 - end3 - end2 - end1 - end
为什么输出顺序是这样的呢?在中间件中,当执行到 next() 时,进入下一个中间,执行下一个中间中的代码,当下一个中间件中的代码执行完成后,再返回之前的中间件,继续执行next() 语句后面的代码。
这种特性现象,可以形象地称之为 「洋葱模型」。
洋葱模型
洋葱模型,它是 Koa 中间件的一种串行机制,并且是支持异步的。Koa中间件机制就是函数式组合概念 Compose的概念,将一组需要顺序执行的函数复合为一个函数,外层函数的参数实际是内层函数的返回值。洋葱圈模型可以形象表示这种机制。
下面是官方的一张图,即著名的洋葱圈模型: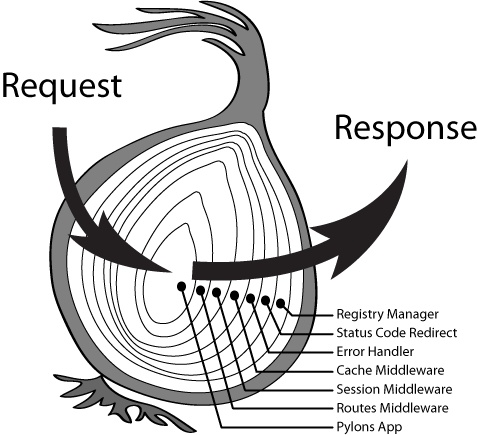
我们通过动图来来看一下中间件的执行顺序: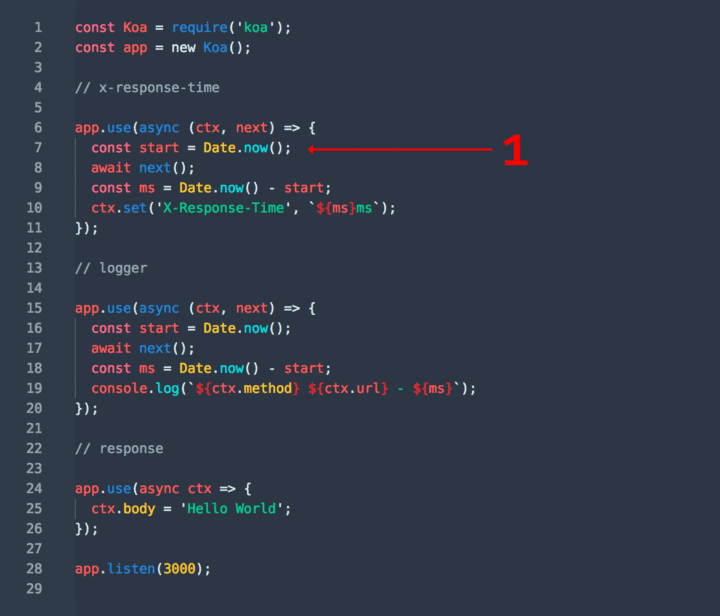
next() 函数
在中间件中,只有调用了 next() 函数,才会进入下一个中间件,那么这个 next() 函数到底是啥呢?
next就是一个包裹了dispatch的函数;
在第n个中间件中执行next,就是执行dispatch(n+1),也就是进入第n+1个中间件;
因为dispatch返回的都是Promise,所以在第n个中间件await next(); 进入第n+1个中间件。当第n+1个中间件执行完成后,可以返回第n个中间件;
如果在某个中间件中不再调用next,那么它之后的所有中间件都不会再调用了。
小结
Application 是 Koa 的核心对象,Koa 通过这个对象来初始化一个 App 应用,并创建一个 WebServer 服务器。

若有收获,就点个赞吧
0 人点赞
