九、面向对象
三、多态
多态理解
1.多态指的是:
父类型引|用指向子类型对象。
●编译阶段:绑定父类的方法。
●运行阶段: 动态绑定子类型对象的方法。
2.运算符:instanceof(运行阶段动态判断)
- instanceof运算符的运算结果只能是:true/false
- 假设(c instanceof Cat)为true表示:
c引用指向的堆内存中的java对像是一个Cat。
- 假设(c instanceof Cat)为false表示:
多态在实际开发中的作用
多态使用之前
public class Dog {public void eat(){System.out.println("狗狗喜欢吃骨头,吃的很香");}}
public class Cat {public void eat(){System.out.println("猫喜欢吃鱼,吃的很香");}}
public class Master {public void feed(Dog d){d.eat();}public void feed(Cat c){c.eat();}
public class Test {public static void main(String[] args) {Master master = new Master();Dog dog = new Dog();master.feed(dog);Cat cat = new Cat();master.feed(cat);}}
多态使用之后
public class Pet {public void eat(){}}
public class Dog extends Pet{public void eat(){System.out.println("狗狗喜欢吃骨头,吃的很香");}}
public class Cat extends Pet{public void eat(){System.out.println("猫喜欢吃鱼,吃的很香");}}
public class Master {public void feed(Pet pet){//编译的时候,编译器发现pet是Pet类,会去Pet类中找eat()方法,结果找到了,编译通过。//运行的时候,底层实际的对象是什么,就自动调用到该实际对象对应的eat()方法上。//这就是多态的使用。pet.eat();}}
public class Test {public static void main(String[] args) {Master master = new Master();Dog dog = new Dog();master.feed(dog);Cat cat = new Cat();master.feed(cat);}}
四、接口和抽象类
接口在开发中的作用
public interface FoodMeau{void xihongshi();void qiezi();}
public class ChinaCook implements FoodMeau{public void xihongshi(){System.out.println("中国西红柿");}public void qiezi(){System.out.println("中国茄子");}}
public class AmericCook implements FoodMeau {public void xihongshi(){System.out.println("美国西红柿");}public void qiezi(){System.out.println("美国茄子");}}
public class Customer {private FoodMeau foodMeau;public Customer(){}public Customer(FoodMeau foodMeau){this.foodMeau=foodMeau;}public void setFoodMeau( FoodMeau foodMeau){this.foodMeau=foodMeau;}public FoodMeau getFoodMeau(){return foodMeau;}public void order(){foodMeau.xihongshi();foodMeau.qiezi();}}
public class Test {public static void main(String[] args) {//创建厨师对象FoodMeau cook1 = new ChinaCook();//创建顾客对象Customer customer = new Customer(cook1);;//如果去掉参数,则空指针异常customer.order();//中国西红柿//中国茄子}}
十、反射
1、获得Class对象
第一种: Class c = Class.forName(“完整的类名带包名”);
第二种: Class c = 对象.getClass();
第三种: Class c = 任何类型.class;
注意:Class.forName是一个静态方法。
如果你只是希望一个类的静态代码块执行,其它代码一律不执行,你可以使用:Class.forName(“完整类名”); 这个方法的执行会导致类加载,类加载时,静态代码块执行。
2、判断是否为某个类的实例
一般地,我们用 instanceof 关键字来判断是否为某个类的实例。同时我们也可以借助反射中 Class 对象的 isInstance() 方法来判断是否为某个类的实例,它是一个 native 方法:public native boolean isInstance(Object obj);
3、创建实例
通过反射来生成对象主要有两种方式。
使用Class对象的newInstance()方法来创建Class对象对应类的实例。
Class<?> c = String.class;Object str = c.newInstance();
注意: 重点是:new Instance()调用的是无参构造,必须保证无参构造是存在的!
先通过Class对象获取指定的Constructor对象,再调用Constructor对象的newInstance()方法来创建实例。这种方法可以用指定的构造器构造类的实例。
//获取String所对应的Class对象Class<?> c = String.class;//获取String类带一个String参数的构造器Constructor constructor = c.getConstructor(String.class);//根据构造器创建实例Object obj = constructor.newInstance("23333");System.out.println(obj);
4.获取方法
获取某个Class对象的方法集合,主要有以下几个方法:
getDeclaredMethods 方法返回类或接口声明的所有方法,包括公共、保护、默认(包)访问和私有方法,但不包括继承的方法。
public Method[] getDeclaredMethods() throws SecurityException
getMethods 方法返回某个类的所有公用(public)方法,包括其继承类的公用方法。
public Method[] getMethods() throws SecurityException
getMethod 方法返回一个特定的方法,其中第一个参数为方法名称,后面的参数为方法的参数对应Class的对象。
public Method getMethod(String name, Class<?>... parameterTypes)
只是这样描述的话可能难以理解,我们用例子来理解这三个方法:
package org.ScZyhSoft.common;import java.lang.reflect.InvocationTargetException;import java.lang.reflect.Method;public class test1 {public static void test() throws IllegalAccessException, InstantiationException, NoSuchMethodException, InvocationTargetException {Class<?> c = methodClass.class;Object object = c.newInstance();Method[] methods = c.getMethods();Method[] declaredMethods = c.getDeclaredMethods();//获取methodClass类的add方法Method method = c.getMethod("add", int.class, int.class);//getMethods()方法获取的所有方法System.out.println("getMethods获取的方法:");for(Method m:methods)System.out.println(m);//getDeclaredMethods()方法获取的所有方法System.out.println("getDeclaredMethods获取的方法:");for(Method m:declaredMethods)System.out.println(m);}}class methodClass {public final int fuck = 3;public int add(int a,int b) {return a+b;}public int sub(int a,int b) {return a+b;}}
程序运行结果如下:
Methods获取的方法:public int org.ScZyhSoft.common.methodClass.add(int,int)public int org.ScZyhSoft.common.methodClass.sub(int,int)public final void java.lang.Object.wait() throws java.lang.InterruptedExceptionpublic final void java.lang.Object.wait(long,int) throws java.lang.InterruptedExceptionpublic final native void java.lang.Object.wait(long) throws java.lang.InterruptedExceptionpublic boolean java.lang.Object.equals(java.lang.Object)public java.lang.String java.lang.Object.toString()public native int java.lang.Object.hashCode()public final native java.lang.Class java.lang.Object.getClass()public final native void java.lang.Object.notify()public final native void java.lang.Object.notifyAll()getDeclaredMethods获取的方法:public int org.ScZyhSoft.common.methodClass.add(int,int)public int org.ScZyhSoft.common.methodClass.sub(int,int)
可以看到,通过 getMethods() 获取的方法可以获取到父类的方法,比如 java.lang.Object 下定义的各个方法。
5、获取类的成员变量(字段)信息
获取成员变量并调用:
1.批量的
1).Field[] getFields():获取所有的”公有字段”
2).Field[] getDeclaredFields():获取所有字段,包括:私有、受保护、默认、公有;但不包括父类的成员变量。
2.获取单个的:
1).public Field getField(String fieldName):获取某个”公有的”字段;
2).public Field getDeclaredField(String fieldName):获取某个字段(可以是私有的)
5.2、Field:成员变量
(1)设置值void set(Object obj , Object value)
(2)获取值 get(Object obj)
(3)忽略访问权限修饰符的安全检查 setAccessible(true):暴力反射
5、3通过反射访问对象属性
Student类:
package com.bjpowernode;//反射属性Fieldpublic class Student {//Field翻译为字段,其实就是属性/成员private String name;//Field对象protected int age;boolean sex;public int no;public static final double MATH_PI=3.1415926;}
测试类:
package com.bjpowernode;import java.lang.reflect.Field;public class FieldTest {public static void main(String[] args) throws Exception{//使用反射机制,去访问一个对象属性(set,get)Class studentCLass = Class.forName("com.bjpowernode.Student");Object obj=studentCLass.newInstance();//obj就是Student对象(底层调用无参构造方法)//获取no属性(根据属性的名称来获取Field)Field noField = studentCLass.getDeclaredField("no");noField.set(obj,2222);System.out.println(noField.get(obj));//2222//可以访问私有属性(打破封装)Field nameField = studentCLass.getDeclaredField("name");nameField.setAccessible(true);//给name属性赋值nameField.set(obj,"jackson");//获取name属性的值System.out.println(nameField.get(obj));//jackson}}
6、通过反射调用方法
当我们从类中获取了一个方法后,我们就可以用 invoke() 方法来调用这个方法。invoke 方法的原型为:
public Object invoke(Object obj, Object... args)throws IllegalAccessException, IllegalArgumentException,InvocationTargetException
下面是一个实例:
public class test1 {public static void main(String[] args) throws IllegalAccessException, InstantiationException, NoSuchMethodException, InvocationTargetException {Class<?> klass = methodClass.class;//创建methodClass的实例Object obj = klass.newInstance();//获取methodClass类的add方法Method method = klass.getMethod("add",int.class,int.class);//调用method对应的方法 => add(1,4)Object result = method.invoke(obj,1,4);System.out.println(result);}}class methodClass {public final int fuck = 3;public int add(int a,int b) {return a+b;}public int sub(int a,int b) {return a+b;}}
7、通过反射运行配置文件内容
Student类:
package com.bjpowernode.Test;public class Student {public void show(){System.out.println("is show()");}}
配置文件以pro.txt文件为例子:
className = com.bjpowernode.Test.StudentmethodName = show
测试类:
package com.bjpowernode.Test;import java.io.FileReader;import java.lang.reflect.Constructor;import java.lang.reflect.Method;import java.util.Properties;public class Test {public static void main(String[] args) throws Exception {//加载键值对数据Properties properties = new Properties();FileReader fileReader = new FileReader("pro.txt");properties.load(fileReader);fileReader.close();//获取数据String classname= properties.getProperty("className"); //com.bjpowernode.Test.StudentString methodName= properties.getProperty("methodName"); //show//反射Class c=Class.forName(classname);Constructor con = c.getConstructor();Object obj=con.newInstance();//调用方法Method m =c.getMethod(methodName);m.invoke(obj);}}
输出: is show()
8.资源绑定器
Classinfo2.properties文件:
className=123;
/*java.util包下提供了一个资源绑定器,便于获取属性配置文件中的内容。使用以下这种方式的时候,属性配置文件xxx.properties必须放到类路径下。*/public class ResourceBundleTest{public static void main(String[] args){资源绑定器,只能绑定xxx.properties文件。并且这个文件必须在类路径下文件扩展名也必须是properties并且在写路径的时候,路径后面的扩展名不能写。ResourceBundle bundle = ResourceBundle.getBundle("classinfo2");String className = bundle.getString("className");System.out.println(className); //123}}
9、利用反射创建数组
数组在Java里是比较特殊的一种类型,它可以赋值给一个Object Reference。下面我们看一看利用反射创建数组的例子:
public static void testArray() throws ClassNotFoundException {Class<?> cls = Class.forName("java.lang.String");Object array = Array.newInstance(cls,25);//往数组里添加内容Array.set(array,0,"hello");Array.set(array,1,"Java");Array.set(array,2,"fuck");Array.set(array,3,"Scala");Array.set(array,4,"Clojure");//获取某一项的内容System.out.println(Array.get(array,3));}
其中的Array类为java.lang.reflect.Array类。我们通过Array.newInstance()创建数组对象,它的原型是:
public static Object newInstance(Class<?> componentType, int length)throws NegativeArraySizeException {return newArray(componentType, length);}
而 newArray 方法是一个 native 方法,它在 HotSpot JVM 里的具体实现我们后边再研究,这里先把源码贴出来:
private static native Object newArray(Class<?> componentType, int length)throws NegativeArraySizeException
源码目录:openjdk\hotspot\src\share\vm\runtime\reflection.cpp
arrayOop Reflection::reflect_new_array(oop element_mirror, jint length, TRAPS) {if (element_mirror == NULL) {THROW_0(vmSymbols::java_lang_NullPointerException());}if (length < 0) {THROW_0(vmSymbols::java_lang_NegativeArraySizeException());}if (java_lang_Class::is_primitive(element_mirror)) {Klass* tak = basic_type_mirror_to_arrayklass(element_mirror, CHECK_NULL);return TypeArrayKlass::cast(tak)->allocate(length, THREAD);} else {Klass* k = java_lang_Class::as_Klass(element_mirror);if (k->oop_is_array() && ArrayKlass::cast(k)->dimension() >= MAX_DIM) {THROW_0(vmSymbols::java_lang_IllegalArgumentException());}return oopFactory::new_objArray(k, length, THREAD);}}
10、通过反射越过泛型检查
泛型用在编译期,编译过后泛型擦除(消失掉),所以是可以通过反射越过泛型检查的
测试类:
import java.lang.reflect.Method;import java.util.ArrayList;/** 通过反射越过泛型检查* 例如:有一个String泛型的集合,怎样能向这个集合中添加一个Integer类型的值?*/public class Demo {public static void main(String[] args) throws Exception{ArrayList<String> strList = new ArrayList<>();strList.add("aaa");strList.add("bbb");// strList.add(100);//获取ArrayList的Class对象,反向的调用add()方法,添加数据Class listClass = strList.getClass(); //得到 strList 对象的字节码 对象//获取add()方法Method m = listClass.getMethod("add", Object.class);//调用add()方法m.invoke(strList, 100);//遍历集合for(Object obj : strList){System.out.println(obj);}}}
控制台输出:
aaabbb100
十一、IO流
一、四大家族的首领:
java.io.InputStream 字节输入流
java.io.OutputStream 字节输出流
java.io.Reader 字符输入流
java.io.Writer 字符输出流
四大家族的首领都是抽象类。(abstract class)
java.io包下需要掌握的流有16个:
文件专属:
java.io.FileInputStream(掌握)
java.io.FileOutputStream(掌握)
java.io.FileReader
java.io.FileWriter
转换流:(将字节流转换成字符流)
java.io.InputStreamReader
java.io.OutputStreamWriter
缓冲流专属:
java.io.BufferedReader
java.io.BufferedWriter
java.io.BufferedInputStream
java.io.BufferedOutputStream
数据流专属:
java.io.DataInputStream
java.io.DataOutputStream
标准输出流:
java.io.PrintWriter
java.io.PrintStream(掌握)
对象专属流:
java.io.ObjectInputStream(掌握)
java.io.ObjectOutputStream(掌握)
二、举例
1.FileInputStream
| 方法摘要 | 方法 | 作用 |
|---|---|---|
| abstract int | read() | 从输入流中读取数据的下一个字节 |
| int | read(byte[] b) | 将输入流中读取一定数量 并将其存储在缓冲区数组 b 中。 |
| int | read(byte[] b, int off, int len) | 将输入流中最多 len 个数据字节读入 byte 数组。返回总字节数. |
演示read[byte[] b]: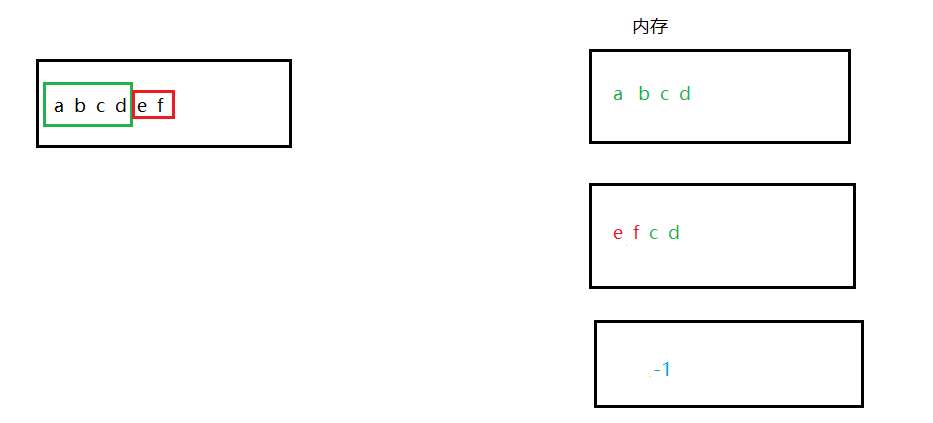
import java.io.FileInputStream;import java.io.FileNotFoundException;import java.io.IOException;public class Finally {public static void main(String[] args) {FileInputStream fis =null;try {fis=new FileInputStream("E:\\IO\\ceshi\\finally.text");//准备一个byte数组byte[] bytes=new byte[4];int readCount=0;//read(bytes)方法是读到的字节个数为几个,当读到没有时返回-1while ((readCount=fis.read(bytes))!=-1){//把byte数组转化为字符串,读到几个转换几个System.out.print(new String(bytes,0,readCount));}} catch (FileNotFoundException e) {e.printStackTrace();} catch (IOException e) {e.printStackTrace();}finally {if(fis!=null){try {fis.close();} catch (IOException e) {e.printStackTrace();}}}}}
abcdef
2.FileOutputStream
import java.io.FileNotFoundException;import java.io.FileOutputStream;import java.io.IOException;public class OutTest {public static void main(String[] args) {FileOutputStream fos=null;try {//这种方式谨慎使用,这种方式会先将原文件清空,然后重新写入// fos=new FileOutputStream("E:\\IO\\ceshi\\finally.text");//以追加的方式在文件末尾写入。不会清除原文件内容。fos=new FileOutputStream("E:\\IO\\ceshi\\finally.text",true);byte[] bytes ={97,98,99,100};//将byte数组全部写出!fos.write(bytes);//abcd//将byte数组一部分写出!fos.write(bytes,0,2);//再写出ab//写完之后一定要刷新fos.flush();} catch (FileNotFoundException e) {e.printStackTrace();} catch (IOException e) {e.printStackTrace();}finally {if(fos!=null){try {fos.close();} catch (IOException e) {e.printStackTrace();}}}}}
3.所有文件的复制
import java.io.FileInputStream;import java.io.FileNotFoundException;import java.io.FileOutputStream;import java.io.IOException;public class OutTest {public static void main(String[] args) {FileInputStream fis=null;FileOutputStream fos=null;try {fis=new FileInputStream("E:\\IO\\ceshi\\resource.txt");fos=new FileOutputStream("E:\\IO\\ceshi2\\position.txt");//最核心的:一边读,一边写byte [] bytes = new byte[1024*1024];//1MB(最多可拷贝1MB)int readCount=0;while ((readCount=fis.read(bytes))!=-1){fos.write(bytes,0,readCount);}} catch (FileNotFoundException e) {e.printStackTrace();} catch (IOException e) {e.printStackTrace();}finally {//分开try,不要一起tryif(fis!=null){try {fis.close();} catch (IOException e) {e.printStackTrace();}}if(fos!=null){try {fos.close();} catch (IOException e) {e.printStackTrace();}}}}}
3.1所有目录的赋复制
package com.bjpowernode.java.io;import java.io.*;/*拷贝目录*/public class CopyAll {public static void main(String[] args) {// 拷贝源File srcFile = new File("D:\\course\\02-JavaSE\\document");// 拷贝目标File destFile = new File("C:\\a\\b\\c");// 调用方法拷贝copyDir(srcFile, destFile);}/*** 拷贝目录* @param srcFile 拷贝源* @param destFile 拷贝目标*/private static void copyDir(File srcFile, File destFile) {if(srcFile.isFile()) {// srcFile如果是一个文件的话,递归结束。// 是文件的时候需要拷贝。// ....一边读一边写。FileInputStream in = null;FileOutputStream out = null;try {// 读这个文件// D:\course\02-JavaSE\document\JavaSE进阶讲义\JavaSE进阶-01-面向对象.pdfin = new FileInputStream(srcFile);// 写到这个文件中// C:\course\02-JavaSE\document\JavaSE进阶讲义\JavaSE进阶-01-面向对象.pdfString path = (destFile.getAbsolutePath().endsWith("\\") ? destFile.getAbsolutePath() : destFile.getAbsolutePath() + "\\") + srcFile.getAbsolutePath().substring(3);out = new FileOutputStream(path);// 一边读一边写byte[] bytes = new byte[1024 * 1024]; // 一次复制1MBint readCount = 0;while((readCount = in.read(bytes)) != -1){out.write(bytes, 0, readCount);}out.flush();} catch (FileNotFoundException e) {e.printStackTrace();} catch (IOException e) {e.printStackTrace();} finally {if (out != null) {try {out.close();} catch (IOException e) {e.printStackTrace();}}if (in != null) {try {in.close();} catch (IOException e) {e.printStackTrace();}}}return;}// 获取源下面的子目录File[] files = srcFile.listFiles();for(File file : files){// 获取所有文件的(包括目录和文件)绝对路径//System.out.println(file.getAbsolutePath());if(file.isDirectory()){// 新建对应的目录//System.out.println(file.getAbsolutePath());//D:\course\02-JavaSE\document\JavaSE进阶讲义 源目录//C:\course\02-JavaSE\document\JavaSE进阶讲义 目标目录String srcDir = file.getAbsolutePath();String destDir = (destFile.getAbsolutePath().endsWith("\\") ? destFile.getAbsolutePath() : destFile.getAbsolutePath() + "\\") + srcDir.substring(3);File newFile = new File(destDir);if(!newFile.exists()){newFile.mkdirs();}}// 递归调用copyDir(file, destFile);}}}
4.java.io.BufferedReader和转换流
import java.io.*;/*带有缓冲区的字符输入流使用这个流的时候不需要自定义char数组,或者说不需要自定义byte数组,自带缓冲。*/public class BufferedReaderTest {public static void main(String[] args) throws IOException {/*这个构造方法只能传一个字符流。不能传字节流//通过转换流转换(InputStreamReader将字节流转换为字符流)FileInputStream是节点流,BufferedReader是包装流。*/BufferedReader br = new BufferedReader(new InputStreamReader(new FileInputStream("E:\\IO\\ceshi\\finally.text")));//br.readLine读一行String Line = null;while ((Line = br.readLine()) != null) {System.out.println(Line);}//关闭流//对于包装流来说,只需要关闭最外层流就行,里面的节点流自动关闭(可以看源码)br.close();}}
5.DataOutputStream和DataInputStream
/*java.io.DataOutputStream:数据专属的流。这个流可以将数据连同数据的类型一并写入文件。注意:这个文件不是普通文本文档。(这个文件使用记事本打不开。)*//*DataInputStream:数据字节输入流。DataOutputStream写的文件,只能使用DataInputStream去读。并且读的时候你需要提前知道写入的顺序。读的顺序需要和写的顺序一致。才可以正常取出数据。*/import java.io.DataOutputStream;import java.io.FileOutputStream;import java.io.IOException;public class Data {public static void main(String[] args) throws IOException {//创建数据专属的字节输出流//Dataoutputstream(Outputstream) Outputstream是抽象类无法实例化,我们可以new 他的子类DataOutputStream dos=new DataOutputStream(new FileOutputStream("E:\\IO\\ceshi\\finally.text"));//写数据int i=300;boolean sex=false;char c='a';//写dos.writeInt(i);dos.writeBoolean(sex);dos.writeChar(c);//刷新dos.flush();//关闭最外层dos.close();}}
6.标准输出流
标准输出流是不需要关闭流的
import java.io.FileNotFoundException;import java.io.FileOutputStream;import java.io.PrintStream;import java.text.SimpleDateFormat;import java.util.Date;public class Logger {public static void log(String msg){try {//指向一个日志文件PrintStream out=new PrintStream(new FileOutputStream("log.txt",true));//改变输出方向System.setOut(out);//日期当前时间Date nowTime = new Date();SimpleDateFormat sdf =new SimpleDateFormat("yyyy-MM-dd HH:mm:ss: SSS");String strTime =sdf.format(nowTime);System.out.println(strTime+":"+msg);} catch (FileNotFoundException e) {e.printStackTrace();}}}
public class LogTest {public static void main(String[] args) {//测试工具类Logger.log("调用了System类的gc方法,建议启动垃圾回收");Logger.log("调用了UserService的doSome()方法");Logger.log("用户尝试登陆,验证失败");Logger.log("我非常喜欢这个记录工具哦");}}
2021-11-10 17:12:04: 764:调用了System类的gc方法,建议启动垃圾回收2021-11-10 17:12:04: 797:调用了UserService的doSome()方法2021-11-10 17:12:04: 801:用户尝试登陆,验证失败2021-11-10 17:12:04: 801:我非常喜欢这个记录工具哦
7.序列化和反序列化
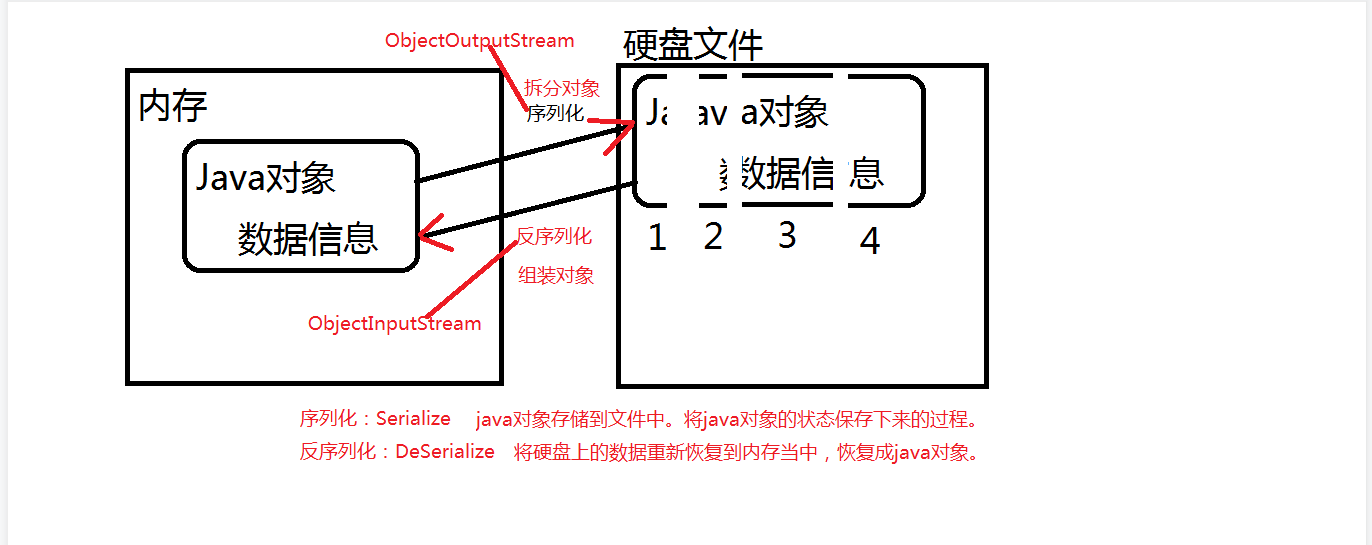
1:参与序列化和反序列化的对象,必须实现Serializable接口。
注意:通过源代码发现,Serializable接口只是一个标志接口:
public interface Serializable {
}
2
凡是一个类实现了Serializable接口,建议给该类提供一个固定不变的序列化版本号。
这样,以后这个类即使代码修改了,但是版本号不变,java虚拟机会认为是同一个类。
3:
transient关键字表示游离的,不参与序列化。
private transient String name; // name不参与序列化操作!
package com.bjpowernode.java.io;import java.io.Serializable;public class Student implements Serializable {private static final long serialVersionUID = 1L;// java虚拟机识别一个类的时候先通过类名,如果类名一致,再通过序列化版本号。private int no;private String name;public Student() {}public Student(int no, String name) {this.no = no;this.name = name;}public int getNo() {return no;}public void setNo(int no) {this.no = no;}public String getName() {return name;}public void setName(String name) {this.name = name;}@Overridepublic String toString() {return "Student{" +"no=" + no +", name='" + name + '\'' +'}';}}
package com.bjpowernode.java.io;import java.io.FileOutputStream;import java.io.ObjectOutputStream;public class ObjectOutputStreamTest01 {public static void main(String[] args)throws Exception {//创建java对象Student s =new Student(111,"zhangsan");//序列化ObjectOutputStream oos =new ObjectOutputStream(new FileOutputStream("students"));//序列化对象oos.writeObject(s);//刷新oos.flush();//关闭oos.close();}}
一次性序列多个对象(参考)
/*一次序列化多个对象呢?可以,可以将对象放到集合当中,序列化集合。提示:参与序列化的ArrayList集合以及集合中的元素User都需要实现 java.io.Serializable接口。*/public class ObjectOutputStreamTest02 {public static void main(String[] args) throws Exception{List<User> userList = new ArrayList<>();userList.add(new User(1,"zhangsan"));userList.add(new User(2, "lisi"));userList.add(new User(3, "wangwu"));ObjectOutputStream oos = new ObjectOutputStream(new FileOutputStream("users"));// 序列化一个集合,这个集合对象中放了很多其他对象。oos.writeObject(userList);oos.flush();oos.close();}}
8.IO流和Properties的使用
userinfo.properties
username=adminpassword=123
import java.io.FileReader;import java.util.Properties;public class IoPropertiesTest01 {public static void main(String[] args) throws Exception {//新建一个输入流对象FileReader reader =new FileReader("src/userinfo.properties");//新建一个Map集合Properties pro=new Properties();//调用properties对象的load方法将文件中的数据加载到Map集合中pro.load(reader);//通过key来获取valueString username=pro.getProperty("username");System.out.println(username);String password=pro.getProperty("password");System.out.println(password);}}
三、File类常用方法
Files.exists():检测⽂件路径是否存在。
Files.createFile():创建⽂件。
Files.createDirectory():创建⽂件夹。
Files.delete():删除⼀个⽂件或⽬录。
Files.copy():复制⽂件。
Files.move():移动⽂件。
Files.size():查看⽂件个数。
Files.read():读取⽂件。
Files.write():写⼊⽂件。
十二、JAVA多线程
一、实现线程三种方式
一、未开启线程并发
public class MyThread {public static void main(String[] args) {BranchThread t=new BranchThread();t.run();for(int i=0;i<=100;i++){System.out.println("主线程"+i);}}}class BranchThread extends Thread{public void run(){for(int i=0;i<=1000;i++){System.out.println("分支线程------------->"+i);}}}
1: 自上而下的顺序2:先输出分支线程1-1000,输出完之后再输出主线程1-100

一、第一种方式
实现线程的第一种方式:
编写一个类,直接继承java.lang.Thread,重写run方法。
public class MyThread {public static void main(String[] args) {BranchThread t=new BranchThread();//start()方法的作用是:启动一个分支线程,在JVM中开辟一个新的栈空间,这段代码任务完成之后,瞬间就结束了。t.start();for(int i=0;i<=1000;i++){System.out.println("主线程"+i);}}}class BranchThread extends Thread{public void run(){for(int i=0;i<=1000;i++){System.out.println("分支线程------------->"+i);}}}
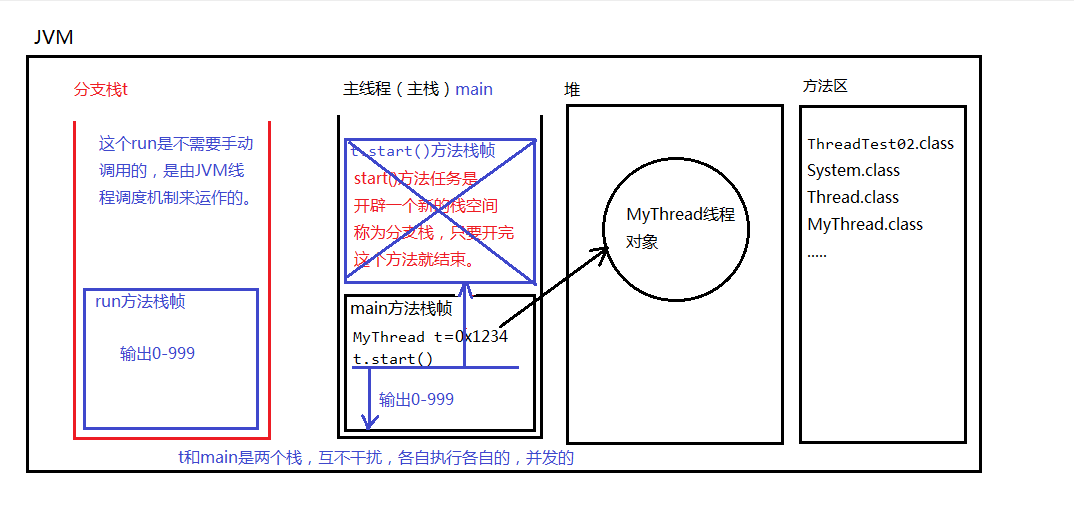
"C:\Program Files\Java\jdk-15.0.1\bin\java.exe" "-javaagent:C:\Program Files\JetBrains\IntelliJ IDEA 2020.3.1\lib\idea_rt.jar=64875:C:\Program Files\JetBrains\IntelliJ IDEA 2020.3.1\bin" -Dfile.encoding=UTF-8 -classpath C:\Users\cao\IdeaProjects\untitled3\out\production\untitled Thread.ThreadTest02分支线程--------->0主线程0分支线程--------->1主线程1分支线程--------->2分支线程--------->3主线程2分支线程--------->4主线程3分支线程--------->5主线程4分支线程--------->6主线程5分支线程--------->7主线程6分支线程--------->8主线程7分支线程--------->9主线程8分支线程--------->10主线程9分支线程--------->11主线程10分支线程--------->12主线程11主线程12分支线程--------->13主线程13分支线程--------->14主线程14分支线程--------->15
二、第二种方式
实现线程的第二种方式,编写一个类实现java.lang.Runnable接口。
public class MyThread {public static void main(String[] args) {/*** 创建一个可运行的对象* BranchThread r= new BranchThread();* 将可运行的对象封装成一个线程对象* Thread t=new Thread(r)*/Thread t = new Thread(new BranchThread());//合并代码t.start();for(int i=0;i<=100;i++){System.out.println("主线程"+i);}}}class BranchThread implements Runnable{public void run(){for(int i=0;i<=100;i++){System.out.println("分支线程------------->"+i);}}}
采用匿名内部类的方式【第二种变形】
public class MyThread {public static void main(String[] args) {//创建线程对象,采用匿名内部类方式。Thread t = new Thread(new Runnable() {@Overridepublic void run() {for (int i = 0; i <= 100; i++) {System.out.println("t线程----->" + i);}}});t.start();for (int i = 0; i <= 100; i++) {System.out.println("main线程----->" + i);}}}
三、第三种方式
实现线程的第三种方式:
实现Callable接口
这种方式的优点:可以获取到线程的执行结果。
这种方式的缺点:效率比较低,在获取t线程执行结果的时候,当前线程受阻塞,效率较低。
import java.util.concurrent.Callable;import java.util.concurrent.FutureTask; // JUC包下的,属于java的并发包,老JDK中没有这个包。新特性。public class MyThread {public static void main(String[] args) throws Exception {// 第一步:创建一个“未来任务类”对象。// 参数非常重要,需要给一个Callable接口实现类对象。FutureTask task = new FutureTask(new Callable() {@Overridepublic Object call() throws Exception { // call()方法就相当于run方法。只不过这个有返回值// 线程执行一个任务,执行之后可能会有一个执行结果// 模拟执行System.out.println("call method begin");Thread.sleep(1000 * 10);System.out.println("call method end!");int a = 100;int b = 200;return a + b; //自动装箱(300结果变成Integer)}});// 创建线程对象Thread t = new Thread(task);// 启动线程t.start();// 这里是main方法,这是在主线程中。// 在主线程中,怎么获取t线程的返回结果?// get()方法的执行会导致“当前线程阻塞”Object obj = task.get();System.out.println("线程执行结果:" + obj);// main方法这里的程序要想执行必须等待get()方法的结束// 而get()方法可能需要很久。因为get()方法是为了拿另一个线程的执行结果// 另一个线程执行是需要时间的。System.out.println("hello world!");}}
call method begin/*等待sleep */call method end!/*等待另一个线程结束拿到300*/线程执行结果:300hello world!
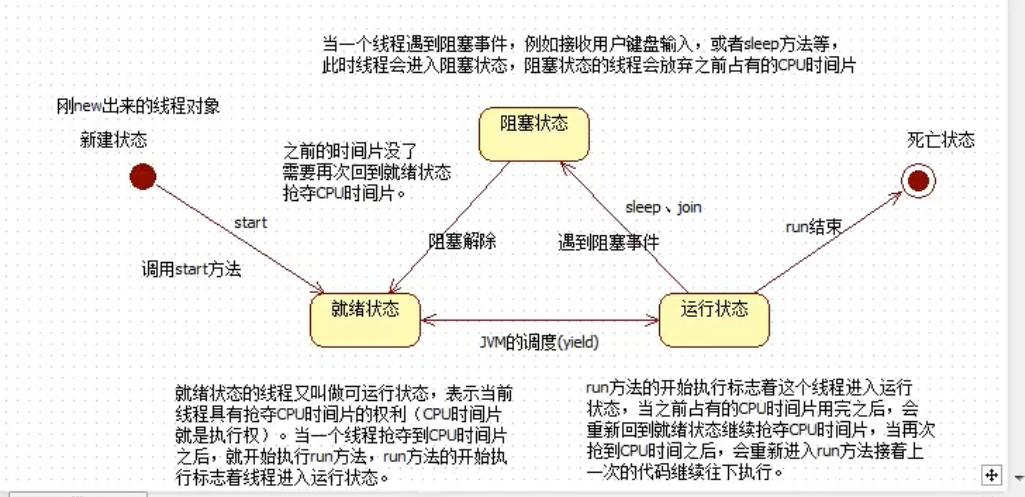
二、线程的生命周期
三、线程的三个基本方法
public class MyThread {public static void main(String[] args) {MyThread2 t = new MyThread2();//获取线程名字System.out.println(t.getName()); //默认值为 Thread-0//修改线程名字t.setName("曹1");System.out.println(t.getName());//曹1//获取当前线程对象?Thread y =Thread.currentThread();System.out.println(y.getName());//maint.start();}}class MyThread2 extends Thread{public void run(){//获取当前线程对象,t.start();谁启动就是谁Thread y1= Thread.currentThread();System.out.println(y1.getName());//曹1}}
四、Thread.sleep()
关于Thread.sleep()方法的一个面试题;
1、静态方法:Thread.sleep(1000);
2、参数是毫秒
3、作用:让当前线程进入休眠,进入“阻塞状态”,放弃占有CPU时间片,让给其它线程使用。
这行代码出现在A线程中,A线程就会进入休眠。
这行代码出现在B线程中,B线程就会进入休眠。
4、Thread.sleep()方法,可以做到这种效果:
间隔特定的时间,去执行一段特定的代码,每隔多久执行一次
public class MyThread {public static void main(String[] args) {//创建一个线程对象,一个多态Thread t =new MyThread3();t.setName("t");t.start();try {//问题:这行代码会让线程t进入休眠状态吗?t.sleep(1000*3);//在执行的时候还是会转成:Thread.sleep(1000*5) 这是静态方法//这行代码的作用是:让当前线程进入休眠,也就是说main进入休眠.//这样代码出现在main方法中,main线程睡眠。} catch (InterruptedException e) {e.printStackTrace();}//3秒之后执行到这里System.out.println("hello word");}}class MyThread3 extends Thread{public void run(){for(int i =0;i<10000;i++){System.out.println(Thread.currentThread().getName()+"------>"+i);}}}
4.1合理终止一个线程
public class MyThread {public static void main(String[] args) {MyThread4 r =new MyThread4();Thread t =new Thread(r);t.setName("t");t.start();//模拟5秒try {Thread.sleep(5000);} catch (InterruptedException e) {e.printStackTrace();}//终止线程//你想要什么时候终止t的执行,那么你可以把标记修改为false,就结束了。r.run=false;}}class MyThread4 implements Runnable{//打一个布尔标记boolean run=true;public void run(){for(int i =0;i<10;i++){if(run){System.out.println(Thread.currentThread().getName()+"--->"+i);try {Thread.sleep(1000);} catch (InterruptedException e) {e.printStackTrace();}}else {//return就结束了,你在结束之前还有什么没保存的。在这里可以保存//终止当前线程return;}}}}
t--->0t--->1t--->2t--->3t--->4
五 、线程安全问题
1: 什么时候数据在多线程并发的环境下会存在安全问题呢? 三个条件: 条件1:多线程并发。 条件2:有共享数据。 条件3:共享数据有修改的行为。
满足以上3个条件之后,就会存在线程安全问题。
synchronized有三种写法:第一种:同步代码块灵活synchronized(线程共享对象){同步代码块;}第二种:在实例方法上使用synchronized表示共享对象一定是this并且同步代码块是整个方法体。第三种:在静态方法上使用synchronized表示找类锁。类锁永远只有1把。就算创建了100个对象,那类锁也只有一把。对象锁:1个对象1把锁,100个对象100把锁。类锁:100个对象,也可能只是1把类锁。
synchronized () 括号中中写什么?
那要看你想让哪些线程同步。
假设t1、t2、t3、t4、t5,有5个线程,
你只希望t1 t2 t3排队,t4 t5不需要排队。怎么办?
你一定要在()中写一个t1 t2 t3共享的对象。而这个
对象对于t4 t5来说不是共享的。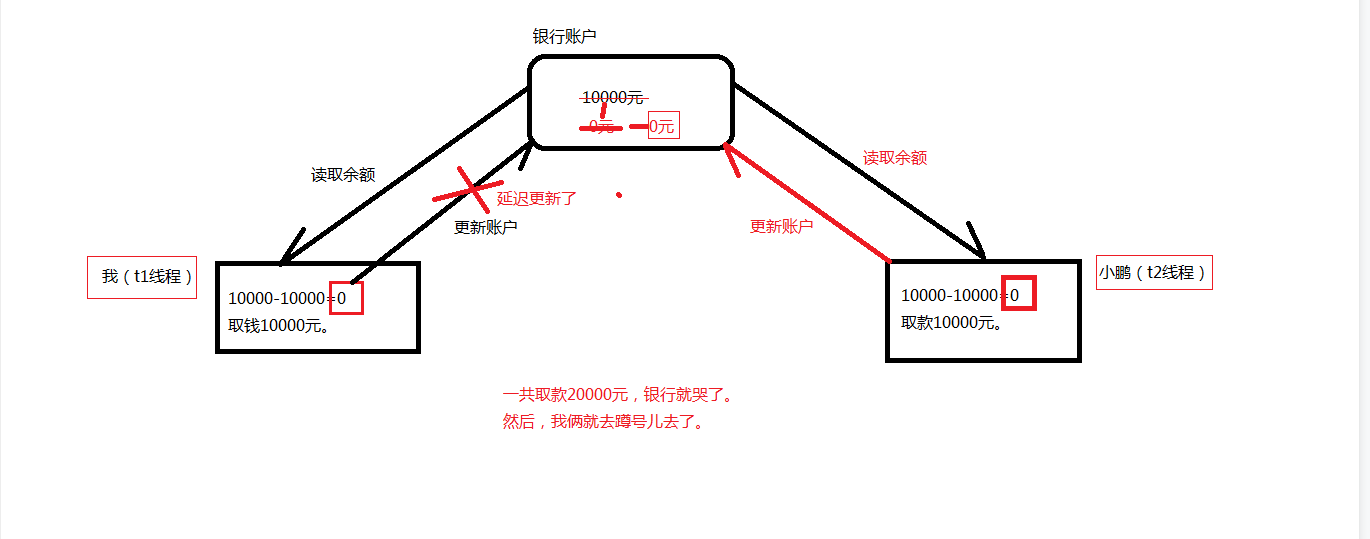
下面模拟两个人取同一个账户
package ThreadSafe;public class Account {private String actno;private double balance;public Account() {}public Account(String actno, double balance) {this.actno = actno;this.balance = balance;}public String getActno() {return actno;}public void setActno(String actno) {this.actno = actno;}public double getBalance() {return balance;}public void setBalance(double balance) {this.balance = balance;}//取款的方法 第一种方式public void withdraw(double money) {synchronized (this) {//取款之前户余额double before = this.getBalance();//取款之后的余额double after = before - money;try {Thread.sleep(1000);} catch (InterruptedException e) {e.printStackTrace();}//更新余额this.setBalance(after);}}}/* 第二种方式public synchronized void withdraw(double money){double before = this.getBalance(); // 10000double after = before - money;try {Thread.sleep(1000);} catch (InterruptedException e) {e.printStackTrace();}this.setBalance(after);}} */
package ThreadSafe;public class AccountThread extends Thread {// 两个线程必须共享同一个账户对象。private Account act;// 通过构造方法传递过来账户对象public AccountThread(Account act) {this.act = act;}public void run(){// run方法的执行表示取款操作。// 假设取款5000double money = 5000;// 取款// 多线程并发执行这个方法。act.withdraw(money);//第三种方式/* synchronized (act) { // 这种方式也可以,只不过扩大了同步的范围,效率更低了。act.withdraw(money);}*/System.out.println(Thread.currentThread().getName() + "对"+act.getActno()+"取款"+money+"成功,余额" + act.getBalance());}}
package ThreadSafe;public class Test {public static void main(String[] args) {// 创建账户对象(只创建1个)Account act = new Account("act-001", 10000);// 创建两个线程Thread t1 = new AccountThread(act);Thread t2 = new AccountThread(act);// 设置namet1.setName("t1");t2.setName("t2");// 启动线程取款t1.start();t2.start();}}
六、死锁

死锁package com.bjpowernode.java.deadlock;/*死锁代码要会写。一般面试官要求你会写。只有会写的,才会在以后的开发中注意这个事儿。因为死锁很难调试。*/public class DeadLock {public static void main(String[] args) {Object o1 = new Object();Object o2 = new Object();// t1和t2两个线程共享o1,o2Thread t1 = new MyThread1(o1,o2);Thread t2 = new MyThread2(o1,o2);t1.start();t2.start();}}class MyThread1 extends Thread{Object o1;Object o2;public MyThread1(Object o1,Object o2){this.o1 = o1;this.o2 = o2;}public void run(){synchronized (o1){try {Thread.sleep(1000);} catch (InterruptedException e) {e.printStackTrace();}synchronized (o2){}}}}class MyThread2 extends Thread {Object o1;Object o2;public MyThread2(Object o1,Object o2){this.o1 = o1;this.o2 = o2;}public void run(){synchronized (o2){try {Thread.sleep(1000);} catch (InterruptedException e) {e.printStackTrace();}synchronized (o1){}}}}
七、守护线程
public class ThreadTest14 {public static void main(String[] args) {Thread t = new BakDataThread();t.setName("备份数据线程");//启动线程之前,将线程设置为守护线程t.setDaemon(true);//守护线程t.start();//主线程,主线是用户线程for(int i=0;i<10;i++){System.out.println(Thread.currentThread().getName()+"--->"+i);try {Thread.sleep(1000);} catch (InterruptedException e) {e.printStackTrace();}}}}class BakDataThread extends Thread{public void run(){int i=0;//即使是死循环,但由于该线程是守护线程,当用户线程结束,守护线程自动停止。while (true){System.out.println(Thread.currentThread().getName()+"--->"+(++i));try {Thread.sleep(1000);} catch (InterruptedException e) {e.printStackTrace();}}}}
7.1实现定时器
package com.bjpowernode.java.thread;import java.text.SimpleDateFormat;import java.util.Date;import java.util.Timer;import java.util.TimerTask;/*使用定时器指定定时任务。*/public class TimerTest {public static void main(String[] args) throws Exception {// 创建定时器对象Timer timer = new Timer();//Timer timer = new Timer(true); //守护线程的方式// 指定定时任务//timer.schedule(定时任务, 第一次执行时间, 间隔多久执行一次);SimpleDateFormat sdf = new SimpleDateFormat("yyyy-MM-dd HH:mm:ss");Date firstTime = sdf.parse("2020-03-14 09:34:30");//timer.schedule(new LogTimerTask() , firstTime, 1000 * 10);// 每年执行一次。//timer.schedule(new LogTimerTask() , firstTime, 1000 * 60 * 60 * 24 * 365);//匿名内部类方式timer.schedule(new TimerTask(){@Overridepublic void run() {// code....}} , firstTime, 1000 * 10);}}// 编写一个定时任务类// 假设这是一个记录日志的定时任务class LogTimerTask extends TimerTask {@Overridepublic void run() {// 编写你需要执行的任务就行了。SimpleDateFormat sdf = new SimpleDateFormat("yyyy-MM-dd HH:mm:ss");String strTime = sdf.format(new Date());System.out.println(strTime + ":成功完成了一次数据备份!");}
八、wait和notify方法
1.注意:wait和notify方法不是线程对象的方法,是java中任何一个java对象
都有的方法,因为这两个方式是Object类中自带的。
Object o = new Object();
o.wait();
2.wait()方法的作用:o.wait()让正在o对象上活动的线程t进入等待状态,并且释放掉t线程之前占有的o对象的锁。
3、notify方法作用:o.notify()让正在o对象上等待的线程唤醒,只是通知,不会释放o对象上之前占有的锁。
4.notifyAll()方法这个方法是唤醒o对象上处于等待的所有线程。
下面模拟生产者与消费者关系
package bjpowernode;public class Store {private int mike;//默认仓库是没有牛奶的boolean state=false;public synchronized void put(int mike){//如果state为true,则说明有牛奶需要让该线程等待if(state){try {wait();} catch (InterruptedException e) {e.printStackTrace();}}//state为fasle,没有牛奶可以生产this.mike=mike;System.out.println("将第几"+this.mike+"个牛奶放入仓库");//等生产完了标记为truestate=true;//唤醒等待中所有线程notifyAll();/*注意唤醒之后由于state为true,所以返回到上面释放掉该线程重新抢*/}public synchronized void get(){//从上面wait过来的,所以state为true//!state表示没有牛奶if(!state){try {wait();} catch (InterruptedException e) {e.printStackTrace();}}System.out.println("取得第"+this.mike+"个牛奶");//取完牛奶后就没了,标记为falsestate =false;notifyAll();}}
package bjpowernode;public class Put implements Runnable {Store store;public Put(Store store){this.store=store;}@Overridepublic void run() {for(int i=1;i<6;i++){store.put(i);}}}
package bjpowernode;public class Get implements Runnable {Store store;public Get(Store store){this.store=store;}@Overridepublic void run() {while (true) {store.get();}}}
package bjpowernode;public class Test {public static void main(String[] args) {Store store = new Store();Put put = new Put(store);Get get = new Get(store);Thread t1 = new Thread(put);Thread t2 =new Thread(get);t1.setName("t1");t1.setName("t2");t1.start();t2.start();}}
十三、注解
Java 注解是附加在代码中的一些元信息,用于一些工具在编译、运行时进行解析和使用,起到说明、配置的功能。注解不会也不能影响代码的实际逻辑,仅仅起到辅助性的作用。
一、注解的用处:
1、生成文档。这是最常见的,也是java 最早提供的注解。常用的有@param @return 等<br /> 2、跟踪代码依赖性,实现替代配置文件功能。比如Dagger 2 依赖注入,未来java 开发,将大量注解配置,具有很大用处;<br /> 3、在编译时进行格式检查。如@override 放在方法前,如果你这个方法并不是覆盖了超类方法,则编译时就能检查出
二、注解的原理:
注解本质是一个继承了Annotation 的特殊接口,其具体实现类是Java 运行时生成的动态代理类。而我们通过反射获取注解时,返回的是Java 运行时生成的动态代理对象$Proxy1。通过代理对象调用自定义注解(接口)的方法,会最终调用AnnotationInvocationHandler 的invoke 方法。该方法会从memberValues 这个Map 中索引出对应的值。而memberValues 的来源是Java 常量池。
三、元注解
java.lang.annotation 提供了四种元注解,专门注解其他的注解(在自定义注解的时候,需要使用到元注解):
@Documented – 注解是否将包含在JavaDoc中
@Retention – 什么时候使用该注解
@Target – 注解用于什么地方
@Inherited – 是否允许子类继承该注解
1.)@Retention – 定义该注解的生命周期
● RetentionPolicy.SOURCE : 在编译阶段丢弃。这些注解在编译结束之后就不再有任何意义,所以它们不会写入字节码。@Override, @SuppressWarnings都属于这类注解。
● RetentionPolicy.CLASS : 在类加载的时候丢弃。在字节码文件的处理中有用。注解默认使用这种方式
● RetentionPolicy.RUNTIME : 始终不会丢弃,运行期也保留该注解,因此可以使用反射机制读取该注解的信息。我们自定义的注解通常使用这种方式。
2.)Target – 表示该注解用于什么地方。默认值为任何元素,表示该注解用于什么地方。可用的ElementType 参数包括
● ElementType.CONSTRUCTOR: 用于描述构造器
● ElementType.FIELD: 成员变量、对象、属性(包括enum实例)
● ElementType.LOCAL_VARIABLE: 用于描述局部变量
● ElementType.METHOD: 用于描述方法
● ElementType.PACKAGE: 用于描述包
● ElementType.PARAMETER: 用于描述参数
● ElementType.TYPE: 用于描述类、接口(包括注解类型) 或enum声明
3.)@Documented – 一个简单的Annotations 标记注解,表示是否将注解信息添加在java 文档中。
4.)@Inherited – 定义该注释和子类的关系
@Inherited 元注解是一个标记注解,@Inherited 阐述了某个被标注的类型是被继承的。如果一个使用了@Inherited 修饰的annotation 类型被用于一个class,则这个annotation 将被用于该class 的子类。
四、常见标准Annotation
1.)Override
java.lang.Override 是一个标记类型注解,它被用作标注方法。它说明了被标注的方法重写了父类的方法,起到了断言的作用。如果我们使用了这种注解在一个没有覆盖父类方法的方法时,java 编译器将以一个编译错误来警示。
2.)Deprecated
Deprecated 也是一种标记类型注解。当一个类型或者类型成员使用@Deprecated 修饰的话,编译器将不鼓励使用这个被标注的程序元素。所以使用这种修饰具有一定的“延续性”:如果我们在代码中通过继承或者覆盖的方式使用了这个过时的类型或者成员,虽然继承或者覆盖后的类型或者成员并不是被声明为@Deprecated,但编译器仍然要报警。
3.)SuppressWarnings
SuppressWarning 不是一个标记类型注解。它有一个类型为String[] 的成员,这个成员的值为被禁止的警告名。对于javac 编译器来讲,被-Xlint 选项有效的警告名也同样对@SuppressWarings 有效,同时编译器忽略掉无法识别的警告名。
@SuppressWarnings(“unchecked”)
五、自定义注解
自定义注解类编写的一些规则:
1. Annotation 型定义为@interface, 所有的Annotation 会自动继承java.lang.Annotation这一接口,并且不能再去继承别的类或是接口.
2. 参数成员只能用public 或默认(default) 这两个访问权修饰
3. 参数成员只能用基本类型byte、short、char、int、long、float、double、boolean八种基本数据类型和String、Enum、Class、annotations等数据类型,以及这一些类型的数组.
4. 要获取类方法和字段的注解信息,必须通过Java的反射技术来获取 Annotation 对象,因为你除此之外没有别的获取注解对象的方法
5. 注解也可以没有定义成员,,不过这样注解就没啥用了
PS:自定义注解需要使用到元注解
六、自定义注解的实例:
FruitName.java
import java.lang.annotation.Documented;import java.lang.annotation.Retention;import java.lang.annotation.Target;import static java.lang.annotation.ElementType.FIELD;import static java.lang.annotation.RetentionPolicy.RUNTIME;/*** 水果名称注解*/@Target(FIELD)@Retention(RUNTIME)@Documentedpublic @interface FruitName {/* 属性 属性默认值*/String value() default "";}
FruitColor.java
import java.lang.annotation.Documented;import java.lang.annotation.Retention;import java.lang.annotation.Target;import static java.lang.annotation.ElementType.FIELD;import static java.lang.annotation.RetentionPolicy.RUNTIME;/*** 水果颜色注解*/@Target(FIELD)@Retention(RUNTIME)@Documentedpublic @interface FruitColor {/*** 颜色枚举*/public enum Color{ BLUE,RED,GREEN};/*** 颜色属性*/Color fruitColor() default Color.GREEN;}
FruitProvider.java
import java.lang.annotation.Documented;import java.lang.annotation.Retention;import java.lang.annotation.Target;import static java.lang.annotation.ElementType.FIELD;import static java.lang.annotation.RetentionPolicy.RUNTIME;/*** 水果供应者注解*/@Target(FIELD)@Retention(RUNTIME)@Documentedpublic @interface FruitProvider {/*** 供应商编号*/public int id() default -1;/*** 供应商名称*/public String name() default "";/*** 供应商地址*/public String address() default "";}
FruitInfoUtil.java
import java.lang.reflect.Field;/*** 注解处理器*/public class FruitInfoUtil {public static void getFruitInfo(Class<?> clazz){String strFruitName=" 水果名称:";String strFruitColor=" 水果颜色:";String strFruitProvicer="供应商信息:";Field[] fields = clazz.getDeclaredFields();for(Field field :fields){//A.isAnnotationPresent(B.class);意思就是:注释B是否在此A上。if(field.isAnnotationPresent(FruitName.class)){//获取该注解对象FruitName fruitName = (FruitName) field.getAnnotation(FruitName.class);//获取该注解的属性ruitName.value();strFruitName=strFruitName+fruitName.value();System.out.println(strFruitName);}else if(field.isAnnotationPresent(FruitColor.class)){FruitColor fruitColor= (FruitColor) field.getAnnotation(FruitColor.class);strFruitColor=strFruitColor+fruitColor.fruitColor().toString();System.out.println(strFruitColor);}else if(field.isAnnotationPresent(FruitProvider.class)){FruitProvider fruitProvider= (FruitProvider) field.getAnnotation(FruitProvider.class);strFruitProvicer=" 供应商编号:"+fruitProvider.id()+" 供应商名称:"+fruitProvider.name()+" 供应商地址:"+fruitProvider.address();System.out.println(strFruitProvicer);}}}}
Apple.java
import test.FruitColor.Color;/*** 注解使用*/public class Apple {@FruitName("Apple")private String appleName;@FruitColor(fruitColor=Color.RED)private String appleColor;@FruitProvider(id=1,name="陕西红富士集团",address="陕西省西安市延安路89号红富士大厦")private String appleProvider;public void setAppleColor(String appleColor) {this.appleColor = appleColor;}public String getAppleColor() {return appleColor;}public void setAppleName(String appleName) {this.appleName = appleName;}public String getAppleName() {return appleName;}public void setAppleProvider(String appleProvider) {this.appleProvider = appleProvider;}public String getAppleProvider() {return appleProvider;}public void displayName(){System.out.println("水果的名字是:苹果");}}
FruitRun.java
/*** 输出结果*/public class FruitRun {public static void main(String[] args) {FruitInfoUtil.getFruitInfo(Apple.class);}}
运行结果是:
水果名称:Apple
水果颜色:RED
供应商编号:1 供应商名称:陕西红富士集团 供应商地址:陕西省西安市延安路89号红富士大厦

若有收获,就点个赞吧
0 人点赞
