Angular Routing and Navigation
在单页面应用程序(SPA)中,用户在站点浏览各种页面内容时,浏览器视图的更新任务将交由客户端处理,而不是向服务端请求新页面。为了能在各种视图之间导航,我们需要使用Router。 它通过解析浏览器URL地址作为(instruction)指令,在页面导航的时候切换加载不同的视图。
客户端路由概览

路由状态树
Angular应用由组件树构成,相应的angular router也会通过解析浏览器url地址构建路由状态树。假设有如下路由定义:
import { RouterModule, Route } from '@angular/router';const ROUTES: Route[] = [{ path: 'home', component: HomeComponent },{ path: 'notes',children: [{ path: '', component: NotesComponent },{ path: ':id', component: NoteComponent }]},];@NgModule({imports: [RouterModule.forRoot(ROUTES)]})export class AppModule{}
这将会生成以下路由状态树:
激活路由(Active Route)是整个路由状态树的一个子树,url地址 /notes 会以以下激活路由表述: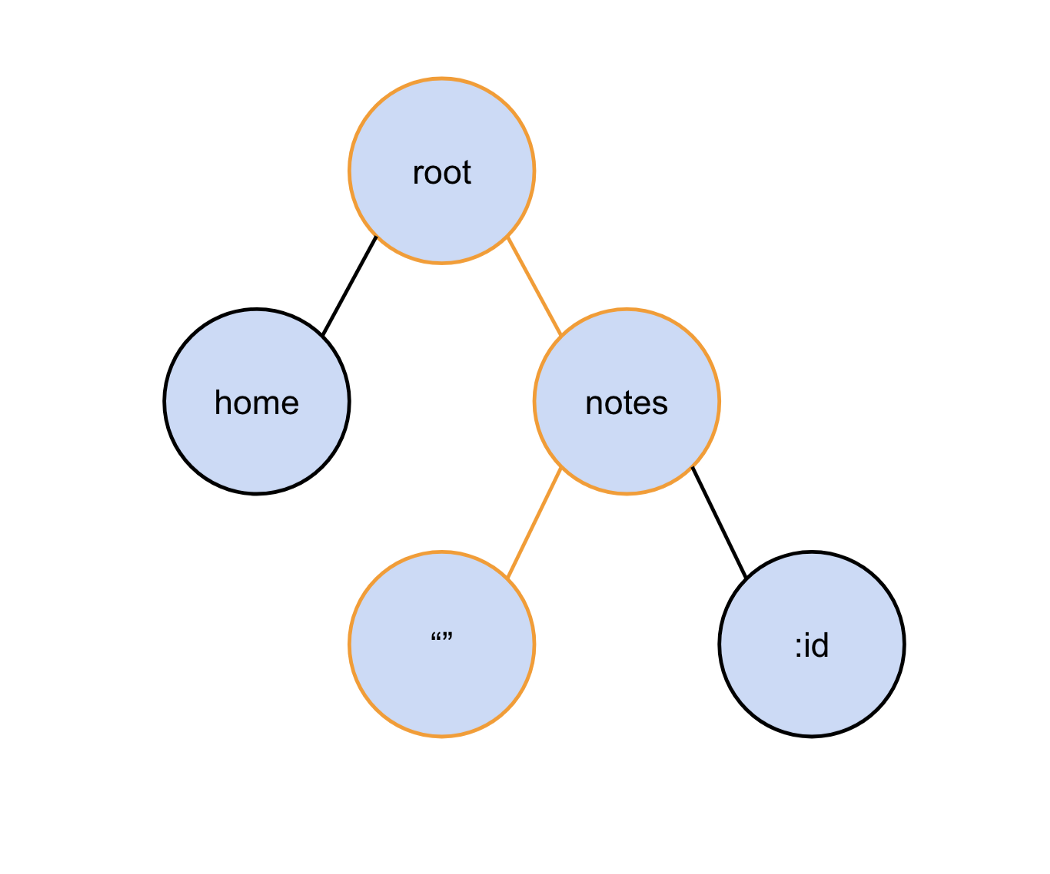
当一个路由(Route)的path被匹配上后,定义的路由中属性component所引用的组件将会被渲染。无论何时,在应用中发生导航时,Router会解析当前的url(生成UrlTree),并且尝试匹配到路由状态树。
Note: Since a router state is a tree, and the URL is nothing but a serialized state, the URL is a serialized tree. UrlTree is a data structure that provides a lot of affordances in dealing with URLs
路由(Router)生命周期
和组件生命周期一样,每次路由状态改变时,Router也将循环执行一系列步骤。
在导航的生命周期中,Router会触发一系列事件。以下是一些值得注意的事件:
- NavigationStart An event triggered when navigation starts.
- NavigationCancel: An event triggered when navigation is canceled.
- RoutesRecognized: An event triggered when the Router parses the URL and the routes are recognized.
- NavigationEnd: An event triggered when navigation ends successfully.
这些事件可以通过浏览器控制台看到,通过设置以下选项:
@NgModule({imports: [RouterModule.forRoot(ROUTES,{enableTracing:true})]})
也可以给组件注入Router服务,然后订阅它的events observable:
constructor(private router: Router) {this.router.events.subscribe( (event: RouterEvent) => console.log(event))}
懒加载子模块
当我们的应用变的越来越大时,一些功能可以被封装进单独的模块。应用首次加载时,有些模块没有被使用到,所以可以不在主模块中包含他们。以下是通过路由实现模块懒加载的例子:
{path: 'child',loadChildren: () => import('./child/child.module').then(m => m.ChildModule)}
路由守卫
使用路由守卫来阻止未授权的用户访问站点的有关部分,以下是angular提供的路由守卫:
可以定义一个类,实现想要使用的相应类型的守卫,以下是使用CanActivate来守卫路由:
export class YourGuard implements CanActivate {canActivate(next: ActivatedRouteSnapshot,state: RouterStateSnapshot): boolean {// your logic goes here}}
将路由守卫配置到相应的路由中:
{path: '/your-path',component: YourComponent,canActivate: [YourGuard],}
- 什么是指令,有什么作用?
- Angular有哪些常用内置指令以及用法?
- 如何自定义指令并使用?
Angular 指令
什么是指令?有什么作用?
- 指令是为 Angular 应用程序中的元素添加额外行为的类
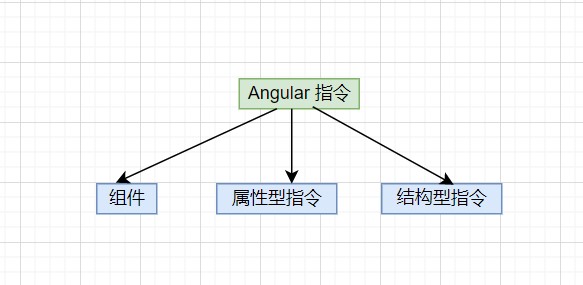
组件:带有模板的指令。这种指令类型是最常见的指令类型。
属性型指令: 更改元素、组件或其他指令的外观或行为的指令。
结构型指令: 通过添加和删除 DOM 元素来更改 DOM 布局的指令。
内置指令
属性指令
见directives-demo1
/* html*/<h2>Attribute directives</h2><hr><h2 id="ngClass">NgClass Binding</h2><div [ngClass]="flagClass?'active':''">NgClass Binding.</div><div [ngClass]="currentClasses">NgClass Binding.</div><button (click)="setCurrentClass()">change currentClass</button><hr><h2 id="ngStyle">NgStyle Binding</h2><div [ngStyle]="currentStyle">NgStyle Binding.</div><button (click)="setCurrentStyles()">change currentStyles</button>/* css*/.active {color: red}/* ts*/import { Component, Input, Output, EventEmitter } from '@angular/core';@Component({selector: 'directives-demo1',templateUrl: './directives-demo1.component.html',styleUrls: [ './directives-demo1.component.less' ]})export class DirectivesDemo1Component {flagStyle: boolean = falseflagClass: boolean = falsecurrentClasses = {}currentStyle={}constructor() {}setCurrentClass() {this.flagClass = !this.flagClassthis.currentClasses = {active: this.flagClass}}setCurrentStyles() {this.flagStyle = !this.flagStylethis.currentStyle = {'font-size': this.flagStyle ? '24px' : '12px'}}}
结构指令
/* html*/<h2>Structural directives</h2><h3 id="ngIf">NgIf Binding</h3><div *ngIf="flag">NgIf cool</div><div *ngIf="flag;else temp">NgIf cool</div><ng-template #temp>NgIf not cool</ng-template><button (click)="changeFlag()">change currentClass</button><hr><h3 id="ngFor">NgFor Binding</h3><div *ngFor="let item of items;let i=index">name: {{item.name}} index:{{i}}<hr></div><!--每个元素只能应用一个结构型指令 --><!--<div *ngFor="let item of items;let i=index" *ngIf="item==='A'">name: {{item.name}} index:{{i}}<hr></div>--><!--为没有 DOM 元素的指令安排宿主:Angular 的 <ng-container> 是一个分组元素,它不会干扰样式或布局,因为 Angular 不会将其放置在 DOM 中。--><hr><h3>NgFor and NgIf Binding</h3><ng-container *ngFor="let item of items;let i=index"><div *ngIf="i>1">name: {{item.name}} index:{{i}}<hr></div></ng-container><!--通过跟踪对条目列表的更改,使用 *ngFor 的 trackBy 属性,Angular 只能更改和重新渲染已更改的条目,而不必重新加载整个条目列表。--><hr><h3>NgFor 的trackBy 跟踪条目</h3><div *ngFor="let item of items;let i=index;trackBy:trackByItems">name: {{item.name}} index:{{i}}<hr></div><button (click)="add()">change currentClass</button><hr><h3>NgSwitch</h3><ng-container *ngFor="let item of items;let i=index"><div [ngSwitch]="item.name"><span *ngSwitchCase="'A'"> 我是A</span><span *ngSwitchDefault>我是B</span></div></ng-container>/* ts*/import { Component, Input, Output, EventEmitter } from '@angular/core';@Component({selector: 'directives-demo1',templateUrl: './directives-demo2.component.html',styleUrls: [ './directives-demo2.component.less' ]})export class DirectivesDemo2Component {flag: boolean = falseitems = [{ name: 'A', key: 1 },{ name: 'B', key: 2 },{ name: 'C', key: 3 },{ name: 'D', key: 4 }]constructor() {}changeFlag() {this.flag = !this.flag}trackByItems(item: any) {return item.key}add() {this.items = [ { name: 'A', key: 1 },{ name: 'B', key: 2 },{ name: 'C', key: 3 },{ name: 'D', key: 4 },{ name: 'E', key: 5 }]}}
自定义属性指令
import { Directive, ElementRef, HostListener, Input } from '@angular/core';/*** @Directive() 装饰器的配置属性会指定指令的 CSS 属性选择器 [appHighlight]。* */@Directive({selector: '[appHighlight]'})export class HighlightDirective {@Input() appHighlight = '';@Input() defaultColor = 'yellow';/*** ElementRef 的 nativeElement 属性会提供对宿主 DOM 元素的直接访问权限。* */constructor(private el: ElementRef) {//el.nativeElement.style.backgroundColor = 'yellow';}private highlight(color: string) {this.el.nativeElement.style.backgroundColor = color;}/*** 使用 @HostListener() 装饰器,你可以订阅本属性型指令宿主 DOM 元素上的事件* */@HostListener('mouseenter') onMouseEnter() {this.highlight(this.appHighlight||this.defaultColor);}@HostListener('mouseleave') onMouseLeave() {this.highlight('');}}
自定义结构指令
/* html*/<hr><h3>自定义结构指令</h3><p *unless="false">unless!!!!</p><!--*是一个语法糖等同于,避免复杂写ng-template--><ng-template [unless]="false"><p>unless!!!!</p></ng-template>/* ts*/import { Directive, Input, TemplateRef, ViewContainerRef } from '@angular/core';/*** @Directive() 装饰器的配置属性会指定指令的 CSS 属性选择器 [unless]。* */@Directive({selector: '[unless]'})export class UnlessDirective {private hasView = false;/*** 通过TemplateRef 拿到宿主的内嵌视图* 通过ViewContainerRef 拿到宿主视图容器访问权限* */constructor(private templateRef: TemplateRef<any>,private viewContainer: ViewContainerRef) {}@Input() set unless(condition: boolean) {if (!condition && !this.hasView) {/*** 通过createEmbeddedView去实例化视图* */this.viewContainer.createEmbeddedView(this.templateRef);this.hasView = true;} else if (condition && this.hasView) {this.viewContainer.clear();this.hasView = false;}}}

若有收获,就点个赞吧
0 人点赞
