作者:linuxer 发布于:2014-6-6 16:03 分类:统一设备模型
一、前言
Device Tree 总共有三篇,分别是:
1、为何要引入 Device Tree,这个机制是用来解决什么问题的?(请参考引入 Device Tree 的原因)
2、Device Tree 的基础概念(请参考DT 基础概念)
3、ARM linux 中和 Device Tree 相关的代码分析(这是本文的主题)
本文主要内容是:以 Device Tree 相关的数据流分析为索引,对 ARM linux kernel 的代码进行解析。主要的数据流包括:
1、初始化流程。也就是扫描 dtb 并将其转换成 Device Tree Structure。
2、传递运行时参数传递以及 platform 的识别流程分析
3、如何将 Device Tree Structure 并入 linux kernel 的设备驱动模型。
注:本文中的 linux kernel 使用的是 3.14 版本。
二、如何通过 Device Tree 完成运行时参数传递以及 platform 的识别功能?
1、汇编部分的代码分析
linux/arch/arm/kernel/head.S 文件定义了 bootloader 和 kernel 的参数传递要求:
MMU = off, D-cache = off, I-cache = dont care, r0 = 0, r1 = machine nr, r2 = atags or dtb pointer.
目前的 kernel 支持旧的 tag list 的方式,同时也支持 device tree 的方式。r2 可能是 device tree binary file 的指针(bootloader 要传递给内核之前要 copy 到 memory 中),也可以能是 tag list 的指针。在 ARM 的汇编部分的启动代码中(主要是 head.S 和 head-common.S),machine type ID 和指向 DTB 或者 atags 的指针被保存在变量machine_arch_type 和atags_pointer 中,这么做是为了后续 c 代码进行处理。
2、和 device tree 相关的 setup_arch 代码分析
具体的 c 代码都是在 setup_arch 中处理,这个函数是一个总的入口点。具体代码如下(删除了部分无关代码):
void __init setup_arch(char *cmdline_p)
{
const struct machine_desc mdesc;……
mdesc = setup_machine_fdt(atags_pointer);
if (!mdesc)
mdesc = setup_machine_tags(atags_pointer, __machine_arch_type);
machine_desc = mdesc;
machine_name = mdesc->name;……
}
对于如何确定 HW platform 这个问题,旧的方法是静态定义若干的 machine 描述符(struct machine_desc ),在启动过程中,通过 machine type ID 作为索引,在这些静态定义的 machine 描述符中扫描,找到那个 ID 匹配的描述符。在新的内核中,首先使用 setup_machine_fdt 来 setup machine 描述符,如果返回 NULL,才使用传统的方法 setup_machine_tags 来 setup machine 描述符。传统的方法需要给出machine_arch_type(bootloader 通过 r1 寄存器传递给 kernel 的)和 tag list 的地址(用来进行 tag parse)。machine_arch_type 用来寻找 machine 描述符;tag list 用于运行时参数的传递。随着内核的不断发展,相信有一天 linux kernel 会完全抛弃 tag list 的机制。
3、匹配 platform(machine 描述符)
setup_machine_fdt 函数的功能就是根据 Device Tree 的信息,找到最适合的 machine 描述符。具体代码如下:
const struct machine_desc __init setup_machine_fdt(unsigned int dt_phys)
{
const struct machine_desc mdesc, *mdesc_best = NULL;if (!dt_phys || !early_init_dt_scan(phys_to_virt(dt_phys)))
return NULL;mdesc = of_flat_dt_match_machine(mdesc_best, arch_get_next_mach);
if (!mdesc) {
出错处理
}/ Change machine number to match the mdesc we’re using /
__machine_arch_type = mdesc->nr;return mdesc;
}
early_init_dt_scan 函数有两个功能,一个是为后续的 DTB scan 进行准备工作,另外一个是运行时参数传递。具体请参考下面一个 section 的描述。
of_flat_dt_match_machine 是在 machine 描述符的列表中 scan,找到最合适的那个 machine 描述符。我们首先看如何组成 machine 描述符的列表。和传统的方法类似,也是静态定义的。DT_MACHINE_START 和 MACHINE_END 用来定义一个 machine 描述符。编译的时候,compiler 会把这些 machine descriptor 放到一个特殊的段中(.arch.info.init),形成 machine 描述符的列表。machine 描述符用下面的数据结构来标识(删除了不相关的 member):
struct machine_desc {
unsigned int nr; / architecture number /
const char const dt_compat; / array of device tree ‘compatible’ strings /……
};
nr 成员就是过去使用的 machine type ID。内核 machine 描述符的 table 有若干个 entry,每个都有自己的 ID。bootloader 传递了 machine type ID,指明使用哪一个 machine 描述符。目前匹配 machine 描述符使用 compatible strings,也就是 dt_compat 成员,这是一个 string list,定义了这个 machine 所支持的列表。在扫描 machine 描述符列表的时候需要不断的获取下一个 machine 描述符的 compatible 字符串的信息,具体的代码如下:
static const void __init arch_get_next_mach(const char const *match)
{
static const struct machine_desc mdesc = __arch_info_begin;
const struct machine_desc *m = mdesc;if (m>= __arch_info_end)
return NULL;mdesc++;
*match = m->dt_compat;
return m;
}
__arch_info_begin 指向 machine 描述符列表第一个 entry。通过 mdesc++ 不断的移动 machine 描述符指针(Note:mdesc 是 static 的)。match 返回了该 machine 描述符的 compatible string list。具体匹配的算法倒是很简单,就是比较字符串而已,一个是 root node 的 compatible 字符串列表,一个是 machine 描述符的 compatible 字符串列表,得分最低的(最匹配的)就是我们最终选定的 machine type。
4、运行时参数传递
运行时参数是在扫描 DTB 的 chosen node 时候完成的,具体的动作就是获取 chosen node 的 bootargs、initrd 等属性的 value,并将其保存在全局变量(boot_command_line,initrd_start、initrd_end)中。使用 tag list 方法是类似的,通过分析 tag list,获取相关信息,保存在同样的全局变量中。具体代码位于 early_init_dt_scan 函数中:
bool __init early_init_dt_scan(void *params)
{
if (!params)
return false;/ 全局变量 initial_boot_params 指向了 DTB 的 header/
initial_boot_params = params;/ 检查 DTB 的 magic,确认是一个有效的 DTB /
if (be32_to_cpu(initial_boot_params->magic) != OF_DT_HEADER) {
initial_boot_params = NULL;
return false;
}/ 扫描 /chosen node,保存运行时参数(bootargs)到 boot_command_line,此外,还处理 initrd 相关的 property,并保存在 initrd_start 和 initrd_end 这两个全局变量中 /
of_scan_flat_dt(early_init_dt_scan_chosen, boot_command_line);/ 扫描根节点,获取 {size,address}-cells 信息,并保存在 dt_root_size_cells 和 dt_root_addr_cells 全局变量中 /
of_scan_flat_dt(early_init_dt_scan_root, NULL);/ 扫描 DTB 中的 memory node,并把相关信息保存在 meminfo 中,全局变量 meminfo 保存了系统内存相关的信息。/
of_scan_flat_dt(early_init_dt_scan_memory, NULL);return true;
}
设定 meminfo(该全局变量确定了物理内存的布局)有若干种途径:
1、通过 tag list(tag 是 ATAG_MEM)传递 memory bank 的信息。
2、通过 command line(可以用 tag list,也可以通过 DTB)传递 memory bank 的信息。
3、通过 DTB 的 memory node 传递 memory bank 的信息。
目前当然是推荐使用 Device Tree 的方式来传递物理内存布局信息。
三、初始化流程
在系统初始化的过程中,我们需要将 DTB 转换成节点是 device_node 的树状结构,以便后续方便操作。具体的代码位于 setup_arch->unflatten_device_tree 中。
void init unflatten_device_tree(void)
{
unflatten_device_tree(initial_boot_params, &of_allnodes,
early_init_dt_alloc_memory_arch);/ Get pointer to “/chosen” and “/aliases” nodes for use everywhere /
of_alias_scan(early_init_dt_alloc_memory_arch);
}
我们用 struct device_node 来抽象设备树中的一个节点,具体解释如下:
struct device_node {
const char name;----------------------device node name
const char type;-----------------------对应 device_type 的属性
phandle phandle;-----------------------对应该节点的 phandle 属性
const char *full_name; ----------------从 “/” 开始的,表示该 node 的 full pathstruct property properties;-------------该节点的属性列表
struct property deadprops; ----------如果需要删除某些属性,kernel 并非真的删除,而是挂入到 deadprops 的列表
struct device_node parent;------parent、child 以及 sibling 将所有的 device node 连接起来
struct device_node child;
struct device_node sibling;
struct device_node next; --------通过该指针可以获取相同类型的下一个 node
struct device_node allnext;-------通过该指针可以获取 node global list 下一个 node
struct proc_dir_entry pde;--------开放到 userspace 的 proc 接口信息
struct kref kref;-------------该 node 的 reference count
unsigned long _flags;
void *data;
};
unflatten_device_tree 函数的主要功能就是扫描 DTB,将 device node 被组织成:
1、global list。全局变量 struct device_node *of_allnodes 就是指向设备树的 global list
2、tree。
这些功能主要是在__unflatten_device_tree 函数中实现,具体代码如下(去掉一些无关紧要的代码):
static void __unflatten_device_tree(struct boot_param_header blob,---需要扫描的 DTB
struct device_node **mynodes,---------global list 指针
void (dt_alloc)(u64 size, u64 align))------内存分配函数
{
unsigned long size;
void start, mem;
struct device_node *allnextp = mynodes;此处删除了 health check 代码,例如检查 DTB header 的 magic,确认 blob 的确指向一个 DTB。
/ scan 过程分成两轮,第一轮主要是确定 device-tree structure 的长度,保存在 size 变量中 /
start = ((void *)blob) + be32_to_cpu(blob->off_dt_struct);
size = (unsigned long)unflatten_dt_node(blob, 0, &start, NULL, NULL, 0);
size = ALIGN(size, 4);/ 初始化的时候,并不是扫描到一个 node 或者 property 就分配相应的内存,实际上内核是一次性的分配了一大片内存,这些内存包括了所有的 struct device_node、node name、struct property 所需要的内存。/
mem = dtalloc(size + 4, _alignof(struct device_node));
memset(mem, 0, size);(__be32 )(mem + size) = cpu_to_be32(0xdeadbeef); // 用来检验后面 unflattening 是否溢出
/ 这是第二轮的 scan,第一次 scan 是为了得到保存所有 node 和 property 所需要的内存 size,第二次就是实打实的要构建 device node tree 了 /
start = ((void *)blob) + be32_to_cpu(blob->off_dt_struct);
unflatten_dt_node(blob, mem, &start, NULL, &allnextp, 0);此处略去校验溢出和校验 OF_DT_END。
}
具体的 scan 是在 unflatten_dt_node 函数中,如果已经清楚地了解 DTB 的结构,其实代码很简单,这里就不再细述了。
四、如何并入 linux kernel 的设备驱动模型
在 linux kernel 引入统一设备模型之后,bus、driver 和 device 形成了设备模型中的铁三角。在驱动初始化的时候会将代表该 driver 的一个数据结构(一般是 xxx_driver)挂入 bus 上的 driver 链表。device 挂入链表分成两种情况,一种是即插即用类型的 bus,在插入一个设备后,总线可以检测到这个行为并动态分配一个 device 数据结构(一般是 xxx_device,例如 usb_device),之后,将该数据结构挂入 bus 上的 device 链表。bus 上挂满了 driver 和 device,那么如何让 device 遇到 “对” 的那个 driver 呢?那么就要靠缘分了,也就是 bus 的 match 函数。
上面是一段导论,我们还是回到 Device Tree。导致 Device Tree 的引入 ARM 体系结构的代码其中一个最重要的原因的太多的静态定义的表格。例如:一般代码中会定义一个 static struct platform_device *xxx_devices 的静态数组,在初始化的时候调用 platform_add_devices。这些静态定义的 platform_device 往往又需要静态定义各种 resource,这导致静态表格进一步增大。如果 ARM linux 中不再定义这些表格,那么一定需要一个转换的过程,也就是说,系统应该会根据 Device tree 来动态的增加系统中的 platform_device。当然,这个过程并非只是发生在 platform bus 上(具体可以参考“Platform Device” 的设备),也可能发生在其他的非即插即用的 bus 上,例如 AMBA 总线、PCI 总线。一言以蔽之,如果要并入 linux kernel 的设备驱动模型,那么就需要根据 device_node 的树状结构(root 是 of_allnodes)将一个个的 device node 挂入到相应的总线 device 链表中。只要做到这一点,总线机制就会安排 device 和 driver 的约会。
当然,也不是所有的 device node 都会挂入 bus 上的设备链表,比如 cpus node,memory node,choose node 等。
1、cpus node 的处理
这部分的处理可以参考 setup_arch->arm_dt_init_cpu_maps 中的代码,具体的代码如下:
void __init arm_dt_init_cpu_maps(void)
{
scan device node global list,寻找 full path 是 “/cpus” 的那个 device node。cpus 这个 device node 只是一个容器,其中包括了各个 cpu node 的定义以及所有 cpu node 共享的 property。
cpus = of_find_node_by_path(“/cpus”);for_each_child_of_node(cpus, cpu) { 遍历 cpus 的所有的 child node
u32 hwid;if (of_node_cmp(cpu->type, “cpu”)) 我们只关心那些 device_type 是 cpu 的 node
continue;if (of_property_read_u32(cpu, “reg”, &hwid)) { 读取 reg 属性的值并赋值给 hwid
return;
}reg 的属性值的 8 MSBs 必须设置为 0,这是 ARM CPU binding 定义的。
if (hwid & ~MPIDR_HWID_BITMASK)
return;不允许重复的 CPU id,那是一个灾难性的设定
for (j = 0; j < cpuidx; j++)
if (WARN(tmp_map[j] == hwid, “Duplicate /cpu reg”
“properties in the DT\n”))
return;数组 tmp_map 保存了系统中所有 CPU 的 MPIDR 值(CPU ID 值),具体的 index 的编码规则是: tmp_map[0]保存了 booting CPU 的 id 值,其余的 CPU 的 ID 值保存在 1~NR_CPUS 的位置。
if (hwid == mpidr) {
i = 0;
bootcpu_valid = true;
} else {
i = cpuidx++;
}tmp_map[i] = hwid;
}根据 DTB 中的信息设定 cpu logical map 数组。
for (i = 0; i < cpuidx; i++) {
set_cpu_possible(i, true);
cpu_logical_map(i) = tmp_map[i];
}
}
要理解这部分的内容,需要理解 ARM CUPs binding 的概念,可以参考 linux/Documentation/devicetree/bindings/arm 目录下的 CPU.txt 文件的描述。
2、memory 的处理
这部分的处理可以参考 setup_arch->setup_machine_fdt->early_init_dt_scan->early_init_dt_scan_memory 中的代码。具体如下:
int init early_init_dt_scan_memory(unsigned long node, const char uname,
int depth, void data)
{
char *type = of_get_flat_dt_prop(node, “device_type”, NULL); 获取 device_type 属性值
be32 reg, endp;
unsigned long l;在初始化的时候,我们会对每一个 device node 都要调用该 call back 函数,因此,我们要过滤掉那些和 memory block 定义无关的 node。和 memory block 定义有的节点有两种,一种是 node name 是 memory@形态的,另外一种是 node 中定义了 device_type 属性并且其值是 memory。
if (type == NULL) {
if (depth != 1 || strcmp(uname, “memory@0”) != 0)
return 0;
} else if (strcmp(type, “memory”) != 0)
return 0;获取 memory 的起始地址和 length 的信息。有两种属性和该信息有关,一个是 linux,usable-memory,不过最新的方式还是使用 reg 属性。
reg = of_get_flat_dt_prop(node, “linux,usable-memory”, &l);
if (reg == NULL)
reg = of_get_flat_dt_prop(node, “reg”, &l);
if (reg == NULL)
return 0;endp = reg + (l / sizeof(__be32));
reg 属性的值是 address,size 数组,那么如何来取出一个个的 address/size 呢?由于 memory node 一定是 root node 的 child,因此 dt_root_addr_cells(root node 的 #address-cells 属性值)和 dt_root_size_cells(root node 的 #size-cells 属性值)之和就是 address,size 数组的 entry size。
while ((endp - reg) >= (dt_root_addr_cells + dt_root_size_cells)) {
u64 base, size;base = dt_mem_next_cell(dt_root_addr_cells, ®);
size = dt_mem_next_cell(dt_root_size_cells, ®);early_init_dt_add_memory_arch(base, size); 将具体的 memory block 信息加入到内核中。
}return 0;
}
3、interrupt controller 的处理
初始化是通过 start_kernel->init_IRQ->machine_desc->init_irq() 实现的。我们用 S3C2416 为例来描述 interrupt controller 的处理过程。下面是 machine 描述符的定义。
DT_MACHINE_START(S3C2416_DT, “Samsung S3C2416 (Flattened Device Tree)”)
……
.init_irq = irqchip_init,
……
MACHINE_END
在 driver/irqchip/irq-s3c24xx.c 文件中定义了两个 interrupt controller,如下:
IRQCHIP_DECLARE(s3c2416_irq, “samsung,s3c2416-irq”, s3c2416_init_intc_of);
IRQCHIP_DECLARE(s3c2410_irq, “samsung,s3c2410-irq”, s3c2410_init_intc_of);
当然,系统中可以定义更多的 irqchip,不过具体用哪一个是根据 DTB 中的 interrupt controller node 中的 compatible 属性确定的。在 driver/irqchip/irqchip.c 文件中定义了 irqchip_init 函数,如下:
void init irqchip_init(void)
{
of_irq_init(irqchip_begin);
}
__irqchip_begin 就是所有的 irqchip 的一个列表,of_irq_init 函数是遍历 Device Tree,找到匹配的 irqchip。具体的代码如下:
void __init of_irq_init(const struct of_device_id matches)
{
struct device_node np, parent = NULL;
struct intc_desc desc, *temp_desc;
struct list_head intc_desc_list, intc_parent_list;INIT_LIST_HEAD(&intc_desc_list);
INIT_LIST_HEAD(&intc_parent_list);遍历所有的 node,寻找定义了 interrupt-controller 属性的 node,如果定义了 interrupt-controller 属性则说明该 node 就是一个中断控制器。
for_each_matching_node(np, matches) {
if (!of_find_property(np, “interrupt-controller”, NULL) ||
!of_device_is_available(np))
continue;分配内存并挂入链表,当然还有根据 interrupt-parent 建立 controller 之间的父子关系。对于 interrupt controller,它也可能是一个树状的结构。
desc = kzalloc(sizeof(*desc), GFP_KERNEL);
if (WARN_ON(!desc))
goto err;desc->dev = np;
desc->interrupt_parent = of_irq_find_parent(np);
if (desc->interrupt_parent == np)
desc->interrupt_parent = NULL;
list_add_tail(&desc->list, &intc_desc_list);
}正因为 interrupt controller 被组织成树状的结构,因此初始化的顺序就需要控制,应该从根节点开始,依次递进到下一个 level 的 interrupt controller。
while (!list_empty(&intc_desc_list)) { intc_desc_list 链表中的节点会被一个个的处理,每处理完一个节点就会将该节点删除,当所有的节点被删除,整个处理过程也就是结束了。list_for_each_entry_safe(desc, temp_desc, &intc_desc_list, list) {
const struct of_device_id *match;
int ret;
of_irq_init_cb_t irq_init_cb;最开始的时候 parent 变量是 NULL,确保第一个被处理的是 root interrupt controller。在处理完 root node 之后,parent 变量被设定为 root interrupt controller,因此,第二个循环中处理的是所有 parent 是 root interrupt controller 的 child interrupt controller。也就是 level 1(如果 root 是 level 0 的话)的节点。
if (desc->interrupt_parent != parent)
continue;list_del(&desc->list); -----从链表中删除
match = of_match_node(matches, desc->dev);-----匹配并初始化
if (WARN(!match->data,----------match->data 是初始化函数
“of_irq_init: no init function for %s\n”,
match->compatible)) {
kfree(desc);
continue;
}irq_init_cb = (of_irq_init_cb_t)match->data;
ret = irq_init_cb(desc->dev, desc->interrupt_parent);-----执行初始化函数
if (ret) {
kfree(desc);
continue;
}处理完的节点放入 intc_parent_list 链表,后面会用到
list_add_tail(&desc->list, &intc_parent_list);
}对于 level 0,只有一个 root interrupt controller,对于 level 1,可能有若干个 interrupt controller,因此要遍历这些 parent interrupt controller,以便处理下一个 level 的 child node。
desc = list_first_entry_or_null(&intc_parent_list,
typeof(*desc), list);
if (!desc) {
pr_err(“of_irq_init: children remain, but no parents\n”);
break;
}
list_del(&desc->list);
parent = desc->dev;
kfree(desc);
}list_for_each_entry_safe(desc, temp_desc, &intc_parent_list, list) {
list_del(&desc->list);
kfree(desc);
}
err:
list_for_each_entry_safe(desc, temp_desc, &intc_desc_list, list) {
list_del(&desc->list);
kfree(desc);
}
}
只有该 node 中有 interrupt-controller 这个属性定义,那么 linux kernel 就会分配一个 interrupt controller 的描述符(struct intc_desc)并挂入队列。通过 interrupt-parent 属性,可以确定各个 interrupt controller 的层次关系。在 scan 了所有的 Device Tree 中的 interrupt controller 的定义之后,系统开始匹配过程。一旦匹配到了 interrupt chip 列表中的项次后,就会调用相应的初始化函数。如果 CPU 是 S3C2416 的话,匹配到的是 irqchip 的初始化函数是 s3c2416_init_intc_of。
OK,我们已经通过 compatible 属性找到了适合的 interrupt controller,那么如何解析 reg 属性呢?我们知道,对于 s3c2416 的 interrupt controller 而言,其 #interrupt-cells 的属性值是 4,定义为。每个域的解释如下:
(1)ctrl_num 表示使用哪一种类型的 interrupt controller,其值的解释如下:
- 0 … main controller
- 1 ... sub controller<br />- 2 ... second main controller
(2)parent_irq。对于 sub controller,parent_irq 标识了其在 main controller 的 bit position。
(3)ctrl_irq 标识了在 controller 中的 bit 位置。
(4)type 标识了该中断的 trigger type,例如:上升沿触发还是电平触发。
为了更顺畅的描述后续的代码,我需要简单的介绍 2416 的中断控制器,其 block diagram 如下:
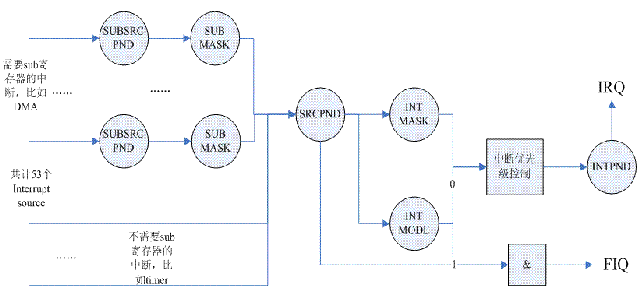
53 个 Samsung2416 的中断源被分成两种类型,一种是需要 sub 寄存器进行控制的,例如 DMA,系统中的 8 个 DMA 中断是通过两级识别的,先在 SRCPND 寄存器中得到是 DMA 中断的信息,具体是哪一个 channel 的 DMA 中断需要继续查询 SUBSRC 寄存器。那些不需要 sub 寄存器进行控制的,例如 timer,5 个 timer 的中断可以直接从 SRCPND 中得到。
中断 MASK 寄存器可以控制产生的中断是否要报告给 CPU,当一个中断被 mask 的时候,虽然 SRCPND 寄存器中,硬件会 set 该 bit,但是不会影响到 INTPND 寄存器,从而不会向 CPU 报告该中断。对于 SUBMASK 寄存器,如果该 bit 被 set,也就是该 sub 中断被 mask 了,那么即便产生了对应的 sub 中断,也不会修改 SRCPND 寄存器的内容,只是修改 SUBSRCPND 中寄存器的内容。
不过随着硬件的演化,更多的 HW block 加入到 SOC 中,这使得中断源不够用了,因此中断寄存器又被分成两个 group,一个是 group 1(开始地址是 0X4A000000,也就是 main controller 了),另外一个是 group2(开始地址是 0X4A000040,叫做 second main controller)。group 1 中的 sub 寄存器的起始地址是 0X4A000018(也就是 sub controller)。
了解了上面的内容后,下面的定义就比较好理解了:
static struct s3c24xx_irq_of_ctrl s3c2416_ctrl[] = {
{
.name = “intc”, -----------main controller
.offset = 0,
}, {
.name = “subintc”, ---------sub controller
.offset = 0x18,
.parent = &s3c_intc[0],
}, {
.name = “intc2”, ----------second main controller
.offset = 0x40,
}
};
对于 s3c2416 而言,irqchip 的初始化函数是 s3c2416_init_intc_of,s3c2416_ctrl 作为参数传递给了 s3c_init_intc_of,大部分的处理都是在 s3c_init_intc_of 函数中完成的,由于这个函数和中断子系统非常相关,这里就不详述了,后续会有一份专门的文档描述之。
4、GPIO controller 的处理
暂不描述,后续会有一份专门的文档描述 GPIO sub system。
5、machine 初始化
machine 初始化的代码可以沿着 start_kernel->rest_init->kernel_init->kernel_init_freeable->do_basic_setup->do_initcalls 路径寻找。在 do_initcalls 函数中,kernel 会依次执行各个 initcall 函数,在这个过程中,会调用 customize_machine,具体如下:
static int __init customize_machine(void)
{if (machine_desc->init_machine)
machine_desc->init_machine();
else
of_platform_populate(NULL, of_default_bus_match_table, NULL, NULL);return 0;
}
arch_initcall(customize_machine);
在这个函数中,一般会调用 machine 描述符中的 init_machine callback 函数来把各种 Device Tree 中定义的 platform device 设备节点加入到系统(即 platform bus 的所有的子节点,对于 device tree 中其他的设备节点,需要在各自 bus controller 初始化的时候自行处理)。如果 machine 描述符中没有定义 init_machine 函数,那么直接调用 of_platform_populate 把所有的 platform device 加入到 kernel 中。对于 s3c2416,其 machine 描述符中的 init_machine callback 函数就是 s3c2416_dt_machine_init,代码如下:
static void __init s3c2416_dt_machine_init(void)
{
of_platform_populate(NULL, ———— 传入 NULL 参数表示从 root node 开始 scanof_default_bus_match_table, s3c2416_auxdata_lookup, NULL);
s3c_pm_init(); --------power management 相关的初始化
}
由此可见,最终生成 platform device 的代码来自 of_platform_populate 函数。该函数的逻辑比较简单,遍历 device node global list 中所有的 node,并调用 of_platform_bus_create 处理,of_platform_bus_create 函数代码如下:
static int of_platform_bus_create(struct device_node bus,——————- 要创建的那个 device node
const struct of_device_id matches,———- 要匹配的 list
const struct of_dev_auxdata lookup,——— 附属数据
struct device parent, bool strict)———————-parent 指向父节点。strict 是否要求完全匹配
{
const struct of_dev_auxdata auxdata;
struct device_node child;
struct platform_device dev;
const char bus_id = NULL;
void *platform_data = NULL;
int rc = 0;删除确保 device node 有 compatible 属性的代码。
auxdata = of_dev_lookup(lookup, bus); 在传入的 lookup table 寻找和该 device node 匹配的附加数据
if (auxdata) {
bus_id = auxdata->name;————————- 如果找到,那么就用附加数据中的静态定义的内容
platform_data = auxdata->platform_data;
}ARM 公司提供了 CPU core,除此之外,它设计了 AMBA 的总线来连接 SOC 内的各个 block。符合这个总线标准的 SOC 上的外设叫做 ARM Primecell Peripherals。如果一个 device node 的 compatible 属性值是 arm,primecell 的话,可以调用 of_amba_device_create 来向 amba 总线上增加一个 amba device。
if (of_device_is_compatible(bus, “arm,primecell”)) {
of_amba_device_create(bus, bus_id, platform_data, parent);
return 0;
}如果不是 ARM Primecell Peripherals,那么我们就需要向 platform bus 上增加一个 platform device 了
dev = of_platform_device_create_pdata(bus, bus_id, platform_data, parent);
if (!dev || !of_match_node(matches, bus))
return 0;一个 device node 可能是一个桥设备,因此要重复调用 of_platform_bus_create 来把所有的 device node 处理掉。
for_each_child_of_node(bus, child) {
pr_debug(“ create child: %s\n”, child->full_name);
rc = of_platform_bus_create(child, matches, lookup, &dev->dev, strict);
if (rc) {
of_node_put(child);
break;
}
}
return rc;
}
具体增加 platform device 的代码在 of_platform_device_create_pdata 中,代码如下:
static struct platform_device of_platform_device_create_pdata(
struct device_node np,
const char bus_id,
void platform_data,
struct device parent)
{
struct platform_device dev;if (!of_device_is_available(np))————-check status 属性,确保是 enable 或者 OK 的。
return NULL;of_device_alloc 除了分配 struct platform_device 的内存,还分配了该 platform device 需要的 resource 的内存(参考 struct platform_device 中的 resource 成员)。当然,这就需要解析该 device node 的 interrupt 资源以及 memory address 资源。
dev = of_device_alloc(np, bus_id, parent);
if (!dev)
return NULL;设定 platform_device 中的其他成员
dev->dev.coherent_dma_mask = DMA_BIT_MASK(32);
if (!dev->dev.dma_mask)
dev->dev.dma_mask = &dev->dev.coherent_dma_mask;
dev->dev.bus = &platform_bus_type;
dev->dev.platform_data = platform_data;if (of_device_add(dev) != 0) {————————— 把这个 platform device 加入统一设备模型系统中
platform_device_put(dev);
return NULL;
}return dev;
}
原创文章,转发请注明出处。蜗窝科技,www.wowotech.net。
标签: 设备树


若有收获,就点个赞吧
0 人点赞
