gitlab-runner 安装
- 以Centos7 为例,作为服务器
- 安装
```shell
我当前centos 7 为 Linux x86-64
sudo curl -L —output /usr/local/bin/gitlab-runner https://gitlab-runner-downloads.s3.amazonaws.com/latest/binaries/gitlab-runner-linux-amd64
设置安装目录可执行
sudo chmod +x /usr/local/bin/gitlab-runner
直接使用 root 用户权限运行 gitlab-runner (或者其他用户,看需求)
sudo gitlab-runner install —user=root —working-directory=/home/gitlab-runner
启动
sudo gitlab-runner start sudo gitlab-runner status
如果提示命令 command not found 需要配置环境
添加软链接
ln -s -f /usr/local/bin/gitlab-runner /usr/bin/gitlab-runner
查看版本
gitlab-runner -v
- 安装成功```shell# 执行安装成功检查 gitlab-runner -v[root@no ~]# gitlab-runner -vVersion: 13.3.1Git revision: 738bbe5aGit branch: 13-3-stableGO version: go1.13.8Built: 2020-08-25T12:29:06+0000OS/Arch: linux/amd64
gitlab-runner 注册
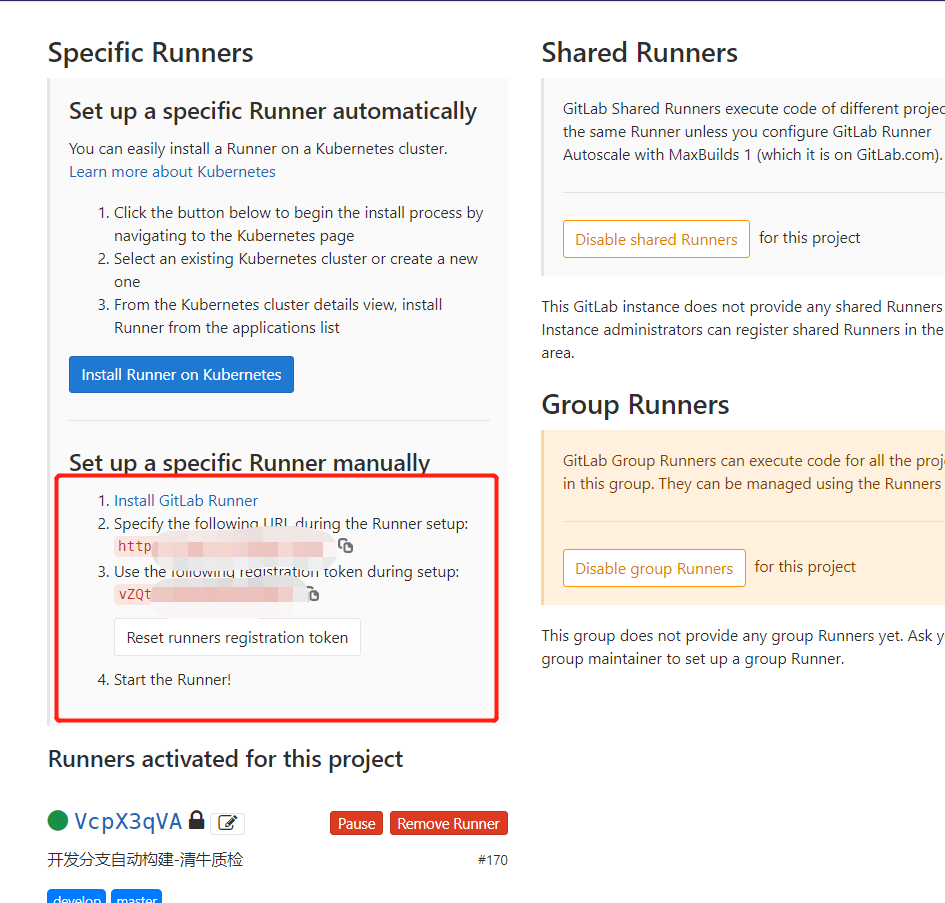
- 准备Gitlab仓库找到需要注册的URL和Token
XXX项目 ---》 左边栏找到 ---》Settings ---》CI/CD ---》Runners 展开

- 在shell 中开始注册
[root@localhost ~]# gitlab-runner registerRunning in system-mode.# 引导会让你输入gitlab的url,输入自己的url,例如http://gitlab.example.com/Please enter the gitlab-ci coordinator URL (e.g. https://gitlab.com/):http://xxx.xxx.xxx:xxx/# 引导会让你输入token,去相应的项目下找到token,例如xrjc3tWcdQpLcEwoYzkUPlease enter the gitlab-ci token for this runner:xrjc3tWcdQpLcEwoYzkU# 输入描述Please enter the gitlab-ci description for this runner:[localhost.localdomain]: 测试CI部署# 引导会让你输入tag,一个项目可能有多个runner,是根据tag来区别runner的,输入若干个就好了,比如web,hook,deploy,develop(配置.gitlab-ci.yml会用到)Please enter the gitlab-ci tags for this runner (comma separated):test-ci# 引导会让你输入executor,这个是要用什么方式来执行脚本,图方便输入shell就好了Please enter the executor: shell, ssh, docker+machine, docker, docker-ssh, parallels, virtualbox, docker-ssh+machine, kubernetes:shellRunner registered successfully. Feel free to start it, but if it's running already the config should be automatically reloaded!
- 按照上述步骤成功后,上图Runners activated for this project会出现你刚才注册的任务,默认前边是灰色的需要激活一下
- 任务激活
# 激活任务,前边显示为绿色gitlab-runner verify
gitlab-runner补充说明
# 启动sudo gitlab-runner start# 查看状态sudo gitlab-runner status# 重启sudo gitlab-runner restart# 停止sudo gitlab-runner stop# 通过name 取消注册gitlab-runner unregister --name 、xxx(develop)# 删除所有注册runnergitlab-runner unregister --all-runners
创建 .gitlab-ci.yml文件
# 项目根目录中添加 .gitlab-ci.yml# 参照如下stages: # 分段- install- build- deploycache: # 缓存paths:- node_modules/- dist/# 安装构建依赖install-job:tags:- test-ci # 这个就是刚才上一步的tags,要对应上stage: installonly:# - test-ci # 按照对应的分支进行构建- schedules # 每日构建触发script:- echo '安装构建依赖阶段'- pwd # 查看一下现在的目录位置- npm install --unsafe-perm # 下载依赖 --unsafe-perm 如果不加这个的话下载 vue-cli-service 包失败# 打包新文件build-job:tags:- test-cistage: buildonly:# - test-ci- schedules # 每日构建触发script:- echo '打包新文件阶段'- pwd # 查看当前目录- dir # 查看所有文件- rm -rf ./dist # linux 删除当前文件夹下的 dist 文件夹- npm run build- dir # 打包完成,再次查看所有文件- pwd # 查看当前目录- ls -a# 将打包好的文件拷贝到对应的部署文件deploy-job:tags:- test-cistage: deployonly:# - test-ci- schedules # 每日构建触发script:- echo 'deploy 登录项目部署服务器,移除旧版本项目文件,最后将打包好的文件拷贝过去'- dir- pwd- \cp -rf $(pwd)/dist/* /usr/local/iflymrqc/test-ci # 将dist文件拷贝到/usr/local/iflymrqc/test-ci文件夹下(属于部署和gitlab-runner在一台服务器上)# - sshpass -p $CUSTOM_PASSWORD scp -r ./dist $CUSTOM_USERNAME@$CUSTOM_IP:/usr/local/iflymrqc/test-ci # 这个是不在一起(中间的变量可以在XXX项目 ---》 左边栏找到 ---》Settings ---》CI/CD ---》Environment variables,安全考虑)
大功告成
按照上述步骤来说一般就可以实现自动化部署了,当你提交了一个commit后,查看XXX项目 ---》 左边栏找到 ---》CI/CD ---》Pipelines会增加一条job,可以点进去看看执行进度和输出情况
定时构建任务
XXX项目 ---》 左边栏找到 ---》CI/CD ---》Schedules中添加任务 ,使用的是crond 系统定时任务指令了,注意选择一下时区。
crond 系统定时任务
crond 服务管理重新启动crond服务[root@hadoop101 ~]# service crond restart
crontab 定时任务设置基本语法
基本语法crontab [选项]选项说明-e 编辑crontab定时任务-l 查询crontab任务-r 删除当前用户所有的crontab任务
参数说明 ```shell [root@hadoop101 ~]# crontab -e
(1)进入crontab编辑界面。会打开vim编辑你的工作。
* * * * * 执行的任务项目 含义 范围第一个“*” 一小时当中的第几分钟 0-59第二个“*” 一天当中的第几小时 0-23第三个“*” 一个月当中的第几天 1-31第四个“*” 一年当中的第几月 1-12第五个“*” 一周当中的星期几 0-7(0和7都代表星期日)
(2)特殊符号 特殊符号 含义
* 代表任何时间。比如第一个“*”就代表一小时中每分钟都执行一次的意思。, 代表不连续的时间。比如“0 8,12,16 * * * 命令”,就代表在每天的8点0分,12点0分,16点0分都执行一次命令- 代表连续的时间范围。比如“0 5 * * 1-6命令”,代表在周一到周六的凌晨5点0分执行命令*/n 代表每隔多久执行一次。比如“*/10 * * * * 命令”,代表每隔10分钟就执行一遍命令
(3)特定时间执行命令 时间 含义 45 22 命令 在22点45分执行命令 0 17 1 命令 每周1 的17点0分执行命令 0 5 1,15 命令 每月1号和15号的凌晨5点0分执行命令 40 4 1-5 命令 每周一到周五的凌晨4点40分执行命令 /10 4 命令 每天的凌晨4点,每隔10分钟执行一次命令 0 0 1,15 1 命令 每月1号和15号,每周1的0点0分都会执行命令。注意:星期几和几号最好不要同时出现,因为他们定义的都是天。非常容易让管理员混乱。
- 案例实操
每隔1分钟,向/root/bailongma.txt文件中添加一个11的数字 /1 * /bin/echo ”11” >> /root/bailongma.txt ```

