获取完文本翻译的Access Token之后,可以看本期教程,开始调用该功能。
1、进入百度AI开放平台网址:https://ai.baidu.com,进入控制台。
2、进入控制台后,点击左上角导航览,选择产品服务-机器翻译。
(本文以机器翻译为例,使用者根据自身情况选择对应的应用)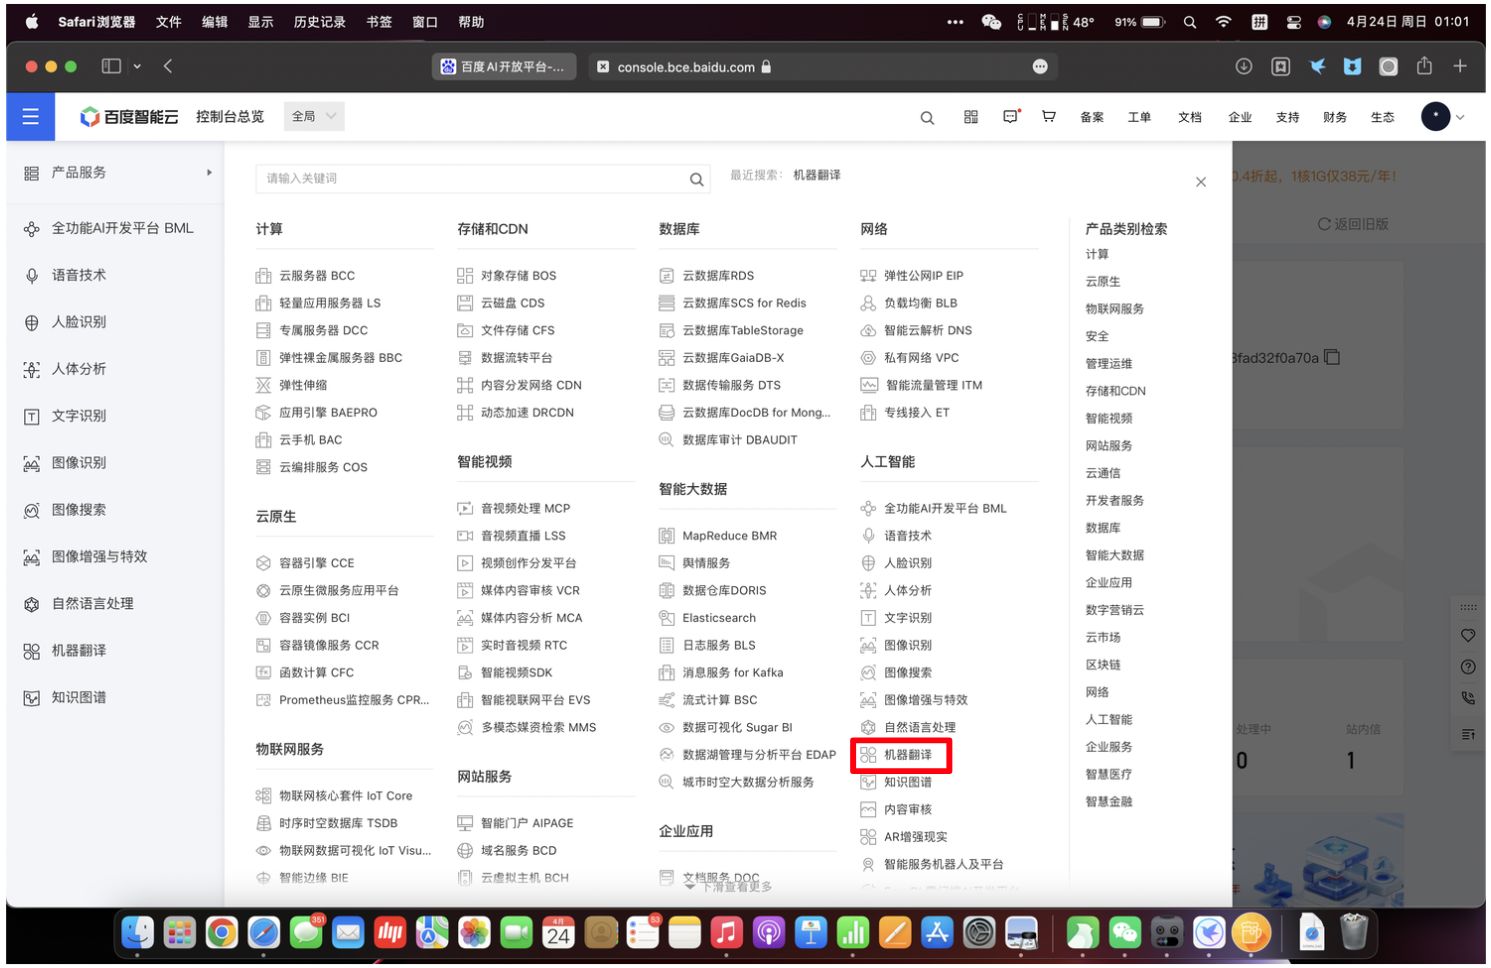
3、进入对应产品的控制台后,点击“管理应用”,再点击已创建好的应用名称“英文单词翻译助手”。
(根据自身情况点击对应的应用名称,如未创建,可参考第一个教程:首次使用,创建AI应用 )
4、点击上方“查看文档”,查看如何用代码调用该功能。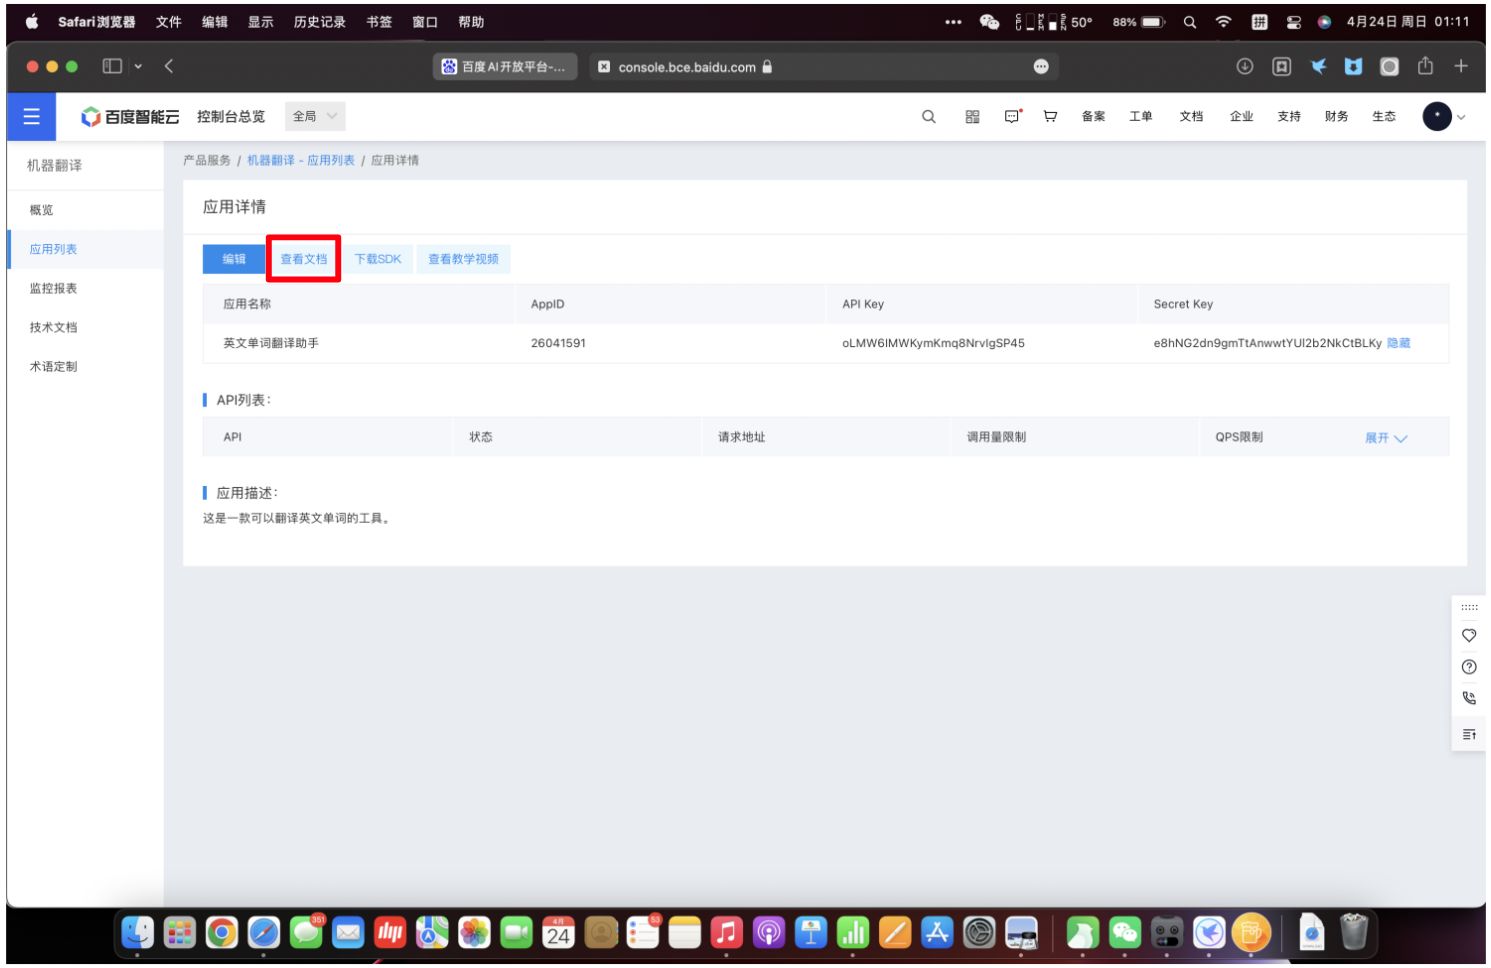
5、在API参考中点击“文本翻译-通用版”。
(根据自身情况选择对应的功能)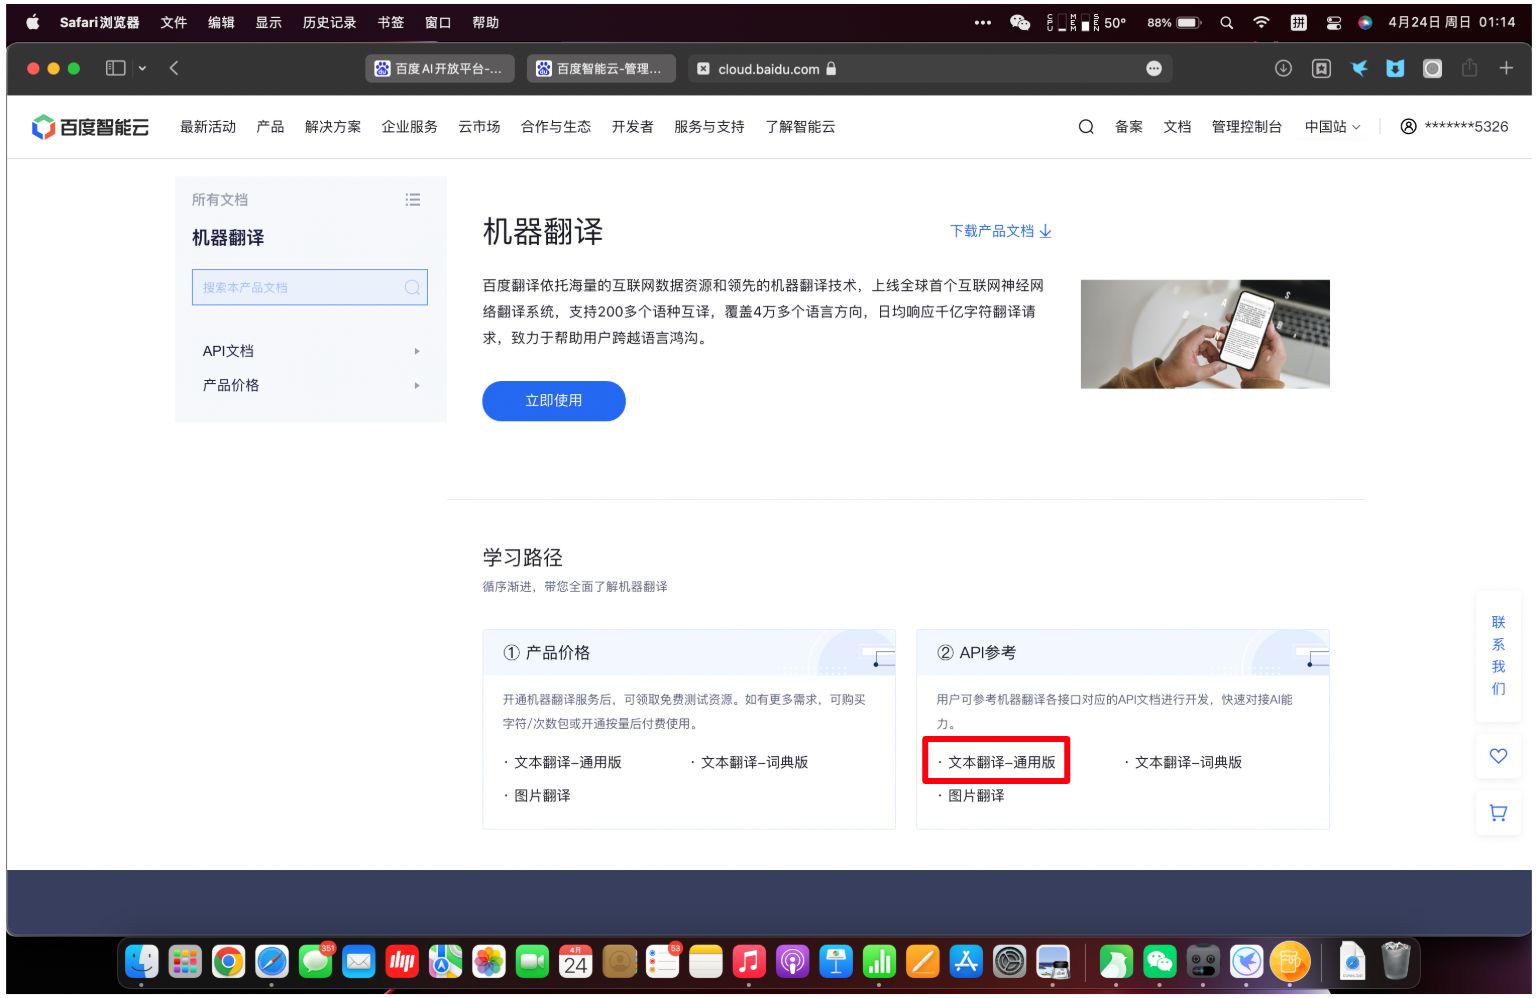
6、在开发文档中,首先需要注意的是“Access Token”获取。
“Access Token获取”的方法这里便不再赘述,详细请看上一篇教程:新手必看2:获取Access Token链接
本教程示范的应用得到以下结果:
‘access_token’: ‘24.670d359695dd66a8c9ec3bdbdc3ec5ee.2592000.1653327303.282335-26041591’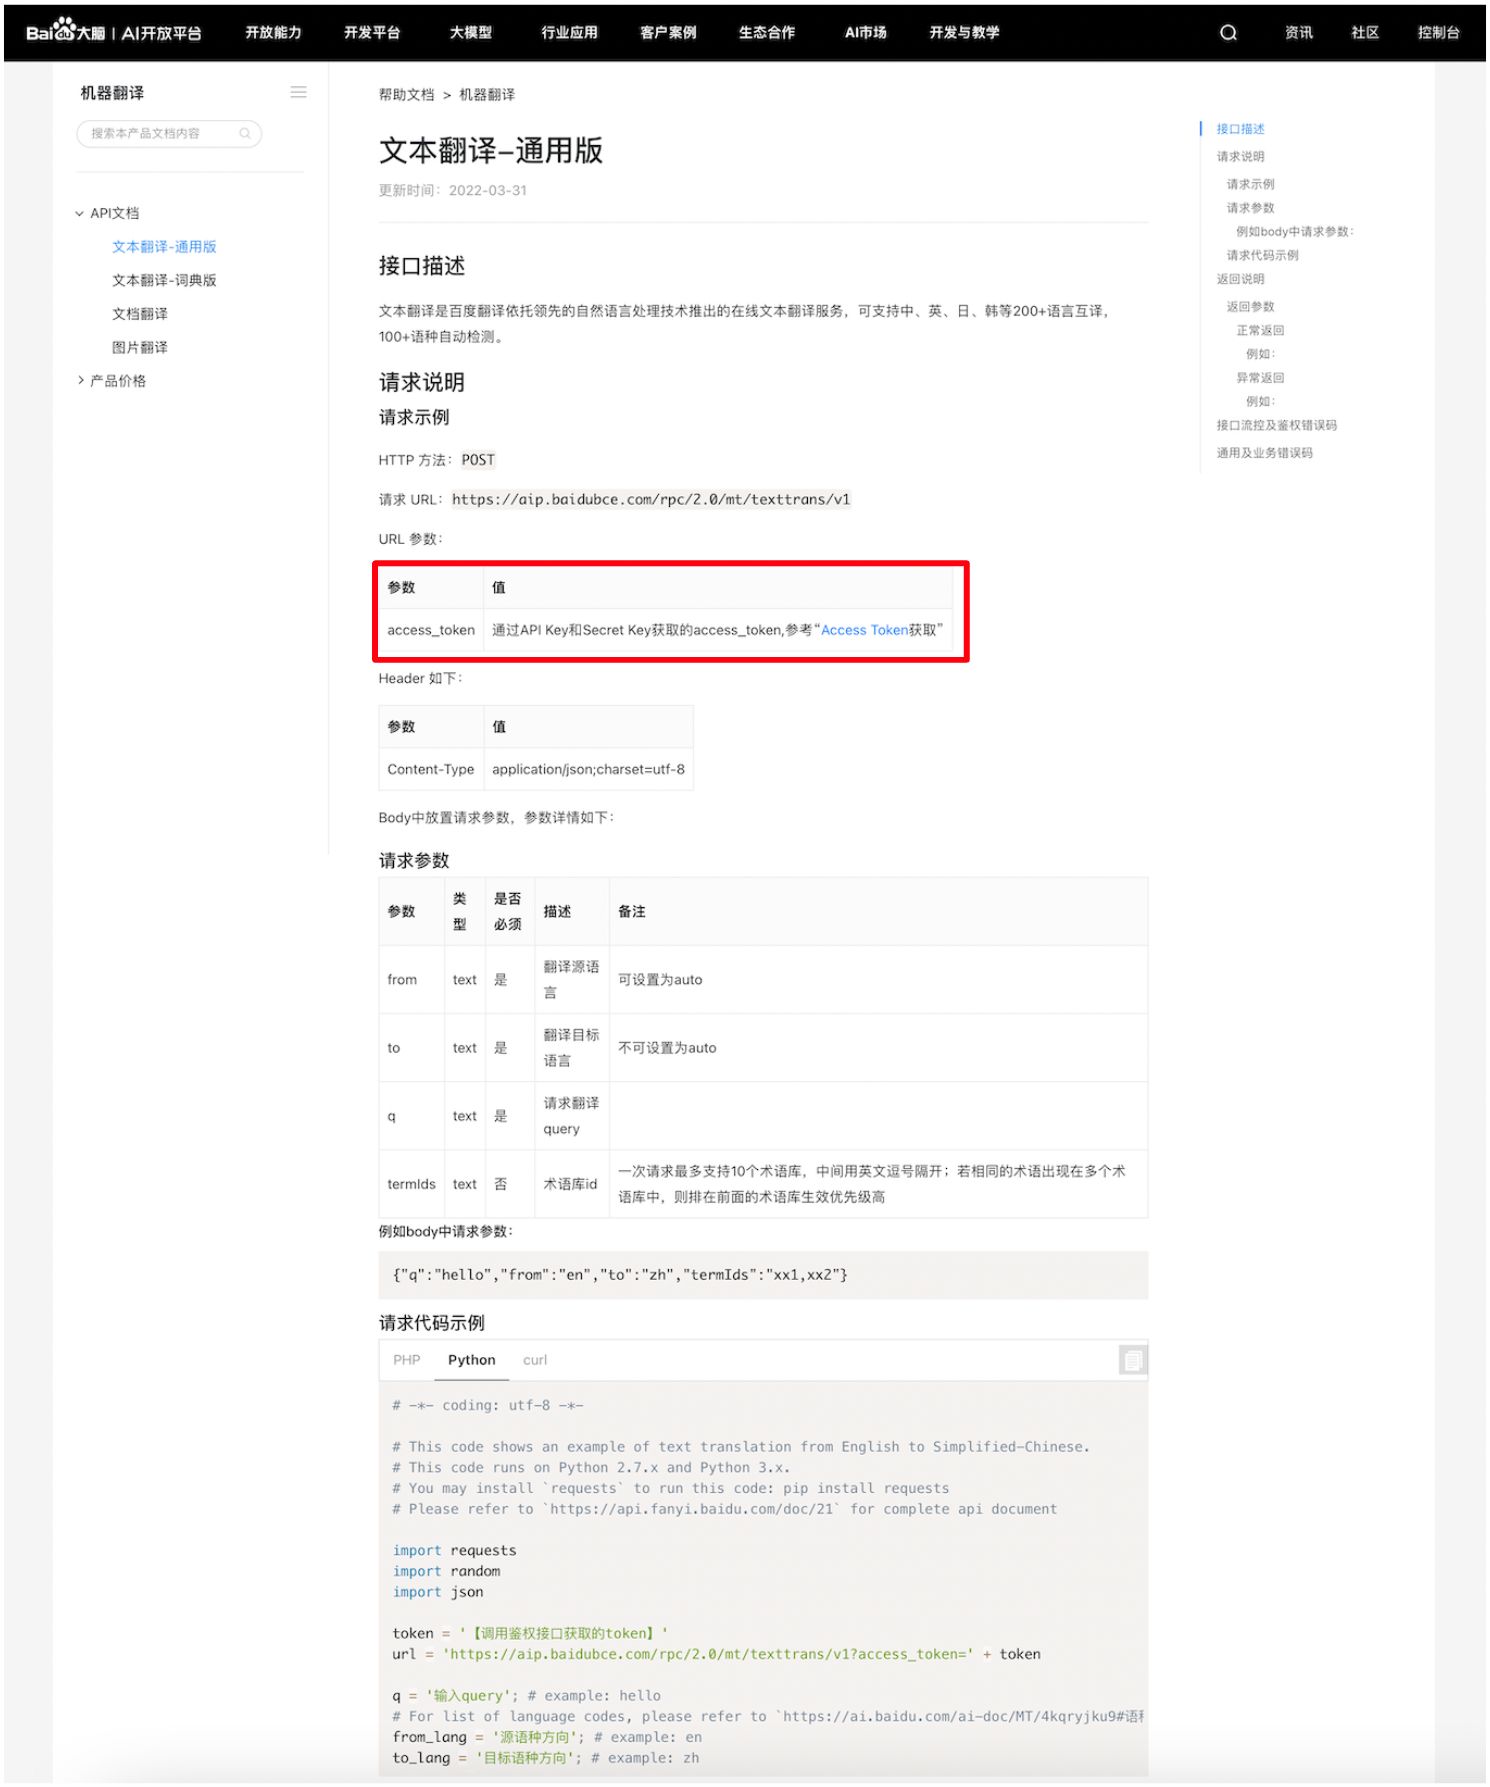
7、获取完Access Token之后,查看开发文档中下方的请求代码示例,选择Python,将代码复制到IDLE或者PyCharm的新程序中运行。
(该应用的python示例中部分代码结尾有分号“;”,不影响运行,也可以省略)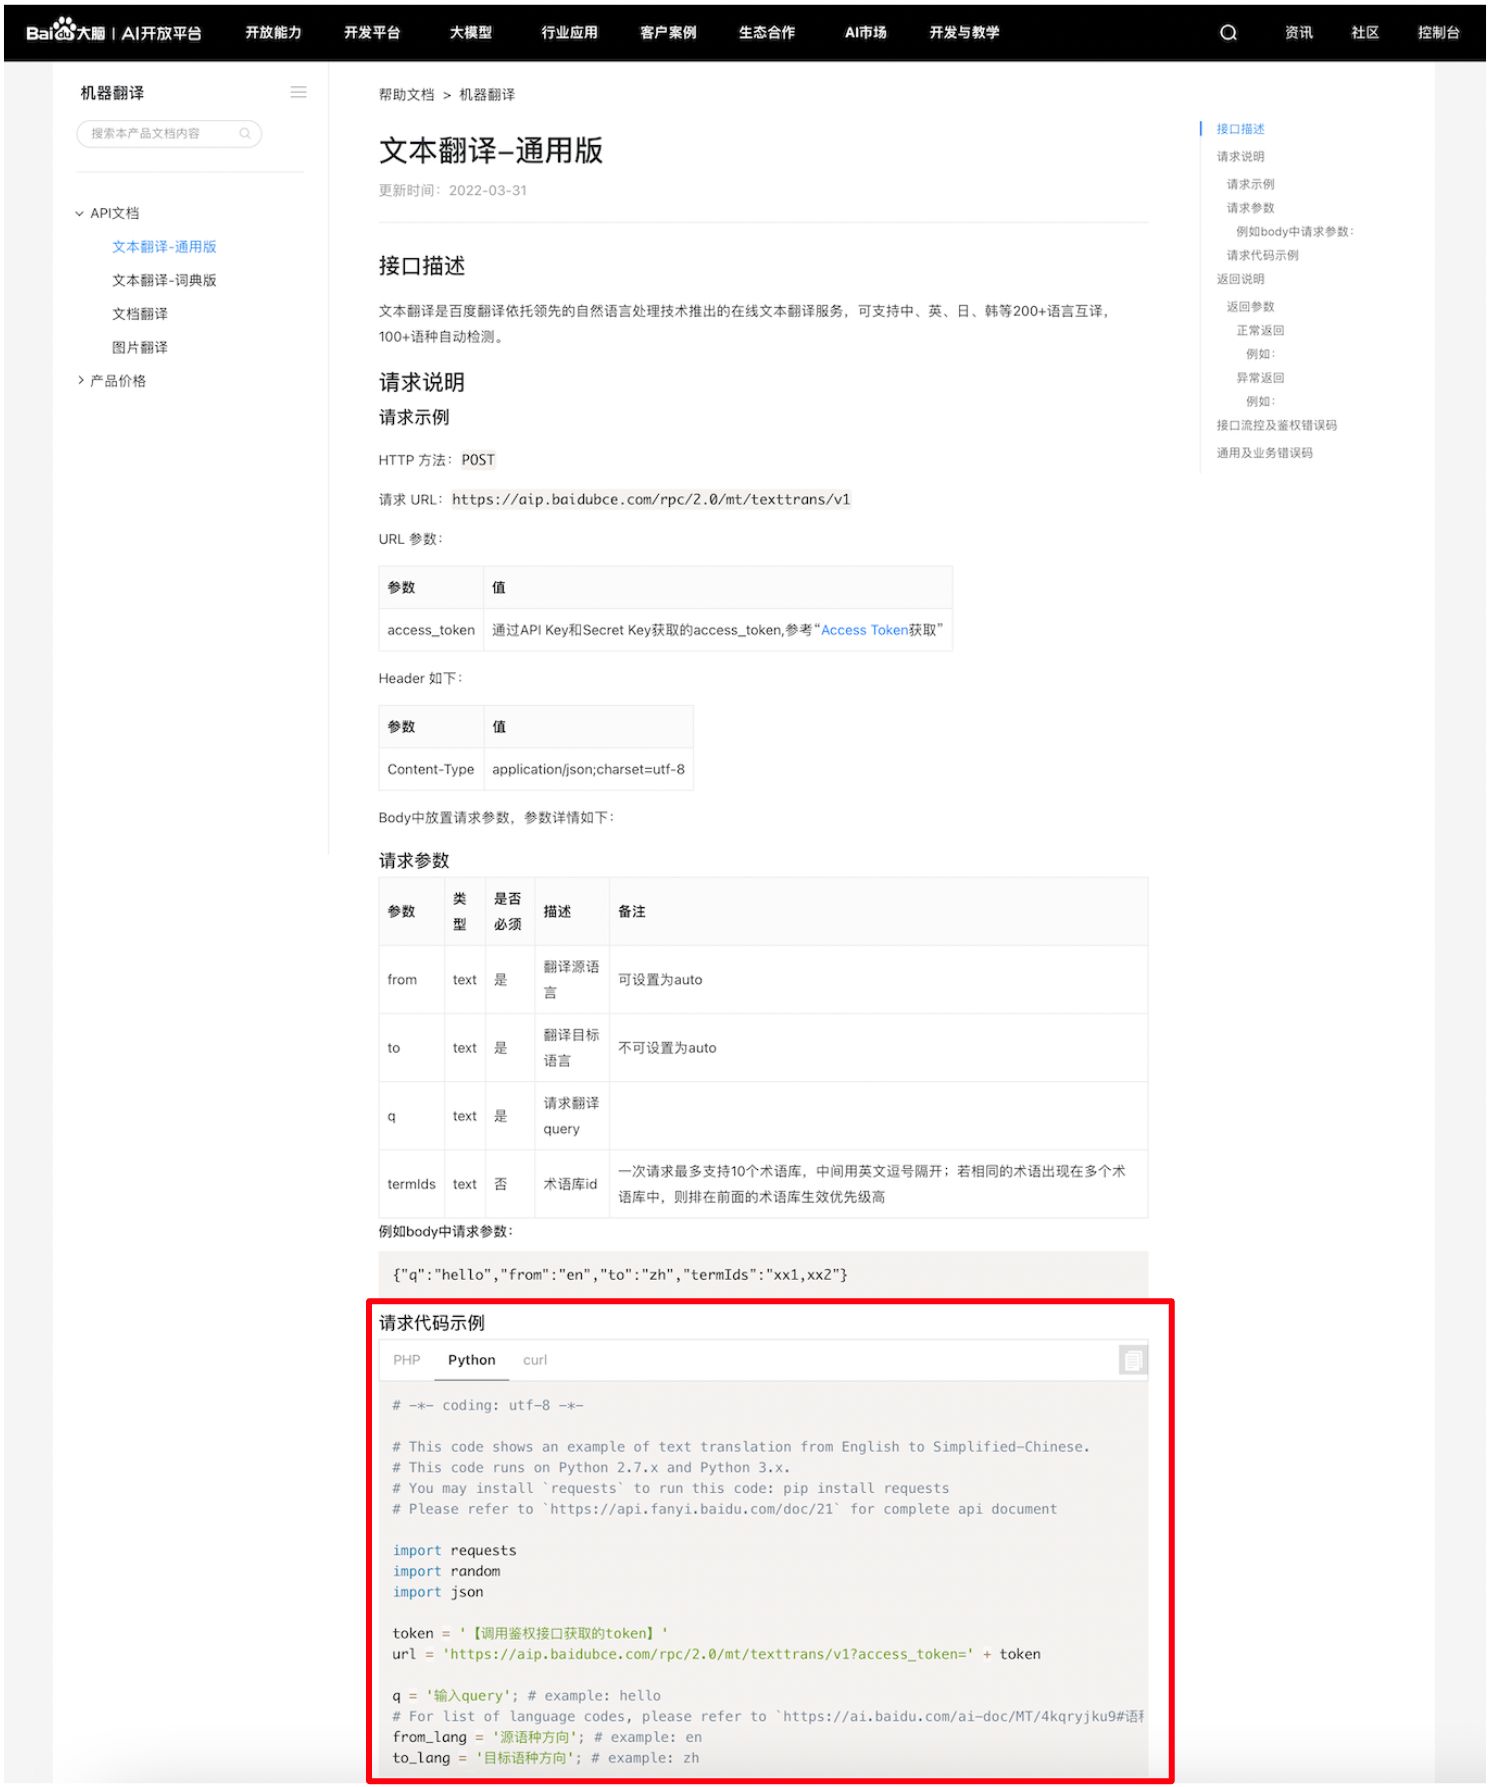
示例代码参考:
# -*- coding: utf-8 -*-# This code shows an example of text translation from English to Simplified-Chinese.# This code runs on Python 2.7.x and Python 3.x.# You may install `requests` to run this code: pip install requests# Please refer to `https://api.fanyi.baidu.com/doc/21` for complete api documentimport requestsimport randomimport jsontoken = '【调用鉴权接口获取的token】'url = 'https://aip.baidubce.com/rpc/2.0/mt/texttrans/v1?access_token=' + tokenq = '输入query'; # example: hello# For list of language codes, please refer to `https://ai.baidu.com/ai-doc/MT/4kqryjku9#语种列表`from_lang = '源语种方向'; # example: ento_lang = '目标语种方向'; # example: zhterm_ids = ''; #术语库id,多个逗号隔开# Build requestheaders = {'Content-Type': 'application/json'}payload = {'q': q, 'from': from_lang, 'to': to_lang, 'termIds' : term_ids}# Send requestr = requests.post(url, params=payload, headers=headers)result = r.json()# Show responseprint(json.dumps(result, indent=4, ensure_ascii=False))
8、更改以下几个参数,运行程序:
token: ‘24.670d359695dd66a8c9ec3bdbdc3ec5ee.2592000.1653327303.282335-26041591’
(上一步获取的Access Token)
q:’hello’(想要翻译的单词)
from_lang:’en’(翻译源语言:英文)
to_lang:’zh’(翻译目标语言:中文)
9、得到一大串结果,想要的答案就在其中。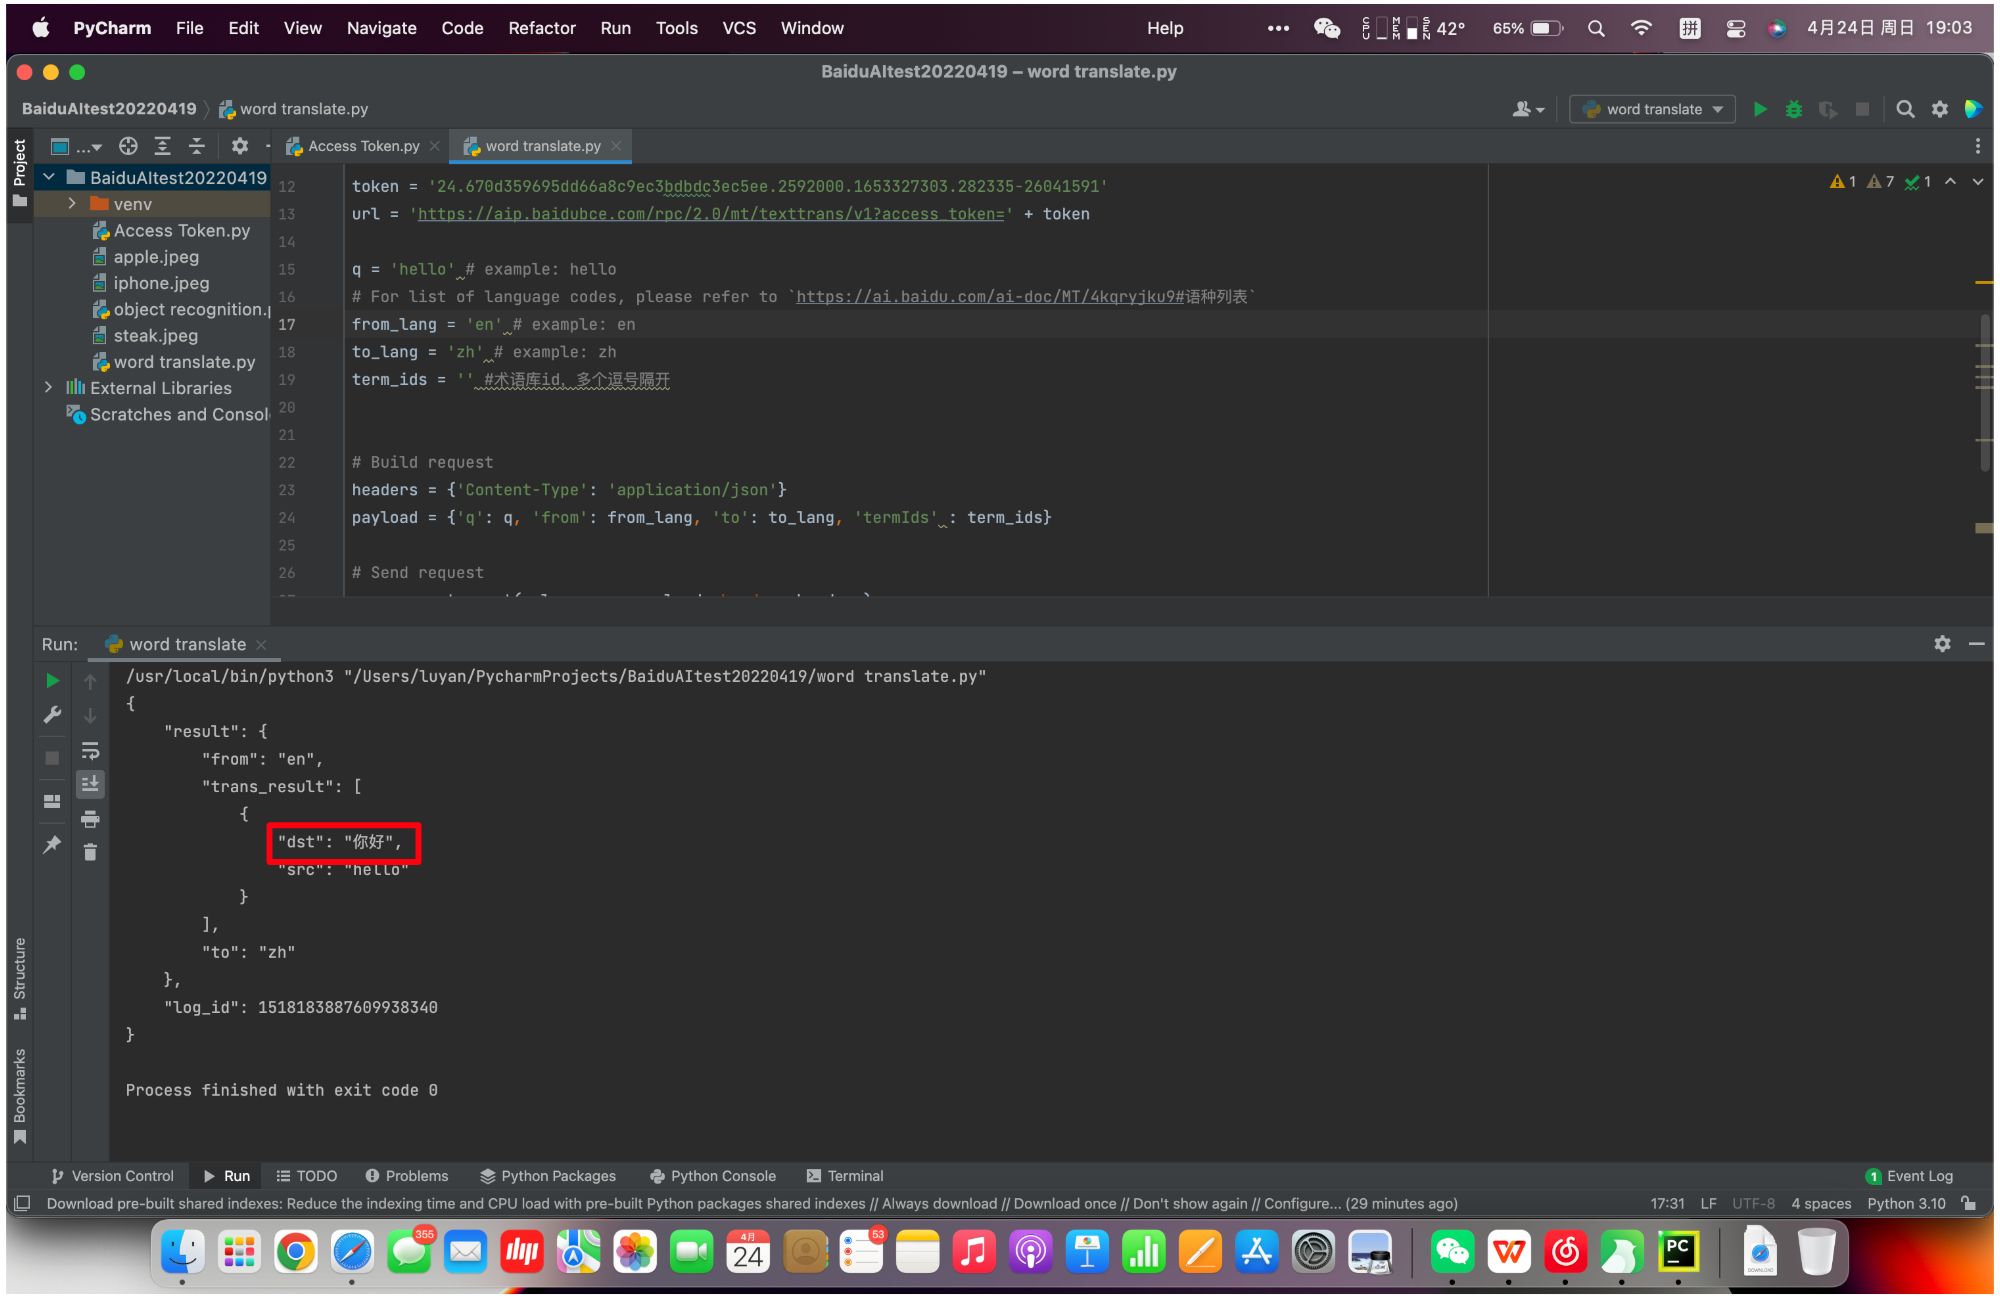
10、如何将想要的答案单独提取出来呢?比如只得到结果:”你好”。
有一个办法,就是针对运行结果作提取。
 代码参考:
代码参考:
# Show answer onlyresponse = eval(json.dumps(result, indent=4, ensure_ascii=False))answer = response["result"]["trans_result"][0]["dst"]print(answer)
12、怎么把这个功能封装成一个方法,后期可以随意调用?
封装成自定义函数即可,不要忘记设置传递参数。
最终代码参考:
def BaiduAI_translate(word):import requestsimport randomimport jsontoken = '24.670d359695dd66a8c9ec3bdbdc3ec5ee.2592000.1653327303.282335-26041591'url = 'https://aip.baidubce.com/rpc/2.0/mt/texttrans/v1?access_token=' + tokenq = word # example: hello# For list of language codes, please refer to `https://ai.baidu.com/ai-doc/MT/4kqryjku9#语种列表`from_lang = 'en' # example: ento_lang = 'zh' # example: zhterm_ids = '' #术语库id,多个逗号隔开# Build requestheaders = {'Content-Type': 'application/json'}payload = {'q': q, 'from': from_lang, 'to': to_lang, 'termIds' : term_ids}# Send requestr = requests.post(url, params=payload, headers=headers)result = r.json()# Show response# print(json.dumps(result, indent=4, ensure_ascii=False)) # 源示例代码# Show answer onlyresponse = eval(json.dumps(result, indent=4, ensure_ascii=False))answer = response["result"]["trans_result"][0]["dst"]print(answer)BaiduAI_translate("pink")
(百度AI的文本翻译功能不一定只能英译中,更改from_lang和to_lang可以自由选择想要翻译的语种,此功能支持翻译的语种有很多,可以参考文本翻译技术文档:https://ai.baidu.com/ai-doc/MT/4kqryjku9,在下方语种列表里有不同语种的代号)
本期教程结束,可以自己尝试调用其他的百度AI功能~

若有收获,就点个赞吧
0 人点赞
