参考https://zhuanlan.zhihu.com/p/370366154
Redis配置说明
Redis中默认的notify-keyspace-events的配置值为空。
notify-keyspace-events 的参数可以是以下字符的任意组合,它指定了服务器该发送哪些类型的通知:
字符 发送的通知
K 键空间通知,所有通知以keyspace@
E 键事件通知,所有通知以 keyevent@
g DEL 、 EXPIRE 、 RENAME 等类型无关的通用命令的通知
$ 字符串命令的通知
l 列表命令的通知
s 集合命令的通知
h 哈希命令的通知
z 有序集合命令的通知
x 过期事件,每当有过期键被删除时发送
e 驱逐事件,每当有键因为maxmemory政策而被删除时发送
A 参数 g$lshzxe 的别名
redis.windows-service.conf配置
找到redis安装目录下的redis.windows-service.conf配置文件,用记事本打开,找到notify-keyspace-events,并配置为notify-keyspace-events Ex
![5XK(]XKC]HGN77Y4LP}7YB.png
创建项目
打开Visual Studio 2019,新建两个项目,分别为:RedisCoreDemo.App,RedisCoreDemo.WebApi。
其中RedisCoreDemo.App是一个.NET Core的控制台应用程序,我们将使用这个项目来订阅Redis的回调并执行相应的回调操作。
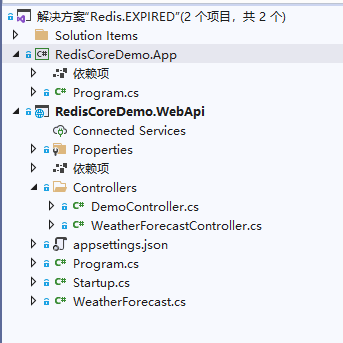
RedisCoreDemo.WebApi是一个http://ASP.NET Core 3.1的Web应用程序,我们将使用这个项目来向Redis发送数据,解决方案结构如下图:
发布消息
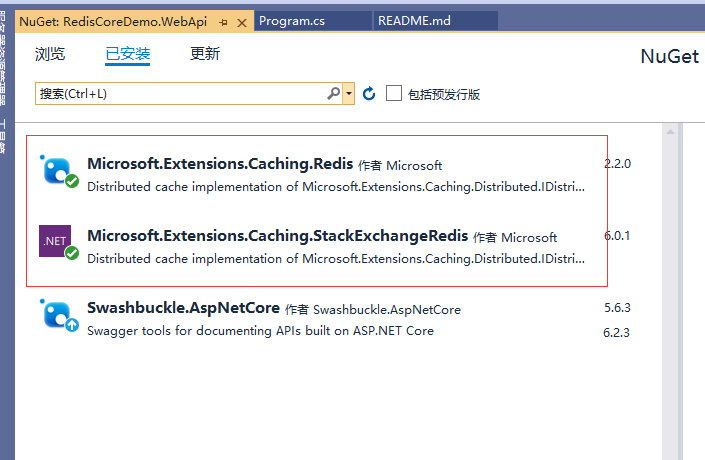
接下来打开项目RedisCoreDemo.WebApi的包管理工具,并安装Redis相应的工具包:
- Microsoft.Extensions.Caching.Redis
- Microsoft.Extensions.Caching.StackExchangeRedis
如下图:
再打开Startup.cs启动文件,添加Redis的缓存服务,如下:
services.AddDistributedRedisCache(option =>{option.Configuration = Configuration["RedisCache:ConnectionString"];});
打开appsettings.json配置文件,添加Redis缓存的配置节点,如下:
{"Logging": {"LogLevel": {"Default": "Information","Microsoft": "Warning","Microsoft.Hosting.Lifetime": "Information"}},"AllowedHosts": "*","RedisCache": {"ConnectionString": "127.0.0.1:6379,password=123,defaultDatabase=2"}}
说明,redis连接本配置里设置了默认连接数据库为2(defaultDatabase=2),在
最后,我们在Controllers目录下创建一个名为DemoController的控制器,并添加一个Set()的操作,如下:
using Microsoft.AspNetCore.Mvc;using Microsoft.Extensions.Caching.Distributed;using Microsoft.Extensions.Logging;using System;using System.Collections.Generic;using System.Linq;using System.Threading.Tasks;namespace RedisCoreDemo.WebApi.Controllers{[ApiController][Route("[controller]/[action]")]public class DemoController : ControllerBase{private readonly IDistributedCache _distributedCache;public DemoController(ILogger<DemoController> logger, IDistributedCache distributedCache){_distributedCache = distributedCache;}[HttpGet("{id}")]public async Task<IActionResult> Set(int id){await _distributedCache.SetStringAsync($"order_{id}", id.ToString(), new DistributedCacheEntryOptions{AbsoluteExpiration = DateTimeOffset.Now.AddSeconds(10)});return Ok("success");}}}
其中,最核心的代码为:
await _distributedCache.SetStringAsync($"order_{id}", id.ToString(), new DistributedCacheEntryOptions{AbsoluteExpiration = DateTimeOffset.Now.AddSeconds(10)});
这一条语句是使用C#/.NET Core向Redis中写入缓存数据,Redis的键名为order_+订单ID。当然,为了测试方便,这个订单ID是直接从URL参数指定的。SetStringAsync()方法的第三个参数指定了一个DistributedCacheEntryOptions实例对象,并设置了AbsoluteExpiration属性为当前时间+5秒,这尤其重要,它表示设置当前的这条Redis缓存数据在写入5秒后过期。
后续测试的时候,我们通过调用这个api,我们便可向Redis中写入缓存数据。
到此,测试用的基于.NET Core 3.1的Web API和Redis的消息发布项目就完成了。接下来,我们继续实现消息订阅客户端RedisCoreDemo.App。
订阅消息并处理回调
回到之前我们创建的控制台应该程序RedisCoreDemo.App,我们使用这个程序来订阅Redis的过期数据,接收并处理回调。
首先,在RedisCoreDemo.App中打开包管理工具并添加Redis工具包StackExchange.Redis
打开Program.cs文件,编写Redis的订阅事件和回调方法,如下:
using StackExchange.Redis;using System;namespace RedisCoreDemo.App{class Program{static void Main(string[] args){//键事件通知,所有通知以 __keyevent@<db>__ 为前缀var EXPIRED_KEYS_CHANNEL = "__keyevent@2__:expired";//redis数据库连接的数据库与发布的数据库保持一致var host = "127.0.0.1:6379,password=123,defaultDatabase=2";var connection = ConnectionMultiplexer.Connect(host);ISubscriber subscriber = connection.GetSubscriber();subscriber.Subscribe(EXPIRED_KEYS_CHANNEL, (channel, key) =>{Console.WriteLine($"EXPIRED: {key}");});Console.WriteLine("Listening for events...");Console.ReadKey();}}}
好了,到此我们的Redis订阅客户端测试项目也完成了。
同时运行RedisCoreDemo.App,RedisCoreDemo.WebApi这两个项目,可以先编译好RedisCoreDemo.App,先运行RedisCoreDemo.App.
再运行RedisCoreDemo.WebApi,在浏览器器里分别输入
https://localhost:44334/Demo/Set/1
https://localhost:44334/Demo/Set/12
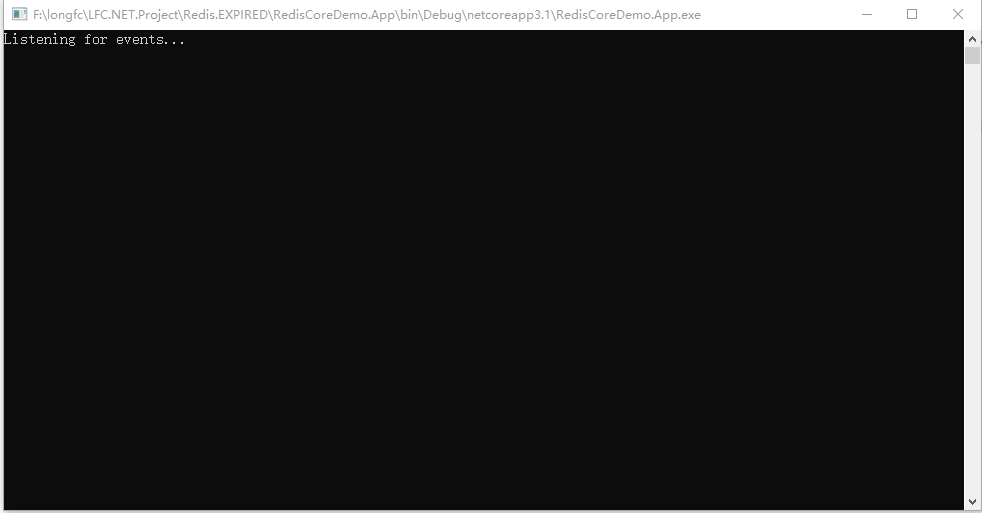
等待下,在RedisCoreDemo.App的控制台就会出现过期后的回调处理信息

