1. Introduction to HTML
Welcome to the world of code! Last year, millions of learners from our community started with HTML. Why? HTML is the skeleton of all web pages. It’s often the first language learned by developers, marketers, and designers and is core to front-end development work. If this is your first time touching code, we’re excited for what you’re about to create.
So what exactly is HTML? HTML provides structure to the content appearing on a website, such as images, text, or videos. Right-click on any page on the internet, choose “Inspect,” and you’ll see HTML in a panel of your screen.
HTML stands for HyperText Markup Language:
- A markup language is a computer language that defines the structure and presentation of raw text.
- In HTML, the computer can interpret raw text that is wrapped in HTML elements.
- HyperText is text displayed on a computer or device that provides access to other text through links, also known as hyperlinks. You probably clicked on a couple of hyperlinks on your way to this Codecademy course.
Learning HTML is the first step in creating websites, but even a bit of knowledge can help you inject code snippets into newsletter, blog or website templates. As you continue learning, you can layer HTML with CSS and JavaScript to create visually compelling and dynamic websites. But for now, we’re going to focus on how to add and modify basic content on a page, like text, images, and videos. Don’t worry if the websites look ugly — we’re just getting started.
2. HTML Anatomy
HTML is composed of elements. These elements structure the webpage and define its content. Let’s take a look at how they’re written.
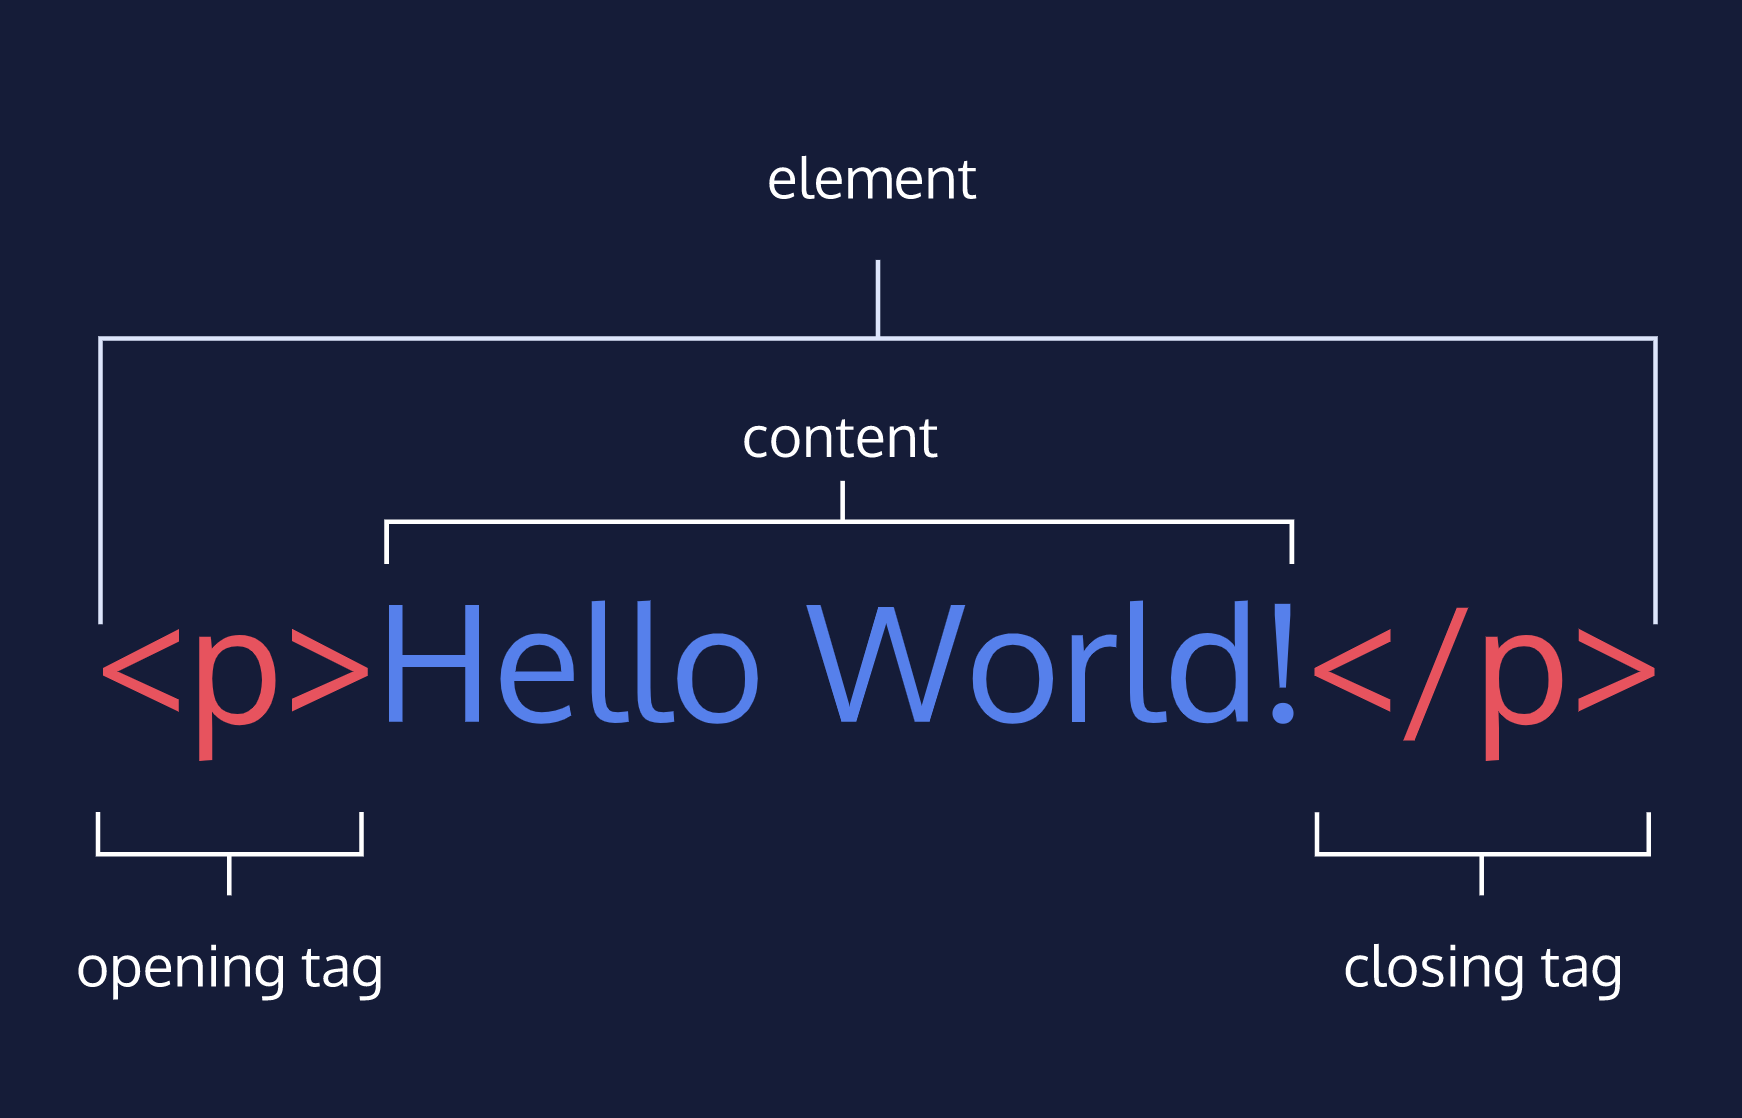
The diagram to the right displays an HTML paragraph element. As we can see, the paragraph element is made up of:
- An opening tag (
<p>) - The content (“Hello World!” text)
- A closing tag (
</p>)
A tag and the content between it is called an HTML element. There are many tags that we can use to organize and display text and other types of content, like images.
Let’s quickly review each part of the element pictured:
- HTML element (or simply, element) — a unit of content in an HTML document formed by HTML tags and the text or media it contains.
- HTML Tag — the element name, surrounded by an opening (
<) and closing (>) angle bracket. - Opening Tag — the first HTML tag used to start an HTML element. The tag type is surrounded by opening and closing angle brackets.
- Content — The information (text or other elements) contained between the opening and closing tags of an HTML element.
- Closing tag — the second HTML tag used to end an HTML element. Closing tags have a forward slash (
/) inside of them, directly after the left angle bracket.
3. The Body
One of the key HTML elements we use to build a webpage is the body element. Only content inside the opening and closing body tags can be displayed to the screen. Here’s what opening and closing body tags look like:
<body></body>
Once the file has a body, many different types of content – including text, images, and buttons – can be added to the body.
<body><p>What's up, doc?</p></body>
4. HTML Structure
HTML is organized as a collection of family tree relationships. As you saw in the last exercise, we placed <p> tags within <body> tags. When an element is contained inside another element, it is considered the child of that element. The child element is said to be nested inside of the parent element.
<body><p>This paragraph is a child of the body</p></body>
In the example above, the <p> element is nested inside the <body> element. The <p> element is considered a child of the <body> element, and the <body> element is considered the parent. You can also see that we’ve added two spaces of indentation (using the space bar) for better readability.
Since there can be multiple levels of nesting, this analogy can be extended to grandchildren, great-grandchildren, and beyond. The relationship between elements and their ancestor and descendent elements is known as hierarchy.
Let’s consider a more complicated example that uses some new tags:
<body><div><h1>Sibling to p, but also grandchild of body</h1><p>Sibling to h1, but also grandchild of body</p></div></body>
In this example, the <body> element is the parent of the <div> element. Both the <h1> and <p> elements are children of the <div> element. Because the <h1> and <p> elements are at the same level, they are considered siblings and are both grandchildren of the <body> element.
Understanding HTML hierarchy is important because child elements can inherit behavior and styling from their parent element. You’ll learn more about webpage hierarchy when you start digging into CSS.
5. Headings
Headings in HTML are similar to headings in other types of media. For example, in newspapers, large headings are typically used to capture a reader’s attention. Other times, headings are used to describe content, like the title of a movie or an educational article.
HTML follows a similar pattern. In HTML, there are six different headings, or heading elements. Headings can be used for a variety of purposes, like titling sections, articles, or other forms of content.
The following is the list of heading elements available in HTML. They are ordered from largest to smallest in size.
<h1>— used for main headings. All other smaller headings are used for subheadings.<h2><h3><h4><h5><h6>
The following example code uses a headline intended to capture a reader’s attention. It uses the largest heading available, the main heading element:
<h1>BREAKING NEWS</h1>
6. Divs
One of the most popular elements in HTML is the <div> element. <div> is short for “division” or a container that divides the page into sections. These sections are very useful for grouping elements in your HTML together.
<body><div><h1>Why use divs?</h1><p>Great for grouping elements!</p></div></body>
<div>s can contain any text or other HTML elements, such as links, images, or videos. Remember to always add two spaces of indentation when you nest elements inside of <div>s for better readability.
7. Attributes
If we want to expand an element’s tag, we can do so using an attribute. Attributes are content added to the opening tag of an element and can be used in several different ways, from providing information to changing styling. Attributes are made up of the following two parts:
- The name of the attribute
- The value of the attribute
One commonly used attribute is the id. We can use the id attribute to specify different content (such as <div>s) and is really helpful when you use an element more than once. ids have several different purposes in HTML, but for now, we’ll focus on how they can help us identify content on our page.
When we add an id to a <div>, we place it in the opening tag:
<div id="intro"><h1>Introduction</h1></div>
8. Displaying Text
If you want to display text in HTML, you can use a paragraph or span:
- Paragraphs (
<p>) contain a block of plain text. <span>contains short pieces of text or other HTML. They are used to separate small pieces of content that are on the same line as other content.
Take a look at each of these elements in action below:
<div><h1>Technology</h1></div><div><p><span>Self-driving cars</span> are anticipated to replace up to 2 million jobs over the next two decades.</p></div>
In the example above, there are two different <div>. The second <div> contains a <p> with <span>Self-driving cars</span>. This <span> element separates “Self-driving cars” from the rest of the text in the paragraph.
It’s best to use a <span> element when you want to target a specific piece of content that is inline, or on the same line as other text. If you want to divide your content into blocks, it’s better to use a <div>.
9. Styling Text
You can also style text using HTML tags. The <em> tag emphasizes text, while the <strong> tag highlights important text.
Later, when you begin to style websites, you will decide how you want browsers to display content within <em> and <strong> tags. Browsers, however, have built-in style sheets that will generally style these tags in the following ways:
- The
<em>tag will generally render as italic emphasis. - The
<strong>will generally render as bold emphasis.
Take a look at each style in action:
<p><strong>The Nile River</strong> is the <em>longest</em> river in the world, measuring over 6,850 kilometers long (approximately 4,260 miles).</p>
In this example, the <strong> and <em> tags are used to emphasize the text to produce the following:
The Nile River is the longest river in the world, measuring over 6,850 kilometers long (approximately 4,260 miles).
As we can see, “The Nile River” is bolded and “longest” is in italics.
10.Line Breaks
The spacing between code in an HTML file doesn’t affect the positioning of elements in the browser. If you are interested in modifying the spacing in the browser, you can use HTML’s line break element: <br>.
The line break element is unique because it is only composed of a starting tag. You can use it anywhere within your HTML code and a line break will be shown in the browser.
<p>The Nile River is the longest river <br> in the world, measuring over 6,850 <br> kilometers long (approximately 4,260 <br> miles).</p>
The code in the example above will result in an output that looks like the following:
The Nile River is the longest river
in the world, measuring over 6,850
kilometers long (approximately 4,260
miles).
11. Unordered Lists
In addition to organizing text in paragraph form, you can also display content in an easy-to-read list.
In HTML, you can use an unordered list tag (<ul>) to create a list of items in no particular order. An unordered list outlines individual list items with a bullet point.
The <ul> element should not hold raw text and won’t automatically format raw text into an unordered list of items. Individual list items must be added to the unordered list using the <li> tag. The <li> or list item tag is used to describe an item in a list.
<ul><li>Limes</li><li>Tortillas</li><li>Chicken</li></ul>
In the example above, the list was created using the <ul> tag and all individual list items were added using <li> tags.
The output will look like this:
- Limes
- Tortillas
- Chicken
12. Ordered Lists
_Ordered lists (<ol>) are like unordered lists, except that each list item is numbered. They are useful when you need to list different steps in a process or rank items for first to last.
You can create the ordered list with the <ol> tag and then add individual list items to the list using <li> tags.
<ol><li>Preheat the oven to 350 degrees.</li><li>Mix whole wheat flour, baking soda, and salt.</li><li>Cream the butter, sugar in separate bowl.</li><li>Add eggs and vanilla extract to bowl.</li></ol>
The output will look like this:
- Preheat the oven to 350 degrees.
- Mix whole wheat flour, baking soda, and salt.
- Cream the butter, sugar in separate bowl.
- Add eggs and vanilla extract to bowl.
13. Images
All of the elements you’ve learned about so far (headings, paragraphs, lists, and spans) share one thing in common: they’re composed entirely of text! What if you want to add content to your web page that isn’t composed of text, like images?
The <img> tag allows you to add an image to a web page. Most elements require both opening and closing tags, but the <img> tag is a self-closing tag. Note that the end of the <img> tag has a forward slash /. Self-closing tags may include or omit the final slash — both will render properly.
<img src="image-location.jpg" />
The <img> tag has a required attribute called src. The src attribute must be set to the image’s source, or the location of the image. In this case, the value of src must be the uniform resource locator (URL) of the image. A URL is the web address or local address where a file is stored.
14. Image Alts
Part of being an exceptional web developer is making your site accessible to users of all backgrounds. In order to make the Web more inclusive, we need to consider what happens when assistive technologies such as screen readers come across image tags.
The alt attribute, which means alternative text, brings meaning to the images on our sites. The alt attribute can be added to the image tag just like the src attribute. The value of alt should be a description of the image.
<img src="#" alt="A field of yellow sunflowers" />
The alt attribute also serves the following purposes:
- If an image fails to load on a web page, a user can mouse over the area originally intended for the image and read a brief description of the image. This is made possible by the description you provide in the
altattribute. - Visually impaired users often browse the web with the aid of screen reading software. When you include the
altattribute, the screen reading software can read the image’s description out loud to the visually impaired user. - The
altattribute also plays a role in Search Engine Optimization (SEO), because search engines cannot “see” the images on websites as they crawl the internet. Having descriptivealtattributes can improve the ranking of your site.
If the image on the web page is not one that conveys any meaningful information to a user (visually impaired or otherwise), the alt attribute should be left empty.
15. Videos
In addition to images, HTML also supports displaying videos. Like the <img> tag, the <video> tag requires a src attribute with a link to the video source. Unlike the <img> tag however, the <video> element requires an opening and a closing tag.
<video src="myVideo.mp4" width="320" height="240" controls>Video not supported</video>
In this example, the video source (src) is myVideo.mp4 The source can be a video file that is hosted alongside your webpage, or a URL that points to a video file hosted on another webpage.
After the src attribute, the width and height attributes are used to set the size of the video displayed in the browser. The controls attribute instructs the browser to include basic video controls: pause, play and skip.
The text, “Video not supported”, between the opening and closing video tags will only be displayed if the browser is unable to load the video.
16. Review
Congratulations on completing the first lesson of HTML! You are well on your way to becoming a skilled web developer.
Let’s review what you’ve learned so far:
- HTML stands for HyperText Markup Language and is used to create the structure and content of a webpage.
- Most HTML elements contain opening and closing tags with raw text or other HTML tags between them.
- HTML elements can be nested inside other elements. The enclosed element is the child of the enclosing parent element.
- Any visible content should be placed within the opening and closing
<body>tags. - Headings and sub-headings,
<h1>to<h6>tags, are used to enlarge text. <p>,<span>and<div>tags specify text or blocks.- The
<em>and<strong>tags are used to emphasize text. - Line breaks are created with the
<br>tag. - Ordered lists (
<ol>) are numbered and unordered lists (<ul>) are bulleted. - Images (
<img>) and videos (<video>) can be added by linking to an existing source.
In the next lesson, we’ll take the content that you’ve added to this website and transform it into an HTML document that’s ready to go on the web.

若有收获,就点个赞吧
0 人点赞
