准备工作
开发环境:node12.x以上
开发语言:TypeScript、JavaScript
内置模块:
1)lerna (可选,用于管理各个模块的依赖关系、发布版本,一键发布推送到git仓库和npm仓库)
2)jest (必选,团队采用TDD模式开发,要求每个开发者都必须掌握一定的单元测试能力)
3)class-transformer (必选,数据转换工具,是项目中的常用工具)
4)class-validator (必选,数据验证工具,是项目中的常用工具)
5)mongoose+typegoose(可选,虽然框架底层封装了mongoose的操作,但有些业务场景需要开发者使用mongoose或typegoose更多的api来实现)
下载项目源代码
git clone https://github.com/feiyueXH/lzy-midway-ddd.git
组件开发
下载组件模板代码
cd packagesgit clone https://github.com/feiyueXH/lzy-component-template.git
组件项目结构
│ .gitignore│ jest.config.js ## jest工具配置文件│ package-lock.json│ package.json│ tsconfig.json├───src│ │ configuration.ts ## 自启动文件│ │ index.ts ## 入口文件│ │ interface.ts│ ├───application ## 应用层│ │ ├───checker│ │ │ │ interface.ts│ │ │ └───impl│ │ │ user.checker.ts│ │ ├───command ## 命令│ │ │ │ change-password.command.ts│ │ │ │ register-user.command.ts│ │ │ └───executor ## 命令执行者│ │ │ user.ts│ │ └───query ## 查询│ │ │ list-user.query.ts│ │ └───executor ## 查询执行者│ │ user.ts│ ├───config│ │ config.default.ts ## 配置文件│ ├───domain ## 领域层│ │ ├───aggregate ## 聚合(包含聚合根、实体、聚合根)│ │ │ user.ts│ │ └───event ## 领域事件│ │ user-registered.event.ts│ ├───infrastructure ## 基础设施层│ │ └───db│ │ └───mongo│ │ └───models ## 定义typegoose的Model│ │ user.ts│ └───web│ └───api ## 对外接口│ hello.controller.ts│ user.controller.ts└───test ## 测试代码
注意:组件项目中的.git文件夹需要自行删除,lerna项目下已经有.git文件夹,如果不删除会造成冲突
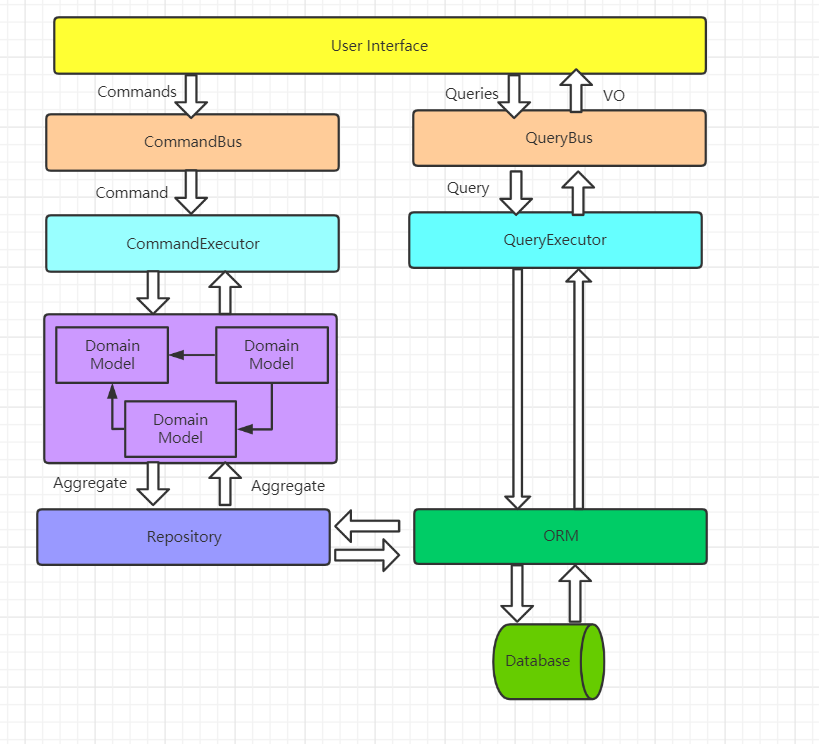
架构图
牛刀小试
功能需求:注册用户和查询用户列表
备注:注册用户表单内容:用户名、密码、邮箱
开发注册用户功能
因为注册用户功能是一个写操作,所以要走执行命令流程
开发流程为:命令—>命令执行者—>领域模型(聚合根、实体、值对象、领域事件)—>数据模型
命令(Command)
// src\application\command\register-user.command.ts// ddd-cqrs是一个自行封装的核心模块,作用是为了提供ddd、cqrs架构下所需的基类、事件总线、命令总线、查询总线、事务处理、能够自动分拣持久化数据通用化仓储等等import { SuperCommand } from '@lzy-plugin/ddd-cqrs';import { Expose } from 'class-transformer';export class RegisterUserCommand extends SuperCommand {@Expose()username: string;@Expose()password: string;@Expose()email: string;}
命令执行者(Command Executor)
// src\application\command\executor\user.tsimport {CommonRepository, // 通用仓储SuperCommand,SuperCommandExecutor,RepositoryManager, // 仓储管理者SubscribeCommand} from '@lzy-plugin/ddd-cqrs';import { Inject, Provide } from '@midwayjs/decorator';import { User } from '../../../domain/aggregate/user';import { IUserChecker } from '../../checker/interface';import { RegisterUserCommand } from '../register-user.command';import { ChangePasswordCommand } from '../change-password.command';@SubscribeCommand([RegisterUserCommand, ChangePasswordCommand])// 订阅命令,命令总线会自动收集订阅@Provide()export class UserCommandExecutor extends SuperCommandExecutor {@Inject()userChecker: IUserChecker; // 用户校验器userRepository: CommonRepository<User>; //用户仓储public async init(repositoryManager: RepositoryManager): Promise<void> {this.userRepository = await repositoryManager.get(User);// 从仓储管理者获取用户仓储}public async executeCommand<C extends SuperCommand>(command: C): Promise<void> {if (command instanceof RegisterUserCommand) {await this.registerUser(command);} else if (command instanceof ChangePasswordCommand) {await this.changePassword(command);}else {throw new Error('未实现业务逻辑');}}/*** 注册用户* @param command*/private async registerUser(command: RegisterUserCommand): Promise<void> {const user = await User.create(User, command, this.userChecker);// 创建一个用户await this.userRepository.add(user);// 调用用户仓储添加用户,执行命令结束后,将自动持久化。}/*** 修改密码* @param command*/private async changePassword(command: ChangePasswordCommand): Promise<void> {const user = await this.userRepository.get(command._id);user.changePassword(command.password); //从仓储内部实现了数据变化侦测,所以改完属性值后,命令执行完毕,仓储会自动持久化。}}
领域模型(Domain Model)
// src\domain\aggregate\user.tsimport {AggregateRoot,Entity,CommonException,ExceptionCodeEnum} from '@lzy-plugin/ddd-cqrs';import { Expose } from 'class-transformer';import { IsNotEmpty } from 'class-validator';import { IUserChecker } from '../../application/checker/interface';export class User extends AggregateRoot {//聚合根@Expose()@IsNotEmpty()username: string;@Expose()@IsNotEmpty()password: string;@Expose()@IsNotEmpty()email: string;changePassword(password: string): void {this.password = password;}static async create<E extends Entity>(clazz: new () => E,object: Record<string, any>,userChecker: IUserChecker): Promise<E> {if (await userChecker.isExistedByUsername(object)) {throw new CommonException(ExceptionCodeEnum.DB_FAIL_CREATE_UNIQUE,'账号已被注册');}return await Entity.create(clazz, object);}}
数据模型 (Data Model)
// src\infrastructure\db\mongo\models\user.ts// 自行封装的ORM模块import { SuperModel, TypegooseModel } from '@lzy-plugin/mongo-context';import { prop } from '@typegoose/typegoose';import { Expose } from 'class-transformer';// 声明为TypegoooseModel,modelName必须与领域层中的实体类名一致,仓储才可以根据实体名称调用ORM持久化@TypegooseModel({ modelName: 'User', collectionName: 'users' })export class UserModel extends SuperModel {@Expose()@prop()username: string;@Expose()@prop()password: string;@Expose()@prop()email: string;}
以上代码就已经完成了注册用户的业务开发,接下来就是对外开发一个接口提供调用
import { SuperController } from '@lzy-plugin/ddd-cqrs';import { Controller, Post, Body, ALL, Provide, Get } from '@midwayjs/decorator';import { plainToClass } from 'class-transformer';import { RegisterUserCommand } from '../../application/command/register-user.command';@Controller('/users')@Provide()export class UserController extends SuperController {@Post('/')async registerUser(@Body(ALL) body: any): Promise<void> {//创建命令const command: RegisterUserCommand = plainToClass(RegisterUserCommand,body);//通过命令总线发布命令,然后等待命令执行完毕await this.commandBus.send(command, { dbKey: 'admin' });//命令执行成功this.httpHelper.success();}}
开发查询用户列表功能
这是一个读操作,并不会写入任何数据,所以走执行查询流程
开发流程:查询—>查询执行者—>调用ORM查询各种数据
查询 (Query)
import { IMatchRule, SuperQuery } from '@lzy-plugin/ddd-cqrs';
import { Expose } from 'class-transformer';

export class ListUserQuery extends SuperQuery {
  @Expose()
  username?: string | IMatchRule;
}
查询执行者 (Query Executor)
import {
  getZoneData,
  SubscribeQuery,
  SuperQuery,
  SuperQueryExecutor
} from '@lzy-plugin/ddd-cqrs';
import { IMongoManager, MongoContext } from '@lzy-plugin/mongo-context';
import { Provide } from '@midwayjs/decorator';
import { ListUserQuery } from '../list-user.query';

@SubscribeQuery([ListUserQuery])
@Provide()
export class UserQueryExecutor extends SuperQueryExecutor {
  mongoContext: MongoContext;

  async init(mongoManager: IMongoManager): Promise<any> {
    this.mongoContext = await mongoManager.getContext(getZoneData('dbKey'));
  }

  async executeQuery<Q extends SuperQuery>(query: Q): Promise<any> {
    if (query instanceof ListUserQuery) {
      return await this.listQuery(query);
    }
    throw new Error('Method not implemented.');
  }

  async listQuery(query: ListUserQuery): Promise<any[]> {
    const result = await this.mongoContext.switchModel('User').find(query);
    return result;
  }
}
接下来只需要对外开放接口即可。
import { SuperController } from '@lzy-plugin/ddd-cqrs';
import { Controller, Post, Body, ALL, Provide, Get } from '@midwayjs/decorator';
import { plainToClass } from 'class-transformer';
import { ListUserQuery } from '../../application/query/list-user.query';
@Controller('/users')
@Provide()
export class UserController extends SuperController {
  @Get('/')
  async listUser(@Body(ALL) body: any): Promise<void> {
    const query: ListUserQuery = plainToClass(ListUserQuery, body);
    const result = await this.queryBus.send(query, { dbKey: 'admin' });
    this.httpHelper.success(result);
  }
}
组件调试
组件开发完了,该如何进行调试?
方法有两种:
1)将组件的package.json中main入口改为src/index.ts,然后通过lerna添加依赖和建立软连接进行热更调试。但这个方法目前存在缺陷,midwayjs没办法监听node_modules中npm建立软连接生成的代码,所以无法热更,目前midwayjs已经修复,但还没发布出来,也不知道怎么使用监听更多文件,所以这个调试方案暂放
2)在每个组件编写测试代码,对组件进行单元测试。
目录结构
└─test
    │  .setup.js
    │  index.test.ts                                                     ## 测试代码文件(重点)
    └─fixtures
        └─base-app                                                        ## 模拟将组件部署到应用上
            │  package.json
            │  tsconfig.json
            ├─logs
            ├─run
            └─src
                │  configuration.ts                        ## 自定义启动文件(重点)
                └─config
                        config.default.ts            ## 配置文件(重点)
在模拟将组件部署到应用上之前,我们先导出组件中定义好的各个类
// packages\user\src\index.ts
export { AutoConfiguration as Configuration } from './configuration';
export * from './application/command/change-password.command';
export * from './application/command/executor/user';
export * from './application/command/register-user.command';
export * from './application/query/list-user.query';
export * from './application/query/executor/user';
export * from './domain/aggregate/user';
export * from './domain/event/user-registered.event';
export * from './infrastructure/db/mongo/models/user';
export * from './web/api/user.controller';
所有被装饰器装饰的类都必须导出,尤其是被Provide装饰的类,这样才能被框架扫描之后执行一些操作:比如添加到控制反转容器、实例化、收集依赖等,例如:
// src\infrastructure\db\mongo\models\user.ts
@TypegooseModel({ modelName: 'User', collectionName: 'users' })
export class UserModel extends SuperModel {}

// src\web\api\user.controller.ts
@Controller('/users')
@Provide()
export class UserController extends SuperController {}

// src\application\command\executor\user.ts
@SubscribeCommand([RegisterUserCommand, ChangePasswordCommand])
@Provide()
export class UserCommandExecutor extends SuperCommandExecutor {}
接下来就可以模拟部署到应用中了
// packages\user\test\fixtures\base-app\src\configuration.ts
import { App, Config, Configuration } from '@midwayjs/decorator';
//导入刚刚开发的用户组件
import * as developTemplate from '../../../../src';
import { join } from 'path';
import { ILifeCycle } from '@midwayjs/core';
import { Application } from 'egg';
import { IMongoConfig, MongoContext } from '@lzy-plugin/mongo-context';

@Configuration({
  imports: [developTemplate],//添加用户组件
  importConfigs: [join(__dirname, 'config')]
})
export class ContainerLifeCycle implements ILifeCycle {
  @App()
  app: Application;
  @Config('mongoConfig')
  mongoConfig: IMongoConfig;

  async onReady(): Promise<void> {
    // 传入mongodb连接参数,连接数据库
    await MongoContext.createConnection(this.mongoConfig);
  }
}
我们对上面只做了三件事:
1、导入开发好的组件
2、添加组件
3、连接数据库
编写测试代码
describe('/test/index.test.ts', () => {
  it('测试用户组件', async () => {
    let app = await createApp(
      join(__dirname, 'fixtures', 'base-app'),
      {},
      Framework
    );
    const result = await createHttpRequest(app)
      .get('/users')
      .send({
        operatorId: '60766c0d564f182c48fad23d'
      })
      .set('x-timeout', '5000');
    expect(result.status).toBe(200);
    console.log(result.body.data);
    await close(app);
  });
});
发布组件
推荐使用lerna的publish命令来发布组件。好处有如下几点:
1、管理不同npm包的依赖关系
2、当某个npm包版本变动,依赖它的npm包的版本也会跟着同步修改
3、会将源码自动发布到git仓库,并且会发布到tag版本。
4、可以一次性发布多个npm包
如果只是测试使用,使用npm直接发布也行。
准备工作
至少需要先准备好git远程仓库和npm包仓库。
建议先简单了解下lerna的使用和npm的发布使用
发布前注意检查一下组件package.json中的main入口是否有改回dist/index.js
发布之前还需要对项目进行编译,lerna exec npm run build —scope @lzy-component/*可以批量对组件名前缀为@lzy-conponent的组件进行编译
开始发布
## 先登记npm远程仓库,然后进行登陆
npm config set registry=[仓库地址]
npm login

## 使用npm模块进行发布
npm publish

## 使用lerna模块进行发布
lerna publish
使用组件
使用组件很简单,跟使用普通的npm包差不多。
## 你可以新增一个midwayjs项目
mw new mw-component-demo
cd mw-component-demo

## 添加刚刚发布出去的组件npm包
npm install @yxk-component/user
## 添加其他所需的依赖包
...
// projects\platform\src\configuration.ts
import { App, Config, Configuration } from '@midwayjs/decorator';
import { ILifeCycle } from '@midwayjs/core';
import { Application } from 'egg';
import { join } from 'path';
import * as user from '@lzy-component/user';
import { IMongoConfig, MongoContext } from '@lzy-plugin/mongo-context';

@Configuration({
  imports: [user],
  importConfigs: [join(__dirname, './config')],
})
export class ContainerLifeCycle implements ILifeCycle {
  @App()
  app: Application;
  @Config('mongoConfig')
  mongoConfig: IMongoConfig;

  async onReady(): Promise<void> {
    await MongoContext.createConnection(this.mongoConfig);
  }
}


