前言
我们已经了解了objc_class结构体的内容了,也分析了isa和superclass的功能,我们在来看看objc_class结构体,来开启我们cache的探索之路。
struct objc_class : objc_object {// Class ISA;// Class _Nonnull isa OBJC_ISA_AVAILABILITY;Class superclass;cache_t cache; // formerly cache pointer and vtableclass_data_bits_t bits;}
找到cache的地址
首先我们可以通过p/x打印出对象的首地址,我们知道每个指针占8字节,那么isa和superclass都是指针各占8字节,那么我们只要内存平移16字节0x10,就可以找到cache的首地址了。
cache_t结构体源码
struct cache_t {private:explicit_atomic<uintptr_t> _bucketsAndMaybeMask; // uintptr_t = long 占8字节union { // 共用体,共用体的内存大等于成员中最大的成员占内存,所以占8字节struct {explicit_atomic<mask_t> _maybeMask; // mask_t = int32 占4字节#if __LP64__uint16_t _flags; // 占2字节#endifuint16_t _occupied; // 占2字节};explicit_atomic<preopt_cache_t *> _originalPreoptCache; // 指针占8字节};// 省略……// occupied++ 插入bucket时调用,缓存计数+1void incrementOccupied();// 初始化cache_tvoid setBucketsAndMask(struct bucket_t *newBuckets, mask_t newMask);// 获取bucketsstruct bucket_t *buckets() const;// 存储元素个数mask_t occupied() const;// 向缓存中插入bucketvoid insert(SEL sel, IMP imp, id receiver);}
_bucketsAndMaybeMask中存储这buckets和mask信息,是在setBucketsAndMask()方法中进行处理
buckets:类似数组,内存连续,存储着缓存的方法
mask:方法查找和插入时的掩码
occupied:记录缓存的方法数量,每次插入新方法时调用incrementOccupied()进行计数+1
insert方法分析
先来看看insert方法源码
void cache_t::insert(SEL sel, IMP imp, id receiver){// 前边忽略,到此处说明需要添加新的缓存// 计算新的occupiedmask_t newOccupied = occupied() + 1;// 获取旧的缓存容量unsigned oldCapacity = capacity(), capacity = oldCapacity;// 判断是否是创建,如果是创建则进行初始化if (slowpath(isConstantEmptyCache())) {// Cache is read-only. Replace it.if (!capacity) capacity = INIT_CACHE_SIZE;reallocate(oldCapacity, capacity, /* freeOld */false);}// 判断是否需要扩容else if (fastpath(newOccupied + CACHE_END_MARKER <= cache_fill_ratio(capacity))) {// Cache is less than 3/4 or 7/8 full. Use it as-is.}#if CACHE_ALLOW_FULL_UTILIZATIONelse if (capacity <= FULL_UTILIZATION_CACHE_SIZE && newOccupied + CACHE_END_MARKER <= capacity) {// Allow 100% cache utilization for small buckets. Use it as-is.}#endif// 扩容操作else {capacity = capacity ? capacity * 2 : INIT_CACHE_SIZE;if (capacity > MAX_CACHE_SIZE) {capacity = MAX_CACHE_SIZE;}// 扩容后需要将旧的存储信息释放掉reallocate(oldCapacity, capacity, true);}bucket_t *b = buckets();mask_t m = capacity - 1;mask_t begin = cache_hash(sel, m);mask_t i = begin;// hash运算进行存储do {if (fastpath(b[i].sel() == 0)) {incrementOccupied();b[i].set<Atomic, Encoded>(b, sel, imp, cls());return;}if (b[i].sel() == sel) {// The entry was added to the cache by some other thread// before we grabbed the cacheUpdateLock.return;}} while (fastpath((i = cache_next(i, m)) != begin)); // 掩码运算索引bad_cache(receiver, (SEL)sel);#endif // !DEBUG_TASK_THREADS}
初始化创建cache_t
if (!capacity) capacity = INIT_CACHE_SIZE;reallocate(oldCapacity, capacity, /* freeOld */false);
初始化容量
初始化容量为4(1 << 2 )
INIT_CACHE_SIZE = (1 << INIT_CACHE_SIZE_LOG2) = 1 << 2
INIT_CACHE_SIZE_LOG2 = 2
reallocate函数初始化
reallocate实现
void cache_t::reallocate(mask_t oldCapacity, mask_t newCapacity, bool freeOld){bucket_t *oldBuckets = buckets();bucket_t *newBuckets = allocateBuckets(newCapacity);setBucketsAndMask(newBuckets, newCapacity - 1);if (freeOld) {collect_free(oldBuckets, oldCapacity);}}
- 首先获取旧的buckets;
- 再创建一个新的容量的buckets;
- 调用setBucketsAndMask函数将buckets和mask关联,mask的值就是容量值-1
- 判断是否需要释放旧的缓存,扩容的时候需要释放旧的缓存
-
扩容与collect_free释放旧的缓存
扩容判断
通过fastpath(newOccupied + CACHE_END_MARKER <= cache_fill_ratio(capacity)判断是否需要扩容
newOccupied:缓存数量;
CACHE_END_MARKER:1;
cache_fill_ratio(capacity):capacity * 3 / 4;
也就是说,当缓存的元素个数大与容量的3/4时,进行扩容。扩容
capacity = capacity ? capacity * 2 : INIT_CACHE_SIZE;
可以看到,扩容时会将容量扩容到原容量的2倍。collect_free实现
void cache_t::collect_free(bucket_t *data, mask_t capacity){_garbage_make_room ();garbage_byte_size += cache_t::bytesForCapacity(capacity);garbage_refs[garbage_count++] = data;cache_t::collectNolock(false);}
扩容为什么要释放旧的缓存信息
由于缓存的存储方式采用的是hash表的方式存储,通过cache_hash(sel, m)计算hash表的key,mask的值时容量大小减1,那么扩容后容量变了,所以mask的值也变了,所以需要清空所有缓存重新进行方法缓存。Hash存储Key计算
// hash运算进行存储do {if (fastpath(b[i].sel() == 0)) {incrementOccupied();b[i].set<Atomic, Encoded>(b, sel, imp, cls());return;}if (b[i].sel() == sel) {// The entry was added to the cache by some other thread// before we grabbed the cacheUpdateLock.return;}} while (fastpath((i = cache_next(i, m)) != begin)); // 掩码运算索引
获取buckets
bucket_t *b = buckets();
- 通过缓存容量计算出mask
mask_t m = capacity - 1;
- 通过sel和mask获取方法的hash值
mask_t begin = cache_hash(sel, m);
mask_t i = begin;
- 通过hash值和mask获取key
i = cache_next(i, m)
cache_next内部实质就是将hash值+1后再重新进行掩码运算,直到满足条件后存储缓存,循环结束
- fastpath(b[i].sel() == 0
判断buckets中对应的key值是否为空,如果为空的话将该方法插入到对应位置,结束循环,否则hash值加1继续掩码运算
代码查看
先找到最初始的cache信息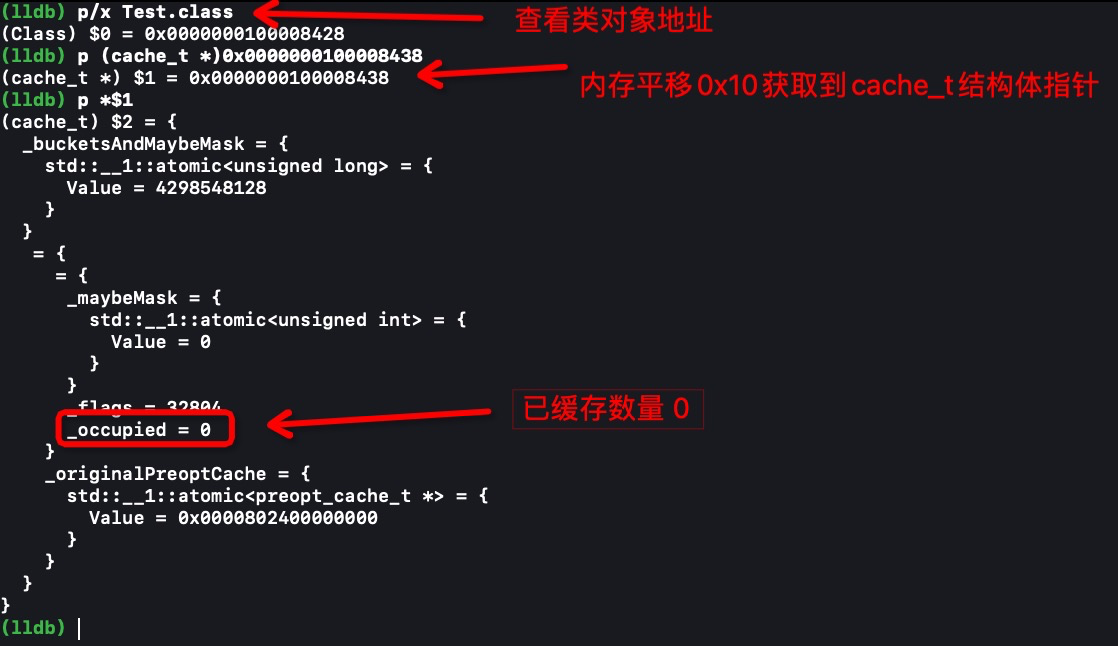
调用test方法后再查看缓存信息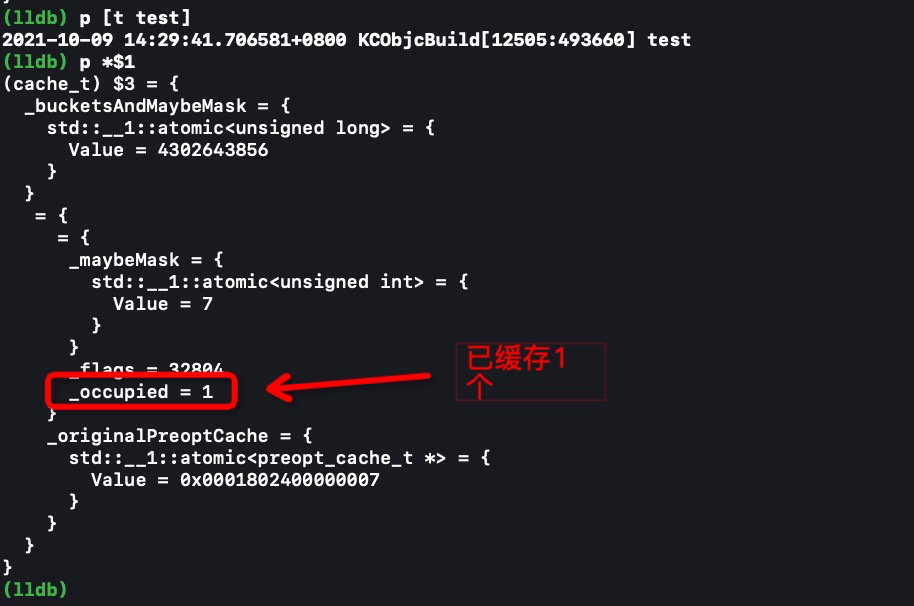
查看缓存的方法信息,通过bucket_t调用sel查看缓存的方法信息
inline SEL sel() const { return_sel.load(memory_order_relaxed); }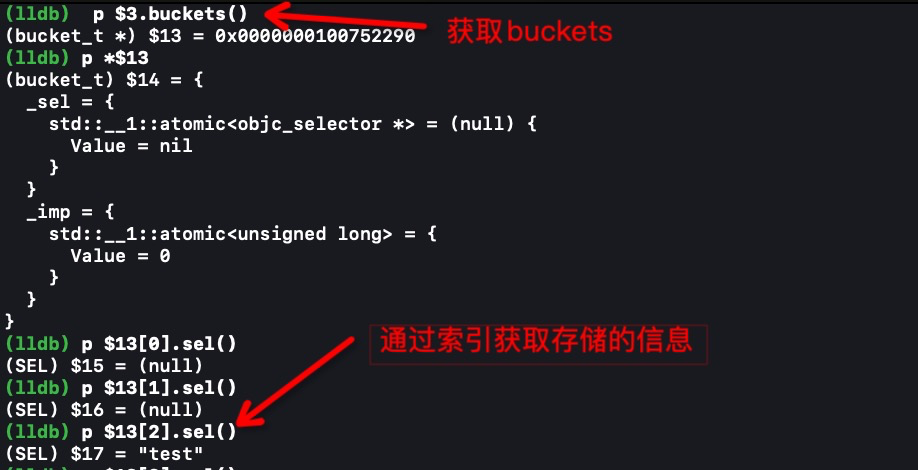
通过bucket_t调用imp查看函数指针
inline IMP imp (UNUSED_WITHOUT_PTRAUTH bucket_t *base, Class cls)

若有收获,就点个赞吧
0 人点赞
