Spring学习笔记01
1.Spring概述
1.1 简介

Spring :春天——> 给软件行业带来了春天
2002年,Rob Jahnson首次推出了Spring框架原型interface21框架
2004年3月24日,Spring框架以interface21框架为基础,经过重新设计,发布了1.0正式版
Spring理念:使现有技术更加实用,整合现有的框架技术
官方文档: https://docs.spring.io/spring-framework/docs/current/spring-framework-reference/
官方下载地址:https://repo.spring.io/release/org/springframework/spring/
GitHub地址:https://github.com/spring-projects/spring-framework
优点:
- Spring是一个免费开源的框架,容器
- spring是一个轻量级的框架,非侵入式的
- 控制反转IoC 面向切面 Aop
- 对事务的支持,对框架的支持
总结:Spring是一个轻量级的控制反转(IoC)和面向切面(Aop)的容器(框架)
1.2 组成
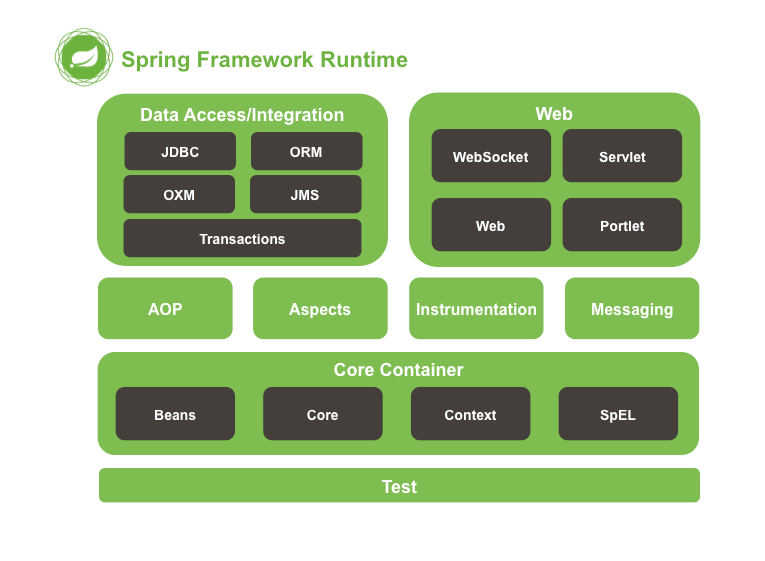
Spring框架是一个分层架构,由7个定义良好的模块组成,Spring模块构建在核心容器之上,核心容器定义了创建,配置,和管理bean的方式
组成Spring框架的每个模块都可以单独存在,或者与其它一个或多个模块联合实现,每个模块的功能如下
- 核心容器:核心容器提供Spring框架的基本功能,核心容器的主要组件是BeanFactory,他是工厂模式的实现
BeanFactory使用控制反转的模式(IoC)将应用程序的配置和依赖性规范与实际的应用程序代码公开
- Spring 上下文:Spring 上下文是一个配置文件,向 Spring 框架提供上下文信息。Spring 上下文包括企业服务,例如 JNDI、EJB、电子邮件、国际化、校验和调度功能。
- Spring AOP: 通过配置管理特性,Spring AOP模式直接将面向切面的编程功能,集成到了Spring框架中,所以,可以很容易的使Spring框架管理任何支持AOP的对象,Spring AOP模块为基于Spring的应用程序中的对象提供了事务管理服务,通过使用Spring AOP,不用依赖组件,就可以将声明性事务管理集成到应用程序中
- Spring DAO: JDBC DAO 抽象层提供了有意义的异常层次结构,可用该结构来管理异常处理和不同数据库供应商抛出的错误消息。异常层次结构简化了错误处理,并且极大地降低了需要编写的异常代码数量(例如打开和关闭连接)。Spring DAO 的面向 JDBC 的异常遵从通用的 DAO 异常层次结构。
- Spring ORM:Spring 框架插入了若干个 ORM 框架,从而提供了 ORM 的对象关系工具,其中包括JDO、Hibernate 和 iBatis SQL Map。所有这些都遵从 Spring 的通用事务和 DAO 异常层次结构。
- Spring Web 模块:Web 上下文模块建立在应用程序上下文模块之上,为基于 Web 的应用程序提供了上下文。所以,Spring 框架支持与 Jakarta Struts 的集成。Web 模块还简化了处理多部分请求以及将请求参数绑定到域对象的工作。
- Spring MVC框架:MVC框架是一个全功能的构建Web应用程序的MVC实现,通过策略接口,MVC框架变成为高度可配置的,MVC容纳了大量视图技术,其中包括JSP、Velocity、iText和POI
1.3 拓展
Spring Boot与Spring Cloud
- Spring Boot是spring的一套快速配置脚手架,可以基于Spring Boot快速开发单个微服务
- Spring Cloud是基于Spring Boot 实现的
- Spring Boot专注与快速、方便集成的单个微服务个体,Spring Cloud关注全局的服务治理框架
- Spring Boot使用了约束优于配置的理念,很多集成方案已经帮你选择好了,能不配置就不配置,Spring Cloud很大的一部分是基于Spring Boot来实现的,Spring Boot可以离开Spring Cloud独立使用开发项目,但是Spring Cloud 离不开Spring Boot,属于依赖的关系
- Spring Boot 在SpringCloud中起到了承上启下的作用,如果要学习Spring Cloud 必须要学习Spring Boot
2.IOC理论指导
2 .1 IOC基础
新建一个maven项目
先用之前的方式写一个项目
1.先写一个UserDao 接口
package com.jcsune.dao;public interface UserDao {void getUser();}
2.再去写Dao的实现类
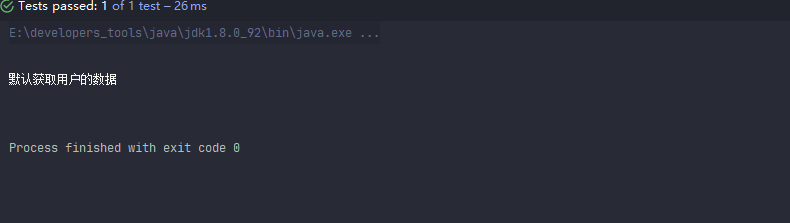
package com.jcsune.dao;public class UserDaoImpl implements UserDao {public void getUser() {System.out.println("默认获取用户的数据");}}
3.接着写UserService的接口
package com.jcsune.service;public interface UserService {public void getUser();}
4.接着写UseService的实现类
package com.jcsune.service;import com.jcsune.dao.UserDao;import com.jcsune.dao.UserDaoImpl;public class UserServiceImpl implements UserService{private UserDao userDao=new UserDaoImpl() ;public void getUser() {userDao.getUser();}}
5.测试
import com.jcsune.service.UserService;import com.jcsune.service.UserServiceImpl;import org.junit.Test;public class MyTest {@Testpublic void test() {UserService service= new UserServiceImpl();service.getUser();}}
6.运行结果
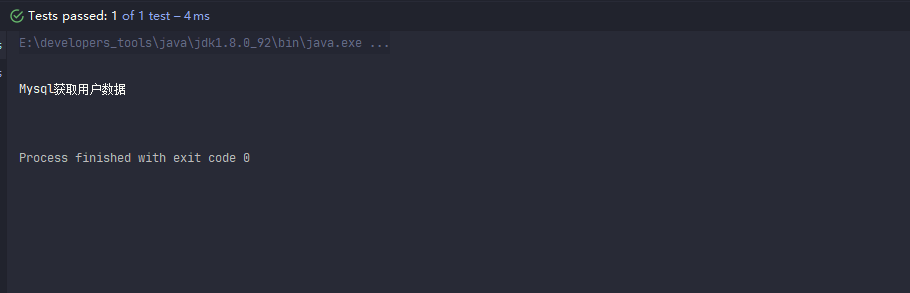
7.如果我们把UserDao的实现类增加一个UserDaoMysqlImpl
package com.jcsune.dao;public class UserDaoMysqlImpl implements UserDao {public void getUser() {System.out.println("Mysql获取用户数据");}}
8.我们如果要去使用Mysql的话,我们就需要去service的实现类里面修改对应的实现
import com.jcsune.dao.UserDao;import com.jcsune.dao.UserDaoImpl;import com.jcsune.dao.UserDaoMysqlImpl;public class UserServiceImpl implements UserService{/*private UserDao userDao=new UserDaoImpl() ;*/private UserDao userDao=new UserDaoMysqlImpl();public void getUser() {userDao.getUser();}}
9.测试结果(这时测试代码不用修改)
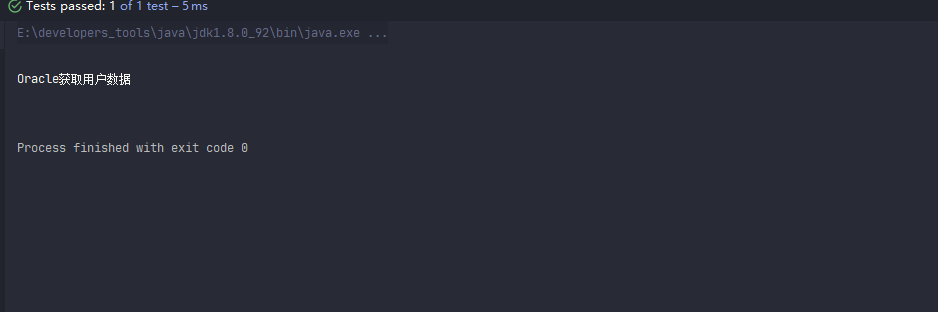
接着如果我们要使用Oracle,又需要去service实现类里面修改对应的实现万一需求大的话,这种方式根本不适用,耦合性太高,牵一发儿动全身
10.解决方法
- 首先新增一个UserDao的实现类UserDaoOracleImpl
package com.jcsune.dao;public class UserDaoOracleImpl implements UserDao {public void getUser() {}}
- 我们在需要用到它的地方,不去实现它,而是留出一个接口,利用set
package com.jcsune.service;import com.jcsune.dao.UserDao;import com.jcsune.dao.UserDaoImpl;import com.jcsune.dao.UserDaoMysqlImpl;public class UserServiceImpl implements UserService{/*private UserDao userDao=new UserDaoImpl() ;*//*private UserDao userDao=new UserDaoMysqlImpl();*/private UserDao userDao;//利用set实现public void setUserDao(UserDao userDao) {this.userDao = userDao;}public void getUser() {userDao.getUser();}}
- 最后去测试类中进行测试(此时测试代码需要更改)
import com.jcsune.dao.UserDaoOracleImpl;import com.jcsune.service.UserService;import com.jcsune.service.UserServiceImpl;import org.junit.Test;public class MyTest {@Testpublic void test() {UserService service= new UserServiceImpl();service.setUserDao(new UserDaoOracleImpl());service.getUser();}}
没使用set之前,所有的东西都是由程序去进行控制创建,而使用set之后由我们自行控制创建对象,把主动权交给了调用者,程序不用去管怎么创建,怎么实现的了,它只负责提供一个接口,这种思想从本质上解决了问题,程序员不用去管对象的创建的了,更多的去关注业务的实现,耦合性大大降低,这也就是IOC的原型
2.2 IOC本质
控制反转 IoC(Inversion of Control)是一种设计思想,DI(依赖注入)是实现IOC的一种方法,在没有IOC的程序中,我们使用面向对象编程,对象的创建与对象间的依赖关系完全硬编码在程序里,对象的创建由程序自己控制,控制反转后将对象的创建转移给第三方,所谓的控制反转就是获得依赖对象的方式反转了
IOC是Spring框架的核心内容,使用多种方式完美实现了IOC,可以使用XML配置,也可以使用注解,新版本的Spring也可以零配置实现IOC
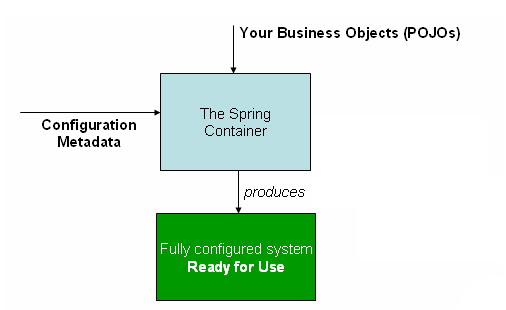
Spring容器在初始化时先读取配置文件,根据配置文件或元数据创建与组织对象存入容器中,程序使用时在从Ioc容器中取出需要的对象
采用XML方式配置Bean的时候,Bean的定义信息和实现是分离的,而采用注解的方式可以把两者合为一体,Bean的定义信息直接以注解的形式定义在实现类中,从而达到了零配置的目的
控制反转是一种通过描述(XML或注解)并通过第三方去生产或获取特定对象的方式,在Spring中实现控制反转的是IOC容器,其实现方法是依赖注入
3.HelloSpring
3.1 HelloSpring
新建一个maven项目,导入jar包
注:Spring需要导入commons-logging进行日志记录,我们利用maven,它会自动下载对应的依赖项
<!-- https://mvnrepository.com/artifact/org.springframework/spring-webmvc --><dependency><groupId>org.springframework</groupId><artifactId>spring-webmvc</artifactId><version>5.1.10.RELEASE</version></dependency>
1.编写一个Hello实体类
package com.jcsune.pojo;public class Hello {private String name;public String getName() {return name;}public void setName(String name) {this.name = name;}public void show(){System.out.println("Hello,"+name);}}
2.编写spring文件,这里我们可以命名为beans.xml
<?xml version="1.0" encoding="UTF-8"?><beans xmlns="http://www.springframework.org/schema/beans"xmlns:xsi="http://www.w3.org/2001/XMLSchema-instance"xsi:schemaLocation="http://www.springframework.org/schema/beanshttps://www.springframework.org/schema/beans/spring-beans.xsd"><!--bean就是java对象,由Spring创建和管理--><bean id="hello" class="com.jcsune.pojo.Hello"><property name="name" value="Spring"/></bean></beans>
3.进行测试
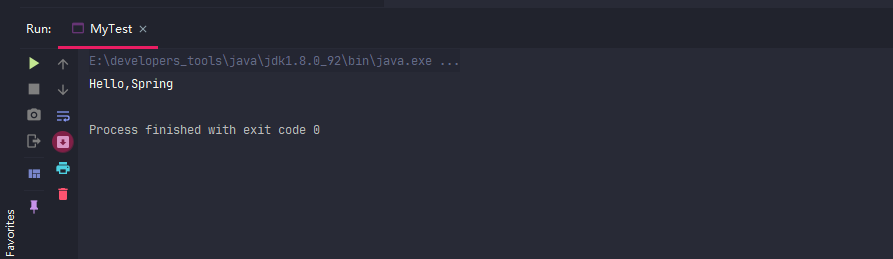
import com.jcsune.pojo.Hello;import org.springframework.context.ApplicationContext;import org.springframework.context.support.ClassPathXmlApplicationContext;public class MyTest {public static void main(String[] args) {//解析beans.xml文件,生成管理对应的Bean对象ApplicationContext context = new ClassPathXmlApplicationContext("beans.xml");//getBean:参数即为spring配置文件中bean的idHello hello=(Hello) context.getBean("hello");hello.show();}}
4.结果
思考
- Hello对象是由谁创建的? 答:Hello对象是由Spring创建的
- Hello对象的属性是怎么设置的? 答:hello对象的属性是由Spring容器设置的,这个过程就叫控制反转
- 控制:谁来控制对象的创建,传统应用程序的对象是由程序本身控制创建的,使用Spring后,对象是由Spring来创建的
- 反转:程序本身不创建对象,而变成被动的接收对象
依赖注入:就是利用set方法来进行注入的
IoC是一种编程思想,由主动的编程变成被动的接收
3.2 IoC创建对象的方式
通过无参构造方法来创建
- User.java
package com.jcsune.pojo;public class User {private String name;public User(){System.out.println("user无参构造方法");}public String getName() {return name;}public void setName(String name) {this.name = name;}public void show(){System.out.println("name="+name);}}
- beans.xml
<?xml version="1.0" encoding="UTF-8"?><beans xmlns="http://www.springframework.org/schema/beans"xmlns:xsi="http://www.w3.org/2001/XMLSchema-instance"xsi:schemaLocation="http://www.springframework.org/schema/beanshttps://www.springframework.org/schema/beans/spring-beans.xsd"><bean id="user" class="com.jcsune.pojo.User"><property name="name" value="jcsune"/></bean></beans>
- 测试类
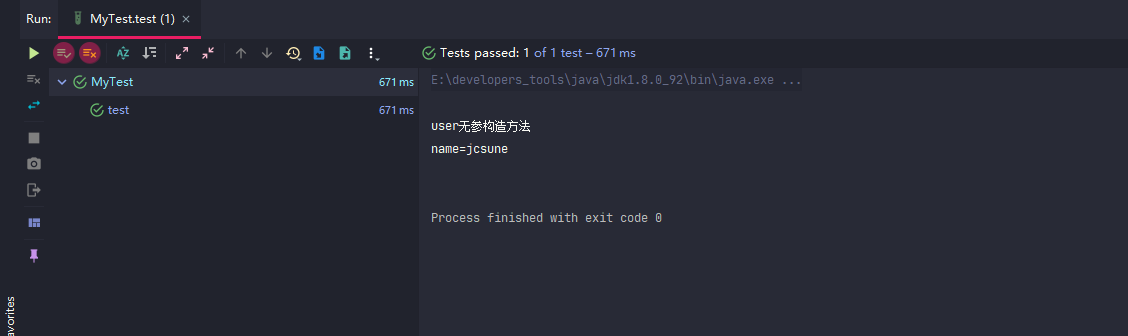
import com.jcsune.pojo.User;import org.junit.Test;import org.springframework.context.ApplicationContext;import org.springframework.context.support.ClassPathXmlApplicationContext;public class MyTest {@Testpublic void test(){ApplicationContext context = new ClassPathXmlApplicationContext("beans.xml");//在执行getBean的时候,user已经创建好了,通过无参构造User user = (User)context.getBean("user");//调用对象的方法user.show();}}
- 结果
通过有参构造方法来编写
- UserT.java
package com.jcsune.pojo;public class UserT {private String name;public UserT(String name){this.name=name;}public String getName() {return name;}public void setName(String name) {this.name = name;}public void show(){System.out.println("name="+name);}}
- bean.xml有三种方式来编写
<?xml version="1.0" encoding="UTF-8"?><beans xmlns="http://www.springframework.org/schema/beans"xmlns:xsi="http://www.w3.org/2001/XMLSchema-instance"xsi:schemaLocation="http://www.springframework.org/schema/beanshttps://www.springframework.org/schema/beans/spring-beans.xsd"><!--<bean id="user" class="com.jcsune.pojo.User">--><!-- <property name="name" value="jcsune"/>--><!--</bean>--><!-- 第一种根据index参数下标设置--><bean id="userT" class="com.jcsune.pojo.UserT"><!-- index指构造方法,下标从0开始--><constructor-arg index="0" value="jcsune2"/></bean><!-- 第二种根据参数名字来设置--><bean id="userT" class="com.jcsune.pojo.UserT"><!-- name指参数名--><constructor-arg name="name" value="jcsune2"/></bean><!-- 第三种根据参数类型设置--><bean id="userT" class="com.jcsune.pojo.UserT"><constructor-arg type="java.lang.String" value="jcsune2"/></bean></beans>
- 测试
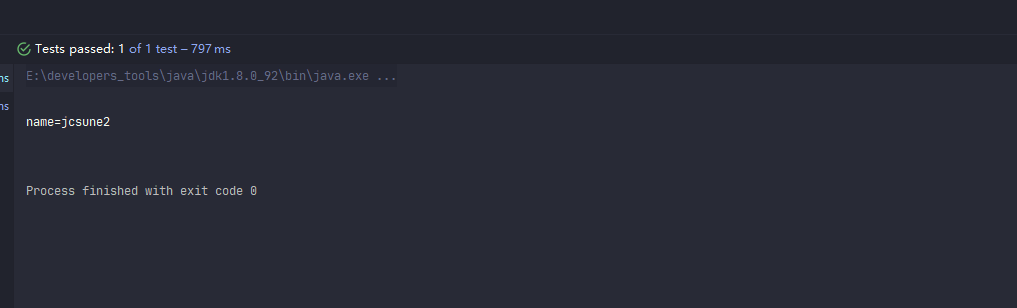
@Testpublic void testT(){ApplicationContext context = new ClassPathXmlApplicationContext("beans.xml");UserT userT=(UserT)context.getBean("userT");userT.show();}
- 结果
3.3 Spring配置
1. 别名
alias 设置别名,为bean设置别名,在获取bean的时候可以使用别名获取
<alias name="userT" alias="ccsune"/>
2.Bean的配置
<!--bean就是java对象,由Spring创建和管理--><!--id 是bean的标识符,要唯一,如果没有配置id,name就是默认标识符如果配置id,又配置了name,那么name是别名name可以设置多个别名,可以用逗号,分号,空格隔开如果不配置id和name,可以根据applicationContext.getBean(.class)获取对象;class是bean的全限定名=包名+类名--><bean id="hello" name="hello2 h2,h3;h4" class="com.kuang.pojo.Hello"><property name="name" value="Spring"/></bean>
3.import
团队的合作使用import来实现,它可以把多个配置文件合并为一个
<import resource="{path}/beans.xml"/>
4.依赖注入
4.1 概念
- 依赖注入(Dependency Injectiojn, DI)
- 依赖:指Bean对象的创建依赖于容器。 Bean对象的依赖资源
- 注入: 指Bean对象所依赖的资源,由容器来设置和装配
4.2 构造器注入
见 3.2 IoC创建对象的方式
4.3 Set注入(重点)
要求被注入的属性,必须有set方法,set方法的方法名是由set+属性首字母大写,如果属性是boolean类型,没有set方法。是is
测试类:
Address.java
package com.jcsune.pojo;public class Address {private String address;public String getAddress() {return address;}public void setAddress(String address) {this.address = address;}}
Student.java
package com.jcsune.pojo;import java.util.*;public class Student {private String name;private Address address;private String[] books;private List<String> hobbies;private Map<String,String> card;private Set<String> games;private String wife;private Properties info;public String getName() {return name;}public void setName(String name) {this.name = name;}public Address getAddress() {return address;}public void setAddress(Address address) {this.address = address;}public List<String> getHobbies() {return hobbies;}public void setHobbies(List<String> hobbies) {this.hobbies = hobbies;}public Map<String, String> getCard() {return card;}public void setCard(Map<String, String> card) {this.card = card;}public Set<String> getGames() {return games;}public void setGames(Set<String> games) {this.games = games;}public String getWife() {return wife;}public void setWife(String wife) {this.wife = wife;}public Properties getInfo() {return info;}public void setInfo(Properties info) {this.info = info;}public String[] getBooks() {return books;}public void setBooks(String[] books) {this.books = books;}@Overridepublic String toString() {return "Student{" +"name='" + name + '\'' +", address=" + address.getAddress() +", books=" + Arrays.toString(books) +", hobbies=" + hobbies +", card=" + card +", games=" + games +", wife='" + wife + '\'' +", info=" + info +'}';}}
beans.xml
<?xml version="1.0" encoding="UTF-8"?><beans xmlns="http://www.springframework.org/schema/beans"xmlns:xsi="http://www.w3.org/2001/XMLSchema-instance"xsi:schemaLocation="http://www.springframework.org/schema/beanshttps://www.springframework.org/schema/beans/spring-beans.xsd"><bean id="addr" class="com.jcsune.pojo.Address"><property name="address" value="河南"/></bean><bean id="student" class="com.jcsune.pojo.Student"><!-- 常量注入--><property name="name" value="小明"/><!-- Bean 注入--><property name="address" ref="addr"/><!-- 数组注入 --><property name="books"><array><value>西游记</value><value>水浒传</value><value>红楼梦</value></array></property><!-- List注入 --><property name="hobbies"><list><value>听歌</value><value>打游戏</value></list></property><!-- Map注入--><property name="card"><map><entry key="中国邮政" value="5487745887"/><entry key="建设银行" value="4448785884"/></map></property><!-- Set注入--><property name="games"><set><value>LOL</value><value>CF</value></set></property><!-- Null注入--><property name="wife"><null/></property><!-- Properties注入--><property name="info"><props><prop key="学号">15401700214</prop><prop key="性别">男</prop><prop key="姓名">小明</prop></props></property></bean></beans>
测试类
import com.jcsune.pojo.Student;import org.junit.Test;import org.springframework.context.ApplicationContext;import org.springframework.context.support.ClassPathXmlApplicationContext;public class MyTest {@Testpublic void test(){ApplicationContext context = new ClassPathXmlApplicationContext("beans.xml");Student student=(Student)context.getBean("student");System.out.println(student.toString());}}
运行结果:

4.5 p命名和c命名注入
User.java
package com.jcsune.pojo;public class User {private String name;private int age;public User() {}public User(String name, int age) {this.name = name;this.age = age;}public String getName() {return name;}public void setName(String name) {this.name = name;}public int getAge() {return age;}public void setAge(int id) {this.age= age;}@Overridepublic String toString() {return "User{" +"name='" + name + '\'' +", age=" + age +'}';}}
beansuser.xml
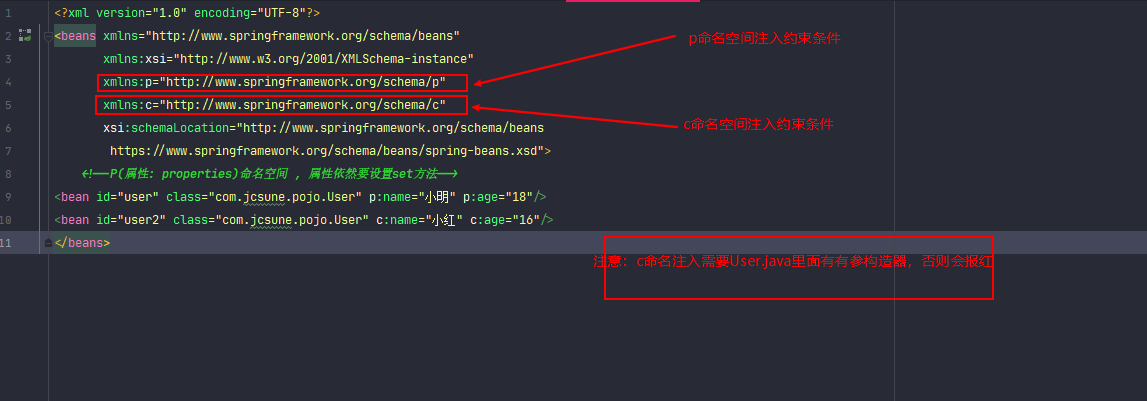
c就是所谓的构造器注入
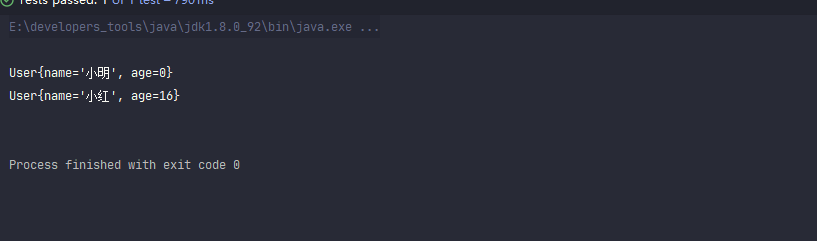
测试:
public void testT(){ApplicationContext context = new ClassPathXmlApplicationContext("beansuser.xml");User user=(User)context.getBean("user");System.out.println(user.toString());User user2=(User)context.getBean("user2");System.out.println(user2.toString());}
运行结果:

若有收获,就点个赞吧
0 人点赞
