go 程序如何运行
go的build 分为 编译和链接
编译过程分为:词法分析、语法分析、语义分析、优化。 然后生成汇编代码。 然后汇编器执行汇编代码。
词法分析: 针对 关键字、标识符、 字面量、 特殊符号等做转化处理。将源码的字符分割转化成一系列token。
语法分析:根据生成映射的token。然后将token生成语法树。语法分析可以检测语法是否错误。
语义分析:语法分析是否存在语法错误之后,然后对语义进行分分析,分析语义的意思,语义分析还包括变量类型的匹配、转换等。
中间代码生成: 从AST抽象语法树到SSA中间代码。
链接过程:将目标文件链接成可执行文件
go 程序启动
go build -gcflags "-N -l" -o hello main.og
-gcflags”-N -l” 是为了关闭编译器优化和函数内联,防止后面在设置断点的时候找不到相对应的代码位置。
通过
$ gdb hello
进入到gdb调试模式, 输入info files,然后根据 Entry point 的地址 输入 b *0x454dd0 这个地址是每次都不同的。然后得到程序的入口地址。
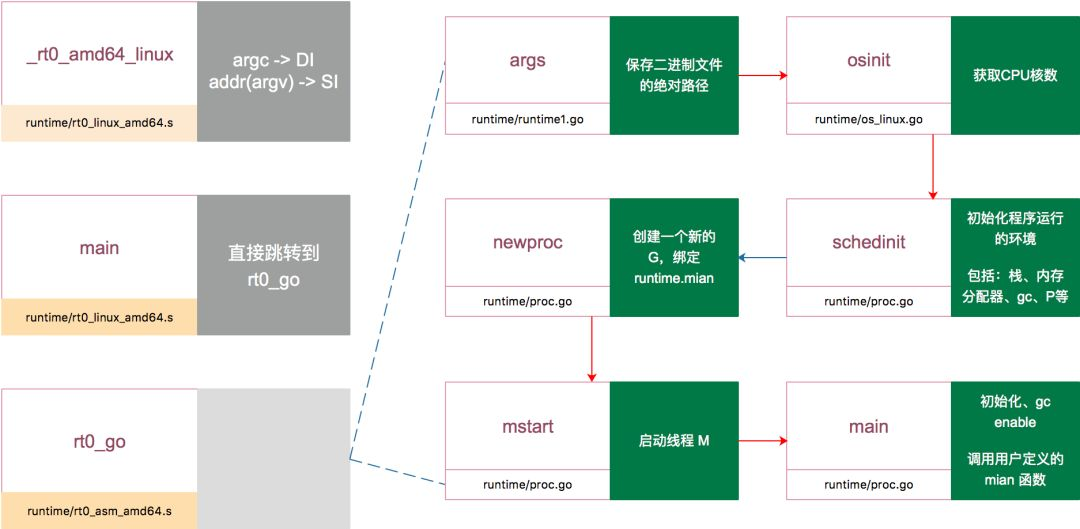
/src/runtime/rt0_linux_amd64.s/ _rt0_amd64_linux(SB)TEXT _rt0_amd64_linux(SB),NOSPLIT,$-8JMP _rt0_amd64(SB)/src/runtime/asm_amd64.s/TEXT _rt0_amd64(SB),NOSPLIT,$-TEXT _rt0_amd64(SB),NOSPLIT,$-8MOVQ 0(SP), DI // argcLEAQ 8(SP), SI // argvJMP runtime·rt0_go(SB)
TEXT runtime·rt0_go(SB),NOSPLIT,$0.......// set the per-goroutine and per-mach "registers"get_tls(BX)LEAQ runtime·g0(SB), CXMOVQ CX, g(BX)LEAQ runtime·m0(SB), AX// save m->g0 = g0MOVQ CX, m_g0(AX)// save m0 to g0->mMOVQ AX, g_m(CX)CLD // convention is D is always left clearedCALL runtime·check(SB)MOVL 16(SP), AX // copy argcMOVL AX, 0(SP)MOVQ 24(SP), AX // copy argvMOVQ AX, 8(SP)CALL runtime·args(SB)/// 初始化执行文件的绝对路径CALL runtime·osinit(SB)// 初始化 CPU 个数和内存页大小CALL runtime·schedinit(SB)// create a new goroutine to start program//要在 main goroutine 上运行的函数MOVQ $runtime·mainPC(SB), AX // entryPUSHQ AXPUSHQ $0 // arg size//新建一个 goroutine,该 goroutine 绑定 runtime.main,放在 P 的本地队列,等待调度CALL runtime·newproc(SB)POPQ AXPOPQ AX// start this M// 启动M,开始调度goroutineCALL runtime·mstart(SB)CALL runtime·abort(SB) // mstart should never returnRET// Prevent dead-code elimination of debugCallV1, which is// intended to be called by debuggers.MOVQ $runtime·debugCallV1(SB), AXRETDATA runtime·mainPC+0(SB)/8,$runtime·main(SB)GLOBL runtime·mainPC(SB),RODATA,$8
汇编函数 runtime·rt0_go(SB)主要工作就几个
�
- 检查运行平台的CPU,设置好程序运行需要相关标志。
- TLS的初始化。
- runtime.args、runtime.osinit、runtime.schedinit 三个方法做好程序运行需要的各种变量与调度器。
- runtime.newproc创建新的goroutine用于绑定用户写的main方法。
- runtime.mstart开始goroutine的调度。

src/runtime/osinit()
获取CPU核数与内存页大小。按照本文的测试工程:
- runtime.ncpu = 8
runtime.physPageSize = 4096
// BSD interface for threading.func osinit() {// pthread_create delayed until end of goenvs so that we// can look at the environment first.ncpu = getncpu()physPageSize = getPageSize()}
src/runtime/proc.go/schedinit() ```go // (gdb) b runtime.schedinit // Breakpoint 5 at 0x1029b60: file /usr/local/go/src/runtime/proc.go, line 458.
// The bootstrap sequence is: // // call osinit // call schedinit // make & queue new G // call runtime·mstart // // The new G calls runtime·main. func schedinit() { // raceinit must be the first call to race detector. // In particular, it must be done before mallocinit below calls racemapshadow. // 从TLS中获取g实例 g := getg()
if raceenabled {_g_.racectx, raceprocctx0 = raceinit()}// 设置全局线程数上限sched.maxmcount = 10000// 初始化一系列函数所在的PC计数器,用于tracebacktracebackinit()// 貌似是验证链接器符号的正确性moduledataverify()// 栈的初始化stackinit()// 内存分配器初始化mallocinit()mcommoninit(_g_.m)// 初始化AES HASH算法alginit() // maps must not be used before this callmodulesinit() // provides activeModulestypelinksinit() // uses maps, activeModulesitabsinit() // uses activeModulesmsigsave(_g_.m)initSigmask = _g_.m.sigmask// 获取命令行参数// 例如: ./$GOPATH/test/main test1 test2// 执行goargs得到runtime.argslice = []string len: 3, cap: 3, ["main","test1","test2"]goargs()// 获取所有的环境变量goenvs()parsedebugvars()// gc初始化gcinit()sched.lastpoll = uint64(nanotime())// P个数检查procs := ncpuif n, ok := atoi32(gogetenv("GOMAXPROCS")); ok && n > 0 {procs = n}if procs > _MaxGomaxprocs {procs = _MaxGomaxprocs}// 所有P的初始化if procresize(procs) != nil {throw("unknown runnable goroutine during bootstrap")}if buildVersion == "" {// Condition should never trigger. This code just serves// to ensure runtime·buildVersion is kept in the resulting binary.buildVersion = "unknown"}
}
src/runtime/proc.go/newproc->newproc1()<br />newproc1() 就比较长了,这儿概括下它做了的事情:1. 从TLS拿到当前运行的G实例,并且使绑定到当前线程的M实例不可抢占。1. 从M实例上取到P实例,如果P实例本地上有free goroutine就拿过去,没有就到全局调度器那儿偷一些过来。这两个地方都没有,就按照最低栈大小2K new一个G实例(即goroutine)。1. 然后设置好G实例上的各种寄存器的信息,SP、PC等。1. 将G实例的状态变更为Grunnable,放到P实例的本地可运行队列里等待调度执行,若队列满了,就把一半的G移到全局调度器下。1. 释放M实例的不可抢占状态。返回新的G实例。> 如果是程序刚启动,经由runtime.rt0_go调用newproc1时,实质干的事情就是创建一个G,把runtime.main(也包含main.main)放进去。在执行mstart时,触发调度。所以main实际是在一个新的G里运行的,而不是g0。```go// Create a new g running fn with narg bytes of arguments starting// at argp and returning nret bytes of results. callerpc is the// address of the go statement that created this. The new g is put// on the queue of g's waiting to run.func newproc1(fn *funcval, argp *uint8, narg int32, nret int32, callerpc uintptr) *g {_g_ := getg()if fn == nil {_g_.m.throwing = -1 // do not dump full stacksthrow("go of nil func value")}_g_.m.locks++ // disable preemption because it can be holding p in a local varsiz := narg + nretsiz = (siz + 7) &^ 7// We could allocate a larger initial stack if necessary.// Not worth it: this is almost always an error.// 4*sizeof(uintreg): extra space added below// sizeof(uintreg): caller's LR (arm) or return address (x86, in gostartcall).// 判断函数参数和返回值的大小是否超出栈大小if siz >= _StackMin-4*sys.RegSize-sys.RegSize {throw("newproc: function arguments too large for new goroutine")}_p_ := _g_.m.p.ptr()// 拿到一个free的goroutine,没有就从全局调度器偷newg := gfget(_p_)if newg == nil {// 新建g实例,栈大小2Knewg = malg(_StackMin)// g实例状态改成deadcasgstatus(newg, _Gidle, _Gdead)// 将此g实例加入全局的g队列里allgadd(newg) // publishes with a g->status of Gdead so GC scanner doesn't look at uninitialized stack.}if newg.stack.hi == 0 {throw("newproc1: newg missing stack")}if readgstatus(newg) != _Gdead {throw("newproc1: new g is not Gdead")}totalSize := 4*sys.RegSize + uintptr(siz) + sys.MinFrameSize // extra space in case of reads slightly beyond frametotalSize += -totalSize & (sys.SpAlign - 1) // align to spAlignsp := newg.stack.hi - totalSizespArg := spif usesLR {// 使用了LR寄存器存放函数调用完毕后的返回地址// caller's LR*(*uintptr)(unsafe.Pointer(sp)) = 0prepGoExitFrame(sp)spArg += sys.MinFrameSize}if narg > 0 {memmove(unsafe.Pointer(spArg), unsafe.Pointer(argp), uintptr(narg))// This is a stack-to-stack copy. If write barriers// are enabled and the source stack is grey (the// destination is always black), then perform a// barrier copy. We do this *after* the memmove// because the destination stack may have garbage on// it.if writeBarrier.needed && !_g_.m.curg.gcscandone {f := findfunc(fn.fn)stkmap := (*stackmap)(funcdata(f, _FUNCDATA_ArgsPointerMaps))// We're in the prologue, so it's always stack map index 0.bv := stackmapdata(stkmap, 0)bulkBarrierBitmap(spArg, spArg, uintptr(narg), 0, bv.bytedata)}}// 将newg.sched结构的内存置0memclrNoHeapPointers(unsafe.Pointer(&newg.sched), unsafe.Sizeof(newg.sched))// g实例的调度现场保存SP寄存器newg.sched.sp = sp// g实例自身也保存SP寄存器newg.stktopsp = sp// g实例的调度现场保存goexit函数的PC寄存器,这样goroutine执行完后都能做好回收newg.sched.pc = funcPC(goexit) + sys.PCQuantum // +PCQuantum so that previous instruction is in same function// g实例的调度现场关联上对应的gnewg.sched.g = guintptr(unsafe.Pointer(newg))// g实例的调度现场保存真正待执行函数的PC寄存器gostartcallfn(&newg.sched, fn)// g实例保存go语句的PC寄存器位置newg.gopc = callerpc// g实例保存待执行函数的PC寄存器位置newg.startpc = fn.fnif _g_.m.curg != nil {// 如果是在goroutine中再new 一个goroutine,就会有labels?newg.labels = _g_.m.curg.labels}// 存在一些go自己创建的goroutine,如果是就在全局调度器里把数量记录下来if isSystemGoroutine(newg) {atomic.Xadd(&sched.ngsys, +1)}// 设置该goroutine不能被gc扫newg.gcscanvalid = false// 设置goroutine状态为可运行casgstatus(newg, _Gdead, _Grunnable)// 检查当前p实例里的goroutine id缓存列表是否已经用完,是的话就从全局调度器那儿再获取_GoidCacheBatch个if _p_.goidcache == _p_.goidcacheend {// Sched.goidgen is the last allocated id,// this batch must be [sched.goidgen+1, sched.goidgen+GoidCacheBatch].// At startup sched.goidgen=0, so main goroutine receives goid=1._p_.goidcache = atomic.Xadd64(&sched.goidgen, _GoidCacheBatch)_p_.goidcache -= _GoidCacheBatch - 1_p_.goidcacheend = _p_.goidcache + _GoidCacheBatch}// 设置goroutine idnewg.goid = int64(_p_.goidcache)_p_.goidcache++if raceenabled {newg.racectx = racegostart(callerpc)}if trace.enabled {traceGoCreate(newg, newg.startpc)}// 把新建的G推进当前P的本地队列,并提优设置为下一个可运行的Grunqput(_p_, newg, true)if atomic.Load(&sched.npidle) != 0 && atomic.Load(&sched.nmspinning) == 0 && mainStarted {// main方法启动后才进入此if块。唤醒一个空闲的P,如果没有M则创建一个wakep()}_g_.m.locks--if _g_.m.locks == 0 && _g_.preempt { // restore the preemption request in case we've cleared it in newstack_g_.stackguard0 = stackPreempt}return newg}
src/runtime/mstart
mstart -> mstart1 -> schedule -> execute
- mstart做一些栈相关的检查,然后就调用mstart1。
- mstart1先做一些初始化与M相关的工作,例如是信号栈和信号处理函数的初始化。最后调用schedule。
- schedule逻辑是这四个方法里最复杂的。简单来说,就是要找出一个可运行的G,不管是从P本地的G队列、全局调度器的G队列、GC worker、因IO阻塞的G、甚至从别的P里偷。然后传给execute运行。
- execute对传进来的G设置好相关的状态后,就加载G自身记录着的PC、SP等寄存器信息,恢复现场继续执行。
GOROOT 和 GOPATH
GOROOT
GOPATH
srcpkgbinsrc 存放源文件,pkg 存放源文件编译后的库文件(归档文件),后缀为 .a;bin 则存放可执行文件
GO 命令详解
go build
-o 只能在编译单个包的时候出现,它指定输出的可执行文件的名字。
-i 会安装编译目标所依赖的包,安装是指生成与代码包相对应的 .a 文件,即静态库文件(后面要参与链接),并且放置到当前工作区的 pkg 目录下,且库文件的目录层级和源码层级一致。
至于 build flags 参数, build,clean,get,install,list,run,test 这些命令会共用一套:
| 参数 | 作用 |
|---|---|
| -a | 强制重新编译所有涉及到的包,包括标准库中的代码包,这会重写 /usr/local/go 目录下的 .a 文件 |
| -n | 打印命令执行过程,不真正执行 |
| -p n | 指定编译过程中命令执行的并行数,n 默认为 CPU 核数 |
| -race | 检测并报告程序中的数据竞争问题 |
| -v | 打印命令执行过程中所涉及到的代码包名称 |
| -x | 打印命令执行过程中所涉及到的命令,并执行 |
| -work | 打印编译过程中的临时文件夹。通常情况下,编译完成后会被删除 |
GOOS 和 GOARCH。这两个环境变量不用我们设置,系统默认的。GOOS 是 Go 所在的操作系统类型,GOARCH 是 Go 所在的计算架构。Mac 平台上这个目录名就是 darwin_amd64。
go install
go install 命令 会在工作目录生成 pkg 目录,GOBIN目录下生成对应的可执行文件
go run
go run 用于编译并运行命令源码文件。 -x 可以打印整个过程涉及到的命令,-work 可以看到临时的工作目录:

