简介
原因
- 作为前端开发,长期与浏览器打交道,需要或者说想要了解部分浏览器的内部流程,但是功能齐全的浏览器又十分复杂,所以想通过实现个玩具来了解流程。
- 我想练下TS。。。
浏览器流程
想要实现一个渲染引擎,需要先确认渲染引擎是浏览器的哪一部分,具体是做什么的,有什么功能。
先来看一下Chrome浏览器:
- Browser Process:
- 负责包括地址栏,书签栏,前进后退按钮等部分的工作
- 负责处理浏览器的一些不可见的底层操作,比如网络请求和文件访问
- Renderer Process:
- 负责一个 tab 内关于网页呈现的所有事情
- Plugin Process:
- 负责控制一个网页用到的所有插件,如 flash
- GPU Process
- 负责处理 GPU 相关的任务

很明显渲染引擎部分肯定是存在于Renderer Process下了,那我们来看一下渲染进程的构成: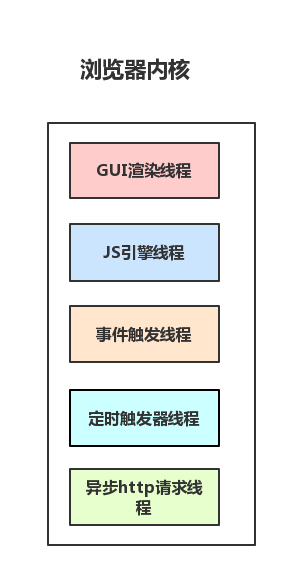
而我们要实现的“渲染”引擎,仅仅是渲染进程中的GUI渲染线程这一小部分。
实现内容
这里是一张网上流传很久的图,就按照它来做。
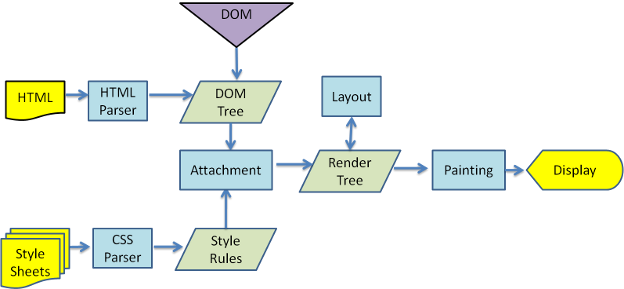
来源(可能需要合理上网):https://www.html5rocks.com/zh/tutorials/internals/howbrowserswork/
实现
下面我们就按照上图一步一步的来做,因为掺杂代码且篇幅较长,阅读时间可能会比较长,大家可以选择感兴趣的章节查看。
标签树(HTML Parser)
标签树(HTML Parser)
我们首先来定一下DOM树的数据格式,然后实现一个解析器(不确定我实现的算不算解析器)
简易DOM
当在浏览器里console.dir(document)的时候,可以看到详细的DOM对象的属性,很多,肯定写不完…… 还是写个简单的吧。
首先,树就是节点带个子节点数组:
export interface Node {children:Array<Node>,node_type:NodeType}// 构建nodeexport function buildNode(name: string, attrs?: AttrMap,children?:Array<Node>):Node {// 因篇幅省略}
详细解释一下上面的类型
这个NodeType暂时只实现了文本节点和普通节点,而且为了方便文本节点没有设置任何属性(后续样式直接继承了父节点)。
而通用节点也是使用了最简单的描述方式: 标签名、标签属性。
// 定义一个全局的stringHash类型export type strHash = {[details: string]:string}// 这里NodeType有两种类型,一直不知道TS这样使用对不对,有更好的使用方式还请大佬评论提点export type NodeType = ElementData | string// node节点的属性字典export type AttrMap = strHashexport class ElementData {tag_name: string;attributes: AttrMap;constructor(tag_name: string, attributes: AttrMap){this.tag_name = tag_namethis.attributes = attributes}idGet():string{return this.attributes['id']}classGet(){return this.attributes?.["class"]?.split(' ')||[]}}
解析HTML
HTML的解析器其实十分复杂,因为他有大量的错误语法兼容。市面上也有很多成熟的实现:gumbo-parser、Beautiful Soup 等等,而我只准备实现其中最基础的标签、属性、文字。
入口方法:
parseHtml(html: string):dom.Node{let nodes = new Parser(0,html).parse_nodes()if(nodes.length==1){return nodes[0]}else{return dom.buildNode('html',{},nodes)}}
我使用指针扫描字符串,下面是指针和最基础的几个扫描函数。
class Parser{pos: number;input: string;constructor(pos: number, input: string){this.pos = posthis.input = input}// 下一字符next_char():string{return this.input[this.pos]}// 返回当前字符,并将this.pos+1。next_char_skip():string {let iter = this.input[this.pos]this.pos++return iter;}// 是否遍历到字符的最后一个is_over():boolean{return this.pos>=this.input.length}// 当前位置的开头starts_with_point(str:string):boolean {return this.input.startsWith(str,this.pos)}/*** 此函数是解析类的核心方法,根据传入的匹配函数来连续匹配符合某种规则的字符* 既能获取符合规则的字符串,又能跳过指定字符串,后续解析大多基于此方法。* @param test 匹配字符函数* @returns 符合规则的连续字符*/check_str(test:(str:string)=>boolean):string {let result:string = ''while (!this.is_over() && test(this.next_char())) {result=`${result}${this.next_char_skip()}`}return result}/// ……其余详细函数}
有了基础方法,后面就是利用基础方法匹配语法。注:本小节下方所有函数均为Parser类中的函数
先来个简单的,跳过空格/回车等无用字符:
check_str_empty(){const reg = /\s/this.check_str((str)=>reg.test(str))}
标签、属性名都是连续的字母/数字字符串,所以:
// 解析 标签 或者 属性名 (就是匹配一串字母、数字的字符串)parse_tag_name():string {return this.check_str((str)=>{const regWord = /[A-Za-z0-9]/;if(str.match(regWord)){return true}return false})}
然后,终于到正式解析节点的部分了:
// 解析一个节点// 如果是"<"就解析Dom,否则就当文本节点解析parse_node():dom.Node{if (this.next_char()=="<") {return this.parse_ele_node()}else{return this.parse_text_node()}}// 解析一个文本节点parse_text_node():dom.Node{const textNode = this.check_str(str=>str!='<')return dom.buildNode(textNode)}// 解析一个dom节点parse_ele_node():dom.Node{if (this.next_char_skip() == '<') {// 初始标签,< 之后就是标签名,直接调用解析标签名方法let tag_name = this.parse_tag_name();// HTML是在标签名后面直接写属性,所以解析完标签名之后,解析属性let attrs = this.parse_attributes();// 解析完属性如果是闭合标识那就继续if (this.next_char_skip() == '>') {// 标签的开始部分就完成了,这时候进入标签内部了,内部就是子节点,见下方let children = this.parse_nodes();// 下面这部分是判断结束标签的语法和是否与开始标签相同if (this.next_char_skip() == '<'&&this.next_char_skip() == '/'&&this.parse_tag_name() == tag_name&&this.next_char_skip() == '>'){return dom.buildNode(tag_name,attrs,children)}else{throw new Error('HTML模板错误,结束标签错误')}}else{throw new Error('HTML模板错误,不以’>‘结束')}}else{throw new Error('HTML模板错误,不以’<‘开始')}}// 解析一组节点 就是一直匹配到结束parse_nodes():Array<dom.Node>{// 函数在parse_ele_node中调用,而函数内又调用了parse_node,形成递归let nodesArr = []while(1){this.check_str_empty();if (this.is_over() || this.starts_with_point("</")) {break;}nodesArr.push(this.parse_node());}return nodesArr}
看到这里,解析一个dom节点的流程就基本清晰了,耐心点,我们再看看流程中的参数解析的过程:
// 解析参数主要就是匹配到“=”,等号左侧为属性名,右侧为属性值,直到发现“>”为止// 流程中掺杂部分错误处理,仅此而已parse_attributes():dom.strHash{let obj = {}while(this.next_char()!='>'){this.check_str_empty()let [name, value] = this.parse_attrs()obj[name] = value}return obj}// 解析参数-内部参数parse_attrs():Array<string>{let name = this.parse_tag_name();if (this.next_char_skip()!="=") {throw new Error("标签内属性设置无‘=’")}let value = this.parse_attr_value();return [name, value]}// 解析参数-内部参数值parse_attr_value():string{let open_quote = this.next_char_skip();if (open_quote != '"'&&open_quote != '\'') {throw new Error('标签属性格式错误')}let value = this.check_str(c=> c != open_quote);if (open_quote != this.next_char_skip()) {throw new Error('标签属性格式错误')}return value}
至此,我们的HTML解析就结束了
import {parseHtml} from './html'const parsed_dom = parseHtml(htmlStr)
此时这个parsed_dom就是一个我们最初定义的DOM树,至此我们的HTML解析工作就完成了。
样式(CSS Parser)
CSS的解析我同样不会做太多的特殊处理,只确保实现基础能力,能够正常解析以下代码即可:
* { display: block;padding: 12px; }div .a { background: #ff0000; }
由此推断,我们需要实现:选择器解析、属性解析
选择器解析:简单选择器、选择器组合
属性解析:普通字符串、像素字符串、16进制颜色字符串
实现内容定位完成,下面开始实现,基本方式和HTML解析基本一致,先定义样式规则对象,之后将符合CSS语法的字符串解析为规则对象。
样式规则Rules
上面我们已经简单的解释过了,一个规则应该是选择器组和属性组的结合:
// 最终输出,一组样式规则export interface StyleSheet {rules:Array<Rules>}export interface Rules{selectors:Array<Selector>, // 选择器declarations:Array<Declaration<string|ColorValue>> // 属性}
参照上方的计划,目前准备实现的是简单选择器,未进行其他类型选择器的实现。所以选择器对象:
export interface Selector {Simple:SimpleSelector;}
而简单选择器我们都知道,根据类、ID、标签等选择器类型来界定了一个“权重”。从链接里可以看到,权重是根据“有无”来界定的,也就是存在ID选择器的情况下,不管有多少类选择器,ID选择器都是最高权重,但是这里为了方便,就直接按照最简单的理解方式实现了权重计算。
简单选择器类:
export class SimpleSelector{tag_name: Array<string>id:Array<string>class:Array<string>constructor(tag_name: Array<string>,id:Array<string>,className:Array<string>){this.tag_name = tag_namethis.id = idthis.class = className}specificity=():number=>this.id.length*100+this.class.length*10+this.tag_name.length}
另一个就是属性,单个属性例如: margin: auto; 其实就是键值对。
目前属性值的类型只支持字符串和颜色,我希望后面能增加一些,但是在TS的使用上,这种 或 逻辑的类型一直处理不太好,后续弄明白再回来优化,但是类型大概就是这样:
// 属性值export interface Declaration<T>{name:string,value:T}export interface ColorValue {r: number,g: number,b: number,a: number}
解析CSS
定义好类型之后就可以进行CSS的解析了,入口函数:
export function parseCss(source:string):StyleSheet{const parser = new Parser(0,source);return {rules:parser.parse_rules()}}
其实解析类的基础方法和HTML解析器基本一致,这里就不赘述了,主要看一下选择器解析和属性解析。
选择器解析:
// 解析选择器parse_selectors():Array<Selector>{let selectors:Array<Selector> = []this.check_str_empty()selectors.push({Simple:this.parse_simple_selector()})this.check_str_empty()const nextStr = this.next_char()if(nextStr=='{'){this.check_str_empty()return selectors}else{throw new Error('类型选择器编排格式错误')}}// 解析单个选择器parse_simple_selector():SimpleSelector{let tag_name=[]let ids=[]let className =[]while(!this.is_over()){this.check_str_empty()const nextStr = this.next_char()if (nextStr === '#') {this.next_char_skip()ids.push(this.parse_identifier())}else if(nextStr === '.'){this.next_char_skip()className.push(this.parse_identifier());}else if(nextStr === '*'){this.next_char_skip()}else if (valid_identifier_char(nextStr)){tag_name.push(this.parse_identifier())}else{break}}return new SimpleSelector(tag_name,ids,className)}
属性解析相对也比较简单:
// 解析单个属性(css的键值对)parse_declaration():Declaration<string|ColorValue>{this.check_str_empty()// 解析属性值let prototype_name = this.parse_identifier()this.check_str_empty()const nextStr = this.next_char_skip()if (nextStr==':') {this.check_str_empty()// 解析属性值let value = this.parse_value()this.check_str_empty()if (this.next_char_skip()==';') {return {name:prototype_name,value:value}}else{throw new Error('css属性没有;关闭')}}else{throw new Error('css属性语法错误')}}
属性解析部分只展示了整体的逻辑,解析逻辑都大同小异,如果认真做了HTML解析,这部分应该比较好理解,详细代码可以去CSS解析查看。
import {parseCss} from './css'const parsed_style_sheet = parseCss(cssStr)
此时这个parsed_style_sheet就是一个个我们定义的StyleSheet规则组。
渲染树(attchment)
在这一步准备实现的是属性分配,该模块是将前面两个解析器的解析结果作为输入,并按照一定的规则给DOM节点添加CSS属性。最终的输出结果是一棵带有CSS样式的树。
样式树单个节点对象:
// 单个样式树节点export class StyleNode{node:dom.Nodechildren:Array<StyleNode>specified_values:myHash<string|css.ColorValue>constructor(node,children,specified_valu){this.node = nodethis.children = childrenthis.specified_values = specified_valu}/// 本章节可暂时忽略以下代码// 如果存在,就返回属性值value(name:string){return this.specified_values[name]}}
这部分是我个人认为在整个流程中最简单的部分,主要是因为我并未实现:继承、初始值、行内属性、!important 声明等兼容。当摒弃了这些复杂的内容后,这部分的核心逻辑就仅仅是遍历DOM树,并根据id、选择器、标签名匹配CSS并关联的操作。
我们先实现单个节点的匹配操作:
/*** 获取有对应class/tagname/id的规则组,并给权重* @param elem* @param stylesheet* @returns*/function match_rules(elem:dom.ElementData,stylesheet:css.StyleSheet):Array<ruleHight>{return stylesheet.rules.map(rule =>{return {declarations:rule.declarations,selector_specificity_all:match_selector(rule.selectors,elem)}}).filter(ruleHight=>ruleHight.selector_specificity_all>0)}/*** 获取选择器组和节点匹配的权重* @param selector css选择器* @param element dom节点*/function match_selector(selectors:Array<css.Selector>,element:dom.ElementData):number{return selectors.reduce((prev,selector)=>{if(matches_simple_selector(selector.Simple,element)){// 这里这个+1操作,是为了适配 * 选择器,在之前的css解析中,* 选择器的权重为0。// 当总权重为0时会在下一步被过滤掉,所以多写一个+1,正式排序权重为上一步计算权重+1return selector.Simple.specificity()+prev+1}},0)}// 要测试简单选择器是否与元素匹配,只需查看每个选择器组件function matches_simple_selector(simple:css.SimpleSelector,element:dom.ElementData):boolean{const tag_name_has:boolean = simple.tag_name.length===0||simple.tag_name.includes(element.tag_name)const id_arr:boolean = simple.id.length===0||simple.id.includes(element.idGet())const class_arr:boolean = simple.class.length===0||simple.class.some(cl=>{return element.classGet().includes(cl)})return tag_name_has&&id_arr&&class_arr}
通过以上方法,可以给单个节点匹配对应的样式,且有对应样式的权重。我则是简单的按照权重从小到大排序,之后依次赋属性值,这样权重大的属性就会覆盖之前赋值的小权重属性。
/*** 获取对应dom的style值* @param elem dom的参数* @param stylesheet 样式树* @returns*/function specified_values(elem:dom.ElementData,stylesheet:css.StyleSheet):myHash<string|css.ColorValue>{let res = {}const rules = match_rules(elem,stylesheet)rules.sort((a,b)=>{return a.selector_specificity_all-b.selector_specificity_all})rules.forEach(ruleHight=>{ruleHight.declarations.forEach(declaration=>{res[declaration.name] = declaration.value})})return res}
现在就获取了一个节点的完整样式属性,然后最后一步,直接递归遍历树,每一个节点执行对应的获取样式属性的方法即可:
// 样式表export function get_style_tree(root:dom.Node, stylesheet:css.StyleSheet,parent:myHash<string|css.ColorValue>={}):StyleNode {// 如果是文本节点就直接取父节点的样式(还是做了一点点继承,主要是没有单独的文本节点样式。。。。)let style_values:myHash<string|css.ColorValue> =typeof root.node_type !== 'string'?specified_values(root.node_type,stylesheet):parentlet style_tree:StyleNode = new StyleNode(root,root.children.map(node => get_style_tree(node,stylesheet,style_values)),style_values)return style_tree}
详细代码可查看 style文件。
import {get_style_tree} from './style'const pStyle = get_style_tree(parsed_dom,parsed_style_sheet)
最终根据DOM树和StyleSheet规则组,生成了带有样式属性的style_tree。
布局计算(Layout)
我觉得直接跳到这里的肯定多。毋庸置疑,这部分一定是最难的,我在项目刚刚开始的时候就期待着这部分的实现。当然,和之前一样,依旧不能实现一个完整的布局内容,本模块我只实现了最简单的display:block块的布局。
而计算布局的最终结果,则是一个“盒模型”树,我们将通过上面得到的样式树计算他的位置和大小。说来惭愧,之前一直不理解Layout过程的核心应该是盒模型,直到读到这篇文章。
既然我们最后要得到一个盒模型,那我们先来定义一个盒模型:
interface EdgeSizes{left: number,right: number,top: number,bottom: number,}// 大小和位置的信息集export class Rect{x: numbery: numberwidth: numberheight: numberconstructor(x: number, y: number, width: number, height: number){this.x = xthis.y = ythis.width = widththis.height = height}// 套壳子,比如,当前盒子是content盒子,传入padding,返回一个padding_box// 根据Dimensions中的使用就很好理解了expanded_by(edge: EdgeSizes):Rect {return new Rect(this.x - edge.left,this.y - edge.top,this.width + edge.left + edge.right,this.height + edge.top + edge.bottom,)}}// 盒模型,margin_box、border_box、padding_box、content等均为Rect类,可以直接得到大小、位置信息。export class Dimensions{// 相对于原点的位置,内容大小content:Rect// 四个方向尺寸padding: EdgeSizesborder: EdgeSizesmargin: EdgeSizesconstructor(content:Rect,padding:EdgeSizes,border: EdgeSizes,margin: EdgeSizes){this.content = contentthis.padding = paddingthis.border = borderthis.margin = margin}padding_box():Rect{return this.content.expanded_by(this.padding)}border_box():Rect{return this.padding_box().expanded_by(this.border)}margin_box():Rect{return this.border_box().expanded_by(this.margin)}}
布局树则是盒模型的树,这棵树的构建要分为两步进行,首先我们要先构建一个内部存储盒模型信息的完整的树结构,之后再遍历树进行定位计算。
为什么一定要先构建树后计算呢?因为我们子节点的宽度不仅仅是由css规范的,而且默认情况下还等于父节点宽度。同时,父节点高度默认情况下也要根据子节点高度和来计算。而如果没有提前构建完整的树,那我们一定是无法计算父节点高度的!
构建布局树
export function defaultDimensions():Dimensions{return new Dimensions(defaultRect(),defaultEdgeSizes(),defaultEdgeSizes(),defaultEdgeSizes())}// 布局块类型export enum BoxType {BlockNode,NoneBlock,InlineBlockNode,InlineNode,TextNode}// 布局树的节点export class LayoutBox{dimensions:Dimensions // 盒模型box_type:BoxType // 盒子类型children:Array<LayoutBox>style_node:StyleNode|nullconstructor(box_type:BoxType,children: Array<LayoutBox>,style_node:StyleNode,dimensions:Dimensions=defaultDimensions()){this.dimensions = dimensionsthis.box_type = box_typethis.children = childrenswitch(box_type){case BoxType.BlockNode:case BoxType.InlineBlockNode:case BoxType.InlineNode:case BoxType.TextNode:this.style_node = style_nodebreakcase BoxType.NoneBlock:default:this.style_node = null}}// 布局layout(containing_block: Dimensions):void{}///// 下方详解}
BoxType是一个布局块类型的枚举,是根据样式树中display属性来判断的,首先来说当前确实未实现除block块之外的布局,但是依旧做了简单分类,方便以后拓展,当前对block/inline类型做了不同的处理,如果是block类型则作为单独子节点存储,如果是inline类型,则统一放到一个子节点下,如果是display:none则直接跳过,不参与布局计算,代码如下:
function build_layout_tree(style_node:StyleNode):LayoutBox{let root = new LayoutBox(style_node.display(),[],// 这一步主要是将子节点置空(我个人认为后面占用内存小)new StyleNode(style_node.node,[],style_node.specified_values))style_node.children.forEach(child_node =>{root.pushChild(child_node)})return root}export class LayoutBox{///// 同上方LayoutBox类,属性见上方代码// 不同子节点处理方案pushChild(child_node:StyleNode){switch(child_node.display()){case BoxType.BlockNode:case BoxType.TextNode:this.children.push(build_layout_tree(child_node))breakcase BoxType.InlineNode:case BoxType.InlineBlockNode:this.inlineChild(child_node).children.push(build_layout_tree(child_node))breakcase BoxType.NoneBlock:break}}/*** 获取行内块* 如果当前父节点本身就是InlineNode,那就直接返回父节点* 如果当前父节点不是InlineNode,那看当前最后的子节点是不是InlineNode,如果是就直接用它,如果不是就新建一个来用* @returns 一个InlineNode类型的节点*/inlineChild(node:StyleNode):LayoutBox{if(this.box_type === BoxType.InlineNode||this.box_type === BoxType.NoneBlock){return this}else{if(!this.children.length||this.children[this.children.length-1].box_type!==BoxType.InlineNode){this.children.push(new LayoutBox(BoxType.InlineNode,[],node))}return this.children[this.children.length-1]}}}
布局计算
当然布局计算也是“偷工减料”版,并未实现:定位、浮动等一系列复杂规则。
在上文中已经提到过,节点的宽度取决于它的父节点,而节点的高度则取决于它的子节点,这就意味着我们在计算宽度时,要自上而下的遍历树,以便在子节点宽度计算时父节点已经完成宽度计算,而在计算高度时,则要自下而上的遍历树,以便父节点的高度计算时,子节点已经完成高度的计算。
我们通过这样一段代码来实现:
export class LayoutBox{///// 同上方LayoutBox类,属性见上方代码 ......// 块模式布局layout_block(containing_block: Dimensions):void {// console.log(containing_block);// 计算块宽度(宽度取决于父节点,所以先计算宽度在计算子节点)this.calculate_block_width(containing_block)// 计算块的位置this.calculate_block_position(containing_block);// 计算子节点(计算宽度后计算子节点)this.calculate_block_children()// 计算块高度(高度取决于子节点,所以先计算子节点之后才能处理高度)/// 第二轮,增加个文本节点的高度if (this.box_type === BoxType.TextNode) {// 文本节点的高度计算this.calculate_Text_hight()}else{this.calculate_block_hight()}}}
我们在子节点计算之前先进行宽度计算,在高度计算之前先进行子节点的计算,本质是利用递归过程中,函数调用栈中的缓存,直接使用调用栈中的父节点宽度和子节点高度。
下面来看下我认为最复杂的宽度计算(开始前没思考过宽度计算如此复杂),我会分步来介绍,首先先获取属性:
// 拓展了前面style中的类,来获取值/*** 获取属性值,如果name找不到就找fallback_name,还没有就直接返回默认值value* @param name* @param fallback_name* @param value*/lookup(name:string, fallback_name:string,value:string|css.ColorValue){return this.value(name)||this.value(fallback_name)||value;}
例如: let margin_left = style.lookup("margin-left", "margin", '0'); 用来取margin-left 的值
然后先计算当前的默认宽度(auto暂时按照0计算),因为后续所有宽度适配逻辑,都是根据当前宽度和父节点宽度对比计算的。
/*** 计算宽/高 的和,auto 暂时当做0* @param restNums 所有参数* @returns 所有参数的和*/function add_px(...restNums:string[]){return restNums.reduce((prev,next)=>{let nextNums:numberif(next=='auto'){nextNums = 0}else{nextNums = Number(next)if(Number.isNaN(nextNums)){throw new Error('布局过程中发现错误px类型')}}return nextNums+prev},0)}
然后用子节点宽度和父节点宽度对比,如果子节点宽度大于父节点宽度,且子节点margin设置的auto,则自动赋值为0,此时子节点自动被父节点截取。
如果子节点宽度小于父节点宽度,则按照各种规则给他填充,最终还是要占满,大家可以看下浏览器的控制台,会有自动补齐但是无法选中的margin。具体规则见代码:
export class LayoutBox{///// 同上方LayoutBox类,属性见上方代码 ......// 计算宽度calculate_block_width(containing_block: Dimensions){if(this.style_node){let style = this.style_nodelet margin_left = style.lookup("margin-left", "margin", '0');let margin_right = style.lookup("margin-right", "margin", '0');let border_left = style.lookup("border-left-width", "border-width", '0');let border_right = style.lookup("border-right-width", "border-width", '0');let padding_left = style.lookup("padding-left", "padding", '0');let padding_right = style.lookup("padding-right", "padding", '0');let width = style.value("width") || 'auto'let total = add_px(margin_left as string,margin_right as string,border_left as string,border_right as string,padding_left as string,padding_right as string,width as string);// 如果宽度超了,而且margin设置的auto,那就给他默认值0if (width != 'auto' && total > containing_block.content.width) {if (margin_left == 'auto') {margin_left = '0'}if (margin_right == 'auto') {margin_right = '0'}}// 如果宽度小了,按照各种规则给他弄满,最终还是要占满(用margin补)let underflow = containing_block.content.width - total;const [width_auto,margin_r_auto,margin_l_auto] = [width=='auto',margin_right=='auto',margin_left=='auto']if(width_auto){// 如果宽度是自适应if (margin_l_auto) margin_left = '0'if (margin_r_auto) margin_right = '0'if (underflow >= 0) {// 那宽度直接等于需要补充的值width = `${underflow}`} else {//或者已经超出了,则margin_right变短(也就是右侧截掉)width = '0'margin_right = `${Number(margin_right)+underflow}`}}else{// 如果宽度固定if(margin_l_auto&&margin_r_auto){// 左右都自适应,各取一半margin_left = `${underflow/2}`margin_right = `${underflow/2}`}else{if(!margin_l_auto&&!margin_r_auto){// 左右都不自适应,margin_right自己去适应,还要计算上自己本身的值margin_right = `${Number(margin_right)+underflow}`}else if(margin_r_auto){// 右自适应margin_right =`${underflow}`}else{// 左自适应margin_left =`${underflow}`}}}// 盒模型开始赋值let di = this.dimensions;di.content.width = Number(width)di.padding.left = Number(padding_left)di.padding.right = Number(padding_right)di.border.left = Number(border_left)di.border.right = Number(border_right)di.margin.left = Number(margin_left)di.margin.right = Number(margin_right)}}}
下面就是相对简单的位置布局了,因为我们取消了特殊布局和浮动,所以我们只需要根据父节点的padding/margin/border等属性进行子节点的XY定位就好了,这里唯一一个思考点在于Y轴,Y轴按照正常页面布局流,当前节点应该在同级前一个节点的底部,而我们的算法在执行上一个子节点时会将父节点height增加,所以当前Y值直接取值父节点的最底部即可:
// 计算位置calculate_block_position(containing_block: Dimensions){let style = this.style_nodeif (style) {let d = this.dimensions;// 这里很有意思,上一个执行的子节点会将父节点height增加,所以当前的Y值直接// 可以取父节点的高度,父节点就是参数 containing_block// 如果是auto变为0const getNumber = (str:string):number=>{if (str == 'auto') {return 0}return Number(str)}d.margin.top = getNumber(style.lookup("margin-top", "margin", '0') as string)d.margin.bottom = getNumber(style.lookup("margin-bottom", "margin", '0') as string)d.border.top = getNumber(style.lookup("border-top-width", "border-width", '0') as string)d.border.bottom = getNumber(style.lookup("border-bottom-width", "border-width", '0') as string)d.padding.top = getNumber(style.lookup("padding-top", "padding", '0') as string)d.padding.bottom = getNumber(style.lookup("padding-bottom", "padding", '0') as string)d.content.x = containing_block.content.x +d.margin.left + d.border.left + d.padding.left;d.content.y = containing_block.content.height + containing_block.content.y +d.margin.top + d.border.top + d.padding.top;}}
子节点,递归调用方法,除此之外额外操作就是给父节点的高度赋值。
// 计算子节点calculate_block_children(){// 直接把孩子递归,但是记得在递归过程中取高度出来const children = this.children,di=this.dimensionsfor (const child of children) {child.layout(di);di.content.height+=child.dimensions.margin_box().height;}}
最后,高度计算,其实就是查看有没有明文的高度属性,如果没有则使用子节点计算时加好的:
// 计算高度calculate_block_hight(){// 如果有明确的高度则使用明确高度,如果没有就直接使用已存在的(子节点布局时加的)if (this.style_node) {const cssHight = this.style_node.value('height')if (cssHight&&cssHight!=='auto') {this.dimensions.content.height = Number(cssHight);}}}
至此,我们的布局计算就完成了,这时候回想一下,我们将HTML字符串和CSS字符串变为了一堆有位置、有尺寸、有颜色的盒子对象,还挺神奇的。
渲染(Painting)
最后则是将盒子渲染成图像的过程,浏览器将这一过程称之为“光栅化”,浏览器使用了Skia、Direct2D等图形库来实现,而我则借助了node-canvas(node层的图形库似乎真的很少)实现。
按照惯例,只做最简单实现,当前只实现了绘制矩形和绘制文字:
function parseFloat(color:ColorValue):string{return "#" +("0" + color.r.toString(16)).slice(-2) +("0" + color.g.toString(16)).slice(-2) +("0" + color.b.toString(16)).slice(-2)}namespace PaintingDraw{export class drawRectangle{color?:ColorValuerect:Rectconstructor(rect:Rect,color?:ColorValue){this.color = colorthis.rect = rect}drawItem(context:CanvasRenderingContext2D){context.fillStyle = this.color?parseFloat(this.color):'transparent'const rect = this.rectcontext.fillRect(rect.x, rect.y, rect.width, rect.height)}}export class drawText{color:ColorValuerect:Recttext:stringconstructor(text:string,rect:Rect,color:ColorValue={r:0,g:0,b:0,a:255}){this.color = colorthis.text = textthis.rect = rect}drawItem(context:CanvasRenderingContext2D){context.fillStyle = this.color?parseFloat(this.color):'transparent'const rect = this.rectconst fillStyle = this.color?parseFloat(this.color):'transparent'context.textBaseline = 'top'context.fillStyle = fillStylecontext.font = `${rect.height}px Impact`context.fillText(this.text, rect.x, rect.y)}}}
渲染类构建完毕,下面我会将整棵树变为一个渲染操作列表,之后遍历这个列表,按顺序进行图形绘制:
// 构建渲染列表function build_display_list(layout_root: LayoutBox):DisplayList {let list:DisplayList = []build_layout(list, layout_root);return list;}function build_layout(list:DisplayList, layout_root:LayoutBox){// console.log(layout_root.box_type);if (layout_root.box_type===BoxType.TextNode) {// 绘制文字build_layout_Text(list, layout_root)}else if(layout_root.box_type===BoxType.BlockNode){// 绘制矩形build_layout_box(list, layout_root)}for (const boxChild of layout_root.children) {build_layout(list,boxChild)}}
下面我们再来看一下矩形的绘制,矩形的绘制主要分两步,背景和边框,而背景是一个矩形,如果颜色透明就跳过(这里也说明了颜色透明和display:none的区别,display:none在布局阶段就已经被跳过),而边框则是四个矩形:
function build_layout_box(list:DisplayList,layout_box:LayoutBox){render_background(list, layout_box);render_borders(list, layout_box);}// 把矩形渲染放进去function render_background(list:DisplayList,layout_box:LayoutBox){const colorValue = get_color(layout_box,'background','background-color')list.push(new PaintingDraw.drawRectangle(layout_box.dimensions.border_box(),colorValue||undefined))}// 渲染边框,其实是渲染四个矩形function render_borders(list:DisplayList,layout_box:LayoutBox){const borderColor = get_color(layout_box,'border-color')let d = layout_box.dimensionslet border_box = d.border_box();// 上边框list.push(new PaintingDraw.drawRectangle(new Rect (border_box.x,border_box.y,border_box.width,d.border.top),borderColor||undefined))// 右边框list.push(new PaintingDraw.drawRectangle(new Rect (border_box.x+border_box.width,border_box.y,d.border.right,border_box.height),borderColor||undefined))// 下边框list.push(new PaintingDraw.drawRectangle(new Rect (border_box.x,border_box.y+border_box.height,border_box.width+d.border.right,d.border.bottom),borderColor||undefined))// 左边框list.push(new PaintingDraw.drawRectangle(new Rect (border_box.x,border_box.y,d.border.left,border_box.height),borderColor||undefined))}function get_color(layout_box:LayoutBox,name:string,otherName?:string){if (layout_box.style_node) {if (otherName){return layout_box.style_node.lookup(name,otherName,null) as ColorValue}return layout_box.style_node.value(name) as ColorValue}return null}
文字渲染:
// 渲染文字function build_layout_Text(list:DisplayList,layout_box:LayoutBox){const fontColor = get_color(layout_box,'color')list.push(new PaintingDraw.drawText(layout_box.style_node.node.node_type as string,layout_box.dimensions.border_box(),fontColor||undefined))}
最后,我们将列表进行图像绘制,并输出
// 主函数,将绘制树变为图片export function paint(layout_root:LayoutBox, bounds:Dimensions):Buffer{let display_list = build_display_list(layout_root);const canvas:Canvas = createCanvas(bounds.content.width, bounds.content.height)const context:CanvasRenderingContext2D = canvas.getContext('2d')for (const drawClass of display_list) {drawClass.drawItem(context)}return canvas.toBuffer('image/png')}
最终结果:
<html><div class="outer"><p class="inner">Hello,world!</p><p class="textTest">Text Test</p><p class="inner" id="bye">Goodbye!</p></div></html>
* {display: block;}span {display: inline;}html {margin: auto;background: #ffffff;}head {display: none;}.outer {width:600px;background: #00ccff;border-color: #666666;border-width: 2px;margin: 50px;}.textTest{background: #008000;font-size:20px;color:#f0f00f;}.inner {border-color: #cc0000;border-width: 4px;height: 100px;margin: auto;margin-bottom: 20px;width: 500px;background: #0000ff;font-size:24px;color:#ffffff;}
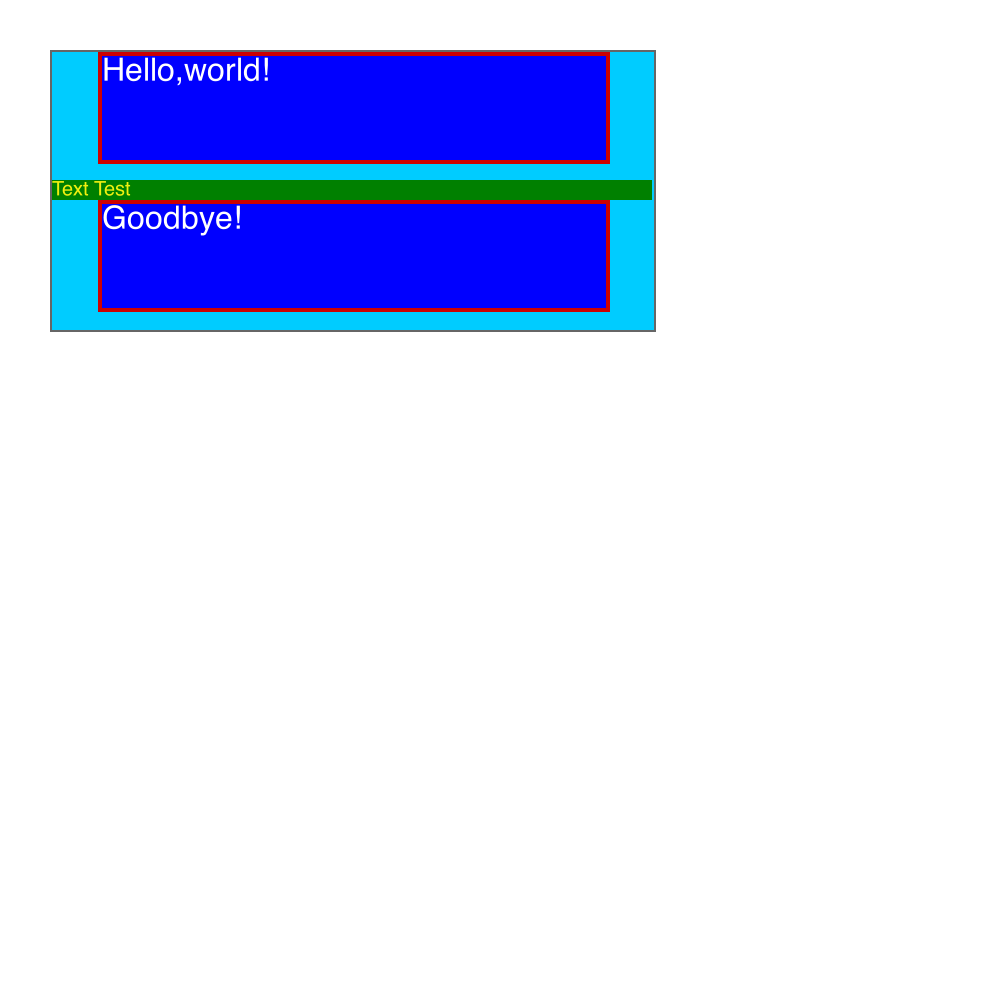
最终,这个玩具实现了渲染引擎的最基本功能,输入HTML、CSS字符串,输出正确的渲染图像。
大家如果感兴趣或者有哪部分代码不完善的可以直接去github上看一下
参考资料:
https://zhuanlan.zhihu.com/p/47407398
http://dev.chromium.org/developers/design-documents
https://segmentfault.com/a/1190000012925872
https://limpet.net/mbrubeck/2014/08/08/toy-layout-engine-1.html

若有收获,就点个赞吧
0 人点赞
