- 3、springmvc入门
- 4、mybatis入门
- DataSourceProperties
- 连接池的配置
- 最大连接数
- 最小空闲连接
- 超时时间30000毫秒
- MybatisProperties
- 映射文件存放位置
- resultType可以省略全限定名
- 自动生成组件
- 数据库字段与实体类字段匹配,例如create_time与createTime的转换
- 4.5、设置日志级别便于排查sql错误
- 5、开发社区首页
- 6、git、github、smartGit代码管理
- ">
- 7、发送邮件功能
- 8、开发注册功能
- 9、会话管理
- 10、生成验证码( Kaptcha )
- 11、登录、退出功能
- 12、显示登录信息
- 13、账号设置功能
- 14、修改密码
- 15、未登录-拦截不可访问的请求
3、springmvc入门
3.1、原始的方式处理请求与响应
@RequestMapping("/http")public void http(HttpServletRequest request, HttpServletResponse response){//1、获取请求数据//获取请求方法System.out.println(request.getMethod());//获取请求路径System.out.println(request.getServletPath());//获取请求体Enumeration<String> names = request.getHeaderNames();while(names.hasMoreElements()){String name = names.nextElement();String value=request.getHeader(name);System.out.println(name+":"+value);}//System.out.println(request.getParameter("code"));//2、返回相应数据response.setContentType("text/html;charset=utf-8");try (PrintWriter writer = response.getWriter();){writer.write("<h1>牛客网</h1>");} catch (IOException e) {e.printStackTrace();}}
3.2、GET请求->@RequestParam
//students?current=1&limit=5@GetMapping("/students")@ResponseBodypublic String selectStu(@RequestParam(name = "current",required = false,defaultValue = "1")int current,@RequestParam(name = "limit",required = false,defaultValue = "10")int limit){System.out.println(current);System.out.println(limit);return "student";}
3.3、GET请求->@PathVariable
//students/id@GetMapping("/students/{id}")@ResponseBodypublic String selectStu(@PathVariable("id") int id){System.out.println(id);return "id";}
3.4、表单提交数据
访问静态资源路径:localhost:8080/community/static/student.html
<!DOCTYPE html><html lang="en"><head><meta charset="UTF-8"><title>增加学生</title></head><body><form method="post" action="/community/student"><p>姓名:<input type="text" name="name"></p><p>年龄:<input type="text" name="age"></p><p><input type="submit" value="保存"></p></form></body></html>
@PostMapping("/student")@ResponseBodypublic String saveStudent(String name,int age){System.out.println(name);System.out.println(age);return "success";}
3.5、相应html方式一ModelAndView
@GetMapping("/teacher")public ModelAndView getTeacher(){ModelAndView mav = new ModelAndView();mav.addObject("name","李四");mav.addObject("age",15);//该路径相当于html/demo/teachermav.setViewName("/demo/teaacher");return mav;}
<!DOCTYPE html><html lang="en" xmlns:th="http://www.thymeleaf.org"><head><meta charset="UTF-8"><title>Title</title></head><body><p th:text="${name}"></p><p th:text="${age}"></p></body></html>
3.6、相应html方式二Model
@GetMapping("/school")public String getSchool(Model model){model.addAttribute("name","五邑大学");model.addAttribute("age",60);return "demo/teacher";}
3.7、相应json字符串(异步请求)
java对象->json字符串->js对象
异步请求示例:
@GetMapping("/emp")@ResponseBodypublic Map<String,Object> getEmp(){Map<String,Object> map=new HashMap<>();map.put("name","张三");map.put("age",18);map.put("salary",15000);return map;}
@GetMapping("/emps")@ResponseBodypublic List<Map<String,Object>> getEmps(){List<Map<String,Object>> list=new ArrayList<>();Map<String,Object> map=new HashMap<>();map.put("name","张三");map.put("age",18);map.put("salary",15000);list.add(map);map.put("name","李四");map.put("age",19);map.put("salary",14000);list.add(map);map.put("name","王五");map.put("age",20);map.put("salary",13000);list.add(map);return list;}
4、mybatis入门
4.1、mybatis简介
MyBatis
• 核心组件
- SqlSessionFactory:用于创建SqlSession的工厂类。
- SqlSession:MyBatis的核心组件,用于向数据库执行SQL。
- 主配置文件:XML配置文件,可以对MyBatis的底层行为做出详细的配置。
- Mapper接口:就是DAO接口,在MyBatis中习惯性的称之为Mapper。
- Mapper映射器:用于编写SQL,并将SQL和实体类映射的组件,采用XML、注解均可实现。
• 示例
- 使用MyBatis对用户表进行CRUD操作。
http://www.mybatis.org/mybatis-3
http://www.mybatis.org/spring4.2、导入mysql、mybatis依赖
<dependency><groupId>mysql</groupId><artifactId>mysql-connector-java</artifactId></dependency><dependency><groupId>org.mybatis.spring.boot</groupId><artifactId>mybatis-spring-boot-starter</artifactId><version>1.3.0</version></dependency>
4.3、application.properties配置
```propertiesDataSourceProperties
spring.datasource.driver-class-name=com.mysql.cj.jdbc.Driver spring.datasource.url=jdbc:mysql://localhost:3306/community?characterEncoding=utf-8&sueSSL=false&serverTimezone=GMT%2B8 spring.datasource.username=root spring.datasource.password=123456连接池的配置
spring.datasource.type=com.zaxxer.hikari.HikariDataSource最大连接数
spring.datasource.hikari.maximum-pool-size=15最小空闲连接
spring.datasource.hikari.minimum-idle=5超时时间30000毫秒
spring.datasource.hikari.idle-timeout=30000
MybatisProperties
映射文件存放位置
mybatis.mapper-locations=classpath:mapper/*.xml
resultType可以省略全限定名
mybatis.type-aliases-package=com.guang.community.entity
自动生成组件
mybatis.configuration.use-generated-keys=true
数据库字段与实体类字段匹配,例如create_time与createTime的转换
mybatis.configuration.map-underscore-to-camel-case=true
<a name="LGHy4"></a>## 4.4、mybatis代码实现<a name="tnR8y"></a>### 4.4.1、创建实体类```java@Data@AllArgsConstructor@NoArgsConstructor@ToStringpublic class User {private int id;private String userName;private String password;private String salt;private String email;private int type;private int status;private String activationCode;private String headerUrl;private Date createTime;}
4.4.2、创建实体类对应的mapper接口
@Mapperpublic interface UserMapper {User selectUserById(int id);User selectUserByName(String name);User selectUserByEmail(String email);int insertUser(User user);int updateUserStatus(int id, int status);int updateUserHeader(int id, String headerUrl);int updateUserPassword(int id, String password);}
4.4.3、创建对应的mapper.xml文件
1、引入mapper头部
<?xml version="1.0" encoding="UTF-8" ?><!DOCTYPE mapperPUBLIC "-//mybatis.org//DTD Mapper 3.0//EN""http://mybatis.org/dtd/mybatis-3-mapper.dtd"><mapper namespace="com.guang.community.dao.UserMapper"></mapper>
<?xml version="1.0" encoding="UTF-8" ?><!DOCTYPE mapperPUBLIC "-//mybatis.org//DTD Mapper 3.0//EN""http://mybatis.org/dtd/mybatis-3-mapper.dtd"><mapper namespace="com.guang.community.dao.UserMapper"><sql id="selectFields">id,username,password,salt,email,type,status,activation_code,header_url,create_time</sql><sql id="insertFields">username,password,salt,email,type,status,activation_code,header_url,create_time</sql><select id="selectUserById" resultType="User">select <include refid="selectFields"></include>from userwhere id=#{id}</select><select id="selectUserByName" resultType="User">select <include refid="selectFields"></include>from userwhere username=#{userName}</select><select id="selectUserByEmail" resultType="User">select <include refid="selectFields"></include>from userwhere email=#{email}</select><!-- keyProperty="id"声明主键是什么--><insert id="insertUser" parameterType="User" keyProperty="id">insert into user (<include refid="insertFields"></include>)values (#{userName},#{password},#{salt},#{email},#{type},#{status},#{activationCode},#{headerUrl},#{createTime})</insert><!-- 基本数据类型返回值不需要生命--><update id="updateUserStatus">update user set status=#{status} where id=#{id}</update><update id="updateUserHeader">update user set header_url=#{headerUrl} where id=#{id}</update><update id="updateUserPassword">update user set password=#{password} where id=#{id}</update></mapper>
4.5、设置日志级别便于排查sql错误
#logger设置全局日志级别为debug方便排查错误logging.level.com.guang.community=debug
5、开发社区首页
5.1、sql脚本创建数据表并导入数据
5.2、实体类DiscussPost
@Data@AllArgsConstructor@NoArgsConstructor@ToStringpublic class DiscussPost {private int id;private int userId;private String title;private String content;private int type;//0普通1置顶private int status;//0正常1精华2拉黑private Date createTime;private int commentCount;private double score;}
5.3、DiscussMapper
@Mapperpublic interface DiscussPostMapper {/**** @param userId 用于个人主页查询个人全部帖子* @param offset 起始页数* @param limit 每页展示的数据条数* @return*/public List<DiscussPost> selectDiscussPosts(int userId,int offset,int limit);/*** @Param:用于给参数取别名,当需要动态拼接sql且参数只有一个时,必须给参数取别名* @param userId* @return*/public int selectDiscussPostRowsTotal(@Param("userId") int userId);}
5.4、discusspost-mapper.xml
<?xml version="1.0" encoding="UTF-8" ?><!DOCTYPE mapperPUBLIC "-//mybatis.org//DTD Mapper 3.0//EN""http://mybatis.org/dtd/mybatis-3-mapper.dtd"><mapper namespace="com.guang.community.dao.DiscussPostMapper"><sql id="selectFields">id,user_id,title,content,type,status,create_time,comment_count,score</sql><select id="selectDiscussPosts" resultType="DiscussPost">select<include refid="selectFields"></include>from discuss_postwhere status !=2<if test="userId!=0">and user_id=#{userId}</if>order by type desc ,create_time desclimit #{offset},#{limit}</select><select id="selectDiscussPostRowsTotal">select count(id)from discuss_postwhere status !=2<if test="userId!=0">and user_id=#{userId}</if></select></mapper>
5.5、DiscussPostService
@Servicepublic class DiscussPostService {@Autowiredprivate DiscussPostMapper discussPostMapper;public List<DiscussPost> selectDiscussPosts(int userId,int offset,int limit){return discussPostMapper.selectDiscussPosts(userId,offset,limit);}public int selectDiscussPostRowsTotal(int userId){return discussPostMapper.selectDiscussPostRowsTotal(userId);}}
5.6、UserService
@Servicepublic class UserService {@Autowiredprivate UserMapper userMapper;public User selectUserById(int id){return userMapper.selectUserById(id);}}
5.7、DiscussPostController
@Controllerpublic class DiscussPostController {@Autowiredprivate DiscussPostService discussPostService;@Autowiredprivate UserService userService;@GetMapping("/index")public String getIndexPage(Model model, Page page) {// 方法调用前,SpringMVC会自动实例化Model和Page,并将Page注入Model.// 所以,在thymeleaf中可以直接访问Page对象中的数据.page.setRows(discussPostService.selectDiscussPostRowsTotal(0));page.setPath("/index");List<DiscussPost> list = discussPostService.selectDiscussPosts(0, page.getOffset(), page.getLimit());List<Map<String, Object>> discussPosts = new ArrayList<>();if (list != null) {for (DiscussPost post : list) {Map<String, Object> map = new HashMap<>();map.put("post", post);User user = userService.selectUserById(post.getUserId());map.put("user", user);discussPosts.add(map);}}model.addAttribute("discussPosts", discussPosts);return "/index";}}
5.8、分页封装类Page
/*** 封装分页相关的信息.*/public class Page {// 当前页码private int current = 1;// 显示上限private int limit = 10;// 数据总数(用于计算总页数)private int rows;// 查询路径(用于复用分页链接)private String path;public int getCurrent() {return current;}public void setCurrent(int current) {if (current >= 1) {this.current = current;}}public int getLimit() {return limit;}public void setLimit(int limit) {if (limit >= 1 && limit <= 100) {this.limit = limit;}}public int getRows() {return rows;}public void setRows(int rows) {if (rows >= 0) {this.rows = rows;}}public String getPath() {return path;}public void setPath(String path) {this.path = path;}/*** 获取当前页的起始行** @return*/public int getOffset() {// current * limit - limitreturn (current - 1) * limit;}/*** 获取总页数** @return*/public int getTotal() {// rows / limit [+1]if (rows % limit == 0) {return rows / limit;} else {return rows / limit + 1;}}/*** 获取起始页码** @return*/public int getFrom() {int from = current - 2;return from < 1 ? 1 : from;}/*** 获取结束页码** @return*/public int getTo() {int to = current + 2;int total = getTotal();return to > total ? total : to;}}
5.9、index.html
<!-- 分页 --><nav class="mt-5" th:if="${page.rows>0}"><ul class="pagination justify-content-center"><li class="page-item"><a class="page-link" th:href="@{${page.path}(current=1)}">首页</a></li><li th:class="|page-item ${page.current==1?'disabled':''}|"><a class="page-link" th:href="@{${page.path}(current=${(page.current)-1})}">上一页</a></li><li th:class="|page-item ${i==page.current?'active':''}|" th:each="i:${#numbers.sequence(page.from,page.to)}"><a class="page-link" href="#" th:text="${i}">1</a></li><li th:class="|page-item ${page.current==page.total?'disabled':''}|"><a class="page-link" th:href="@{${page.path}(current=${page.current+1})}">下一页</a></li><li class="page-item"><a class="page-link" th:href="@{${page.path}(current=${page.total})}">末页</a></li></ul></nav>
6、git、github、smartGit代码管理
6.1、git配置
1、下载安装好gitgit-scm.com/download2、配置git的全局用户名和邮箱git config --list 查看当前配置信息git config --grobal user.name "lirongguang" 设置用户名git config --grobal user.email "758679586@qq.com"3、创建ssh密钥并且完成github功能的第二步ssh-keygen -t rsa -C "758679586@qq.com" 回车.....4、cd 到项目的目录下。例如demo01项目git init 该命令后该项目目录下会产生.git文件4、将生成的ssh密钥到远程仓库中配置git remote add origin 远程仓库链接+.git 远程仓库的别名为origin
6.2、github配置
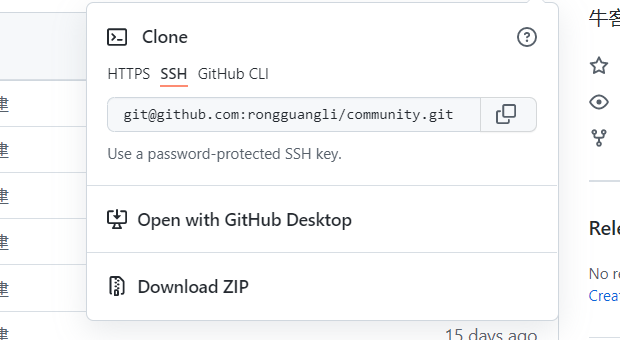
1、注册并登录github账号2、将git生成的ssh密钥在github的settings->SSh and GPG keys中添加复制ssh密钥的的命令:clip < ~/.ssh/id_rsa.pub3、创建仓库并且将其ssh地址复制完成git功能的第四步
7、发送邮件功能
7.1、新浪邮箱开启smtp服务

7.2、maven仓库搜索spring mail并导入pom.xml

7.3、application.properties配置
#mailPropertiesspring.mail.host=smtp.sina.comspring.mail.port=465spring.mail.username=lirong_guang@sina.com#该项密码为smtp服务的授权码spring.mail.password=7f3585c4744806e1spring.mail.protocol=smtpsspring.mail.properties.mail.smtp.ssl.enable=true
7.4、创建邮件发送client
private static final Logger logger = LoggerFactory.getLogger(MailClient.class);@Autowiredprivate JavaMailSender mailSender;@Value("${spring.mail.username}")private String from;public void sendMail(String to, String subject, String text) {try {MimeMessage message = mailSender.createMimeMessage();MimeMessageHelper helper = new MimeMessageHelper(message);helper.setFrom(from);helper.setTo(to);helper.setSubject(subject);//支持发生html模式helper.setText(text,true);mailSender.send(helper.getMimeMessage());} catch (MessagingException e) {logger.error("邮件发送失败:"+e.getMessage());}}
7.5、创建html模板
<!DOCTYPE html><html lang="en" xmlns:th="http://www.thymeleaf.org"><head><meta charset="UTF-8"><title>邮件示例</title></head><body><p>欢迎你, <span style="color:red;" th:text="${username}"></span>!</p></body></html>
7.6、测试
@Autowiredprivate TemplateEngine templateEngine;@Testpublic void testHtmlMail() {Context context = new Context();context.setVariable("username", "sunday");String content = templateEngine.process("/mail/demo", context);System.out.println(content);mailClient.sendMail("lihonghe@nowcoder.com", "HTML", content);}
8、开发注册功能
8.1、commons lang数据校验
<dependency><groupId>org.apache.commons</groupId><artifactId>commons-lang3</artifactId><version>3.12.0</version></dependency>
8.2、配置域名
#community配置域名community.path.domain=http://localhost:8080
8.3、注册功能工具类
public class CommunityUtils {//生成随机字符串public static String getUUID(){return UUID.randomUUID().toString().replaceAll("-","");}//md5加密public static String md5(String key){if(StringUtils.isEmpty(key)){return null;}return DigestUtils.md5DigestAsHex(key.getBytes());}}
8.4、注册工具类接口
public interface CommunityConstant {/*** 激活成功*/int ACTIVATION_SUCCESS = 0;/*** 重复激活*/int ACTIVATION_REPEAT = 1;/*** 激活失败*/int ACTIVATION_FAILURE = 2;}
8.5、UserService注册业务层
@Servicepublic class UserService implements CommunityConstant {@Autowiredprivate UserMapper userMapper;@Autowiredprivate MailClient mailClient;@Autowiredprivate TemplateEngine templateEngine;@Value("${community.path.domain}")private String domain;@Value("${server.servlet.context-path}")private String contextPath;public User selectUserById(int id) {return userMapper.selectUserById(id);}public Map<String, Object> register(User user) {Map<String, Object> map = new HashMap<>();// 空值处理if (user == null) {throw new IllegalArgumentException("参数不能为空!");}if (StringUtils.isBlank(user.getUsername())) {map.put("usernameMsg", "账号不能为空!");return map;}if (StringUtils.isBlank(user.getPassword())) {map.put("passwordMsg", "密码不能为空!");return map;}if (StringUtils.isBlank(user.getEmail())) {map.put("emailMsg", "邮箱不能为空!");return map;}// 验证账号User u = userMapper.selectUserByName(user.getUsername());if (u != null) {map.put("usernameMsg", "该账号已存在!");return map;}// 验证邮箱u = userMapper.selectUserByEmail(user.getEmail());if (u != null) {map.put("emailMsg", "该邮箱已被注册!");return map;}// 注册用户user.setSalt(CommunityUtil.getUUID().substring(0, 5));user.setPassword(CommunityUtil.md5(user.getPassword() + user.getSalt()));user.setType(0);user.setStatus(0);user.setActivationCode(CommunityUtil.getUUID());user.setHeaderUrl(String.format("http://images.nowcoder.com/head/%dt.png", new Random().nextInt(1000)));user.setCreateTime(new Date());userMapper.insertUser(user);// 激活邮件Context context = new Context();context.setVariable("email", user.getEmail());// http://localhost:8080/community/activation/101/codeString url = domain + contextPath + "/activation/" + user.getId() + "/" + user.getActivationCode();context.setVariable("url", url);String content = templateEngine.process("/mail/activation", context);mailClient.sendMail(user.getEmail(), "激活账号", content);return map;}public int activation(int userId, String code) {User user = userMapper.selectUserById(userId);if (user.getStatus() == 1) {return ACTIVATION_REPEAT;} else if (user.getActivationCode().equals(code)) {userMapper.updateUserStatus(userId, 1);return ACTIVATION_SUCCESS;} else {return ACTIVATION_FAILURE;}}}
8.6、注册接口
@Controllerpublic class LoginController implements CommunityConstant {@Autowiredprivate UserService userService;@GetMapping("/register")public String getRegisterPage() {return "/site/register";}@GetMapping("/login")public String getLoginPage() {return "/site/login";}@PostMapping("/register")public String register(Model model, User user) {Map<String, Object> map = userService.register(user);if (map == null || map.isEmpty()) {model.addAttribute("msg", "注册成功,我们已经向您的邮箱发送了一封激活邮件,请尽快激活!");model.addAttribute("target", "/index");return "/site/operate-result";} else {model.addAttribute("usernameMsg", map.get("usernameMsg"));model.addAttribute("passwordMsg", map.get("passwordMsg"));model.addAttribute("emailMsg", map.get("emailMsg"));return "/site/register";}}// http://localhost:8080/community/activation/101/code@GetMapping("/activation/{userId}/{code}")public String activation(Model model, @PathVariable("userId") int userId, @PathVariable("code") String code) {int result = userService.activation(userId, code);if (result == ACTIVATION_SUCCESS) {model.addAttribute("msg", "激活成功,您的账号已经可以正常使用了!");model.addAttribute("target", "/login");} else if (result == ACTIVATION_REPEAT) {model.addAttribute("msg", "无效操作,该账号已经激活过了!");model.addAttribute("target", "/index");} else {model.addAttribute("msg", "激活失败,您提供的激活码不正确!");model.addAttribute("target", "/index");}return "/site/operate-result";}}
8.7、页面(略)
9、会话管理
• HTTP的基本性质
- HTTP是简单的
- HTTP是可扩展的
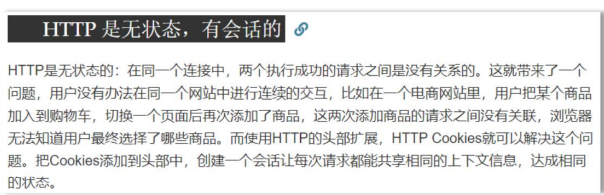
- HTTP是无状态的,有会话的
• Cookie
- 是服务器发送到浏览器,并保存在浏览器端的一小块数据。
- 浏览器下次访问该服务器时,会自动携带块该数据,将其发送给服务器。
• Session
- 是JavaEE的标准,用于在服务端记录客户端信息。
- 数据存放在服务端更加安全,但是也会增加服务端的内存压力。
9.1、Cookie
存放在浏览器,对于密码等个人信息不适合进行存储,不安全但减少服务器压力。
// cookie示例@GetMapping("/cookie/set")@ResponseBodypublic String setCookie(HttpServletResponse response) {// 创建cookieCookie cookie = new Cookie("code", CommunityUtil.generateUUID());// 设置cookie生效的范围cookie.setPath("/community/alpha");// 设置cookie的生存时间cookie.setMaxAge(60 * 10);// 发送cookieresponse.addCookie(cookie);return "set cookie";}@GetMapping("/cookie/get")@ResponseBodypublic String getCookie(@CookieValue("code") String code) {System.out.println(code);return "get cookie";}
9.2、Session(依赖于Cookie)
存放于服务器Session对象存放于服务器,携带sessionId的Cookie对象存放在浏览器,安全但增加服务器压力。
// session示例@GetMapping("/session/set")@ResponseBodypublic String setSession(HttpSession session) {session.setAttribute("id", 1);session.setAttribute("name", "Test");return "set session";}@GetMapping("/session/get")@ResponseBodypublic String getSession(HttpSession session) {System.out.println(session.getAttribute("id"));System.out.println(session.getAttribute("name"));return "get session";}
9.2.1、Session分布式部署问题:

解决方案:
1、粘性session
浏览器只访问一台服务器,再次访问也访问该台服务器
2、同步session
当服务器创建session时,同步给其他的服务器,增加服务器压力,服务器间产生耦合
3、共享session
腾出一台服务器专门用来存储session,单体服务器存在安全隐患
4、存储到数据库redis..
10、生成验证码( Kaptcha )
1、导入依赖
<!-- https://mvnrepository.com/artifact/com.github.penggle/kaptcha --><dependency><groupId>com.github.penggle</groupId><artifactId>kaptcha</artifactId><version>2.3.2</version></dependency>
2、配置类
@Configurationpublic class KaptchaConfig {@Beanpublic Producer kaptchaProducer() {Properties properties = new Properties();properties.setProperty("kaptcha.image.width", "100");properties.setProperty("kaptcha.image.height", "40");properties.setProperty("kaptcha.textproducer.font.size", "32");properties.setProperty("kaptcha.textproducer.font.color", "0,0,0");properties.setProperty("kaptcha.textproducer.char.string", "0123456789ABCDEFGHIJKLMNOPQRSTUVWXYAZ");properties.setProperty("kaptcha.textproducer.char.length", "4");properties.setProperty("kaptcha.noise.impl", "com.google.code.kaptcha.impl.NoNoise");DefaultKaptcha kaptcha = new DefaultKaptcha();Config config = new Config(properties);kaptcha.setConfig(config);return kaptcha;}}
3、生成随机验证码接口
private final Logger logger= LoggerFactory.getLogger(LoginController.class);@Autowiredprivate Producer kaptchaProducer;@GetMapping("/kaptcha")public void getKaptcha(HttpServletResponse response, HttpSession session){//生成随机验证码,并且将验证码制作成图片String text = kaptchaProducer.createText();BufferedImage image = kaptchaProducer.createImage(text);//将验证码放入session,后面进行验证session.setAttribute("kaptcha",text);//将图片输出给浏览器response.setContentType("image/png");try {ServletOutputStream os = response.getOutputStream();ImageIO.write(image,"png",os);} catch (IOException e) {logger.error("获取验证码失败"+e.getMessage());}}
11、登录、退出功能
12、显示登录信息
拦截器
@Componentpublic class LoginTicketInterceptor implements HandlerInterceptor {@Autowiredprivate UserService userService;@Autowiredprivate HostHolder hostHolder;@Overridepublic boolean preHandle(HttpServletRequest request, HttpServletResponse response, Object handler) throws Exception {String ticket = CookieUtil.getValue(request, "ticket");if (ticket != null) {LoginTicket loginTicket = userService.findLoginTicket(ticket);//检查凭证是否有效if (loginTicket != null && loginTicket.getStatus() == 0 && loginTicket.getExpired().after(new Date())) {User user = userService.selectUserById(loginTicket.getUserId());hostHolder.setUsers(user);}}return true;}@Overridepublic void postHandle(HttpServletRequest request, HttpServletResponse response, Object handler, ModelAndView modelAndView) throws Exception {User user = hostHolder.getUser();if(user!=null&&modelAndView!=null){modelAndView.addObject("loginUser",user);}}@Overridepublic void afterCompletion(HttpServletRequest request, HttpServletResponse response, Object handler, Exception ex) throws Exception {hostHolder.clear();}}
提取cookie工具类
public class CookieUtil {public static String getValue(HttpServletRequest request,String name){if(request==null||name==null)throw new IllegalArgumentException("参数为空!!!");Cookie[] cookies = request.getCookies();if(cookies!=null){for (Cookie cookie : cookies) {if(cookie.getName().equals(name)){return cookie.getValue();}}}return null;}}
存储对象ThreadLocal
@Componentpublic class HostHolder {ThreadLocal<User> users=new ThreadLocal<>();public void setUsers(User user){users.set(user);}public User getUser(){return users.get();}public void clear(){users.remove();}}
配置类添加拦截器
@Configurationpublic class WebMvcConfig implements WebMvcConfigurer {@Autowiredprivate LoginTicketInterceptor loginTicketInterceptor;@Overridepublic void addInterceptors(InterceptorRegistry registry) {registry.addInterceptor(loginTicketInterceptor).excludePathPatterns("/**/*.css","/**/*.js","/**/*.png","/**/*.jpg","/**/*.jpeg");}}
13、账号设置功能
UserController
@Controller@RequestMapping("/user")public class UserController {private static final Logger logger = LoggerFactory.getLogger(UserController.class);@Value("${community.path.upload}")private String uploadPath;@Value("${community.path.domain}")private String domain;@Value("${server.servlet.context-path}")private String context;@Autowiredprivate UserService userService;@Autowiredprivate HostHolder hostHolder;/*** 去到登录页面** @return*/@GetMapping("/setting")public String getSettingPage() {return "/site/setting";}/*** 处理头像上传路径** @param headerImage* @param model* @return*/@PostMapping("/upload")public String uploadHeader(MultipartFile headerImage, Model model) {if (headerImage == null) {model.addAttribute("error", "您还没有上传图片");return "/site/setting";}String fileName = headerImage.getOriginalFilename();String suffix = fileName.substring(fileName.lastIndexOf("."));if (StringUtils.isBlank(suffix)) {model.addAttribute("error", "文件格式不正确");return "/site/setting";}//生成随机文件名fileName = CommunityUtil.getUUID() + suffix;File dest = new File(uploadPath + "/" + fileName);try {headerImage.transferTo(dest);} catch (IOException e) {logger.error("上传文件失败" + e.getMessage());throw new RuntimeException("上传文件失败" + e.getMessage());}//更新用户头像,外界可获取的连接地址//http://localhost:8080/community/user/header/xxx.pngString headerUrl = domain + context + "/user/header/" + fileName;User user = hostHolder.getUser();userService.updateHeader(user.getId(),headerUrl);return "redirect:/index";}/*** 获取头像** @param fileName* @param response*/@GetMapping("/header/{fileName}")public void getHeader(@PathVariable("fileName") String fileName, HttpServletResponse response) {// 服务器存放路径fileName = uploadPath + "/" + fileName;String suffix = fileName.substring(fileName.lastIndexOf("."));// 响应图片response.setContentType("image/" + suffix);try (FileInputStream fis = new FileInputStream(fileName);OutputStream os = response.getOutputStream();) {byte[] buffer = new byte[1024];int b = 0;while ((b = fis.read(buffer)) != -1) {os.write(buffer, 0, b);}} catch (IOException e) {logger.error("读取头像失败: " + e.getMessage());}}}
UserService
public int updateHeader(int userId,String headerUrl){return userMapper.updateUserHeader(userId,headerUrl);}
application.properties
#配置头像上传路径community.path.upload=d:/AAcommunity/data/upload
14、修改密码
15、未登录-拦截不可访问的请求
Annotation-LoginRequire
@Target(ElementType.METHOD)@Retention(RetentionPolicy.RUNTIME)public @interface LoginRequire {}
LoginRequiredInterceptor
@Componentpublic class LoginRequiredInterceptor implements HandlerInterceptor {@Autowiredprivate HostHolder hostHolder;@Overridepublic boolean preHandle(HttpServletRequest request, HttpServletResponse response, Object handler) throws Exception {if(handler instanceof HandlerMethod){HandlerMethod handlerMethod=(HandlerMethod)handler;Method method = handlerMethod.getMethod();LoginRequire annotation = method.getAnnotation(LoginRequire.class);if(annotation!=null&&hostHolder.getUser()==null){response.sendRedirect(request.getContextPath()+"/login");return false;}}return true;}}
WebMvcConfig添加拦截器
registry.addInterceptor(loginRequiredInterceptor).excludePathPatterns("/**/*.css","/**/*.js","/**/*.png","/**/*.jpg","/**/*.jpeg");

若有收获,就点个赞吧
0 人点赞
