Dockerfile简介

Dockerfile
演示
使用Dockerfile构建Nginx容器,添加容器健康检查。
准备Dockerfile
# 基于 nginx:1.17.9 镜像构建FROM nginx:1.17.9# 指定信息LABEL maintainer="test@qq.com"# 设置环境变量ENV NGINX_VERSION 1.17.9ARG work_pwd=/data/html# 切换 root 用户USER root# 执行命令,安装 curl 软件,设置软链接把nginx服务的日志显示到终端RUN apt-get -yq update && apt-get install -y curl && \ln -sf /dev/stdout /var/log/nginx/access.log && \ln -sf /dev/stderr /var/log/nginx/error.log# 设置工作目录WORKDIR $work_pwd# 复制index.html 文件到WORKDIR目录下COPY index.html .# 映射8080端口EXPOSE 8080CMD ["nginx", "-g", "daemon off;"]STOPSIGNAL SIGRTMAX# 检查容器健康,通过访问nginx服务8080端口来判断容器服务示范健康HEALTHCHECK --interval=5s --timeout=3s \CMD curl -fs http://localhost/ || exit 1
当前目录下构建镜像
从log中可以看到,构建是按照dockerfile从上到下一步一步执行。
# -t tag:version[root@centos nginx]# docker build -t n:1 .Sending build context to Docker daemon 2.56kBStep 1/12 : FROM nginx:1.17.9---> 5a8dfb2ca731Step 2/12 : LABEL maintainer="test@qq.com"---> Using cache---> 416c45116ea1Step 3/12 : ENV NGINX_VERSION 1.17.9---> Using cache---> 0994368b154eStep 4/12 : ARG work_pwd=/data/html---> Using cache---> d447d5c7ee58Step 5/12 : USER root---> Using cache---> 7630d105f930Step 6/12 : RUN apt-get -yq update && apt-get install -y curl && ln -sf /dev/stdout /var/log/nginx/access.log && ln -sf /dev/stderr /var/log/nginx/error.log---> Running in 8f2f9c9cab24...
查看构建的镜像
[root@centos nginx]# docker imagesREPOSITORY TAG IMAGE ID CREATED SIZEn 1 1d7f959d2796 2 minutes ago 152MB
启动镜像
[root@centos nginx]# docker run n:1127.0.0.1 - - [21/Nov/2020:09:17:13 +0000] "GET / HTTP/1.1" 200 612 "-" "curl/7.64.0" "-"127.0.0.1 - - [21/Nov/2020:09:17:18 +0000] "GET / HTTP/1.1" 200 612 "-" "curl/7.64.0" "-"
查看容器状态
可以看到健康检查打上的healthy标签
[root@centos ~]# docker psCONTAINER ID IMAGE COMMAND CREATED STATUS PORTS NAMES3bb7a0758d0c n:1 "nginx -g 'daemon of…" 46 seconds ago Up 45 seconds (healthy) 80/tcp, 8080/tcp silly_ptolemy
查看镜像的label
[root@seliius21734 test]# docker image inspect n:1 --format "{{json .ContainerConfig.Labels}}"{"maintainer":"test@ericsson.com"}
进入容器并查看状态
[root@centos ~]# docker exec -it silly_ptolemy bashroot@3bb7a0758d0c:/data/html# lsindex.htmlroot@3bb7a0758d0c:/data/html# iduid=0(root) gid=0(root) groups=0(root)# 可以看到dockerfile中定义的动作workdir和copy动作都实现了
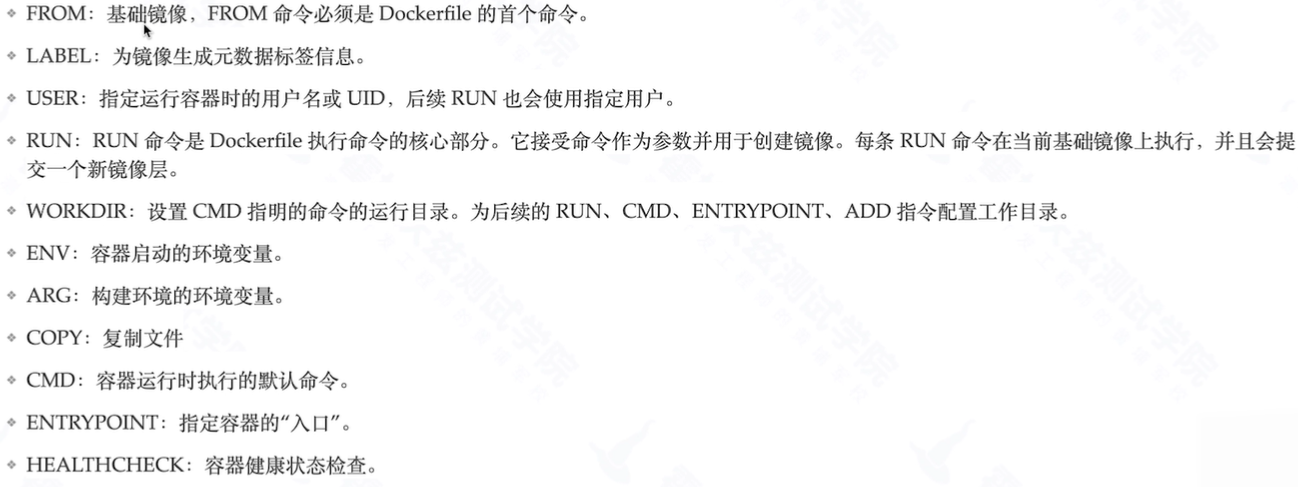
通过浏览器查看
1.后台运行容器n:1并将端口映射到8080端口
2.通过浏览器查看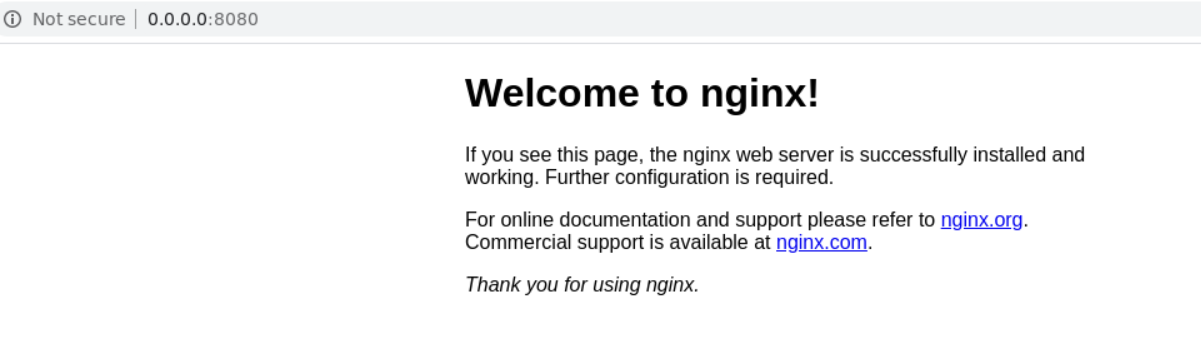
总结
通过这里例子可以看到,我们可以对这个dockerfile继续改造。
准备好index.html, 然后指定路径。
这样我们来体会一个dockerfile构建自己的容器:一键启动后,网页就部署好了。
index.html:
<h1>Test Docker Build</h1>
修改dockerfile:在构建的时候直接把index.html替换掉nginx默认目录下的index
COPY index.html /usr/share/nginx/html/index.html
一键部署:
root@18141d6b1875:/usr/share/nginx/html# exitexit[root@centos nginx]# vim Dockerfile[root@centos nginx]# lsDockerfile index.html nginx[root@centos nginx]# docker rm -f nginxnginx[root@centos nginx]#[root@centos nginx]#[root@centos nginx]# docker build -t n:1 .Sending build context to Docker daemon 5.12kBStep 1/14 : FROM nginx:1.17.9---> 5a8dfb2ca731Step 2/14 : LABEL maintainer="test@qq.com"---> Using cache---> 416c45116ea1Step 3/14 : ENV NGINX_VERSION 1.17.9---> Using cache---> 0994368b154eStep 4/14 : ARG work_pwd=/data/html---> Using cache---> d447d5c7ee58Step 5/14 : USER root---> Using cache---> 7630d105f930Step 6/14 : RUN sed -i s@/deb.debian.org/@/mirrors.aliyun.com/@g /etc/apt/sources.list---> Using cache---> ac050a1b0a87Step 7/14 : RUN sed -i s@/security.debian.org/@/mirrors.aliyun.com/@g /etc/apt/sources.list---> Using cache---> b408fda38344Step 8/14 : RUN apt-get -yq update && apt-get install -y curl && ln -sf /dev/stdout /var/log/nginx/access.log && ln -sf /dev/stderr /var/log/nginx/error.log---> Using cache---> e8983a355809Step 9/14 : WORKDIR $work_pwd---> Using cache---> 2dd2d9a46a6aStep 10/14 : COPY index.html /usr/share/nginx/html/index.html---> 6a37b65e0ba6Step 11/14 : EXPOSE 8080---> Running in 3845ae6825a8Removing intermediate container 3845ae6825a8---> f5215fec001fStep 12/14 : CMD ["nginx", "-g", "daemon off;"]---> Running in 04f4fb65d4f3Removing intermediate container 04f4fb65d4f3---> 5de25f38c4d5Step 13/14 : STOPSIGNAL SIGRTMAX---> Running in 291143f1af33Removing intermediate container 291143f1af33---> 99d9ac06c014Step 14/14 : HEALTHCHECK --interval=5s --timeout=3s CMD curl -fs http://localhost/ || exit 1---> Running in beb56658c919Removing intermediate container beb56658c919---> 98d416ae609eSuccessfully built 98d416ae609eSuccessfully tagged n:1[root@centos nginx]# docker run -d --name nginx -p 8080:80 n:1fe02a3f5efd54a688664aac3ffb27d8b84644ee41ac2ef22cee25fb58507d155
遇到的坑
Nginx容器中安装curl失败
由于很多镜像都是基于Ubuntu,所以dockfile用了apt-get。
但是国内的又访问或者很难访问到国外的服务器,导致下载curl失败。
所以需要修改source list中的uri
解决办法就是在构架的时候替换镜像源。在Dockerfile中添加两句语句:
RUN sed -i s@/deb.debian.org/@/mirrors.aliyun.com/@g /etc/apt/sources.listRUN sed -i s@/security.debian.org/@/mirrors.aliyun.com/@g /etc/apt/sources.list
如何在docker容器中安装vim
1.首先需要进入容器
[root@centos nginx]# docker exec -it nginx bash
2.更新apt-get
root@8106885274d2:/# apt-get update
3.apt-get安装curl
root@8106885274d2:/# apt-get install vim

若有收获,就点个赞吧
0 人点赞
