1. Spring 简介
Spring
- 轻量级、非入侵式的(不会影响原先的代码)框架/容器
- 针对企业及应用开发
- 复杂性控制反转(IoC)和面向切面(AOP)
- 支持处理事务、框架整合
- 具有向后兼容性
基本介绍
- EJB:Enterprise JavaBeans
- JSP:JavaServer Pages(Java 服务器页面)
- JNDI:Java Naming and Directory Interface(Java 命名与目录接口)
- JMS:Java Message Service
- SSH:Struct2 + Spring + Hibernate
- SSM: SpringMVC + Spring + Mybatis
- Spirng 官网
- Spring Github 主页
-
- spring-webmvc
org.springframeworkspring-webmvc5.2.8.RELEASE
- spring-jdbc
org.springframeworkspring-jdbc5.2.8.RELEASE
Spring 框架七大模块
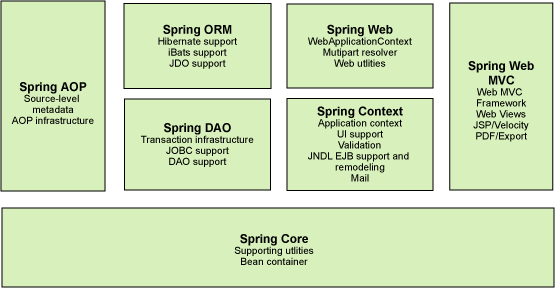
- Spring Core:使用BeanFactory来产生和管理Bean,是工厂模式的实现;BeanFactory使用控制反转(IoC)模式将应用的配置和依赖性规范与实际的应用程序代码分开。
- Spring Context:提供上下文服务,邮件验证、校验、JDNI和EJB等
- Spring AOP:集成了声明性事务管理
- Spring DAO:异常处理
- Sping ORM:对象实体关系映射
- Spring Web:为基于Web的应用程序提供上下文
- Spring Web MVC:输入逻辑、业务逻辑和 UI 逻辑之间相互解耦
拓展
SpringBoot
- 快速开发脚手架
- 开发单个微服务
- 约定大于配置
- 需要完全掌握 Spring 和 SpringMVC
- Spring Cloud 基于 SpringBoot 实现
- Spring Cloud Data Flow
2. 控制反转(Inversion of Control,IOC)
传统开发中,用户调用业务层,由业务层调用数据访问对象(Data Access Object,DAO)层;业务层会调用DAO层。但开发者需要根据用户的需求对源代码进行修改,修改成本昂贵。
IOC原理:根据用户的需求,使用 set 方法实现接口的动态注入,将控制权交给用户。通过接口调用DAO,降低系统耦合性,可以更加注重业务实现。
控制反转:获得依赖对象的方式反转
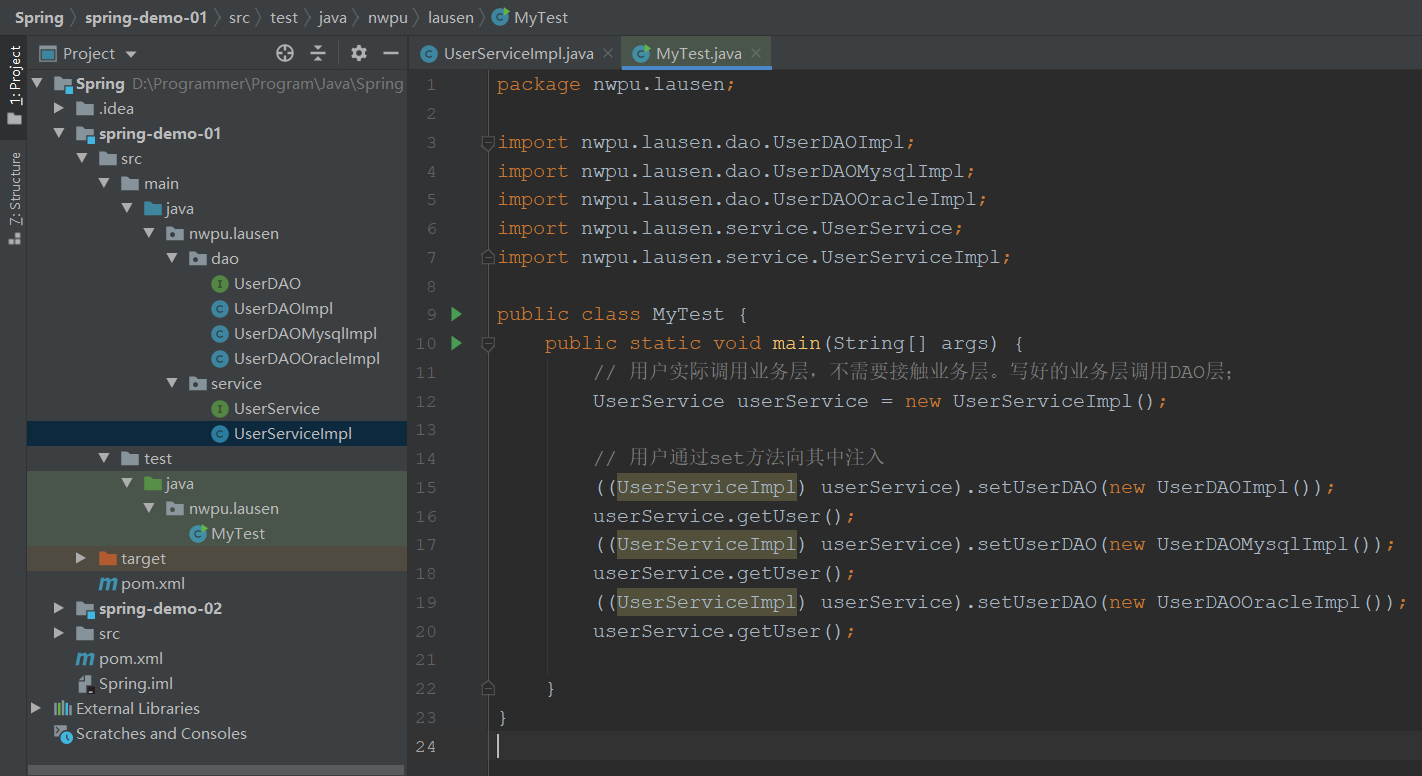
传统开发,用户通过业务层调用DAO,而业务层依靠开发者定义
IOC开发,主动权在用户,可选择通过控制业务层的实现,进而决定调用何DAO
控制反转是一种基于 XML 或注解描述,通过第三方创建特定对象的方式。在 Spring 中的实现方式是 IoC 容器,实现方法是依赖注入(Dependency Injection,DI)。用户和程序员都不需要修改程序,只需要在XML文件中进行配置。IOC即对象托管给Spring进行创建、管理和配置。
Spring 配置容器实操
在 Maven 项目的 src/main/resource/ 目录下创建
applicationContext.xml配置文件在 Spring 官方文档 中,找到配置元数据 ```xml <?xml version=”1.0” encoding=”UTF-8”?>
3.修改其中的 Bean,并进行赋值——这是 Spring 创建变量的过程1. bean 标签中的 id 对应变量名,class 对应类名2. property 标签中的 id 对应成员变量名,value 对应变量值(基本数据类型和String),ref 对应 Spring 容器中已经创建了的对象名(ref 动态引用,value 静态注入)4.在 Test 中,使用 ClassPathXmlApplicationContext 获取容器。再使用 getBean 并进行强制类型转换获取对象。```javaApplicationContext context = new ClassPathXmlApplicationContext("applicationContext.xml");HelloSpring helloSpring = (HelloSpring) context.getBean("hello");
测试时,不需要 new 对象,只需要从 ApplicationContext 中获取 Spring 容器,需要什么对象直接 getBean 即可。在 XML 配置文件中定义好对象,用户在服务层选择 getBean 所传递的参数即可控制DAO层;或者直接改配置文件也可以进行操作。
(ClassPathXmlApplicationContext 缩写 CPXAC)
IoC 创建对象的方式
在通过ClassPathXmlApplicationContext加载配置文件,获取容器的过程中创建了对象,而不是在getBean的时候才创建。
- 无参构造方法
在执行构造容器,在容器中创建对象的时候,已经默认调用了类的无参构造方法,而不是全参构造方法。随后通过 setAttr 进行赋值,因此,配置文件中使用无参构造方法创建对象时,如果类中没有定义 setter 函数,是无法通过编译的。
<bean id="user" class="nwpu.lausen.User"><porperty name="name" value="sensen"/></bean>
没有无参构造方法,只有全参构造方法时,会报错。
有参构造方法(constructor argument resolution)
使用下列三种方式会调用全参构造方法,并向参数列表进行赋值。- 下标赋值
<bean id="user" class="nwpu.lausen.User"><constructor-arg index="0" value="sensen"/></bean>
- 下标赋值
- 类型匹配
<bean id="user" class="nwpu.lausen.User">
<constructor-arg type="java.lang.String" value="louis"/>
</bean>
- 变量名匹配
<bean id="user" class="nwpu.lausen.User">
<constructor-arg name="name" value="sensen"/>
</bean>
3. Spring 配置
- ALIAS
对对象名取别名后,可以通过别名来getBean:<alias name="user" alias="userName">
- BEANS
id:bean 的唯一标识符,即对象名
name:对象的别名,可以取多个别名(用空格、逗号、分号、空格分隔开来)
class:bean 对象所对应的全限定名,包名+类型<bean id="user" class="nwpu.lausen.User", name="u1,u2;u3 u4"> <porperty name="name" value="sensen"/> </bean>
- IMPORT
用于团队开发,导入多个配置文件<import resource="applicationContext1.xml"/> <import resource="applicationContext2.xml"/> <import resource="applicationContext3.xml"/>
依赖注入 Dependency Injection
构造器注入
set 方式注入
注入不同格式的数据(基本数据类型、Bean对象、List、Set、Map、Properties、数组和空值),applicationContext.xml 文件如下 ```xml <?xml version=”1.0” encoding=”UTF-8”?>西游记 红楼梦 水浒传 三国演义 说学逗唱 唱念做打 唱 跳 rap 篮球 14 male
<!-- more bean definitions go here -->
3.
p 标签、c 标签

   1.
p命名空间注入,可以直接注入属性值(对应 Set 的属性注入)
```xml
<beans xmlns="http://www.springframework.org/schema/beans"
    xmlns:xsi="http://www.w3.org/2001/XMLSchema-instance"
    xmlns:p="http://www.springframework.org/schema/p"
    xmlns:c="http://www.springframework.org/schema/c"
    xsi:schemaLocation="http://www.springframework.org/schema/beans
        https://www.springframework.org/schema/beans/spring-beans.xsd">

    <bean name="classic" class="com.example.ExampleBean">
        <property name="email" value="someone@somewhere.com"/>
    </bean>

    <bean name="p-namespace" class="com.example.ExampleBean"
        p:email="someone@somewhere.com"/>
</beans>
直接使用p标签注入。使用创建好的 bean 对象赋值的时候,要使用 变量名-ref
<bean id="student0" class="nwpu.lausen.Student" p:address-ref="address" p:name="louis"/>
- c命名空间注入;类中必须有全参构造器,才能使用c标签
<bean id="student0" class="nwpu.lausen.Student" c:address-ref="address" c:name="louis"/>
4. Bean 的性质
Bean 的作用域
singleton(默认)
- 虽然可以从容器中取出多个对象,但都是单例;
- 修改标签
<bean id="..." class="..." scope="singleton"></bean>
prototype:
- 每次从容器中
getBean都会创建新对象 - 修改标签
<bean id="..." class="..." scope="prototype"></bean>
- 每次从容器中
- request、session、application、websocket 只能在web开发中使用的到
- application
- websocket
Bean 的自动装配
Spring支持的三种配置属性的方式
- XML文件中显式配置
- 在 Java 中显式配置
隐式地进行 Bean 的自动装配(bean 标签中的 autowire 属性)
ByName
<bean id="..." class="..." autowire="byName">- 在上下文容器(XML 文件)中查找,与 set 方法名相同的 bean(必须保证Bean的id唯一,并且字面上需要与注入属性名相同)
ByType
<bean id="..." class="..." autowire="byType">- 在上下文容器(XML 文件)中查找,与自己对象属性类型相同的 bean(必须保证类型的Bean唯一)
5. 使用注解开发
基本注解使用方式
使用方式 ```xml <?xml version=”1.0” encoding=”UTF-8”?>
   1.
导入约束:`xmlns:context="http://www.springframework.org/schema/context"`

   2.
添加约束的支持:
xsi:schemaLocation=”http://www.springframework.org/schema/beans https://www.springframework.org/schema/beans/spring-beans.xsd http://www.springframework.org/schema/context https://www.springframework.org/schema/context/spring-context.xsd">
   3.
添加注解支持: `<context:annotation-config/>`

2.
`@Autowired`

   1. 直接写到属性上,或者属性对应的 Set 方法上;
   2. 当类的定义中属性上写了 `@Autowired`,连 Set 方法都可以省略,因为注解使用**反射**来实现;
   3. 不写 Set 方法的前提是需要自动装配的属性(带 `@Autowired` 的),在 Spring 的 IoC 容器中存在且名字符合 ByName 自动装配规则;
   4. `@Autowired(required = false)` 代表该需要自动装配的属性可以为 null,否则不能为空
   5. 标记了注解 `@Nullable`,该字段可以为 null
   6. 标记了注解 `@Qualifier(value = "attrName")`,在 XML 的 Bean 中可以有名为 "attrName" 的属性,并且可以指定唯一的 Bean 对象并实现自动注入
3.
`@Resource`

   1.
在 Maven 配置文件 `pom.xml` 中添加依赖,才可以使用 `@Resource`
```xml
<dependency>
    <groupId>javax.annotation</groupId>
    <artifactId>jsr250-api</artifactId>
    <version>1.0</version>
</dependency>
也可以用来自动装配,都可以放在属性字段上
@Autowired- 先使用 ByType 方式进行匹配,如果只有一个对应的类对象,则成功;否则,使用 ByName 对属性名进行精准匹配
- 如果 XML 容器中的 Bean 对象不唯一,则使用
@Qualifier注解进行指定 - 如果被
@Autowired注解的属性名,没有在 XML 配置文件中出现,类的定义会报错。此时也需要使用@Qualifier注解进行指定
@Resource先使用 ByName,再使用 ByType 进行匹配,匹配不到则报错
注解整理
使用方法
- 导入 AOP 的包
- 使用注解导入 context 约束
<context:annotation-config/>,增加注解驱动的支持 - 在配置文件中加上
<context:component-scan base-package="...">会扫描指定包下的注解,其中的注解生效
注册 Bean 的注解
- 在类定义上方,使用
@Componet并由 Spring 接管,注册 Bean 并保存到容器中 - 在类中的成员变量声明、Set 方法上方,使用
@Value("value")注入数据 @Component衍生注解(功能相同,都是将某类注册到 Spring 中,装配到 Bean 容器中;需要写在类的上方)- DAO 层:
@Repository - Service 层:
@Service - Controller 层:
@Controller
- DAO 层:
- 在类定义上方,使用
自动装配的注解
@Autowired@Resource@Qualifier@Nullable
对 Bean 作用域的注解(需要写在注册 Bean 的注解之下,类定义之上)
- 单例模式
@Scope("singleton") - 原型模式
@Scope("prototype")
- 单例模式
- 最佳实践:XML 配置文件来管理 Bean,注解完成属性注入
纯 Java 的方式配置 Spring
(SpringBoot 中常用)
推荐使用核心功能 JavaConfig 进行 Spring 的配置
创建一个配置类,使用
@Configuration声明组件在配置类的上方,使用
@ComponentScan(...)扫描指定包下的注解在配置类中的方法上方,使用
@Bean注解;- 带
@Bean的类,相当于一个 bean 标签 - 该方法的方法名,相当于 bean 标签中的 id 属性(即在Test 类中,从上下容器中 getBean 中需要传入的参数)
- 该方法应该返回要注入容器的对象,相当于 bean 标签中的 class 属性
- 带
使用注解
@Import(appConfig.class),引入其他配置类在 Test 类中通过
AnnotationConfigApplicationContext来获取上下文容器ApplicationContext context = new AnnotationConfigApplicationContext(appConfig.class);
(使用 XML 文件进行配置时,用 ClassPathXmlApplicationContext 获取容器,传入的参数是 XML 的文件名;使用注解进行配置的时候,用 AnnotationConfigApplicationContext 获取容器,传入的是配置类)
其他
- Spring 除了事务之外,配置比较简单
- MyBatis 建议使用 XML 文件进行配置,可以配置成更简单的形式
- 学习完 Java 要掌握 30 个技术栈,常用的比较熟悉,最近项目没有涉及的技术如果不记笔记、不复习,就忘了
6. 面向切面编程(Aspect Oriented Programming AOP)
代理模式
SpringAOC 和 SpringMVC 面试必问,而代理模式是 SpringAOC 的底层。
代理模式分类
- 静态代理
- 动态代理(通过反射机制动态创建)
- CGLIB 代理类
静态代理
- 当客户类不能直接引用委托类,代理类可以充当委托类和客户类的中介
- 代理类应和委托类实现同一接口,或在代理类中声明委托类对象
- 通过代理类来拓展功能和公共服务,而不需要修改委托类
- 代理类并不实现具体业务,而是通过调用委托类的方法来实现——需要新功能,则改代理类,而不需要改动委托类的业务代码
动态代理(通过反射动态加载类)
与静态代理角色相同:客户类、委托类、代理类、抽象业务类
代理类是动态生成的
动态代理的类别
- 基于接口:JDK 的动态代理
- 基于类:CGLIB
- 基于 Java 字节码: JAVAssit
实现
不用写代理类,而是动态生成。写 ProxyInvocationHandler 类(Proxy:代理;Invocation:调用;Handler:处理程序)
- 该类实现 InvocationHandler 接口(该接口仅有 invoke 一个方法)
- 声明被代理类的对象
- 使用反射包下的 Proxy 类中的
newProxyInstance方法,来构造生成代理类的方法getProxy - 写
invoke函数通过反射来调用委托类方法,返回结果 - 横向添加功能,就在 ProxyInvocationHandler 类中进行拓展 ```java package nwpu.lausen.demoproxy;
import nwpu.lausen.service.UserServiceImpl;
import java.lang.reflect.InvocationHandler; import java.lang.reflect.Method; import java.lang.reflect.Proxy;
// 一个创建代理类的 InvocationHandler 的实现类 public class ProxyInvocationHandler implements InvocationHandler { // 声明委托类(接口的实现类)对象 private UserServiceImpl userService;
// 对应的 Setter 函数
public void setUserService(UserServiceImpl userService) {
    this.userService = userService;
}

// 创建代理类;代理的是接口
// public static Object newProxyInstance(ClassLoader loader, Class<?>[] interfaces, InvocationHandler h)
public Object getProxy() {
    return Proxy.newProxyInstance(  // Proxy 代理类的方法
            this.getClass().getClassLoader(),  // 该实现类的 ClassLoader
            userService.getClass().getInterfaces(),  // 委托类实现的**接口**,代理一类对象
            this  // 本类的对象
    );
}

// 处理代理实例,调用委托类中的方法,并返回结果
public Object invoke(Object proxy, Method method, Object[] args) throws Throwable {
    Object result = method.invoke(userService, args);  // 使用 invoke 执行方法
    return result;
}
}
`method.getName()`
      2.
客户类

         1. 创建抽象代理角色 ProxyInvocationHandler 的对象
         2. 创建委托类对象,并通过 `set` 函数向抽象代理角色中进行注入
         3. 使用抽象代理对象中的成员函数 `getProxy` 动态生成代理类
         4. 通过代理类访问和调用委托类中的方法
```java
package nwpu.lausen.demoproxy;

import nwpu.lausen.service.UserServiceImpl;

public class Client {
    public static void main(String[] args) {
        // 委托类对象
        UserServiceImpl userService = new UserServiceImpl();

        // 获取代理类的实现类 的对象
        ProxyInvocationHandler pih = new ProxyInvocationHandler();
        // 注入委托类对象
        pih.setUserService(userService);
        // 动态实现代理类;动态代理代理的是接口,而不是实现类
        UserServiceImpl proxy = (UserServiceImpl) pih.getProxy();

        // 通过代理类,执行的委托类中的方法
        proxy.getUser();
    }
}
AOP 简介
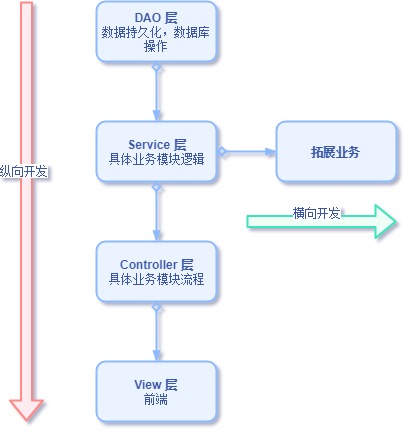
如果要在不改动业务逻辑和底层源码的情况下,增添新的业务功能,可以使用动态代理的方式,也可以使用 Spring 中的 AOP。
- 允许用户自定义切面
- 提供声明式事务
概念
- 横切关注点:与业务逻辑无关,需要关注的日志、缓存、事务等部分
- 切面:将横切关注点模块化为类
- 通知:切面需要完成的方法
- 切入点:切面执行通知的位置
- 连接点:与切入点匹配的执行位置
- 目标:被通知的对象(如果使用 Spring 的话,Spring 通过 InvocationHandler 帮忙做了)
- 代理:目标应用通知之后创建的对象(Spring 通过 InvocationHandler 帮忙做了)
SpringAOP 中,通过 Advice 定义横切逻辑,支持五种
- Before Advice
- After Advice
- After Returning Advice
- After Throwing Advice
- Around Advice
使用 Spring 实现 AOP
- 通过模块的 pom.xml 文件导入 aspectjweaver (顺带 spring-aop 和 spring-context)的包(项目中应该已有 springframework 和 junit 依赖)
```xml
org.aspectj aspectjweaver 1.9.4 runtime org.springframework spring-aop 5.2.9.RELEASE org.springframework spring-context 5.2.9.RELEASE test
2.
实现通知类

   1. 之前的通知继承 `MethodBeforeAdvice`,重写其中的 `public void before(Method method, Object[] args, Object target) throws Throwable {}`
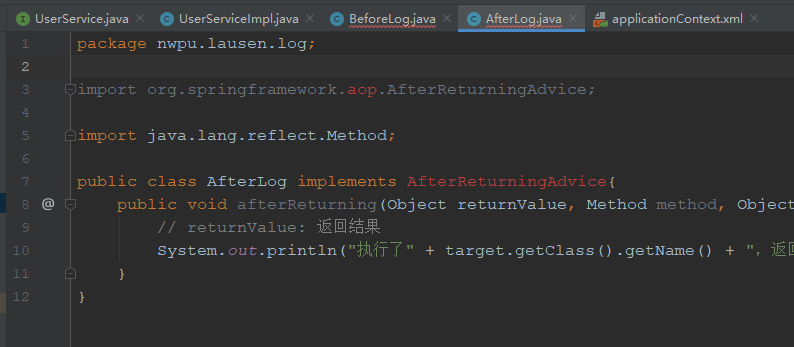
   2. 之后的通知继承 `AfterReturningAdvice`,重写其中的 `public void afterReturning(Object returnValue, Method method, Object[] args, Object target) throws Throwable {}`
3.
修改 resource/applicationContext.xml (Spring 配置文件)
```xml
<?xml version="1.0" encoding="UTF-8"?>
<beans xmlns="http://www.springframework.org/schema/beans"
       xmlns:xsi="http://www.w3.org/2001/XMLSchema-instance"
       xmlns:aop="http://www.springframework.org/schema/aop"
       xsi:schemaLocation="http://www.springframework.org/schema/beans
        https://www.springframework.org/schema/beans/spring-beans.xsd
        http://www.springframework.org/schema/aop
        http://www.springframework.org/schema/aop/spring-aop.xsd">

    <!--方式一-->
    <!--注册 Bean-->
    <bean id="userService" class="nwpu.lausen.service.UserServiceImpl"/>
    <bean id="beforeLog" class="nwpu.lausen.log.BeforeLog"/>
    <bean id="afterLog" class="nwpu.lausen.log.AfterLog"/>

    <!--AOP 的配置;导入 AOP 的约束-->
    <aop:config>
        <!--切入点;expression表达式,execution(要执行的位置 * * * *)-->
        <aop:pointcut id="pointcut" expression="execution(* nwpu.lausen.service.UserServiceImpl.*(..))"/>
        <!--执行环绕增加;将beforeLog类,切入到pointcut对应的方法(此处是UserServiceImpl中的所有方法,增删改查)上-->
        <aop:advisor advice-ref="beforeLog" pointcut-ref="pointcut"/>
        <aop:advisor advice-ref="afterLog" pointcut-ref="pointcut"/>
    </aop:config>

</beans>
- 添加 aop 的命名空间(xmlns:XML NameSpace)
- 在 xsi:schemaLocation 属性中添加 aop 对应的 xsd 文件和命名空间的对应关系
- 确定切入点位置——某实现类的方法
- 将 log 对应的实现类绑定到切入点上,即可在执行切入点方法时,执行 log 实现类中的函数
使用自定义类实现 AOP
- 创建一个自定义类 ```java package nwpu.lausen.diy;
public class DiyPointCut { public void beforeLog() { System.out.println(“=====方法执行前=====”); }
public void afterLog() {
    System.out.println("=====方法执行后=====");
}
}
2.
在 applicationContext.xml 文件中进行 AOP 配置
```xml
<?xml version="1.0" encoding="UTF-8"?>
<beans xmlns="http://www.springframework.org/schema/beans"
       xmlns:xsi="http://www.w3.org/2001/XMLSchema-instance"
       xmlns:aop="http://www.springframework.org/schema/aop"
       xsi:schemaLocation="http://www.springframework.org/schema/beans
        https://www.springframework.org/schema/beans/spring-beans.xsd
        http://www.springframework.org/schema/aop
        http://www.springframework.org/schema/aop/spring-aop.xsd">

<!--    方式二-->
<!--    注册Bean-->
    <bean id="userService" class="nwpu.lausen.service.UserServiceImpl"/>
    <bean id="beforeLog" class="nwpu.lausen.log.BeforeLog"/>
    <bean id="afterLog" class="nwpu.lausen.log.AfterLog"/>
    <bean id="diy" class="nwpu.lausen.diy.DiyPointCut"/>
    <aop:config>
        <aop:aspect ref="diy">  <!-- 自定义切面,引用 diy 类 -->
<!--    切入点,是目标类对象中的全部方法-->
            <aop:pointcut id="point" expression="execution(* nwpu.lausen.service.UserServiceImpl.*(..))"/>
<!--    通知-->
            <aop:before method="beforeLog" pointcut-ref="point"/>
            <aop:after method="afterLog" pointcut-ref="point"/>
        </aop:aspect>
    </aop:config>

</beans>
- 切面是一个类,通知是切面中的方法。
- 切入点是人为指定的对象中的方法,此处使用表达式:
expression="execution(* nwpu.lausen.service.UserServiceImpl.*(..))"
使用注解实现 AOP(功能有限)
实现一个切面的类,在类前面使用注解 @Aspect 声明式切面
在其中的方法上添加声明其为增强的注解,如@After,@Around,@Before ```java package nwpu.lausen.diy;
import org.aspectj.lang.ProceedingJoinPoint; import org.aspectj.lang.Signature; import org.aspectj.lang.annotation.After; import org.aspectj.lang.annotation.Around; import org.aspectj.lang.annotation.Aspect; import org.aspectj.lang.annotation.Before;
@Aspect public class AnnotationPointCut { @Before(“execution( nwpu.lausen.service.UserServiceImpl.(..))”) public void beforeLog() { System.out.println(“=====方法执行前=====”); }
@After("execution(* nwpu.lausen.service.UserServiceImpl.*(..))")
public void afterLog() {
    System.out.println("=====方法执行后=====");
}

@Around("execution(* nwpu.lausen.service.UserServiceImpl.*(..))")
// 在环绕增强中,我们可以给定一个参数代表获取处理切入的点
public void around(ProceedingJoinPoint pjp) throws Throwable {
    System.out.println("=====  环绕前 =====");
    Object proceed = pjp.proceed();
    System.out.println("=====  环绕后 =====");

    Signature signature = pjp.getSignature();
    System.out.println("signature: " + signature);
    System.out.println(proceed);
}
}
3.
在 applicationContext.xml 文件中进行配置
```xml
<?xml version="1.0" encoding="UTF-8"?>
<beans xmlns="http://www.springframework.org/schema/beans"
       xmlns:xsi="http://www.w3.org/2001/XMLSchema-instance"
       xmlns:aop="http://www.springframework.org/schema/aop"
       xsi:schemaLocation="http://www.springframework.org/schema/beans
        https://www.springframework.org/schema/beans/spring-beans.xsd
        http://www.springframework.org/schema/aop
        http://www.springframework.org/schema/aop/spring-aop.xsd">

<!--    方式三-->
<!--    注册 Bean-->
    <bean id="userService" class="nwpu.lausen.service.UserServiceImpl"/>
    <bean id="beforeLog" class="nwpu.lausen.log.BeforeLog"/>
    <bean id="afterLog" class="nwpu.lausen.log.AfterLog"/>
    <bean id="annotationPointCut" class="nwpu.lausen.diy.AnnotationPointCut"></bean>
<!--    开启注解支持,通过注解自动代理-->
    <aop:aspectj-autoproxy/>
</beans>
- 打印出的结果:
=====  环绕前 =====
=====方法执行前=====
增加了一个用户!
=====方法执行后=====
=====  环绕后 =====
signature: void nwpu.lausen.service.UserService.create()
null
学到了 https://www.bilibili.com/video/BV1WE411d7Dv?p=23,之后开始回顾 MyBatis。需要先学一下,再回来接着看完最后几P。
0. 报错
Maven 编译报错
Failed to execute goal org.apache.,maven.plugins:maven-compiler-plugin:3.8.1解决方案:在项目的 pom.xml 文件中加上插件
```xml
    <build>
        <plugins>
            <plugin>
                <groupId>org.springframework.boot</groupId>
                <artifactId>spring-boot-maven-plugin</artifactId>
            </plugin>
            <plugin>
                <groupId>org.apache.maven.plugins</groupId>
                <artifactId>maven-compiler-plugin</artifactId>
                <version>3.8.1</version>
                <configuration>
                    <source>1.8</source>
                    <target>1.8</target>
                </configuration>
            </plugin>
        </plugins>
    </build>
```
- applicationContext.xml 文件编译提示错误
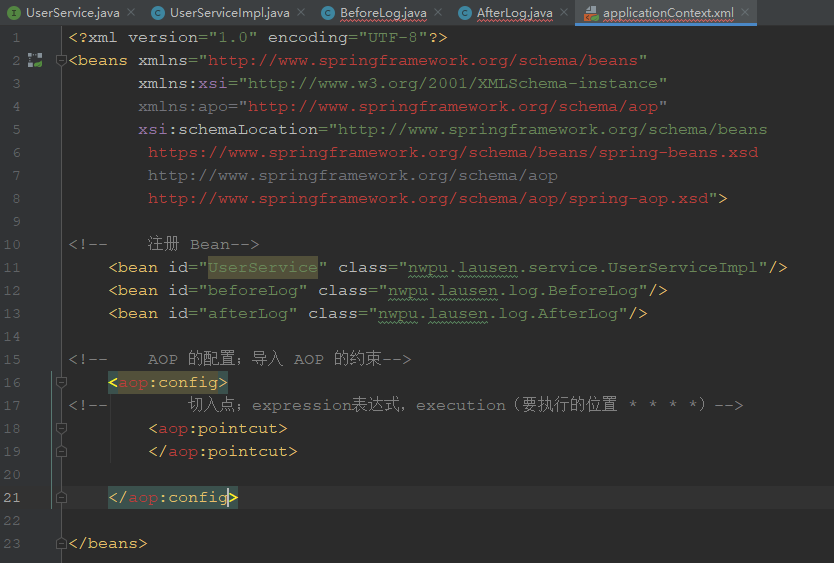
右键-Show Context Actions-Fetch eternal resource,即可
<aop:config>标签报错,需要进行 Create Namespace Delaration,也就是上方的xmlns:apo="http://www.springframework.org/schema/aop"匹配不到 maven 依赖中 aop 中的内容
右键-Show Context Actions-Add Maven Dependency,然后再进行一次 compile
补充
POJO v.s. JavaBean
- POJO(Plain Ordinary Java Object):简单普通的 Java 对象
- JavaBean:作为可复用组件的 Java 类
- POJO 是相对更纯净的简单接口,只存储数据不具有业务逻辑,而JavaBean 中往往封装些简单逻辑

