参考
AI SUMMER这篇文章写的很好,很直观,很清晰:https://theaisummer.com/positional-embeddings/
前言
这里讨论的相对位置编码的实现策略来自于Music Transformer。
这里有一篇介绍性的文章:https://gudgud96.github.io/2020/04/01/annotated-music-transformer/,图例非常清晰。
首先理解下相对位置自注意力中关于位置嵌入的一些细节。 相对注意力的一些相关概念。摘自Music Transformer。在不考虑head维度时:
 : relative position embedding,大小为
 : 来自Shaw论文中引入的相对位置嵌入的中间表示,大小为
 : 表示相对位置编码与query的交互结果,大小为
 ,即在
,即在 维度上进行了累加
- Music Transformer的一点工作就是将这个会占用较大存储空间的中间表示
 去掉,直接得到
 ,如下图所示

要注意这里的 表示的是针对相对位置
 的嵌入,最小相对位置为
 ,最大为0(因为需要考虑因果关系,前面的i看不到后面的j),所以有
 个位置。
个位置。
而对于我们这里将要讨论的不考虑因果关系的情况,最小相对位置为 ,最大为
,最大为 。所以我们的位置嵌入
 形状为
形状为 。
。
代码分析
首先找份代码来看看,https://github.com/lucidrains/bottleneck-transformer-pytorch/blob/main/bottleneck_transformer_pytorch/bottleneck_transformer_pytorch.py实现的相对位置编码涉及到几个关键的组件:
import torchimport torch.nn as nnfrom einops import rearrangedef relative_to_absolute(q):"""Converts the dimension that is specified from the axisfrom relative distances (with length 2*tokens-1) to absolute distance (length tokens)borrowed from lucidrains:https://github.com/lucidrains/bottleneck-transformer-pytorch/blob/main/bottleneck_transformer_pytorch/bottleneck_transformer_pytorch.py#L21Input: [bs, heads, length, 2*length - 1]Output: [bs, heads, length, length]"""b, h, l, _, device, dtype = *q.shape, q.device, q.dtypedd = {'device': device, 'dtype': dtype}col_pad = torch.zeros((b, h, l, 1), **dd)x = torch.cat((q, col_pad), dim=3) # zero pad 2l-1 to 2lflat_x = rearrange(x, 'b h l c -> b h (l c)')flat_pad = torch.zeros((b, h, l - 1), **dd)flat_x_padded = torch.cat((flat_x, flat_pad), dim=2)final_x = flat_x_padded.reshape(b, h, l + 1, 2 * l - 1)final_x = final_x[:, :, :l, (l - 1):]return final_xdef rel_pos_emb_1d(q, rel_emb, shared_heads):"""Same functionality as RelPosEmb1DArgs:q: a 4d tensor of shape [batch, heads, tokens, dim]rel_emb: a 2D or 3D tensorof shape [ 2*tokens-1 , dim] or [ heads, 2*tokens-1 , dim]"""if shared_heads:emb = torch.einsum('b h t d, r d -> b h t r', q, rel_emb)else:emb = torch.einsum('b h t d, h r d -> b h t r', q, rel_emb)return relative_to_absolute(emb)class RelPosEmb1DAISummer(nn.Module):def __init__(self, tokens, dim_head, heads=None):"""Output: [batch head tokens tokens]Args:tokens: the number of the tokens of the seqdim_head: the size of the last dimension of qheads: if None representation is shared across heads.else the number of heads must be provided"""super().__init__()scale = dim_head ** -0.5self.shared_heads = heads if heads is not None else Trueif self.shared_heads:self.rel_pos_emb = nn.Parameter(torch.randn(2 * tokens - 1, dim_head) * scale)else:self.rel_pos_emb = nn.Parameter(torch.randn(heads, 2 * tokens - 1, dim_head) * scale)def forward(self, q):return rel_pos_emb_1d(q, self.rel_pos_emb, self.shared_heads)
可以看到:
RelPosEmb1DAISummer初始化了
rel_pos_emb_1d为relative_to_absolute提供 (为了便于书写,我们将其设为
 ),通过在
),通过在relative_to_absolute中各种形变和padding,从而得到了
理解的难点在relative_to_absolute中的实现过程。
这里会把 从一个
从一个 tensor转化为一个
 的tensor。这个过程实际上就是一个从表中查找的过程。
这里的实现其实有些晦涩,直接阅读代码是很难明白其中的意义。接下来会重点说这个。
需要注意的是,下面的分析都是按照1D的token序列来解释的,实际上2D的也是将H和W分别基于1D的策略处理的。也就是将H或者W合并到头索引那一维度,即这里的heads,结果就和1D的一致了,只是还会多一个额外的广播的过程。如下代码:
import torch.nn as nnfrom einops import rearrangefrom self_attention_cv.pos_embeddings.relative_embeddings_1D import RelPosEmb1Dclass RelPosEmb2DAISummer(nn.Module):def __init__(self, feat_map_size, dim_head, heads=None):"""Based on Bottleneck transformer paperpaper: https://arxiv.org/abs/2101.11605 . Figure 4Output: qr^T [batch head tokens tokens]Args:tokens: the number of the tokens of the seqdim_head: the size of the last dimension of qheads: if None representation is shared across heads.else the number of heads must be provided"""super().__init__()self.h, self.w = feat_map_size # height , widthself.total_tokens = self.h * self.wself.shared_heads = heads if heads is not None else Trueself.emb_w = RelPosEmb1D(self.h, dim_head, heads)self.emb_h = RelPosEmb1D(self.w, dim_head, heads)def expand_emb(self, r, dim_size):# Decompose and unsqueeze dimensionr = rearrange(r, 'b (h x) i j -> b h x () i j', x=dim_size)expand_index = [-1, -1, -1, dim_size, -1, -1] # -1 indicates no expansionr = r.expand(expand_index)return rearrange(r, 'b h x1 x2 y1 y2 -> b h (x1 y1) (x2 y2)')def forward(self, q):"""Args:q: [batch, heads, tokens, dim_head]Returns: [ batch, heads, tokens, tokens]"""assert self.total_tokens == q.shape[2], f'Tokens {q.shape[2]} of q must \be equal to the product of the feat map size {self.total_tokens} '# out: [batch head*w h h]r_h = self.emb_w(rearrange(q, 'b h (x y) d -> b (h x) y d', x=self.h, y=self.w))r_w = self.emb_h(rearrange(q, 'b h (x y) d -> b (h y) x d', x=self.h, y=self.w))q_r = self.expand_emb(r_h, self.h) + self.expand_emb(r_w, self.w)return q_r
提前的思考
首先我们要明确,为什么对于每个维度为 的token
  ,其对应的整体
 会有
会有 这样一个缩减的过程?
因为对于长为 的序列中的每一个元素
 ,实际上与之可能有关的元素
 最多只有
最多只有 个(废话,O(∩_∩)O哈哈~)。
所以对于每个元素,实际上这里的 并不会都用到。这里的
 只是所有可能会用到的情形(分别对应于各种相对距离
 )。
)。
这里需要说明的一点是,有些相对注意力的策略中,会使用固定的窗口。 即对于窗口之外的j,和窗口边界上的j的相对距离认为是一样的,即
,我们这里介绍的可以看做是
。 例如这个实现:https://github.com/TensorUI/relative-position-pytorch/blob/master/relative_position.py
所以这里前面展示的这个函数relative_to_absolute实际上就是在做这样一件事:从 中抽取对应于各个token
 真实存在的相对距离
 的位置嵌入集合
 来得到最终的
 。
。
背后的动机
为了便于展示这个代码描述的过程的动机,我们首先构造一个简单的序列 ,包含5个元素,则
 。这里嵌入的维度为
 。则位置
。则位置 对应的相对距离矩阵可以表示为:
图1
这里红色标记表示各个位置上的相对距离。
我们再看下假定已经得到的 :
: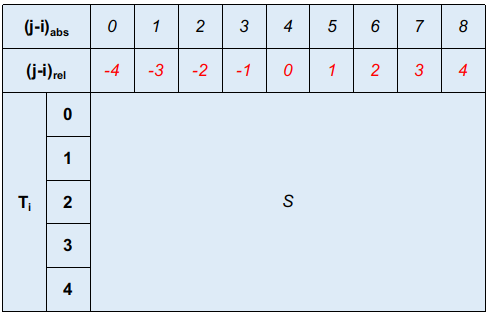
图2
这里对各个 都提供了独立的一套嵌入
 。为了直观的展示,这里我们也展示了对于这
 个相对位置的相对距离,同时也标注了对应于嵌入矩阵各列的绝对索引。
接下来我们就需要提取想要的那部分嵌入的tensor了。
这个时候,我们需要明白,我们要获取的是哪部分结果:
图3
这里实际上就是结合了图1中已经得到的相对距离和图2中的 ,从而就可以明白,红色的这部分区域正是我们想要的那部分合理索引对应的位置编码。
稍微整理下,也就是如下的绝对索引对应的嵌入信息 (形状与
(形状与 一致,可以直接元素级相加):
图4
而前面的代码relative_to_absolute正是在做这样一件事。就是通过不断的padding和reshape来从图3中获得图4中这些绝对索引对应的嵌入。
对应的流程
关于代码的流程,参考链接中的图例非常直观:
col_pad = torch.zeros((b, h, l, 1), **dd)x = torch.cat((q, col_pad), dim=3) # zero pad 2l-1 to 2l

flat_x = rearrange(x, 'b h l c -> b h (l c)')

flat_pad = torch.zeros((b, h, l - 1), **dd)flat_x_padded = torch.cat((flat_x, flat_pad), dim=2)

final_x = flat_x_padded.reshape(b, h, l + 1, 2 * l - 1)final_x = final_x[:, :, :l, (l - 1):]

将提取的内容对应于原始的 中,可以看到是如下区域,正如前面的分析所示。

若有收获,就点个赞吧
0 人点赞
