在Ubuntu18上安装Nvidia drivers的几种方式
解决方案
注意:请关闭BIOS设置中的安全启动,不然可能ubuntu检测不到显卡,也就是后面的ubuntu-drivers devices没有输出!!!
The objective is to install the NVIDIA drivers on Ubuntu 18.04 Bionic Beaver Linux. This article will discuss three methods of Nvidia driver installation in the following order:
- Automatic Install using standard Ubuntu Repository
- Automatic Install using PPA repository to install Nvidia Beta drivers
- Manual Install using the Official nvidia.com driver
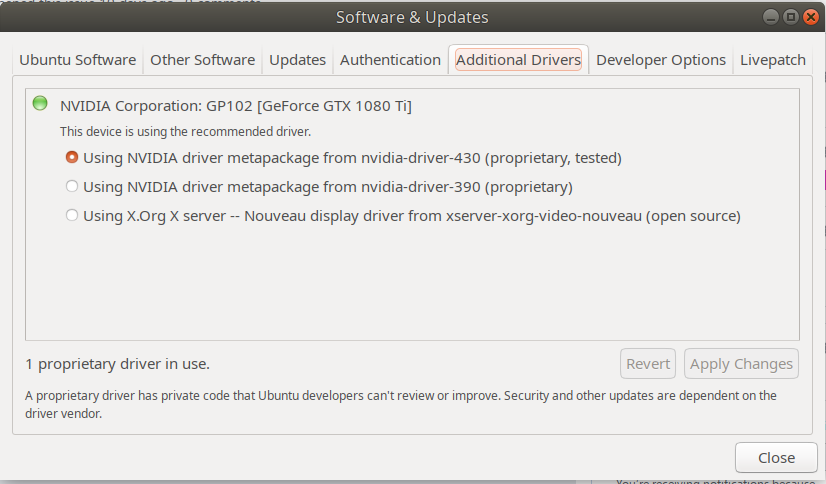
- 直接从“软件与更新”中的“附加驱动”中勾选安装
Automatic Install using standard Ubuntu Repository
The first method is the easiest to perform and in most cases it is the recommended approach.
First, detect the model of your nvidia graphic card and the recommended driver. To do so execute:
$ ubuntu-drivers devices== /sys/devices/pci0000:00/0000:00:01.0/0000:01:00.0 ==modalias : pci:v000010DEd00001180sv00001458sd0000353Cbc03sc00i00vendor : NVIDIA Corporationmodel : GP106 [GeForce GTX 1060 6GB]driver : nvidia-304 - distro non-freedriver : nvidia-340 - distro non-freedriver : nvidia-390 - distro non-free recommendeddriver : xserver-xorg-video-nouveau - distro free builtin== cpu-microcode.py ==driver : intel-microcode - distro free
From the above output we can conclude that the current system has NVIDIA GeForce GTX 680 graphic card installed and the recommend driver to install is nvidia-384.
If you agree with the recommendation feel free to use ubuntu-drivers command again to install all recommended drivers:
$ sudo ubuntu-drivers autoinstall
Alternatively, install desired driver selectively using the apt command. For example:
$ sudo apt install nvidia-340
Once the installation is concluded, reboot your system and you are done.
Automatic Install using PPA repository to install Nvidia Beta drivers
Using graphics-drivers PPA repository allows us to install bleeding edge Nvidia beta drivers at the risk of unstable system.
To proceed first add the ppa:graphics-drivers/ppa repository into your system:
$ sudo add-apt-repository ppa:graphics-drivers/ppa$ sudo apt update
Next, identify your graphic card model and recommended driver:
$ ubuntu-drivers devices== /sys/devices/pci0000:00/0000:00:01.0/0000:01:00.0 ==modalias : pci:v000010DEd00001C03sv00001043sd000085ABbc03sc00i00vendor : NVIDIA Corporationmodel : GP106 [GeForce GTX 1060 6GB]driver : nvidia-driver-390 - third-party freedriver : nvidia-driver-410 - third-party free recommendeddriver : nvidia-driver-396 - third-party freedriver : xserver-xorg-video-nouveau - distro free builtin
Same as with the above standard Ubuntu repository example, either install all recommended drivers automatically:
$ sudo ubuntu-drivers autoinstall
or selectively using the apt command. Example:
$ sudo apt install nvidia-410
Once done, reboot your system.
Manual Install using the Official Nvidia.com driver
Identify your NVIDIA VGA card.The below commands will allow you to identify your Nvidia card model:
$ lshw -numeric -C display
or
$ lspci -vnn | grep VGA
Download the Official Nvidia Driver. Using your web browser navigate to the official Nvidia website and download an appropriate driver for your Nvidia graphic card. Save the file into your home directory. Example:
$ ls
NVIDIA-Linux-x86_64-410.73.bin
Install Prerequisites. The following prerequisites are required to compile and install Nvidia driver:
$ sudo dpkg --add-architecture i386
$ sudo apt update
$ sudo apt install build-essential libc6:i386 libglvnd-dev pkg-config
Next step is to disable the default nouveau Nvidia driver. Follow this guide on how to disable the default Nouveau Nvidia driver.
Make sure you reboot your system before you proceed to the next step.
In order to install new Nvidia driver we need to stop the current display server.
The easiest way to do this is to change into runlevel 3 using the telinit command. After executing the following linux command the display server will stop, therefore make sure you save all your current work ( if any ) before you proceed:
$ sudo telinit 3
Hit CTRL+ALT+F1 and login with your username and password to open a new TTY1 session.
To start installation of Nvidia driver execute the following linux command and follow the wizard:
$ sudo bash NVIDIA-Linux-x86_64-410.73.bin
You now need to Accept License and follow the wizard to completed the installation. You man also be asked questions like:
The distribution-provided pre-install script failed!
Are you sure you want to continue? -> CONTINUE INSTALLATION
Would you like to run the nvidia-xconfig utility? -> YES
The Nvidia driver is now installed.
Reboot your system:
$ sudo reboot
Configure NVIDIA X Server Settings. After reboot you should be able to start NVIDIA X Server Settings app from the Activities menu.
Appendix
Error message:
WARNING: Unable to find suitable destination to install 32-bit compatibility libraries
Depending on your needs, this can be safely ignored. However, if you wish to install steam game platform this issue cannot be ignored. To resolve execute:
$ sudo dpkg --add-architecture i386
$ sudo apt update
$ sudo apt install libc6:i386
and re-run the nvidia driver installation.
更简单直接的方式
在”软件与更新“中的附加驱动里选择安装。
参考链接

若有收获,就点个赞吧
0 人点赞
