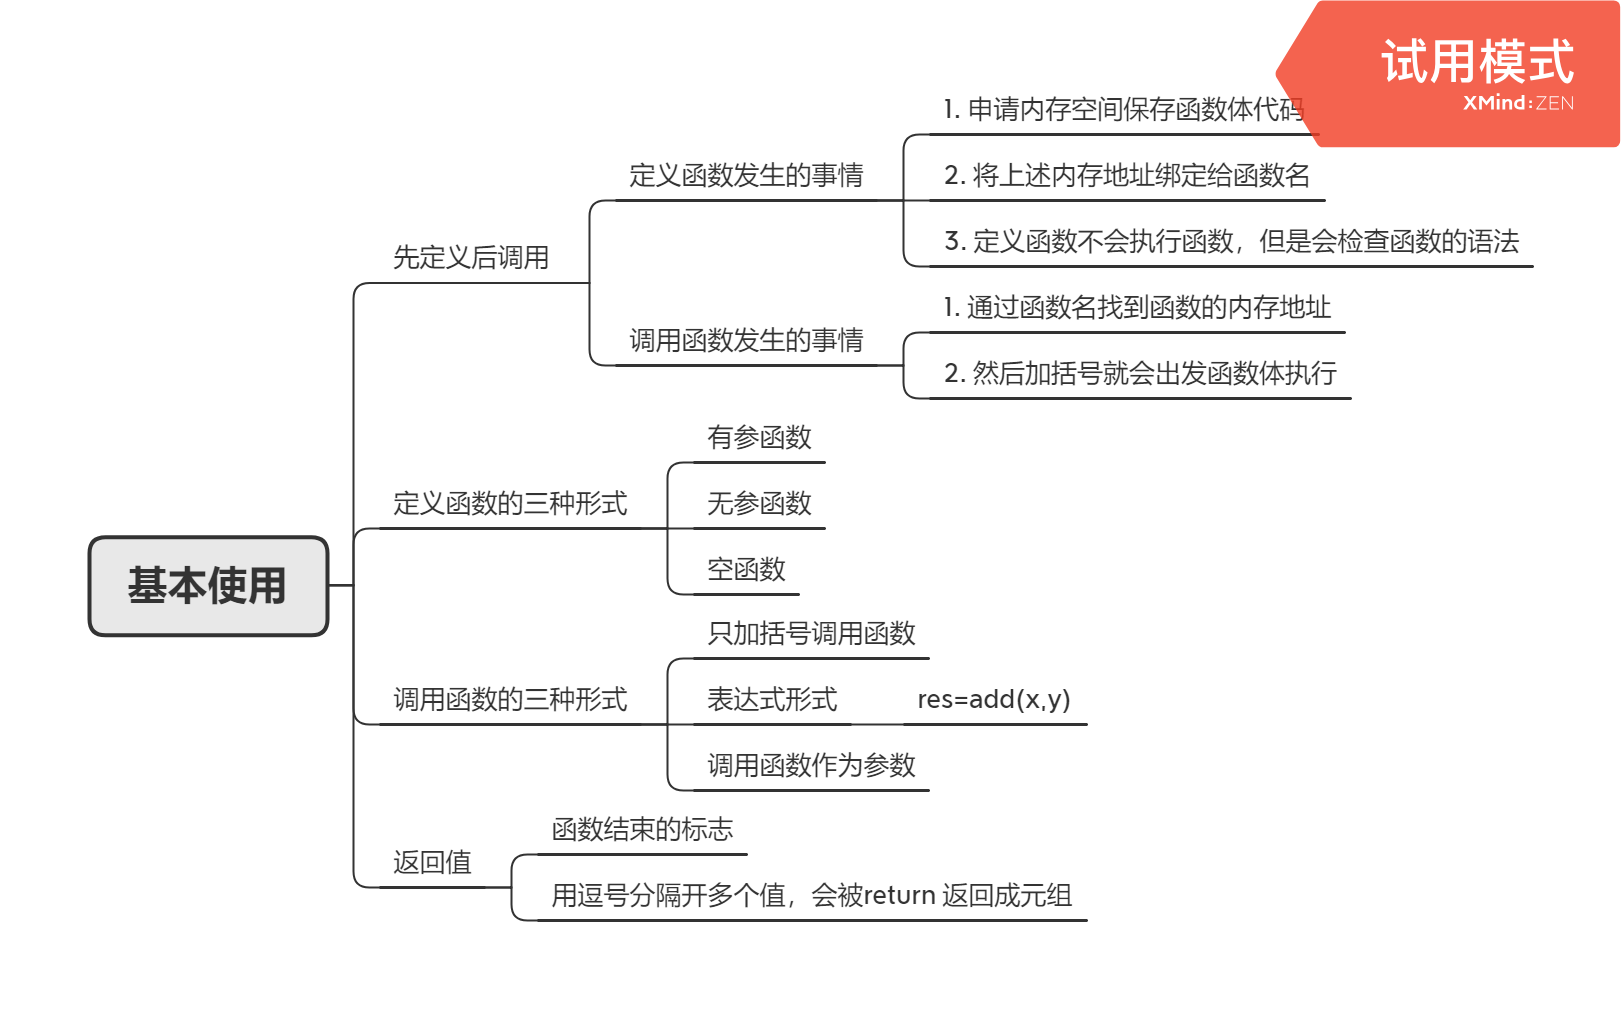
基本使用
函数定义和调用阶段的坑
### 判断以下函数是否会报错# 1.def foo():bar()print("from foo")def bar():print("from bar")foo()"""答案:不会报错,因为在foo()被调用之前,bar和foo都已经定义了,有了对应的内存空间"""# 2.def foo():bar()print("from foo")foo()def bar():print("from bar")"""答案:会报错,在foo()时,bar并没有被定义,所以找不到对应的内存地址"""
函数的参数

默认参数
### 写出以下函数的输出结果m=2def func(x,y=m): # y==>2的内存地址print(x,y)m=33func(1)"""答案:1 2- 原因:默认参数的值是在函数定义阶段被赋值的- 过程:在定义时y=m,其实是y指向了2的内存地址,所以后面定义的m,与定义时无关了。"""m = [1111]def func(x, y=m):print(x, y)m.append(33)func(1)"""答案:1 [1111,33]- y=[]的内存地址,append并不会改变地址,只是原地添加- 修好不要使用可变类型,因为这样可能受其他语句影响"""
args和*kwargs
*和被用到形参中**
# *args :位置形参# **kwargs:关键字形参def func(x, y, *args):print(x, y, args)func(1, 2, 3, 4, 5, 6)"""输出:1 2 (3, 4, 5, 6)- *:用来接收溢出的位置实参,溢出的位置实参会被*保存成元组赋值给紧随其后的变量名args"""def func(x, y, *args, **kwargs):print(x, y, args, kwargs)func(1, 2, 3, 4, k=5, z=6, m=7)"""输出: 1 2 (3, 4) {'k': 5, 'z': 6, 'm': 7}"""
*和被用到实参中**
# 实参中带*,可以先*将值打散成位置实参应用:将l中的内容空格隔开输出,最后一个不要空格l = [1, 2, 3, 4, 5, 6]print(*l)>>> 1 2 3 4 5 6## **示例def func(k1, k2, k3):print(k1, k2, k3)dic = {"k1": 3, "k2": 2, "k3": 3}func(*dic) # func('k1','k2','k3')func(**dic) # func(k1=1,k2=2,k3=3) # 这里是关键字参数,形参和实参的名字要相同print(*dic) # k1 k2 k3print(**dic) # 报错==>因为print中并没有对应可以接收关键字的key,所以会报错
def test(k1, k2, k3):print("===>test", k1, k2, k3)dic = {"k1": 3, "k2": 2, "k3": 3}test(*dic) # func('k1','k2','k3')test(**dic) # func(k1=1,k2=2,k3=3)def func(x1, x2, x3): # 这里的参数需要是data3,data2,data1print(x1, x2, x3)dic = {"data3": 1, "data2": 2, "data1": 3}func(*dic)func(**dic)***********运行结果***********===>test k1 k2 k3===>test 3 2 3data3 data2 data1Traceback (most recent call last):File "D:/mycode/test_top/direction1/leetcode_49.py", line 11, in <module>func(**dic)TypeError: func() got an unexpected keyword argument 'data3'Process finished with exit code 1
形参和实参中都带或*
### 形参和实参中都带*def func(x, y, *args):print(x, y, args)func(1, 2, [3, 4, 5, 6])func(1, 2, *[3, 4, 5, 6])>>>1 2 ([3, 4, 5, 6],) # 注意,若元组中只有一个元素,需要加逗号>>>1 2 (3, 4, 5, 6)### 形参和实参中都带**def func(x,y,**kwargs):print(x,y,kwargs)func(**{'y':222,'x':111,'a':333,'b':444})>>>111 222 {'a': 333, 'b': 444}
# 定义def index(x, y):print(x, y)def wrapper(*args, **kwargs): # 形参: args=(1,) kwargs={'y':2,'z':3}index(*args, **kwargs) # 实参:index(*(1,),**{'y':2,'z':3})解析为:index(1,z=3,y=2)# 调用wrapper(1, z=3, y=2)"""- 调用wrapper函数需要遵循index的参数规则(目前多了z=3,会报错)- 参数不能多,不能少"""
命名关键字参数(了解)
# 命名关键字参数:在定义函数时,*后定义的参数,如下所示:def fun(x,y,*,a,b):print(x,y)print(a,b)"""命名关键字参数必须按照key=value的形式为其传值""">>> func(1,2,b=222,a=111)
名称空间和作用域
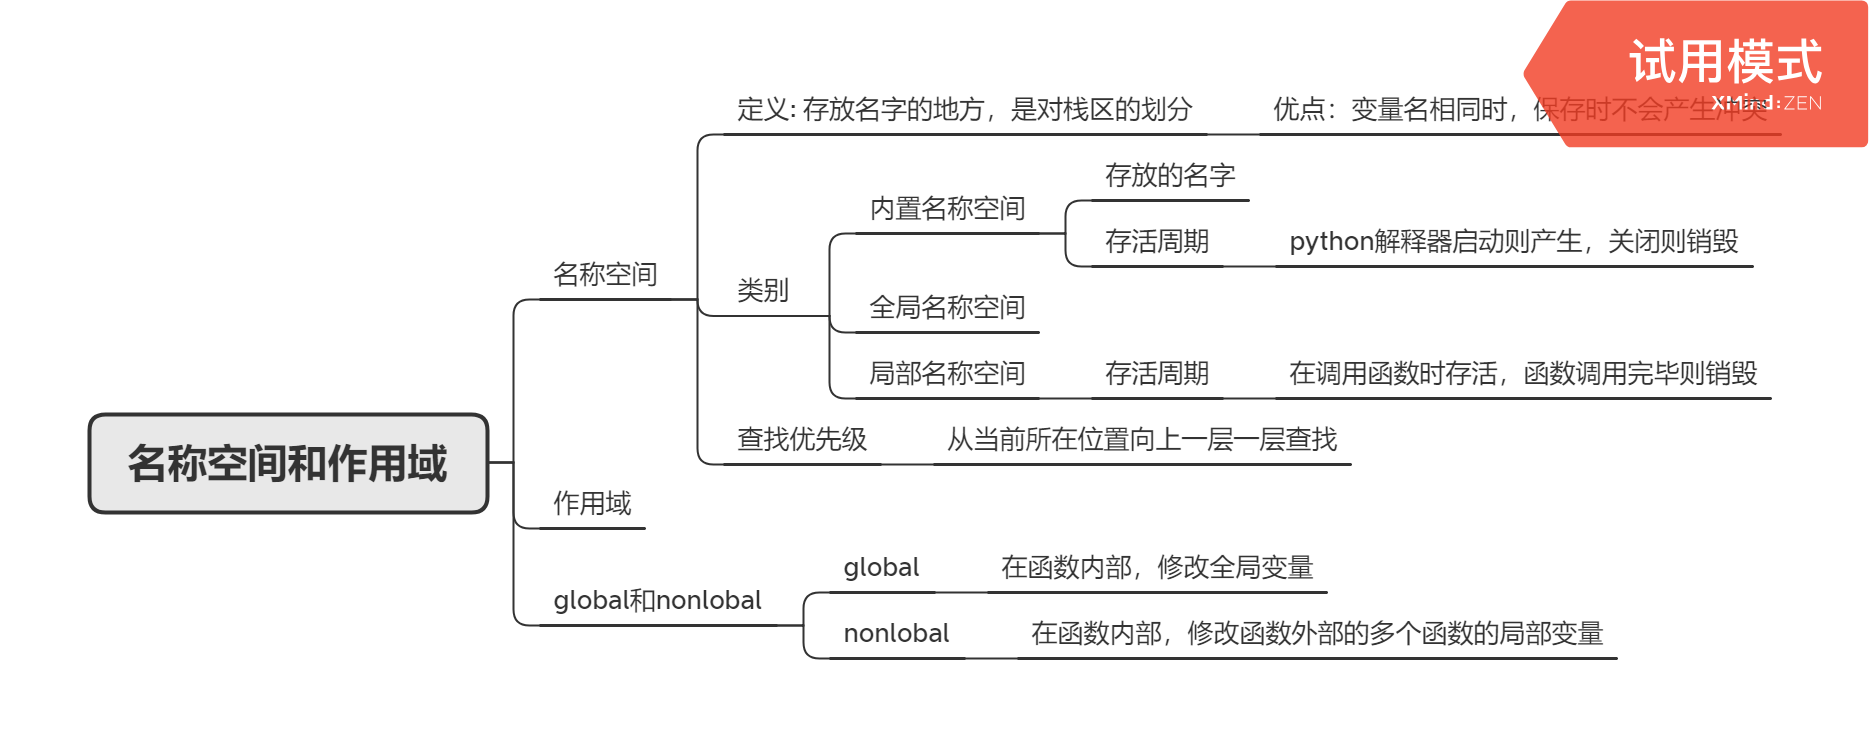
gloabl和nonlobal
# 示例一:局部和全局使用相同的名字x = 111def foo():x = 222print("===>foo:", x) # 222foo()print("===>main:", x) # 111# 示例2 :通过局部去修改全局变量的值,需要使用global(注:不可变类型)x = 111def foo():global x # 声明该x为全局的x,不需要新的内存空间了x = 222print("===>foo:", x) # 222foo()print("===>main:", x) # 222# 示例3 :通过局部去修改全局变量的值(可变类型可以直接改)x = [111]def foo():x.append(222) # 原地修改的,所以没有global问题不大print("===>foo:", x) # [111,222]foo()print("===>main:", x) # [111,222]
# 示例1:函数外层仍为函数x = 1def func1():x = 2def func2():x = 3print("====>func2:", x) # 3func2()print("====>func1:", x) # 2func1()print("====> main:", x) # 1# 示例2:x = 1def func1():x = 2def func2():nonlocal x # 声明该x为当前函数外部函数里的x(不会上升到全局变量,若外部函数没有则报错)x = 3print("====>func2:", x) # 3func2()print("====>func1:", x) # 3func1()print("====> main:", x) # 1# 示例3:x = 1def func1():#######def func2():nonlocal x # 声明该x为当前函数外部函数里的x(不会上升到全局变量,若外部函数没有则报错)x = 3print("====>func2:", x)func2()print("====>func1:", x)func1()print("====> main:", x)>>> SyntaxError: no binding for nonlocal 'x' found"""nonlocal:会从当前函数的局部往外层套着的函数里查找,一直到外层函数不再套函数为止。- 可变类型依然不需要声明"""
装饰器
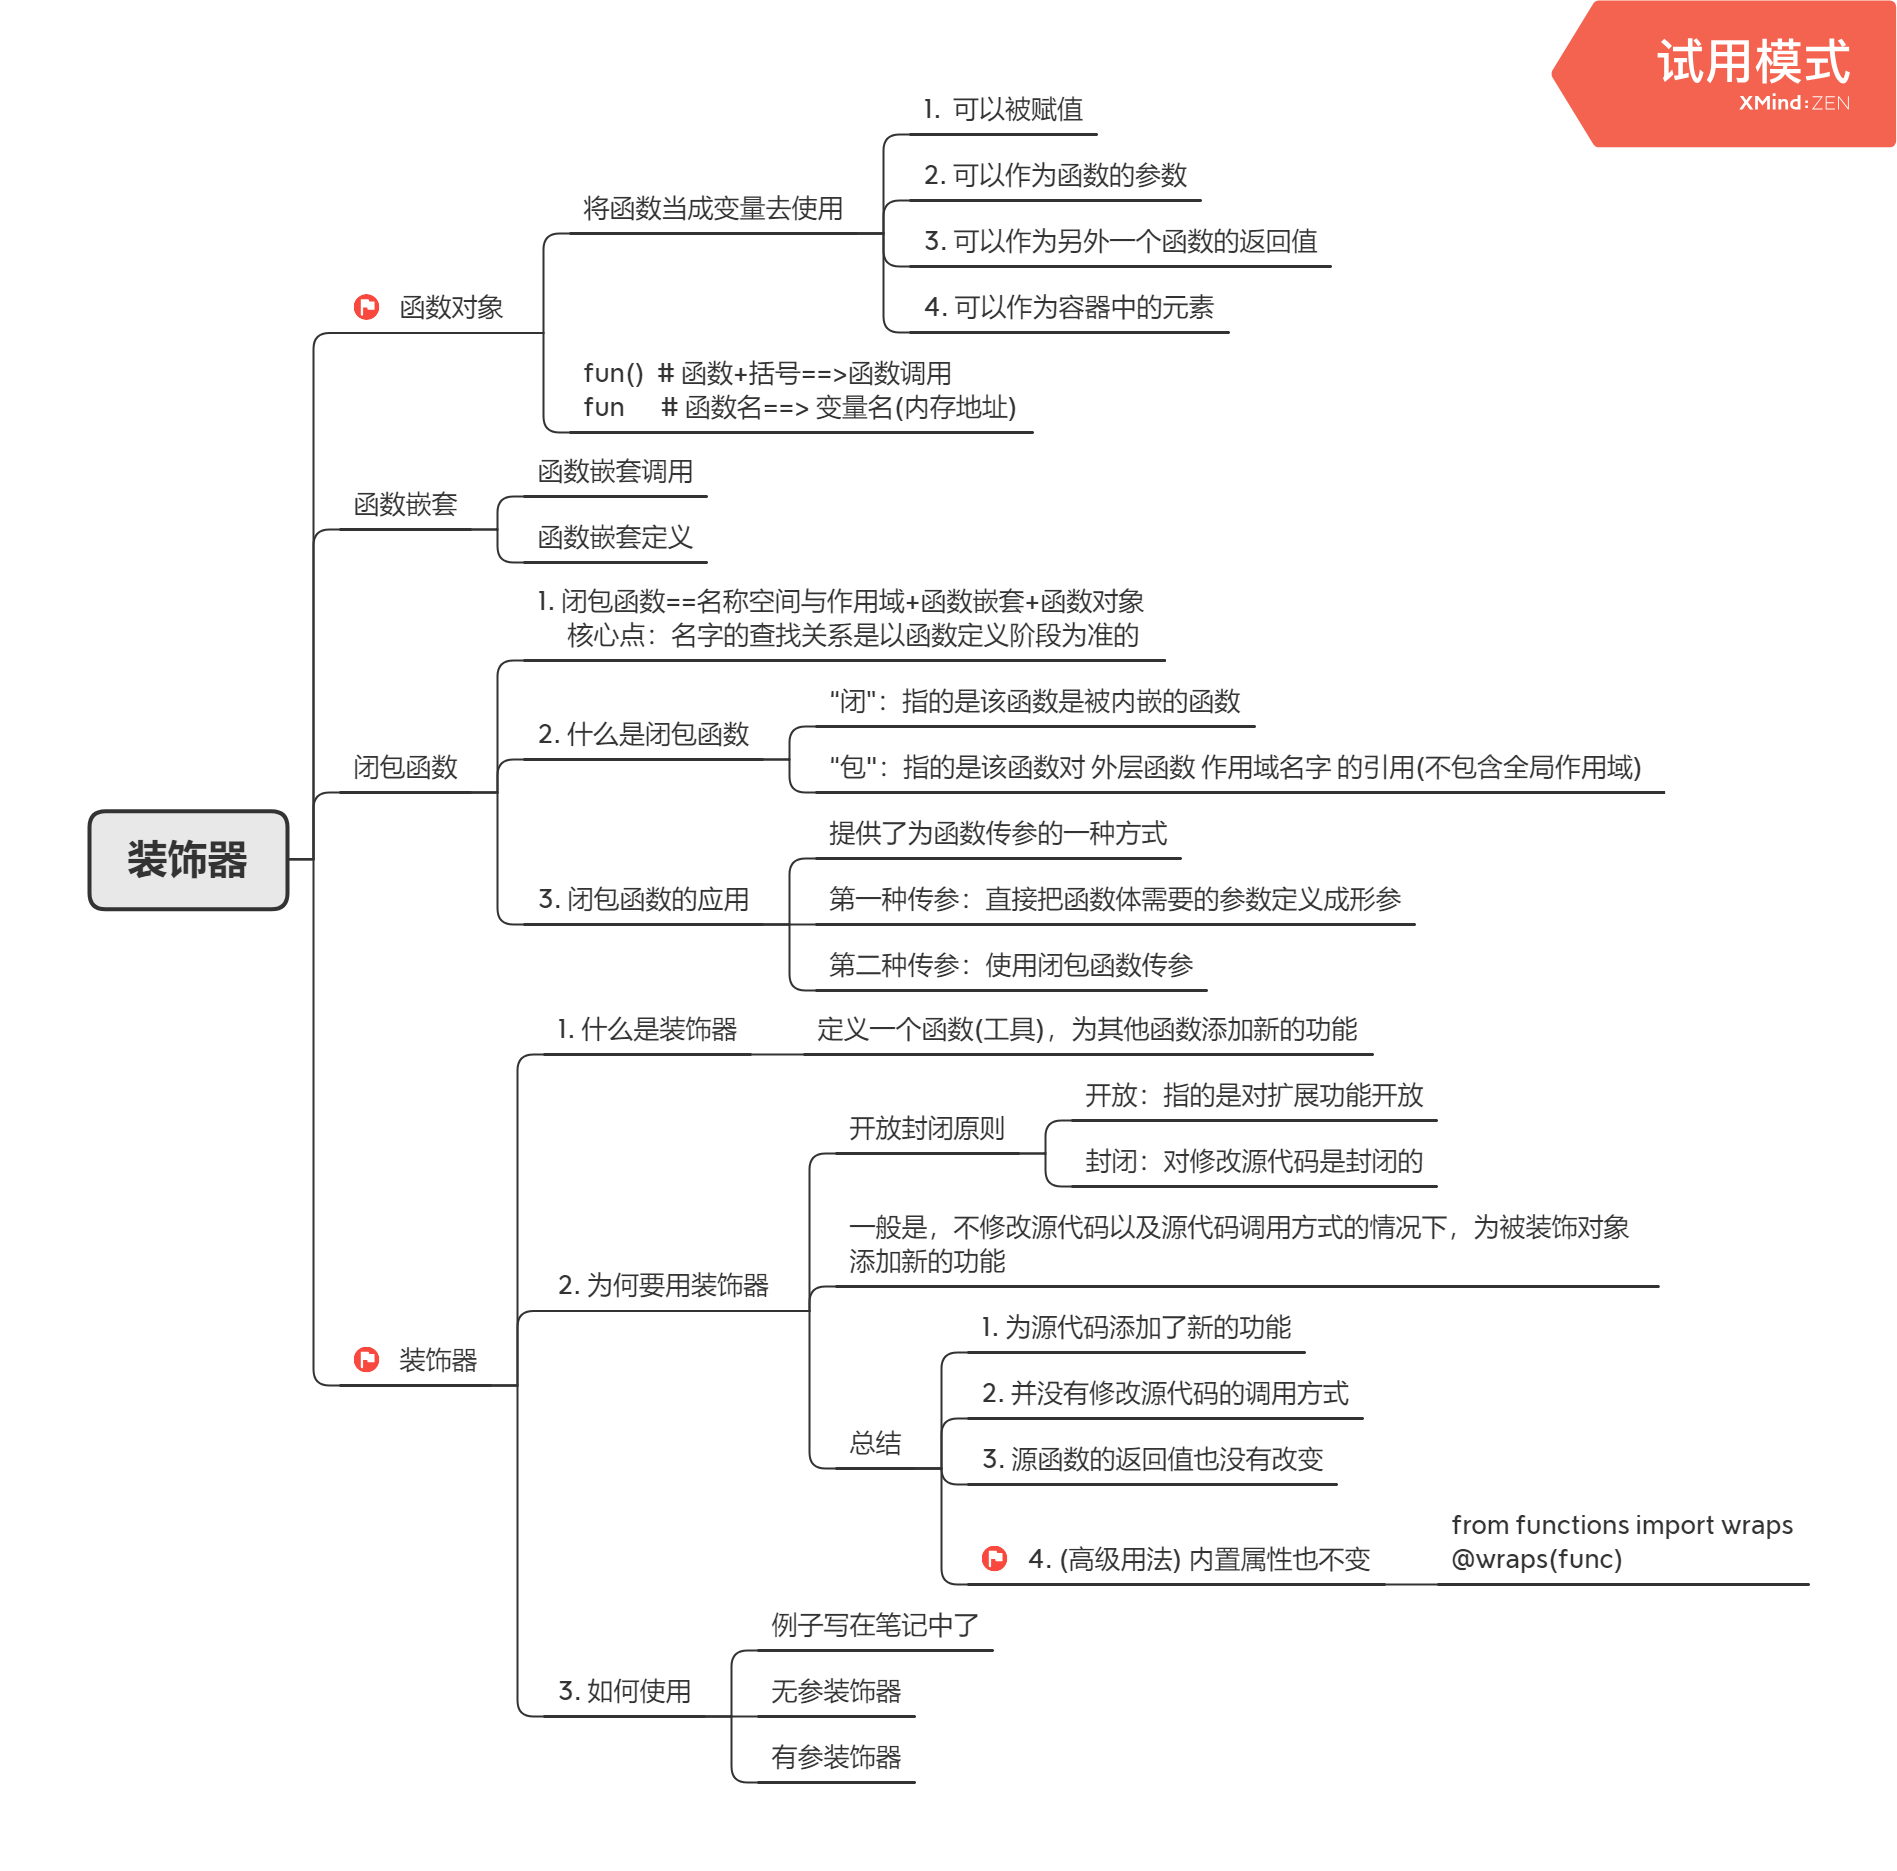
函数对象
def func():print("===>func")"""函数对象:即把函数当成变量名使用- 不加括号去调用,而是直接传函数名- func ==> 本质是内存地址"""# 1. 函数对象:可以被赋值f = funcprint(f, func) # 两个相同的内存地址# 2. 函数对象:可以作为函数的参数def foo(x):print("===>foo", x)x() # func仍然可以被调用foo(func)# 3. 函数对象:可以作为另外一个函数的返回值def new(x):return xres = new(func)print(res)res()print(res()) # None(该函数没有返回值)# 4. 函数对象:可以作为容器中的元素ls = [func, 2]ls[0]()dic = {"k1": func}dic["k1"]()
函数对象的应用案例
def login():print("登录成功")def tranfer():print("转账记录")def check_banlance():print("查询余额")def withdraw():print("提现")while True:print("q==>退出\n0==>登录\n1==>转账\n2==>余额\n3==>提现")choice = input("请输入对应编号已完成对应功能>>>").strip()if choice == "q":breakif not choice.isdigit():print("请输入正确的编号")continueelif choice == "0":login()elif choice == "1":tranfer()elif choice == "2":check_banlance()elif choice == "3":withdraw()else:print("该编号不存在")"""- if...elif...else过长,过于冗余- 另外如果新加功能的话,需要从新写if...else..."""
def login():print("登录成功")def tranfer():print("转账记录")def check_banlance():print("查询余额")def withdraw():print("提现")dic = {### 注:这里使用元组可能更好,因为列表是可变类型,元组是不可变类型'q': ['退出', None],'0': ['登录', login],'1': ['转账', tranfer],'2': ['余额', check_banlance],'3': ['提现', withdraw]}while True:for key in dic:print('%s:%s' % (key, dic[key][0]))choice = input("请输入对应编号已完成对应功能>>>").strip()if choice == "q":breakif not choice.isdigit():print("请输入正确的编号")continueelse:if dic.get(choice):dic.get(choice)[1]()else:print("该编号不存在")
all 和 any 的用法
在写torch.fx时,源码中的用法
patterns = set([operator.add, torch.add, "add"])# Go through all the nodes in the Graphfor n in traced.graph.nodes:# If the target matches one of the patternsif any(n.target == pattern for pattern in patterns):# Set the insert point, add the new node, and replace all uses# of `n` with the new nodewith traced.graph.inserting_after(n):new_node = traced.graph.call_function(torch.bitwise_and, n.args, n.kwargs)n.replace_all_uses_with(new_node)# Remove the old node from the graphtraced.graph.erase_node(n)# Don't forget to recompile!traced.recompile()"""any(iterator): iterator种有一个满足即为Trueall(iterator): iterator种有全部满足才为True"""
闭包函数
"""闭包函数=名称空间与作用域+函数嵌套+函数对象"""# 1. 名称空间与作用域+函数嵌套(目前还没有使用函数对象)def f1():x = 33def f2():print("f2中的x:", x)f2()x = 111f1() # "f2中的x:", 33# 2.加上函数对象def f1():x = 33def f2():print("f2中的x:", x)return f2x = 111f1()() # "f2中的x:", 33 ==>这里是两个括号相当于 f2()'''函数传参有两种方式:可能会遇到一种传参不满足需求的情况'''# 1. 方式1:形参def func(x):print(x)func(1)# 2.方式二:闭包函数def f1(x):# x=3def func():print(x)return funcf2=f1(3)f2()
装饰器详解
装饰器属于名称空间与作用域+函数对象+函数嵌套+闭包函数的综合应用
装饰器的引导过程
"""现有一个函数,本身的功能是两数之和需求:现在要求输出函数的运行时间"""import timedef add(x, y):time.sleep(2)print(x + y)"""方法一: 在add函数内部直接修改- 但是在程序庞大的情况下,直接修改可能导致错误,因此尝试不修改原函数但添加该功能"""def add(x, y):start = time.time()time.sleep(2)print(x + y)stop = time.time()print(stop - start)add(1, 2)"""方法二: 在调用该函数前后修改- 问题:若该函数调用多次,那则需要在每一个函数调用前后都加上该代码- 容易造成代码冗余"""start = time.time()add(2, 3)stop = time.time()print(stop - start)start = time.time()add(4, 5)stop = time.time()print(stop - start)"""优化方法二:将代码冗余部分写成函数- 1. 将冗余部分写入函数体,每次去调用新写的函数- 2. 但是参数会被写死,进一步改进参数(*args,**kwargs)- 3. 参数修改完成了,但是被装饰的函数add写死了(闭包改进)"""# 第二步更新后def wrapper(*args,**kwargs):start = time.time()add(*args, **kwargs)stop = time.time()print(stop - start)wrapper(2,3)# 第三步更新后def outter(func):# func=adddef wrapper(*args, **kwargs):start = time.time()func(*args, **kwargs)stop = time.time()print(stop - start)return wrapper # 返回的是wrapper的内存地址# 若是被调用后又赋值给了add,那么原来的add在使用上完全没改变,但功能多了add = outter(add)# 用户使用新的add(该add是被wrapper装饰过的add,内存地址由原来的add变成了现在的wrapper)add(3, 4)# 新定义一个函数名为mul,让该函数也输出运行时间def mul(x, y):time.sleep(2)print(x * y)# 那么调用方式会变成mul = outter(mul)mul(3, 4)"""方法二的进一步优化:- 在以上的写法中我们都没有考虑返回值的问题- 但其实,修改过程需要函数本身不变、函数调用方式不变、返回值也不变- 因此可以进一步改写装饰器,该方法也为装饰器的常用写法"""def outter(func):def wrapper(*args, **kwargs):start = time.time()res = func(*args, **kwargs)stop = time.time()print(stop - start)return res # 为被装饰的函数func的返回值return wrapper # 返回的是wrapper的内存地址mul = outter(mul)res = mul(3, 4)print(res)
装饰器语法糖
import timedef outter(func):def wrapper(*args, **kwargs):start = time.time()res = func(*args, **kwargs)stop = time.time()print(stop - start)return res # 为被装饰的函数func的返回值return wrapper # 返回的是wrapper的内存地址@outter #该语法等于 add=outter(add)def add(x, y):time.sleep(2)return x + y@outterdef mul(x, y):time.sleep(2)return x * y# add = outter(add)res = add(3, 4)print(res)# mul = outter(mul)res = mul(3, 4)print(res)"""原本代码中:add = outter(add)mul = outter(mul)可以使用 @装饰器名称 写在被装饰函数的前面"""
装饰器补充
def add(x, y):"""两数相加"""time.sleep(2)return x + yprint(add.__name__) # 该函数原函数的名称print(help(add)) # 帮助文档,看的是文档的注释信息===> 原函数.__doc__返回结果:>>>add>>>两数相加
@outterdef add(x, y):"""两数相加"""time.sleep(2)return x + yprint(add.__name__)print(help(add))返回结果:>>>wrapper>>>None"""出现原因:- 在add函数被装饰过后,即使原函数不变、调用方式不变、返回值不变,但是还有函数的内置属性- 如果想进一步使装饰过后的函数,内置属性也相同需要在写装饰器时加上内置属性"""def timmer(func):def wrapper(*args, **kwargs):passwrapper.__name__ = func.__name__wrapper.__doc__ = func.__doc__return wrapper# 但是这种写法没有办法写全所有的内置属性,还很麻烦,因此python提供了库"""最终写法:"""from functools import wrapsdef timmer(func):@wraps(func)def wrapper(*args, **kwargs):res = func(*args, **kwargs)return resreturn wrapper
装饰器模板
from functools import wrapsdef outter(func):@wraps(func) # 使得func函数的内置属性不变def wrapper(*args, **kwargs):"""添加新功能"""res = func(*args, **kwargs)"""添加新功能"""return res # 为被装饰的函数func的返回值return wrapper # 返回的是wrapper的内存地址"""注意:闭包函数最后返回的是wrapper函数对象,并没有加括号调用- 方便记忆,可以理解为:被装饰的函数func原本是在 全局变量 里的,经过闭包写在了 局部变量里,因此最后需要把被装饰的函数返回到 全局变量 里"""
#套三层
加载顺序自下而上运行顺序自上而下def func1(add):print("func1")def wrapper1(*args, **kwargs):print("wrapper1")res = add()return resreturn wrapper1def func2(add):print("func2")def wrapper2(*args, **kwargs):print("wrapper2")return add()return wrapper2@func1@func2def func():print("hello world")func()"""func2func1wrapper1wrapper2hello world"""
迭代器
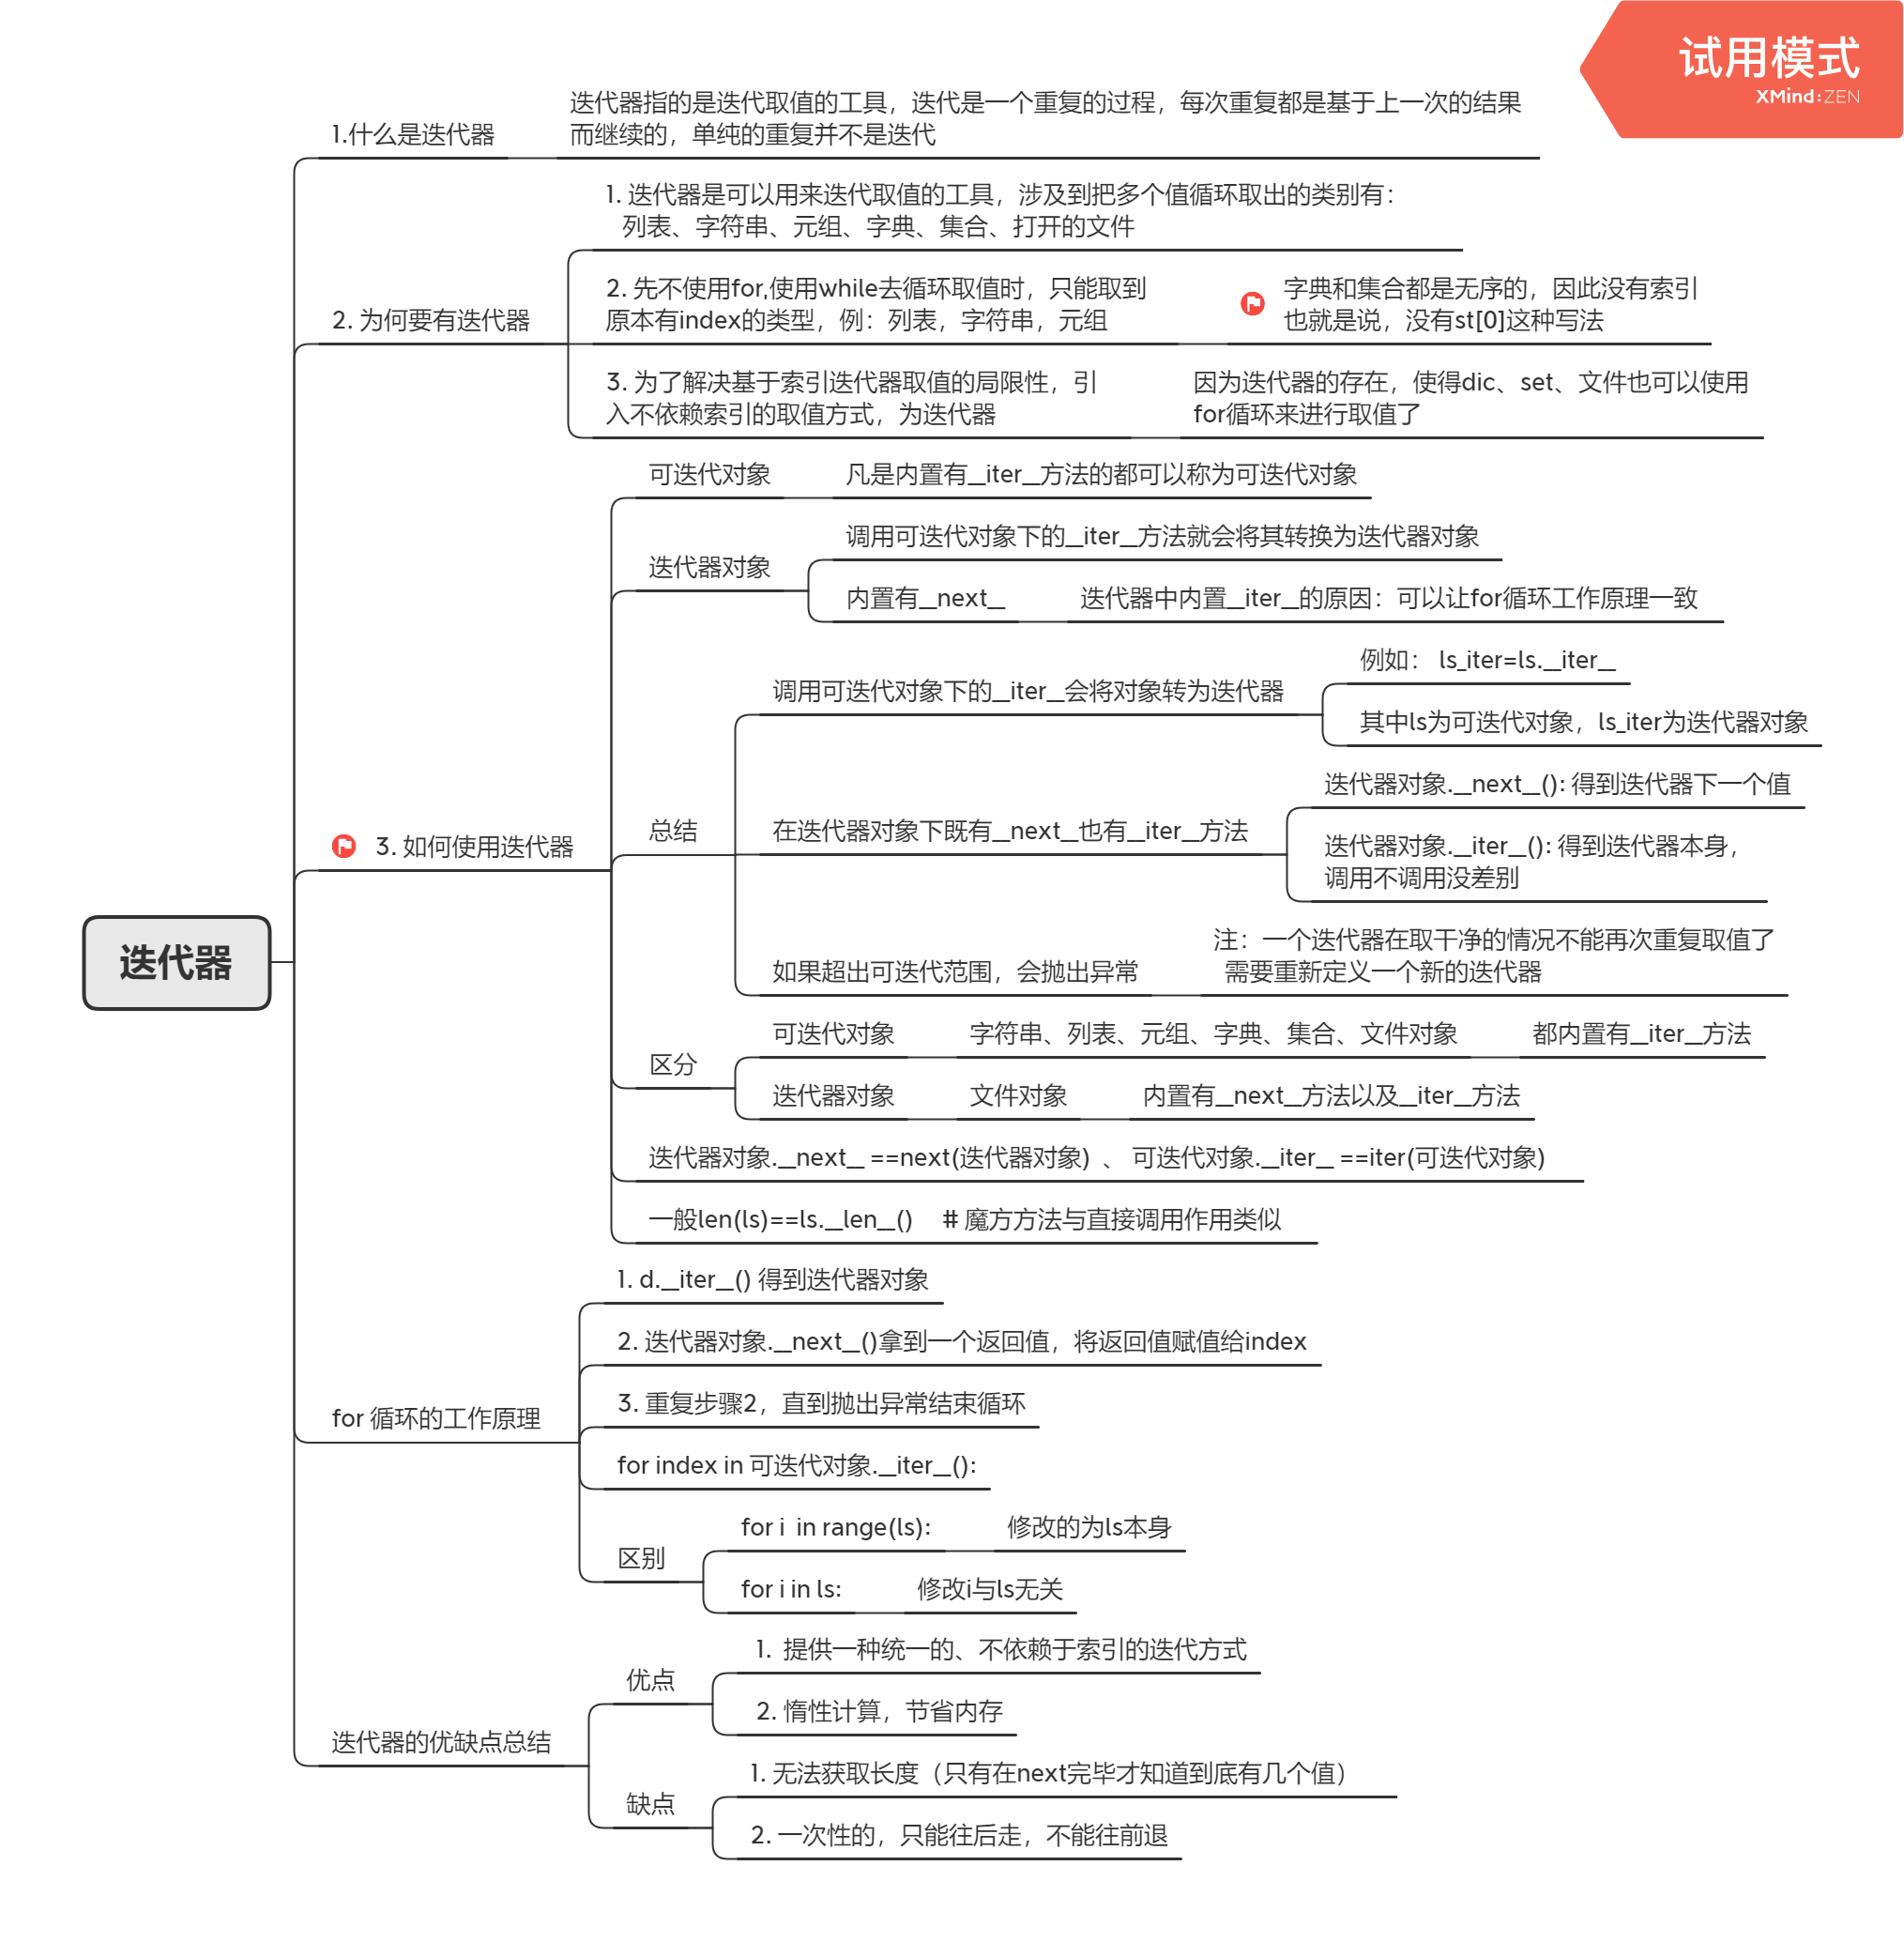
# 循环取值:这种取值办法不依赖索引ls = [1, 2, 3]ls_iter = ls.__iter__()"""ls下有__iter__,是可迭代对象"""print(ls_iter)"""ls_iter:调用了可迭代对象下的__iter__转为迭代器对象迭代器对象.__next__:可以得到迭代器的下一个值"""# 方法一:value = ls_iter.__next__()print(value) # 1value = ls_iter.__next__()print(value) # 2value = ls_iter.__next__()print(value) # 3# value = ls_iter.__next__()# print(value) # StopIteration# 方法二:使用while迭代while True:try:value = ls_iter.__next__()print(value)except StopIteration:break # 抛出异常后退出循环即可"""可迭代对象:字符串、列表、元组、字典、集合、文件对象迭代器对象:文件对象"""# 方法3: for循环# 文件使用迭代器with open('a.txt', mode='rt', encoding='utf-8') as f:# f.__iter__()# f.__next__()for line in f: # f.__iter__()print(line)
生成器
引入
生成器:本质是一个自定义的迭代器。也包含了__iter__ 和__next__
# 引入def func():print("aaa")return 'a'res=func()print(res)"""如果使用的是return,我们调用这个函数时,便会出现调用结果但是如果使用的是yield,调用该函数的时候,其实并没有运行"""# 生成器例子def func():print("第一次")yield 1print("第二次")yield 2print("第三次")yield 3print("第四次")g = func()print(g) # 迭代器对象g = g.__iter__() # iter(迭代器对象)之后还是本身print(g)"""生成器:- 函数调用之后赋值给一个值,这个值是生成器对象。- 内置有__iter__和__next__方法- 使用next(迭代器对象)就会被赋值- 但是会在遇见yield时停下来,将yield后的值,当作本次调用的返回值- yield后没有值的话,默认为None"""# 方法一:while True:try:value=g.__next__()print(value)except StopIteration:break# 方法二:for value in g:print(value)
yield
- yield与return一样用在函数中(上述例子就是)
- yield用在表达式中(并发编程的时候使用的比较多)
```python
def student(name):
print(“你的名字是:%s” % name)
while True:
x = yield Noneprint('你的名字是 %s, 今年 %s 岁了' % (name, x))
gen = student(‘python’)
print(gen) #
gen.send(‘19’) # can’t send non-None value to a just-started generator
gen.send(None) # 你的名字是:python
gen.send(“18”) # 你的名字是 python, 今年 18 岁了 gen.send(‘20’) # 你的名字是 python, 今年 20 岁了 gen.close() # 关闭生成器
gen.send(‘12’) # 关闭之后在传值会导致错误
“”” yield在表达式中:
- yield在表达式中会接收send()传入的值
- 并且一开始传入的值只能是None
- 该生成器可以使用close()关闭,但是关闭之后不可以再传值了
- gen.send() 就相当于 g = next(gen)
“””
```
解析式
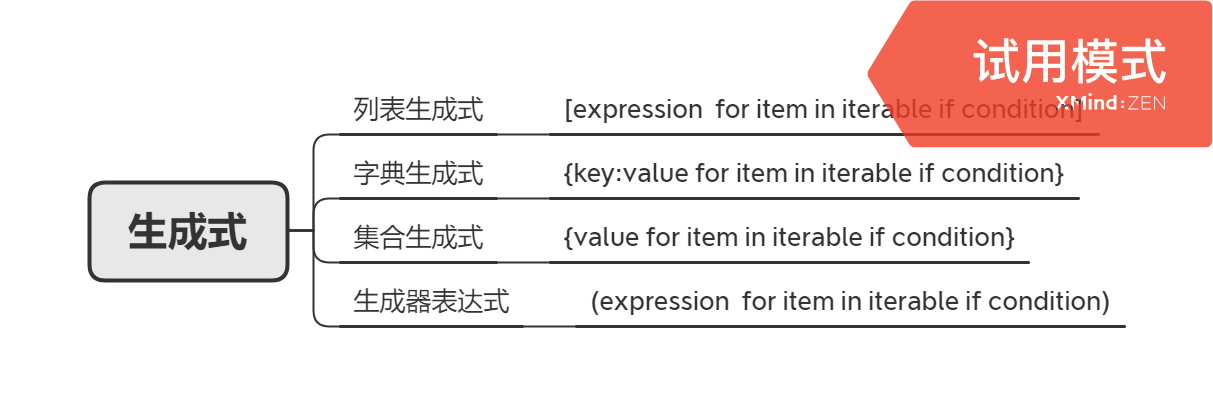
列表、字典、集合、生成器
```python1. 列表生成式
l = [‘wxx_py’, ‘yxx_py’, ‘exx_py’, ‘a_java’, ‘b_java’] new_ls = [name for name in l if name.endswith(‘py’)] print(new_ls) “””
- 将l中的元素转为大写
- 去掉后缀py
“””
new_ls = [name.upper() for name in l]
new_ls = [name[:-2] for name in l if name.upper().endswith(‘PY’)]
for name in l:
if name.upper().endswith(‘PY’):
name = name.upper()[:-2]
new_ls.append(name)
print(new_ls)
2.字典生成式(key:value必须有)
items = [(‘name’, ‘egon’), (‘age’, 18), (‘gender’, ‘male’)] dic = {name[0]: name[1] for name in items} dic_new = {k: v for k, v in items} print(dic) print(dic_new)
3.集合生成式
key = [‘name’, ‘age’, ‘gender’] set1 = {value for value in key if value != ‘gender’} print(set1)
4. 生成器表达式
g = (i for i in range(10) if i > 7) print(g, type(g)) # g是一个生成器,此时g中没有东西,需要使用next print(next(g)) # 8 print(next(g)) # 9
<a name="TFuo7"></a>### 生成器解析式案例```python文件字符数总和(注:\n也属于一个字符)with open('../file_n.txt', mode="rt", encoding='utf-8') as f:# 方法一:res = 0for line in f:res += len(line)print(res)# 方法二:res = [len(line) for line in f]print(res)# 方法三:效率最高res = sum(len(line) for line in f)print(res)"""方法3的效率最高是因为生成器的内部是没有内容的,不然如果是列表还需要占空间占内存"""

若有收获,就点个赞吧
0 人点赞
