12.1 JDBC快速入门
12.1.1 什么是JDBC
它是Java连接数据库的一种技术,由于有许多数据库厂商,Java不可能为每一个厂商单独写一套连接他们家数据库的实现,所以抽象出了一组接口。由各数据库厂商负责实现这些接口来驱动他们家的数据库,这样实际上在API层面就达到了统一。
12.1.2 JDBC原理图

每个厂商将他们的具体实现经过编译后打成jar包,如果项目中需要操作他们家的数据库,就需要引入这个jar包。jar包中包含了若干经过编译后的.class字节码文件。引入的过程也很简单,过程如下:
- 下载所需要的
jar文件 - 在项目目录下新建一个
libs文件,并将jar包文件拷贝进去 add library...
12.1.3 JDBC快速入门demo
使用JDBC操作数据库主要分为4步:
- 注册驱动,获取一个
Driver对象 - 建立连接,获取一个
connect对象 - 执行sql语句,通过
Statement对象来执行- 如果是执行 select 语句,使用
executeQuery()方法 - 如果执行 insert、update、delete,或 DDL 语句,则使用
executeUpdate()方法
- 如果是执行 select 语句,使用
关闭连接,先关闭
statement,再关闭connect```java public class JDBCStartDemo { @SuppressWarnings(“all”) public static void main(String[] args) throws SQLException {// 1. 注册驱动Driver driver = new Driver();// 2. 得到连接String url = "jdbc:mysql://localhost:3306/practice";Properties properties = new Properties();properties.setProperty("user", "root");properties.setProperty("password", "flynessme666");Connection connect = driver.connect(url, properties);// 3. 执行sql
// String sql = “insert into actor values(null, ‘张译’, ‘男’, ‘1978-2-17’, 17828185158)”;
 String sql2 = "delete from actor where id = 2";
 Statement statement = connect.createStatement();
 int row = statement.executeUpdate(sql2);
 System.out.println(row > 0 ? "success" : "failure");

 // 4. 关闭连接
 statement.close();
 connect.close();
}
}
有关`Driver`的简单理解:<br />在上面的第一步中,就是注册驱动获取一个`Driver`对象,这里的`Driver`对象实际类型为厂商提供的`Driver`类,当然不同厂商提供了不同的`Driver`类实现。

在`java.sql`包下,定义了一个名为`Driver`的接口,来看看官方文档是如何描述它的。
> The interface that every driver class must implement.   每一个driver类都必须实现这个接口
> The Java SQL framework allows for multiple database drivers.    Java SQL框架允许使用多个数据库驱动程序
> Each driver should supply a class that implements the Driver interface.   每个驱动程序都应该提供一个实现了驱动程序接口的类

`java.sql.Driver`是`java`提供的驱动程序接口,查看源码发现`com.mysql.cj.jdbc.Driver`类实现了这个接口。当这个类被加载时,它做了一个动作 —— 注册驱动。
```java
public class Driver extends NonRegisteringDriver implements java.sql.Driver {
    public Driver() throws SQLException {
    }

    static {
        try {
            DriverManager.registerDriver(new Driver());
        } catch (SQLException var1) {
            throw new RuntimeException("Can't register driver!");
        }
    }
}
换句话说,当执行new Driver()时,实际底层执行了registerDriver。此时驱动管理器会注册一个mysql的驱动程序。我们就可以通过这个驱动程序来建立与数据库的连接了。
12.2 获取数据库连接的5种方式
方式一
public void connect_1() throws SQLException{
    Driver driver = new Driver();  // 获得驱动器
    String url = "jdbc:mysql://localhost:3306/practice";
    Properties properties = new Properties();
    properties.setProperty("user", "root");
    properties.setProperty("password", "flynessme666");
    Connection connect = driver.connect(url, properties);
    System.out.println(connect);
}

代码分析: 这种方式愚蠢在第2行是一个静态加载(通过 new 创建对象),之前学反射就知道这种方式依赖性强,于是有了方式二
方式二
public void connect_2()
    throws ClassNotFoundException, IllegalAccessException, InstantiationException, SQLException {
    Class<?> Driver = Class.forName("com.mysql.jdbc.Driver");
    Driver driver = (Driver) Driver.newInstance();
    String url = "jdbc:mysql://localhost:3306/practice";
    Properties properties = new Properties();
    properties.setProperty("user", "root");
    properties.setProperty("password", "flynessme666");
    Connection connect = driver.connect(url, properties);
    System.out.println(connect);
}

代码分析: 与方式一的区别在于第三行使用了反射去获取 Driver 类对象,属于动态加载,灵活性更强
方式三
public void connect_3()
    throws ClassNotFoundException, IllegalAccessException, InstantiationException, SQLException {
    Class Driver = Class.forName("com.mysql.jdbc.Driver");
    Driver driver = (Driver) Driver.newInstance();
    String url = "jdbc:mysql://localhost:3306/practice";
    String user = "root";
    String password = "flynessme666";
    DriverManager.registerDriver(driver);
    Connection connection = DriverManager.getConnection(url, user, password);
    System.out.println(connection);
}

代码分析:

该方式与方式二的区别在于,方式二使用driver获取连接,而方式三使用DriverManager来获取。DriverManager相当与driver的总管,只有在DriverManager注册过的driver才能驱动指定的数据库。这就好比你入学要进行新人注册,证明你是该学校的学生后,才能在学校进行各种活动。根据之前的经验来看,当new一个Driver对象时,底层就已经注册了驱动,所以方式三的第8行去掉,程序也是没什么问题的。

此外根据源码可知,DriverManager的getConnection方法底层还是调用的driver的connect方法,所以两种方式本质没啥区别,至于为什么要用DriverManager去获取连接而不是使用driver,就不得而知了,换句话说,如果注册了好多个driver,不同driver驱动不同数据库,那么使用DriverManager获取connection它怎么知道获取的是谁的连接呢?
方式四
public void connect_4() throws ClassNotFoundException, SQLException {
    Class.forName("com.mysql.jdbc.Driver"); // 已经注册了驱动
    String url = "jdbc:mysql://localhost:3306/practice";
    String user = "root";
    String password = "flynessme666";
    Connection connection = DriverManager.getConnection(url, user, password);
    System.out.println(connection);
}

代码分析: 这种方式代码更少了,它让方式三的第4行变成了摆设,事实上方式三的第4行确实也没什么卵用。
当使用反射加载类时,类中的静态代码块就已经包括了注册的操作,这在上面已经看过源码了。所以就不需要创建这个类的实例。
方式五
public void connect_5() throws ClassNotFoundException, IOException, SQLException {
    Properties properties = new Properties();
    properties.load(new FileInputStream("src/mysql.properties"));
    String url = properties.getProperty("url");
    String driver = properties.getProperty("driver");
    String user = properties.getProperty("user");
    String password = properties.getProperty("password");
//        Class.forName(driver);
    Connection connection = DriverManager.getConnection(url, user, password);
    System.out.println(connection);
}

代码分析:
方式五和方式四没什么本质区别,就是把获取连接需要的信息放在了配置文件中去读取。方式五的牛逼之处在于第8行的反射加载类的过程也不需要了。原因在于之前加载的类是com.mysql.jdbc.Driver这个类,而这个类已经过时了,新的驱动类是com.mysql.cj.jdbc.Driver, 借用官方的话描述就是
The driver is automatically registered via the SPI and manual loading of the driver class is generally unnecessary. 简单翻译就是它会通过SPI自动注册,而无需手动加载这个类。
12.3 ResultSet
12.3.1 基本介绍
ResultSet表示通过执行查询操作后返回的一组数据集,可以把它想象成一张表,开始时,一个光标指向第一条数据的上方,然后利用next()往下移动,指向第一条记录依次类推,当光标指向null时,返回false。
12.3.2 案例分析
对actor表进行查询,对返回的结果集进行遍历。
public static void main(String[] args) throws Exception{
    // 连接数据库
    Properties properties = new Properties();
    properties.load(new FileInputStream("src/mysql.properties"));
    String url = properties.getProperty("url");
    String user = properties.getProperty("user");
    String password = properties.getProperty("password");
    String driver = properties.getProperty("driver");
    Connection connection = DriverManager.getConnection(url, user, password);
    Statement statement = connection.createStatement();

    String query = "select id, name from actor";
    ResultSet resultSet = statement.executeQuery(query);

    // 遍历resultSet
    while (resultSet.next()) {
        int id = resultSet.getInt(1);
        String name = resultSet.getString(2);
        System.out.println(id + "\t" + name + "\t");
    }

    // 关闭资源
    resultSet.close();
    statement.close();
    connection.close();
}

代码分析: 代码实现比较简单,这里的重点是搞清楚resultSet的底层数据结构究竟是什么
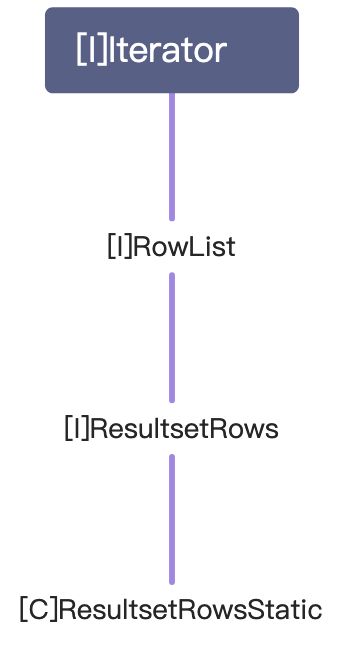
12.3.3 ResultSet的底层结构
针对上面的代码进行调试,首先得知resultSet的类型是ResultSetImpl。首先需要明确,ResultSet是java定义的一个接口,而ResultSetImpl是厂商提供的具体实现类。

上图是resultSet中的rowData属性的结构,它有一个成员rows,其类型为ArrayList,这个rows存放的就是返回的结果集每行的信息,当然信息不止具体每列的数据,还有一些其他信息(在这里可以清楚的看到还有size和modCount),rows中的elementData里面的每个元素中的internalRowData存放的才是具体的每列的数据的值。
再来看看resultSet为什么能够调用next(),首先resultSet的实际类型是ResultSetImpl,查看源码可知,resultSet.next()底层实际上调用的是rowData.next(),rowData的类型为ResultsetRowsStatic,接下来看一组继承关系就知道为什么rowData可以调用next方法了。
12.4 Statement
12.4.1 基本介绍
statement对象用来执行静态sql statement并且返回它产生的结果。
默认情况下,每个Statement对象在同一时刻只能打开一个ResultSet对象。这句话的简单意思就是说:
// 如果执行了这条语句,那么st1和rs二者就产生了关联
Statement st1 = connection.createStatement();
ResultSet rs = st1.executeQuery(sql);
// 如果用st1操作执行别的查询,那么之前与它关联的ResultSet对象就会关闭
ResultSet rs2 = st1.executeQuery(sql2);

所以原则上说,一个statement对应一个resultset,如果需要执行其他query语句,需要其他的statement执行
在JDBC中,执行静态sql有三种方式:
Statement:存在 sql 注入问题,所以基本不会使用这个类PreparedStatement:预处理,解决 sql 注入问题CallableStatement:存储过程
12.4.2 PreparedStatement
12.4.2.1 基本介绍
PreparedStatement对象执行的sql语句中,参数部分使用占位符?来替代,然后通过PreparedStatement对象的setXxx()来设置占位符的具体值,其中setXxx()有两个参数,第一个参数为?在sql语句中的索引,从1开始;第二个参数为该参数具体的值。
当设置好参数部分的值后,使用executeQuery()或executeUpdate()来分别进行查询和增删改的执行。
使用预处理不仅能够解决 sql 注入问题,还能够防止字符串拼接造成的语法错误,并且能够大大减少编译次数,提高效率。所谓预处理可以简单理解为:数据库服务器端只会再首次接收到 sql 后对其进行语法检查、编译,之后再收到同样的 sql 请求时就直接执行它(因为编译的时间相比起运行时间是比较长的)。
12.4.2.2 PreparedStatement如何防止sql注入
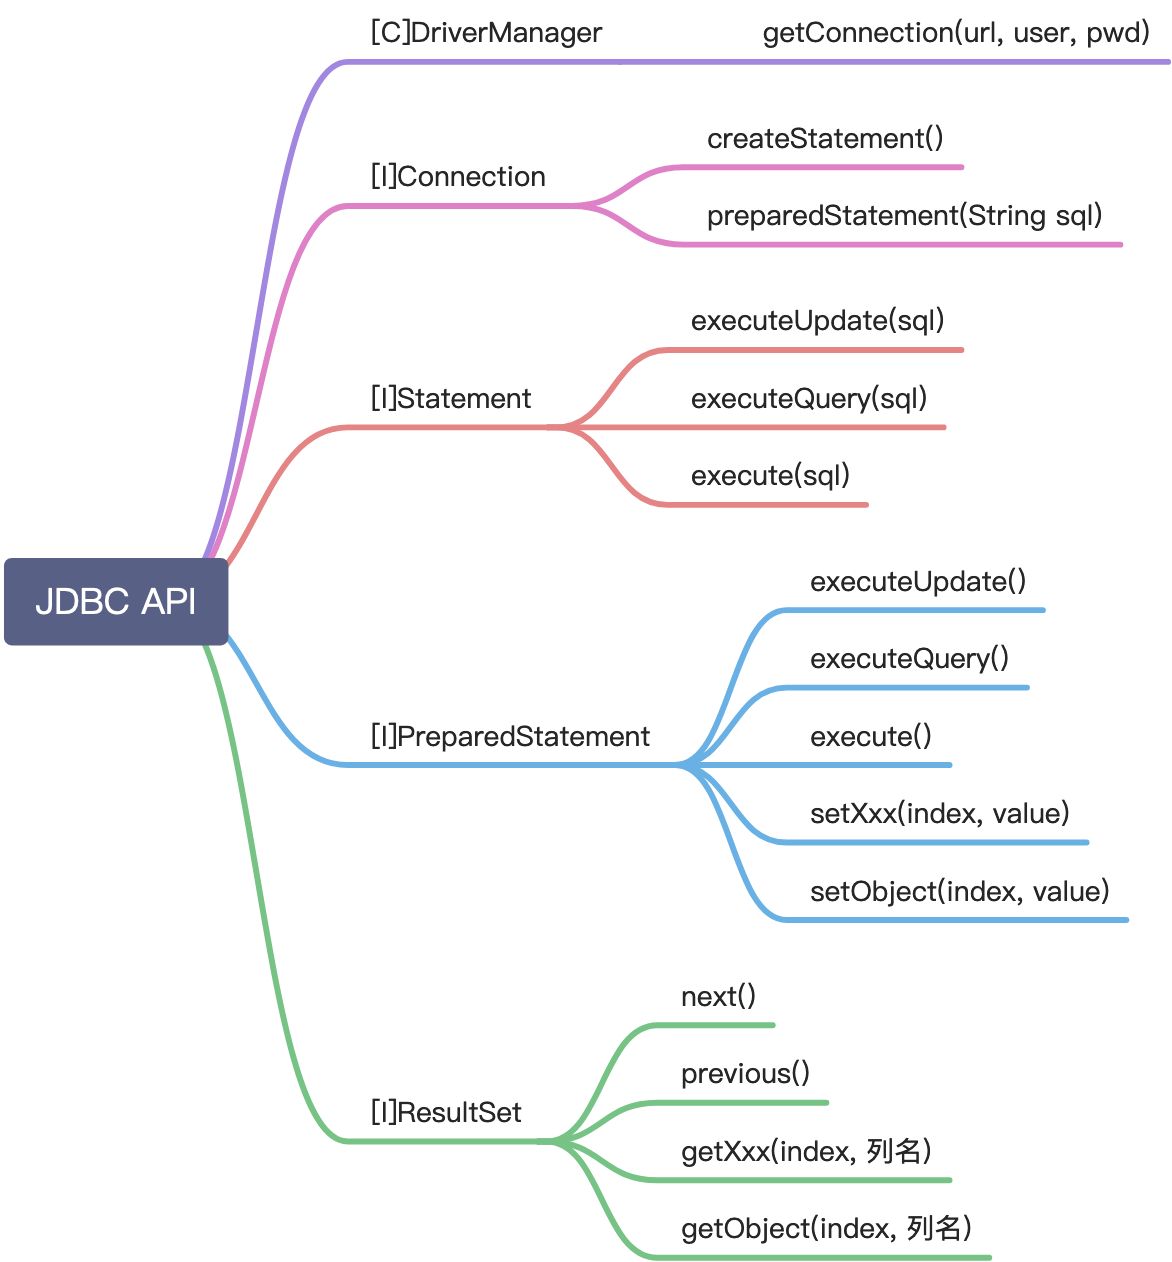
12.5 JDBC API小结
12.6 封装JDBCUtils类
由于获取连接和关闭资源操作很常用,所以把它封装成工具类,代码如下(Pretty easy):
public class JDBCUtils {

    private static String driver;
    private static String url;
    private static String user;
    private static String password;
    private static Connection connection = null;

    static {
        try {
            Properties properties = new Properties();
            properties.load(new FileInputStream("src/mysql.properties"));
            driver = properties.getProperty("driver");
            url = properties.getProperty("url");
            user = properties.getProperty("user");
            password = properties.getProperty("password");
        } catch (IOException e) {
            e.printStackTrace();
        }
    }


    public static Connection getConnection() throws SQLException {
        return DriverManager.getConnection(url, user, password);
    }

    public static void close(ResultSet resultSet, Statement statement, Connection connection)
        throws SQLException {
        if (resultSet != null) {
            resultSet.close();
        }
        if (statement != null) {
            statement.close();
        }
        if (connection != null) {
            connection.close();
        }
    }
}
12.7 事务
12.7.1 基本介绍
数据库事务( transaction)是访问并可能操作各种数据项的一个数据库操作序列,这些操作要么全部执行,要么全部不执行,是一个不可分割的工作单位。事务由事务开始与事务结束之间执行的全部数据库操作组成。
JDBC默认处于自动提交模式,即每个sql语句在完成后都会提交到数据库,且无法回滚。
事务能够控制何时更改提交并应用于数据库。 它将单个SQL语句或一组SQL语句视为一个逻辑单元,如果任何语句失败,整个事务将失败。
使用如下语句可以关闭自动提交:conn.setAutoCommit(false);
12.7.2 提交与回滚
完成更改后,若要提交更改,可在连接对象上调用commit()方法:conn.commit( );,否则,要使用连接名为conn的数据库回滚更新,使用以下代码:conn.rollback( );
12.7.3 经典转账案例
public void Transaction() {
    Connection connection = null;
    PreparedStatement preparedStatement = null;
    String sql = "update account set balance = balance - 1000 where id = 1";
    String sql1 = "update account set balance = balance + 1000 where id = 2";
    try {
        connection = JDBCUtils.getConnection();
        connection.setAutoCommit(false);
        preparedStatement = connection.prepareStatement(sql);
        preparedStatement.executeUpdate();
        int num = 1/0;
        preparedStatement = connection.prepareStatement(sql1);
        preparedStatement.executeUpdate();
        connection.commit();
    } catch (SQLException e) {
        try {
            connection.rollback();
        } catch (SQLException throwables) {
            System.out.println("回滚失败");
            throwables.printStackTrace();
        }
        e.printStackTrace();
    } catch (RuntimeException e) {
        System.out.println("产生了运行时异常");
        System.out.println(e.getMessage());
    }
    finally {
        JDBCUtils.close(null, preparedStatement, connection);
    }
}

代码分析: 转账是一个完整的过程,即会执行两条update语句,只有两条update都成功了,才算转账成功。所以将整个业务过程放在try块中,如果执行到最后都没有异常抛出,则执行commit,否则就会执行回滚。
12.8 批处理
批处理允许将相关的SQL语句分组到批处理中,并通过对数据库的一次调用来提交它们,一次执行完成与数据库之间的交互。一次向数据库发送多个SQL语句时,可以减少通信开销,从而提高性能。
Statement、PreparedStatement和CallableStatement的addBatch()方法用于将单个语句添加到批处理executeBatch()用于执行组成批量的所有语句,该方法返回一个整数数组,数组的每个元素表示相应更新语句的更新计数clearBatch()方法将删除所有使用addBatch()方法添加的语句。但是无法指定选择某个要删除的语句- 批处理往往和PreparedStatement搭配使用,既减少了编译次数,又减少了运行次数,大大提高效率
12.9 数据库连接池
12.9.1 基本介绍
数据库连接池的核心思想是池化思想,所谓池化思想就是当一个对象需要被频繁使用时,提前创建好来供别人使用,这样就能减少频繁创建对象造成的开销。与之类似的应用还有线程池、字符串常量池等。
数据库连接池的种类有以下几种:
Druid:阿里自研的,集成了之前几种数据库连接池的优点,性能优秀,监控能力强HikariCP:最常用,性能最好,也是Spring Boot 2.0默认的数据库连接池C3P0Druid
数据库连接池使用javax.sql.DataSource表示,DataSource是一个接口,具体由厂商进行实现。可以将一个DataSource对象当做一个与物理数据源相连的工厂,该工厂生产与物理数据源相连的连接对象。当java程序想要访问数据库时,就从该工厂获取与数据库连接的连接对象,形象的可以称为此工厂为数据库连接池。
官方对于DataSource的描述如下:
A factory for connections to the physical data source that this DataSource object represents. An alternative to the DriverManager facility DataSource对象代表着一个与物理数据源相连的工厂,它是DriverManager的一个替代品。
12.9.2 C3P0应用实例
第一种方法是不用配置文件,而是将所有配置信息在代码中进行设置,这种方式太愚蠢了,就不演示了。
第二种方法是将配置文件放在src目录下,如果想更改配置只需修改文件即可。
配置文件名固定为:c3p0-config.xml
public class C3P0_ {

    @Test
    public void testC3P0() throws SQLException {
        // 1. new一个DataSource对象
        ComboPooledDataSource comboPool = new ComboPooledDataSource("Pool");
        long start = System.currentTimeMillis();
        for (int i = 0; i < 5000; i++) {
            Connection connection = comboPool.getConnection();
            connection.close();
        }
        long end = System.currentTimeMillis();
        System.out.println("使用连接池耗时: " + (end - start));
    }
}

代码分析: 将连接池的配置文件放在src目录下,连接代码就很简单了,获取connection总共需要两步:
1. 获取ComboPooledDataSource对象
2. 调用该对象的getConnection()方法
这里其实就使用DataSource对象代替了之前的DriverManager
12.9.3 Druid应用实例
public class Druid_ {

    @Test
    public void testDruid() throws Exception {
        Properties properties = new Properties();
        properties.load(new FileInputStream("src/druid.properties"));
        DataSource dataSource = DruidDataSourceFactory.createDataSource(properties);
        long start = System.currentTimeMillis();
        for (int i = 0; i < 5000; i++) {
            Connection connection = dataSource.getConnection();
            connection.close();
        }
        long end = System.currentTimeMillis();
        System.out.println("耗时为: " + (end - start));
    }
}

代码分析: 使用DruidDataSourceFactory的静态方法createDataSource来生成DataSource对象,需要给该静态方法传入一个参数properties,即druid的配置文件。
12.10 Apache-DBUtils
12.10.1 基本介绍
这是Apache组织提供的一个开源JDBC处理工具类库,能大大减少JDBC代码的编写量。
该类库提供了较少了类和接口定义(大概20多个),其中比较重要和核心的接口和类有如下三个:
**DbUtils**类:提供如加载驱动、关闭连接、事务提交、回滚等常规工作的工具类,里面的所有方法都是静态的**QueryRunner**类:该类简单化了SQL查询,它与ResultSetHandler组合在一起使用可以完成大部分的数据库操作,能够大大减少编码量;此外还能执行其他的DML操作**ResultSetHandler**接口:该接口的实现类用来以各种方式处理ResultSet对象ArrayHandlerArrayListHandlerBeanHandlerBeanListHandlerColumnListHandlerKeyedHandlerMapHandlerMapListHandler
12.10.2 基本思想
 上图展示了之前实现的工具类的一些存在问题以及在
DbUtils工具包中是如何对这些问题进行解决的。
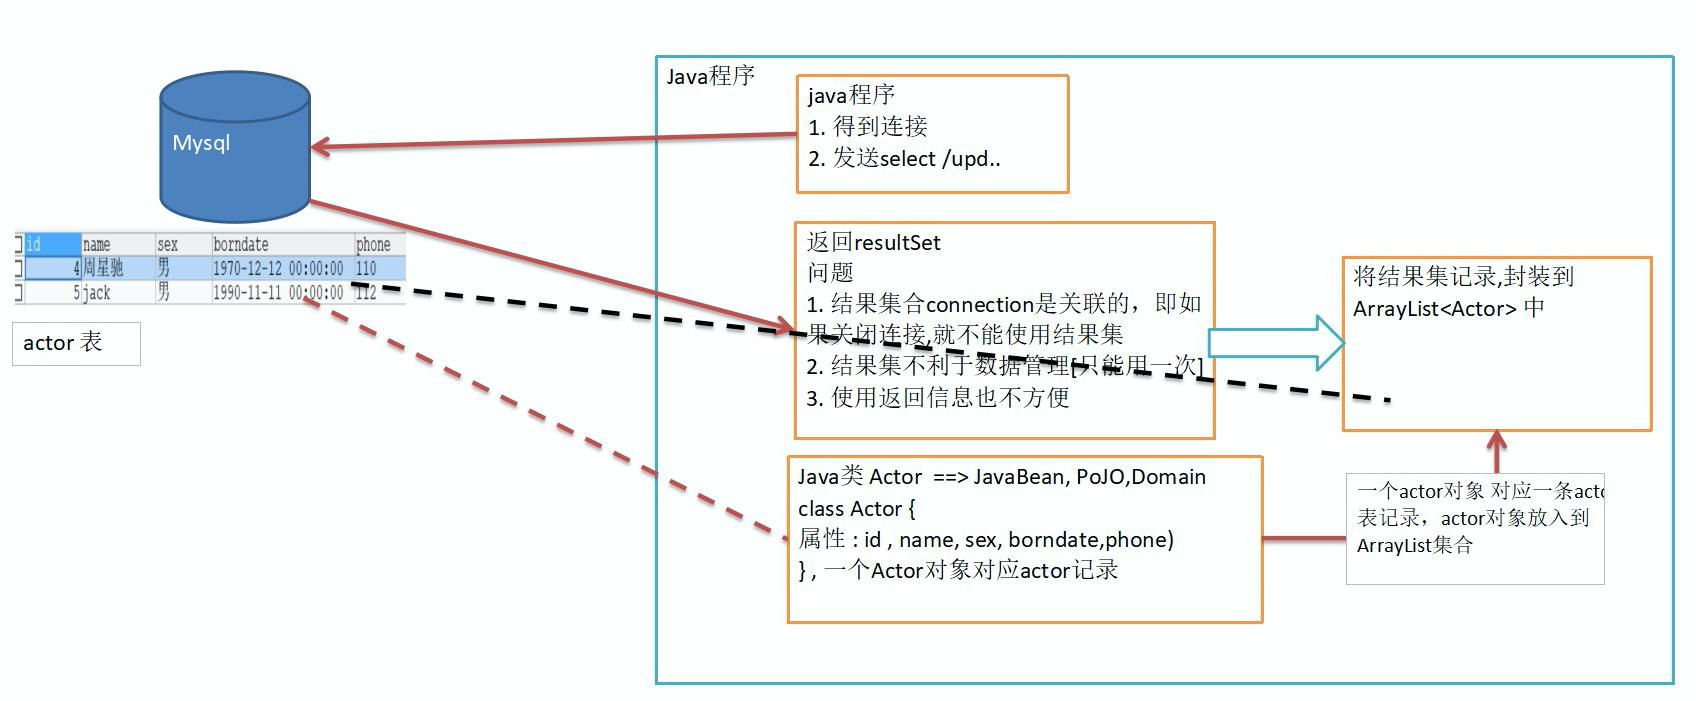
在之前实现的工具类中,无论是使用了连接池还是不使用连接池,都对数据库的连接获取和资源关闭这两个操作进行了封装。但是当执行完sql语句后,都会涉及到对Connecion对象的关闭,一旦关闭了Connection对象,意味着返回的ResultSet对象也就无法使用了。如果其他地方要使用这个结果集,也就无法实现,换句话说,数据的复用性很差。
所以自然而然想到的方法就是将返回的结果集进行封装,并保存在一个数据类型中。具体的类型取决于返回的是什么,如果是很多行数据,就可以把每行数据抽象成一个对象,放在List中;如果只是一行数据,可以放在Bean对象中等等。
简单解释下Bean,Bean其实就是一个类,只不过要遵循一定的规则去写:
getters可以访问的属性(如果这些属性不是只读的,那么setter可以访问这些属性)- 无参数的公共构造函数
- 序列化
比如说在数据库中有一张actor表,它由id、name、gender、birthday、phonenum5个字段组成,查询该表的结果集的每一行都存在这五个字段,那么就可以定义一个actor类来将这些属性封装起来,提供对应的get、set方法来访问和操作这些属性。其中类中的属性和表中的字段一一对应。有这种特征的类就可以成为一个Bean类(当然这里对于Bean类的定义肯定是不严谨的,但是暂时可以这么理解)。
需要注意的是数据表和类属性之前的类型对应关系,由于表的字段是可以为null,所以对于类中属性的基本数据类型要使用其包装类定义,日期类可以使用java.util.Date表示,字符串和字符用String表示即可。
有了以上的基础后,就可以把结果集中的每行封装到一个Bean类中,然后将每个Bean类对象存在一个List中,这样即使关闭了连接,也不妨碍其他程序使用结果集。
12.10.3 使用案例
接下里将结合Dbutils工具包和之前的druid连接池实现对actor表的crud操作。
// 对多行结果查询进行封装并输出
public void TestQueryMany() throws SQLException {
    Connection conn = JDBCUtilsByDruid.getConnection();
    QueryRunner queryRunner = new QueryRunner();
    String sql = "select * from actor where id > ?";
    List<Actor> actors = queryRunner.query(conn, sql, new BeanListHandler<>(Actor.class), 1);
    for (Actor actor : actors) {
        System.out.println(actor);
    }
    JDBCUtils.close(null, null, conn);
}
// 对单行结果查询进行封装并输出
public void TestQuerySingle() throws SQLException {
    Connection conn = JDBCUtilsByDruid.getConnection();
    QueryRunner queryRunner = new QueryRunner();
    String sql = "select id, name from actor where id = 1";
    Actor actor = queryRunner.query(conn, sql, new BeanHandler<>(Actor.class));
    System.out.println(actor);
    JDBCUtilsByDruid.close(null, null, conn);
}
// // 对单行单列结果查询进行封装并输出
public void testScalar() throws SQLException {
    Connection conn = JDBCUtilsByDruid.getConnection();
    QueryRunner queryRunner = new QueryRunner();
    String sql = "select name from actor where id = 1";
    Object obj = queryRunner.query(conn, sql, new ScalarHandler());
    System.out.println(obj);
    JDBCUtilsByDruid.close(null, null, conn);
}
// 使用该工具包执行insert、delete、update操作和以上大同小异,只不过调用的是queryRunner的
// update()方法,注意这里的update()意思是更广泛的对数据进行更新,包含了增删改的操作, 可以类比之// 前使用st.executeQuery()和st.executeUpdate()
12.11 DAO和增删改查通用方法-BaseDao
12.11.1 基本思想
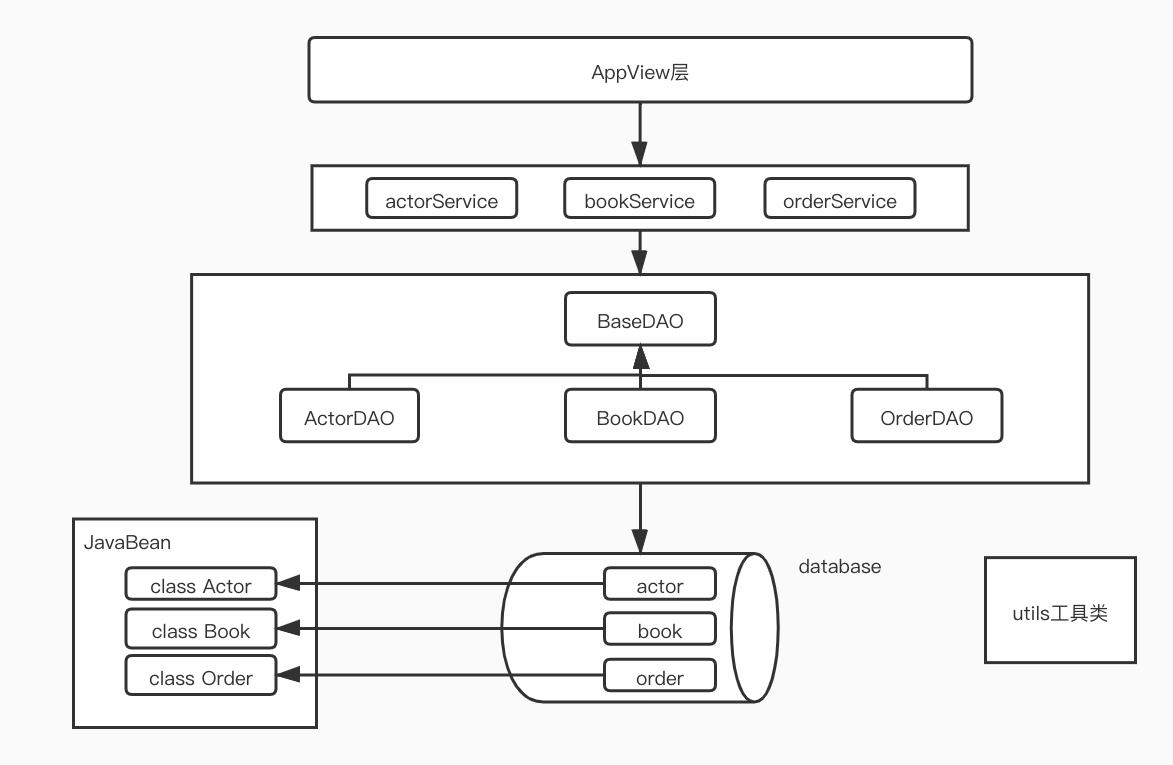 这种设计实际上体现了一种分层思想,大家各司其职实现解耦,方便代码维护,也方便了问题排查。
12.11.2 BaseDAO的实现
根据以上架构,核心实现BaseDao代码如下:
package com.tyc.jdbc.dao_.dao;

import com.tyc.jdbc.dao_.utils.JDBCUtilsDruid;
import java.sql.Connection;
import java.sql.SQLException;
import java.util.List;
import org.apache.commons.dbutils.QueryRunner;
import org.apache.commons.dbutils.ResultSetHandler;
import org.apache.commons.dbutils.handlers.BeanHandler;
import org.apache.commons.dbutils.handlers.BeanListHandler;
import org.apache.commons.dbutils.handlers.ScalarHandler;

/**
 * @author tianyichen <tianyichen@kuaishou.com> Created on 2021-07-01
 */
public class BaseDao<T> {

    QueryRunner queryRunner = new QueryRunner();

    // 实现对表的增、删、改操作
    public int update(String sql, Object... params) {
        Connection conn = null;
        try {
            conn = JDBCUtilsDruid.getConnection();
            return(queryRunner.update(conn, sql, params));
        } catch (SQLException e) {
            throw new RuntimeException(e);
        } finally {
            JDBCUtilsDruid.close(null, null, conn);
        }
    }

    // 实现接受多行对象返回
    public List<T> queryMulti(String sql, Class<T> cls, Object... params) {
        Connection conn = null;
        try {
            conn = JDBCUtilsDruid.getConnection();
            List<T> list = queryRunner.query(conn, sql, new BeanListHandler<>(cls), params);
            return list;
        } catch (SQLException e) {
            throw new RuntimeException(e);
        } finally {
            JDBCUtilsDruid.close(null, null, conn);
        }
    }

    // 实现接受单行对象返回
    public T querySingle(String sql, Class<T> cls, Object... params) {
        Connection conn = null;
        try {
            conn = JDBCUtilsDruid.getConnection();
            T t = queryRunner.query(conn, sql, new BeanHandler<>(cls), params);
            return t;
        } catch (SQLException e) {
            throw new RuntimeException(e);
        } finally {
            JDBCUtilsDruid.close(null, null, conn);
        }
    }

    // 实现接受单行单列对象返回
    public Object queryScalar(String sql, Object... params) {
        Connection conn = null;
        try {
            conn = JDBCUtilsDruid.getConnection();
            Object obj = queryRunner.query(conn, sql, new ScalarHandler(), params);
            return obj;
        } catch (SQLException e) {
            throw new RuntimeException(e);
        } finally {
            JDBCUtilsDruid.close(null, null, conn);
        }
    }
}

若有收获,就点个赞吧
0 人点赞
